手写springmvc框架,实现三个基础注解(controller、requestMapping、requestParam)
参考文章https://my.oschina.net/liughDevelop/blog/1622646。本文实现了springmvc的url映射,但没实现requestParam功能和多个参数,在原基础上优化一下。
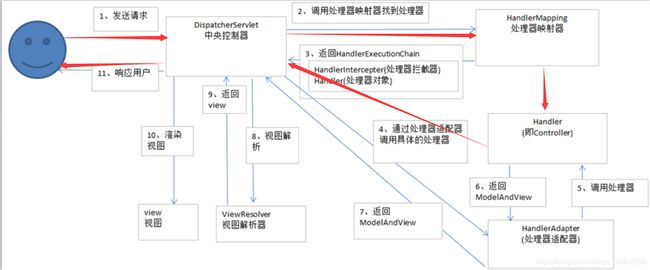
一、springmvc的基本流程
⑴ 用户发送请求至前端控制器DispatcherServlet
⑵ DispatcherServlet收到请求调用HandlerMapping处理器映射器。
⑶ 处理器映射器根据请求url找到具体的处理器,生成处理器对象及处理器拦截器(如果有则生成)一并返回给DispatcherServlet。
⑷ DispatcherServlet通过HandlerAdapter处理器适配器调用处理器
⑸ 执行处理器(Controller,也叫后端控制器)。
⑹ Controller执行完成返回ModelAndView
⑺ HandlerAdapter将controller执行结果ModelAndView返回给DispatcherServlet
⑻ DispatcherServlet将ModelAndView传给ViewReslover视图解析器
⑼ ViewReslover解析后返回具体View
⑽ DispatcherServlet对View进行渲染视图(即将模型数据填充至视图中)。
⑾ DispatcherServlet响应用户。
二、手写springmvc,简化流程
git:https://gitee.com/chuanxin1123/ymvc
红色箭头为简化版的执行流程。
本文实现@Controller、@RequestMapping、@RequestParam三个注解。
项目结构:
依赖:
            javax.servlet
            javax.servlet-api
            3.0.1
三、代码实现
1.MyDispatcherServlet初始化
首先编写web.xml文件
内容为MyDispatcherServlet拦截所有请求。
        MySpringMVC
        com.chuan.servlet.MyDispatcherServlet

            config
            main.properties

        1


        MySpringMVC
        /*
在MyDispatcherServlet初始化过程中要做如下内容:
public void init(ServletConfig config) throws ServletException{
        //将main.properties文件加载进来
        loadProperties(config.getInitParameter("config"));
        //扫描properties文件里指定的路径
        doScanner(properties.getProperty("scanPackage"));
        //将包含controller注解的类的对象放到ioc容器中
        doPutIoc();
        //映射url
        getMapping();
        System.out.println("init完毕!");
    }
让springmvc扫描相关的包,那么我们要指定路径。
main.properties文件:
scanPackage=com.chuan.test然后加载配置文件并扫描:
    private void loadProperties(String location){
        InputStream resourceAsStream = this.getClass().getClassLoader().getResourceAsStream(location);
        try {
            properties.load(resourceAsStream);
        } catch (IOException e) {
            e.printStackTrace();
        }
    }
    private void doScanner(String packageName){
        URL url = this.getClass().getClassLoader().getResource("/" + packageName.replaceAll("\\.", "/"));
        File file =new File(url.getFile());
        for (File curFile:file.listFiles()){
            if (curFile.isDirectory()){
                doScanner(packageName+"."+curFile.getName());
            }else {
                String fileNmae=packageName+"."+curFile.getName().replace(".class","");
                classNames.add(fileNmae);
            }
        }

    }
这时我们去创建三个注解 @MyController、@MyRequestMapping、@MyRequestParam。
@Target(ElementType.TYPE)中的ElementType是一个枚举类型,里面代表了该注解适用于什么内容上。type则代表在类上。method则代表在方法上。parameter则代表在参数上。
@Target(ElementType.TYPE)
@Retention(RetentionPolicy.RUNTIME)
@Documented
public @interface MyController {

    String value() default "";  //别名,不做解释
}
@Target({ElementType.TYPE,ElementType.METHOD})
@Retention(RetentionPolicy.RUNTIME)
@Documented
public @interface MyRequestMapping {
String value() default "";
}@Target(ElementType.PARAMETER)
@Retention(RetentionPolicy.RUNTIME)
@Documented
public @interface MyRequestParam {
String value() default "";
}接下来就是将扫描到的bean对象实例注入到ioc容器中,顺便提一句在spring中的ioc容器里的对象叫bean对象,普通new出来是对象。
 private void  doPutIoc(){
        if (classNames.isEmpty()){
            return;
        }
        for (String className:classNames){
            try {
                Class clazz= Class.forName(className);
                if (clazz.isAnnotationPresent(MyController.class)){
                    IOCObject.put(toLowerFirstWord(clazz.getSimpleName()),clazz.newInstance());
                }
            } catch (ClassNotFoundException e) {
                throw new RuntimeException("类未找到!");
            }  catch (InstantiationException e) {
                throw new RuntimeException("不能实例化!");
            } catch (IllegalAccessException e) {
                throw new RuntimeException("无权限操作!");
            }
        }
    }
  private String toLowerFirstWord(String name){
        char[] charArray = name.toCharArray();
        charArray[0] += 32;
        return String.valueOf(charArray);
    }
接下来将url映射到handleMapping里。
 if (IOCObject.isEmpty()||IOCObject.size()==0){
            return;
        }
        for (Entry entry:IOCObject.entrySet()){
            Class clazz=entry.getValue().getClass();
            if (!clazz.isAnnotationPresent(MyController.class)){
                continue;
            }
            if (!clazz.isAnnotationPresent(MyRequestMapping.class)){
                continue;
            }
            //获取类上的路径
            String baseUrl = clazz.getAnnotation(MyRequestMapping.class).value();
            for (Method method:clazz.getMethods()){
                if (!method.isAnnotationPresent(MyRequestMapping.class)){
                    continue;
                }
               String url = baseUrl+ method.getAnnotation(MyRequestMapping.class).value();
                url=url.replaceAll("/+","/");
                try {
                    handlerMapping.put(url,method);
                    // 优化了重复创建handlercontroller实例
                    Object obj=null;
                    String objName=toLowerFirstWord(clazz.getSimpleName());
                    //如果已经存在,则复用同一个对象
                    if (IOCObject.containsKey(objName)){
                        obj =IOCObject.get(objName);
                    }else {
                        obj=clazz.newInstance();
                    }
                    handlerController.put(url,obj);
                } catch (InstantiationException e) {
                    e.printStackTrace();
                } catch (IllegalAccessException e) {
                    e.printStackTrace();
                }
            }
        }
那么到这里,初始化就完成了,试着放在tomcat里运行一下,成功则继续。
2.写service方法(get或post)
我们重点不在http上,就简单处理:
 @Override
    protected void doPost(HttpServletRequest req, HttpServletResponse resp) throws ServletException, IOException {
        try {
            //处理请求
            doDispatch(req,resp);
        } catch (Exception e) {
            resp.getWriter().write("500!! Server Exception");
        }
    }
 @Override
    protected void doGet(HttpServletRequest req, HttpServletResponse resp) throws ServletException, IOException {
       doPost(req,resp);

    }
重点在请求处理上
 private void doDispatch(HttpServletRequest req, HttpServletResponse resp) throws Exception{
        if (handlerMapping.isEmpty()||handlerMapping.size()==0){
            resp.setCharacterEncoding("UTF-8");
            resp.setHeader("Content-Type", "text/html;charset=UTF-8");
            resp.setContentType("text/html;charset=UTF-8");
            resp.getWriter().write("404 页面未找到");
            return;
        }
        String uri =  req.getRequestURI();
        String contextPath = req.getContextPath();
        String url = uri.replace(contextPath,"");
        if (!handlerMapping.containsKey(url)){
            resp.setCharacterEncoding("UTF-8");
            resp.setHeader("Content-Type", "text/html;charset=UTF-8");
            resp.setContentType("text/html;charset=UTF-8");
            resp.getWriter().write("404 页面未找到");
            return;
        }
        Method method = handlerMapping.get(url);
        Class[] parameterTypes = method.getParameterTypes();
        Annotation[][] parameterAnnotations = method.getParameterAnnotations();
        List requestParamList=new ArrayList();
        int j=0;
        for (Annotation[] annotations : parameterAnnotations) {
            for (Annotation annotation : annotations) {
                Class aClass = annotation.annotationType();
                if (aClass.getName().equals("com.chuan.annotation.MyRequestParam")){
                    //获取注解的value
                    String paramName =  ((MyRequestParam)annotation).value();
                    requestParamList.add(paramName);
                }
            }
        }
        Object[] paramValues = new Object[parameterTypes.length];
        //获取请求参数
        Map parameterMap = req.getParameterMap();
        for (int i=0;i entry:parameterMap.entrySet()){
                        if (requestParamList.get(j).equals(entry.getKey())) {
                            //相同的参数只取第一个的值
                            paramValues[i]=entry.getValue()[0];
                            continue;
                        }
                    }
                  j++;
            }
        }
        method.invoke(handlerController.get(url),paramValues);
    }
写一个测试的controller测试一下。
无参的,1个参数,2个参数。
@MyController
@MyRequestMapping("/chuan")
public class ChuanController {
    @MyRequestMapping("/doChuan")
    public void test2(HttpServletRequest request, HttpServletResponse response, @MyRequestParam("pam") String pam){
        try {
            response.getWriter().println(" success!pam:"+pam);
        } catch (IOException e) {
            e.printStackTrace();
        }
    }
    @MyRequestMapping("/doChuan1")
    public void doChuan1(HttpServletRequest request, HttpServletResponse response, @MyRequestParam("pam") String pam,@MyRequestParam("b") String b){
        try {
            response.getWriter().println(" success!pam:"+pam+",b:"+b);
        } catch (IOException e) {
            e.printStackTrace();
        }
    }
    @MyRequestMapping("/doChuan2")
    public void test2(HttpServletRequest request, HttpServletResponse response){
        try {
            response.getWriter().println("success!");
        } catch (IOException e) {
            e.printStackTrace();
        }
    }
}
大功告成!第一阶段完成!


