MySQL互为主备(双主)加keepalived实现故障自动转换
MySQL双主(互为主从)
环境:
| 主机名 | 系统环境 | 软件 | IP |
|---|---|---|---|
| DB1 | CentOS7.6 | MySQL5.7 ,keepalived | 192.168.66.63 |
| DB2 | CentOS7.6 | MySQL5.7 ,keepalived | 192.168.66.64 |
| Client | CentOS7.6 | MySQL5.7 | 192.168.66.61 |
| VIP | 192.168.66.200 |
一,实现MySQL主主同步
DB1、DB2都已安装MySQL,安装过程省略
MySQL安装见之前的文章:MySQL安装
1,修改MySQL配置文件
在/etc/my.ccnf文件中的[mysqld]段加配置信息
DB1:
[root@DB1 ~]# vim /etc/my.cnf
#mysql双主增加信息
#节点标识,每台的server—id不能一样,全局唯一
server-id=1
#开启binlg日志,用于主从数据复制
log-bin=mysql-bin
#开启relay-log日志
relay-log=mysql-relay-bin
#复制过滤选项
replicate-wild-ignore-table=mysql.%
replicate-wild-ignore-table=test.%
replicate-wild-ignore-table=information_schema.%
#字段一次递增多少
auto-increment-increment = 2
#自增字段的起始值:1、3、5、7、等奇数
auto-increment-offset = 1
slave-skip-errors = all
#保存配置,重启MySQL服务
[root@DB1 ~]# service mysqld restart
Shutting down MySQL.... SUCCESS!
Starting MySQL. SUCCESS!
DB2:
[root@dg ~]# vim /etc/my.cnf
#mysql双主新增内容
server-id=2
log-bin=mysql-bin
relay-log=mysql-relay-bin
replicate-wild-ignore-table=mysql.%
replicate-wild-ignore-table=test.%
replicate-wild-ignore-table=information_schema.%
auto-increment-increment = 2
auto-increment-offset = 2
slave-skip-errors = all

#保存配置,重启服务
[root@dg ~]# service mysqld restart
Shutting down MySQL.... SUCCESS!
Starting MySQL. SUCCESS!
2,配置DB1、DB2主主模式
2.1,查看log bin日志和pos位置
DB1:
[root@DB1 ~]# mysql -u root -p
Enter password:
mysql> show master status;
DB2:
[root@dg ~]# mysql -uroot -p
Enter password:
mysql> show master status;
2.2,DB1、DB2互相提升访问权限
DB1:
#创建DB2的复制用户并授权
mysql> grant replication slave on *.* to 'cproot'@'192.168.66.64' identified by 'cp123456';
Query OK, 0 rows affected, 1 warning (0.03 sec)

#刷新并查看log bin日志和pos位置
mysql> flush privileges;
Query OK, 0 rows affected (0.01 sec)

mysql> show master status;
DB2:
mysql> grant replication slave on *.* to 'cproot'@'192.168.66.63'identified by 'cp123456';
Query OK, 0 rows affected, 1 warning (0.02 sec)
mysql> flush privileges;
Query OK, 0 rows affected (0.01 sec)
mysql> show master status;
2.3,将对方都设置成自己的主服务器
注意:master_log_file和master_log_pos是对方服务器最新的数据
DB1:
mysql> change master to master_host='192.168.66.64',master_user='cproot',master_password='cp123456',master_log_file='mysql-bin.000001',master_log_pos=605;
Query OK, 0 rows affected, 2 warnings (0.20 sec)
DB2:
mysql> change master to master_host='192.168.66.63',master_user='cproot',master_password='cpp123456',master_log_file='mysql-bin.000001',master_log_pos=605;
Query OK, 0 rows affected, 2 warnings (0.17 sec)
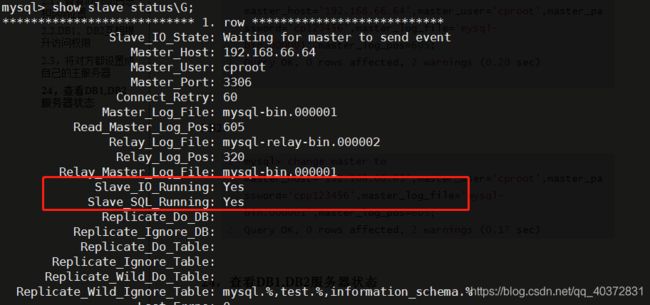
2.4,查看DB1,DB2服务器状态
DB1:
mysql> start slave;
Query OK, 0 rows affected (0.01 sec)

mysql> show slave status\G;
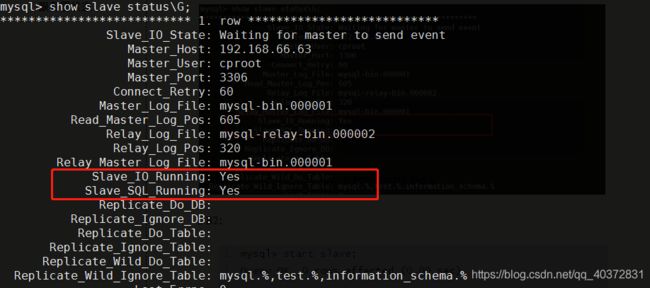
DB2:
mysql> start slave;
Query OK, 0 rows affected (0.00 sec)

mysql> show slave status\G;
这两个地方都为yes说明主主同步成功,如果不是yes的话有以下几种排查思路:
1,网络不通
2,密码不正确
3,pos不对
4,防火墙没关
3,测试主主同步
在DB1服务器上新建数据库one,然后在DB2上查看是否同步
DB2删除one,查看DB1是否还存在
DB1:
mysql> create database one;
Query OK, 1 row affected (0.02 sec)

mysql> show databases;
+--------------------+
| Database           |
+--------------------+
| information_schema |
| mysql              |
| one                |
| performance_schema |
| sys                |
+--------------------+
5 rows in set (0.00 sec)
DB2:
mysql> show databases;
+--------------------+
| Database           |
+--------------------+
| information_schema |
| mysql              |
| one                |
| performance_schema |
| sys                |
+--------------------+
5 rows in set (0.01 sec)
#DB2删除此数据库看DB1是否同步
mysql> drop database one;
Query OK, 0 rows affected (0.01 sec)

mysql> show databases;
+--------------------+
| Database           |
+--------------------+
| information_schema |
| mysql              |
| performance_schema |
| sys                |
+--------------------+
4 rows in set (0.00 sec)
DB1:
mysql> show databases;
+--------------------+
| Database           |
+--------------------+
| information_schema |
| mysql              |
| performance_schema |
| sys                |
+--------------------+
4 rows in set (0.00 sec)
双向操作没问题,主主同步成功
二,使用keepalived实现故障自动转移
1,安装keepalived
keepalived下载
http://www.keepalived.org/software/keepalived-1.3.5.tar.gz
DB1、DB2:
[root@DB1 ~]# yum -y install openssl-devel
[root@DB1 ~]# yum -y install libnl libnl-devel libnfnetlink-devel openssl-devel
[root@DB1 ~]# cd /usr/local/src/
#上传keepalived软件包
[root@DB1 src]# ll | grep keepalived-1.3.5.tar.gz
-rw-r--r--. 1 root root 683183 Jul  9 10:22 keepalived-1.3.5.tar.gz
[root@DB1 src]# tar -zxf keepalived-1.3.5.tar.gz
[root@DB1 src]# cd keepalived-1.3.5
[root@DB1 keepalived-1.3.5]# ./configure --prefix=/usr/local/keepalived
[root@DB1 keepalived-1.3.5]# make && make install
如果有如下报错:
1,
Error: Package: libnl-devel-1.1.4-3.el7.x86_64 (base)
           Requires: kernel-headers
#解决方法:
#注释掉exclude=kernel*
[root@DB2 ~]# vim /etc/yum.conf
#exclude=kernel*
2,
configure: error: in `/usr/local/src/keepalived-1.3.5':
configure: error: no acceptable C compiler found in $PATH
See `config.log' for more details
#解决放法
[root@DB2 keepalived-1.3.5]# yum install gcc gcc-c++ gcc-g77
2,将keepalived配置成系统服务
DB1,DB2:
[root@DB1 keepalived-1.3.5]# cp /usr/local/src/keepalived-1.3.5/keepalived/etc/init.d/keepalived /etc/rc.d/init.d/
[root@DB1 keepalived-1.3.5]# cp /usr/local/keepalived/etc/sysconfig/keepalived /etc/sysconfig/
[root@DB1 keepalived-1.3.5]# mkdir -p /etc/keepalived/
[root@DB1 keepalived-1.3.5]# cp /usr/local/keepalived/etc/keepalived/keepalived.conf /etc/keepalived/
[root@DB1 keepalived-1.3.5]# ln -s /usr/local/keepalived/sbin/keepalived /usr/sbin/
[root@DB1 keepalived-1.3.5]# echo "/etc/init.d/keepalived start" >>/etc/rc.local
3,修改配置文件
DB1:
[root@DB1 ~]# cp /etc/keepalived/keepalived.conf /etc/keepalived/keepalived.conf.bak
[root@DB1 ~]# vim /etc/keepalived/keepalived.conf
! Configuration File for keepalived

global_defs {
   notification_email {
     [email protected]
     [email protected]
     [email protected]
   }
   notification_email_from [email protected]
   smtp_server 127.0.0.1
   smtp_connect_timeout 30
   router_id MASTER-HA
}

#检测脚本
vrrp_script chk_mysql_port { #检测mysql服务是否在运行。有很多方式,比如进程,用脚本检测等等
    script "/opt/chk_mysql.sh"   #这里通过脚本监测
    interval 2                   #脚本执行间隔,每2s检测一次
    weight -5           #脚本结果导致的优先级变更,检测失败(脚本返回非0)则优先级 -5
    fall 2              #检测连续2次失败才算确定是真失败。会用weight减少优先级(1-255之间)
    rise 1              #检测1次成功就算成功。但不修改优先级
}

vrrp_instance VI_1 {
    state BACKUP          #MATER或BAKUP,因为是主主所以此处配置为BACKUP,两台节点一样
    interface ens160      #指定虚拟ip的网卡接口
    mcast_src_ip 192.168.66.63
    virtual_router_id 51  #路由器标识,两台节点一致
    priority 100          #优先级,数字越大优先级越高
    advert_int 1
    authentication {
        auth_type PASS    #认证类型
        auth_pass 1111    #认证密码,两节点一致
    }
    virtual_ipaddress {   #虚拟ip,飘移地址
        192.168.66.200
    }
   track_script {
	chk_mysql_port
}
}
编辑切换脚本,keepalived做心跳检测,如果master的MySQL服务挂了(3306端口宕了),那么就会选择“自杀”。slave的keepalived通过心跳检测发现这个情况就会将VIP飘移地址请求接管
[root@DB1 ~]# yum -y install net-tools
[root@DB1 ~]# vim /opt/chk_mysql.sh
#!/bin/bash
counter=$(netstat -na|grep "LISTEN"|grep "3306"|wc -l)
if [ "${counter}" -eq 0 ]; then
	/etc/init.d/keepalived stop
fi
[root@DB1 ~]# chmod 755 /opt/chk_mysql.sh
[root@DB1 sbin]# /etc/init.d/keepalived start
我这里启动是失败了原因是在keepalived.service文件中pid文件路径不存在
[root@DB1 sbin]# vim /lib/systemd/system/keepalived.service
#把原来的注释下面的重新写上
#PIDFile=/usr/local/keepalived/var/run/keepalived.pid
PIDFile=/var/run/keepalived.pid
#重新加载单元然后重启
root@DB1 sbin]# systemctl daemon-reload
[root@DB1 sbin]# /etc/init.d/keepalived start
Starting keepalived (via systemctl):                       [  OK  ]
查看虚拟ip是否已经有了
[root@DB1 sbin]# ip addr
2: ens160: <BROADCAST,MULTICAST,UP,LOWER_UP> mtu 1500 qdisc mq state UP group default qlen 1000
    link/ether 00:50:56:98:01:f9 brd ff:ff:ff:ff:ff:ff
    inet 192.168.66.63/24 brd 192.168.66.255 scope global noprefixroute ens160
       valid_lft forever preferred_lft forever
    inet 192.168.66.200/32 scope global ens160
       valid_lft forever preferred_lft forever
DB2:
[root@DB2 ~]# cp /etc/keepalived/keepalived.conf /etc/keepalived/keepalived.conf.bak
[root@DB2 ~]# >/etc/keepalived/keepalived.conf
#DB2的配置文件夹只修改IP地址和优先级,优先级比DB1低
[root@DB2 ~]# vim /etc/keepalived/keepalived.conf
! Configuration File for keepalived
global_defs {
notification_email {
     [email protected]
     [email protected]
     [email protected]
}

notification_email_from [email protected]
smtp_server 127.0.0.1
smtp_connect_timeout 30
router_id MASTER-HA
}
vrrp_script chk_mysql_port {
    script "/opt/chk_mysql.sh"
    interval 2
    weight -5
    fall 2
    rise 1
}

vrrp_instance VI_1 {
    state BACKUP
    interface ens160
    mcast_src_ip 192.168.66.64
    virtual_router_id 51
    priority 99
    advert_int 1
    authentication {
        auth_type PASS
        auth_pass 1111
    }
    virtual_ipaddress {
       192.168.66.200
    }

track_script {
   chk_mysql_port
}
}
[root@DB2 ~]# yum -y install net-tools
[root@DB2 ~]# vim /opt/chk_mysql.sh
#!/bin/bash
counter=$(netstat -na|grep "LISTEN"|grep "3306"|wc -l)
if [ "${counter}" -eq 0 ]; then
    /etc/init.d/keepalived stop
fi
[root@DB2 ~]# chmod 755 /opt/chk_mysql.sh
[root@DB2 ~]# vim /lib/systemd/system/keepalived.service
#PIDFile=/usr/local/keepalived/var/run/keepalived.pid
PIDFile=/var/run/keepalived.pid
[root@DB2 ~]# systemctl daemon-reload
[root@DB2 ~]# /etc/init.d/keepalived start
Starting keepalived (via systemctl):                       [  OK  ]
配置参数说明:
(1)notification_email:收件箱
(2)notification_email_from:发件箱
(3)vrrp_mcast_group4:VRRP多播地址,必须为D类地址,即可用IP范围为224.0.0.0~239.255.255.255
(4)script:自定义检查脚本路径
(5)interval:自定义检查脚本的执行时间间隔,单位为秒
(6)vrrp_instance:配置虚拟路由器实例
(7)state:MASTER或BACKUP,当前节点在此虚拟路由器上的初始状态,只能有一个为MASTER,其余的都应该为BACKUP,此处都需要配置为BACKUP
(8)nopreempt:定义工作模式为非抢占模式,默认为抢占模式
(9)preempt_delay:抢占模式下,节点上线后触发新选举操作的延迟时长,单位为秒
(10)interface:绑定当前虚拟路由器使用的物理接口
(11)virtual_router_id:当前虚拟路由器的唯一标识,取值范围为0~255,两个节点必须一致
(12)priority:当前主机在此虚拟路由器中的优先级,取值范围为0~255
(13)advert_int:VRRP通告心跳信息和优先级信息的时间间隔,单位为秒
(14)auth_type:认证类型
(15)auth_pass:认证密码,两个节点必须一致
(16)virtual_ipaddress:VIP地址
(17)可通过命令# man keepalived.conf查看keepalived.conf配置文件的详细帮助文档
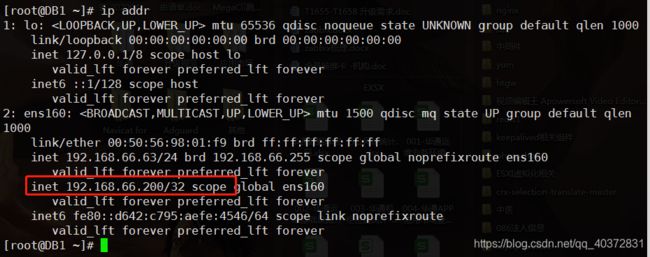
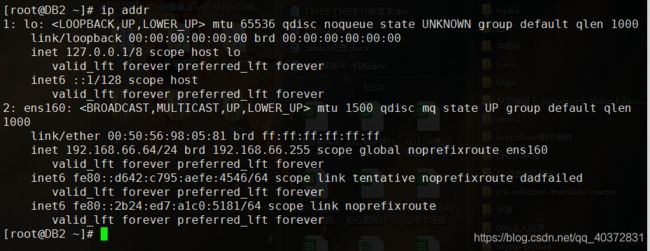
4,查看VIP
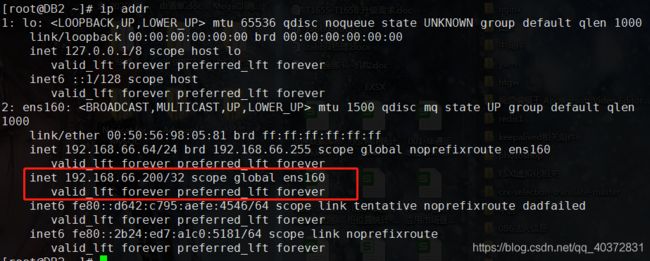
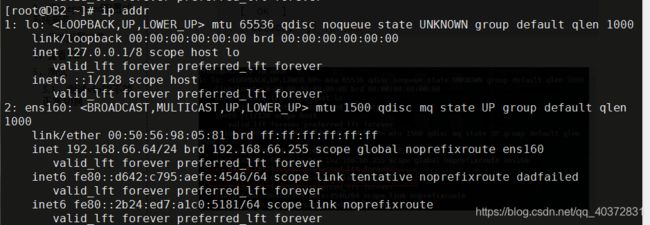
目前vip在DB1身上,因为DB1优先级较高
DB1:
DB2:
5,测试
5.1,测试vip能不能正常切换
DB1:
#关闭MySQL,看vip是否还在
[root@DB1 ~]# /etc/init.d/mysqld stop
Shutting down MySQL............ SUCCESS!
[root@DB1 ~]# ps -ef| grep keepalived
root     11124  3959  0 14:36 pts/3    00:00:00 grep --color=auto keepalived
[root@DB1 ~]# ip addr
DB2:
[root@DB2 ~]# ip addr
关闭DB1的MySQL服务keepalived服务也自动关闭了,vip成功到DB2服务器上
启动DB1的MySQL服务看能不能正常飘回
注意:DB1要先启动MySQL在启动keepalived,不然先启动keepalived的话脚本检测不到MySQL会立马关闭的
DB1:
[root@DB1 ~]# service mysqld satrt
Usage: mysqld  {start|stop|restart|reload|force-reload|status}  [ MySQL server options ]
[root@DB1 ~]# service mysqld start
Starting MySQL. SUCCESS!
[root@DB1 ~]# service keepalived start
Starting keepalived (via systemctl):                       [  OK  ]
[root@DB1 ~]# ip addr
DB2:
经测试,DB1MySQL服务关闭vip服务自动到DB2上,DB1恢复后,vip地址自动飘回
6,故障转移高可用测试
6.1,授权客户端
通过客户端登录写入数据测试
首先要在DB1和DB2服务器上授权允许用户远程登录,并设置防火墙规则
DB1:
#用户授权
[root@DB1 ~]# mysql -u root -p
Enter password:
mysql> grant all on *.* to root@'192.168.66.%' identified by "123456";
Query OK, 0 rows affected, 1 warning (0.02 sec)
mysql> flush privileges;
Query OK, 0 rows affected (0.05 sec)
#添加防火墙规则
#因为Centos7里面没有iptables这个文件所以需要先安装
[root@DB1 ~]# yum -y install iptables iptables-services
[root@DB1 ~]# vim /etc/sysconfig/iptables
#允许组播地址通信
-A INPUT -s 192.168.0.0/24 -d 224.0.0.18 -j ACCEPT
#允许VRRP通信
-A INPUT -s 192.168.0.0/24 -p vrrp -j ACCEPT
#开放mysql的3306端口
-A INPUT -m state --state NEW -m tcp -p tcp --dport 3306 -j ACCEPT
[root@DB1 ~]# systemctl start iptables
DB2:
[root@DB2 ~]# mysql -uroot -p
Enter password:
mysql> grant all on *.* to root@'192.168.66.%' identified by "123456";
Query OK, 0 rows affected, 1 warning (0.01 sec)

mysql> flush privileges;
Query OK, 0 rows affected (0.02 sec)
[root@DB2 ~]# yum -y install iptables iptables-services
[root@DB2 ~]# vim /etc/sysconfig/iptables
-A INPUT -s 192.168.0.0/24 -d 224.0.0.18 -j ACCEPT
-A INPUT -s 192.168.0.0/24 -p vrrp -j ACCEPT
-A INPUT -m state --state NEW -m tcp -p tcp --dport 3306 -j ACCEPT
[root@DB2 ~]# systemctl start iptables
6.2,数据测试
客户端通过vip连接MySQL服务器,看是否能成功
Client:
[root@Client ~]# mysql -h 192.168.66.200 -uroot -p123456
mysql: [Warning] Using a password on the command line interface can be insecure.
Welcome to the MySQL monitor.  Commands end with ; or \g.
Your MySQL connection id is 8
Server version: 5.7.24-log MySQL Community Server (GPL)

Copyright (c) 2000, 2018, Oracle and/or its affiliates. All rights reserved.

Oracle is a registered trademark of Oracle Corporation and/or its
affiliates. Other names may be trademarks of their respective
owners.

Type 'help;' or '\h' for help. Type '\c' to clear the current input statement.

mysql> show databases;
+--------------------+
| Database           |
+--------------------+
| information_schema |
| mysql              |
| performance_schema |
| sys                |
+--------------------+
4 rows in set (0.00 sec)
#查看当前vip在哪一台服务器上
mysql> show variables like "%hostname%";
+---------------+-------+
| Variable_name | Value |
+---------------+-------+
| hostname      | DB1   |
+---------------+-------+
1 row in set (0.00 sec)
创建数据库,然后在库中创建一张表,并插入数据
mysql> show databases;
+--------------------+
| Database           |
+--------------------+
| information_schema |
| mysql              |
| performance_schema |
| sys                |
+--------------------+
4 rows in set (0.00 sec)

mysql> create database one;
Query OK, 1 row affected (0.02 sec)

mysql> use one;
Database changed
mysql> create table test_table(id int,name varchar(32));
Query OK, 0 rows affected (0.18 sec)

mysql> show tables;
+---------------+
| Tables_in_one |
+---------------+
| test_table    |
+---------------+
1 row in set (0.00 sec)

mysql> insert into test_table(id,name) values(1,'glt');
Query OK, 1 row affected (0.03 sec)
mysql> select * from test_table;
+------+------+
| id   | name |
+------+------+
|    1 | glt  |
+------+------+
1 row in set (0.00 sec)
验证数据:
DB1:
mysql> show databases;
+--------------------+
| Database           |
+--------------------+
| information_schema |
| mysql              |
| one                |
| performance_schema |
| sys                |
+--------------------+
5 rows in set (0.00 sec)

mysql> use one;
Reading table information for completion of table and column names
You can turn off this feature to get a quicker startup with -A

Database changed
mysql> show tables;
+---------------+
| Tables_in_one |
+---------------+
| test_table    |
+---------------+
1 row in set (0.00 sec)

mysql> select * from test_table;
+------+------+
| id   | name |
+------+------+
|    1 | glt  |
+------+------+
1 row in set (0.00 sec)
DB2:
mysql> show databases;
+--------------------+
| Database           |
+--------------------+
| information_schema |
| mysql              |
| one                |
| performance_schema |
| sys                |
+--------------------+
5 rows in set (0.04 sec)

mysql> use one;
Reading table information for completion of table and column names
You can turn off this feature to get a quicker startup with -A

Database changed

mysql> show tables;
+---------------+
| Tables_in_one |
+---------------+
| test_table    |
+---------------+
1 row in set (0.00 sec)

mysql> select * from test_table;
+------+------+
| id   | name |
+------+------+
|    1 | glt  |
+------+------+
1 row in set (0.00 sec)
6.3,故障测试
停止DB1的MySQL服务,在客户端通过vip登录查看当前在哪一台服务器上并继续在创建的表中插入数据,然后重启DB1看是否可以同步数据。
DB1:
[root@DB1 ~]# service mysqld stop
Shutting down MySQL............ SUCCESS!
Client:
[root@Client ~]# mysql -h 192.168.66.200 -uroot -p123456
mysql> show variables like "%hostname%";
+---------------+-------+
| Variable_name | Value |
+---------------+-------+
| hostname      | DB2   |
+---------------+-------+
1 row in set (0.01 sec)

mysql> use one;
Reading table information for completion of table and column names
You can turn off this feature to get a quicker startup with -A

Database changed
mysql> show tables;
+---------------+
| Tables_in_one |
+---------------+
| test_table    |
+---------------+
1 row in set (0.01 sec)

mysql> insert into test_table(id,name)values(2,'hh');
Query OK, 1 row affected (0.04 sec)

mysql> select * from test_table;
+------+------+
| id   | name |
+------+------+
|    1 | glt  |
|    2 | hh   |
+------+------+
2 rows in set (0.00 sec)
查看同步情况:
DB2:
mysql> select * from test_table;
+------+------+
| id   | name |
+------+------+
|    1 | glt  |
|    2 | hh   |
+------+------+
2 rows in set (0.00 sec)
DB1:
[root@DB1 ~]# service mysqld start
Starting MySQL. SUCCESS!
[root@DB1 ~]# mysql -uroot -p123456
mysql> use one;
Reading table information for completion of table and column names
You can turn off this feature to get a quicker startup with -A

Database changed
mysql> show tables;
+---------------+
| Tables_in_one |
+---------------+
| test_table    |
+---------------+
1 row in set (0.00 sec)

mysql> select * from test_table;
+------+------+
| id   | name |
+------+------+
|    1 | glt  |
|    2 | hh   |
+------+------+
2 rows in set (0.00 sec)
|
±-----±-----+
2 rows in set (0.00 sec)
查看同步情况:

DB2:

~~~MySQL
mysql> select * from test_table;
+------+------+
| id   | name |
+------+------+
|    1 | glt  |
|    2 | hh   |
+------+------+
2 rows in set (0.00 sec)
DB1:
[root@DB1 ~]# service mysqld start
Starting MySQL. SUCCESS!
[root@DB1 ~]# mysql -uroot -p123456
mysql> use one;
Reading table information for completion of table and column names
You can turn off this feature to get a quicker startup with -A

Database changed
mysql> show tables;
+---------------+
| Tables_in_one |
+---------------+
| test_table    |
+---------------+
1 row in set (0.00 sec)

mysql> select * from test_table;
+------+------+
| id   | name |
+------+------+
|    1 | glt  |
|    2 | hh   |
+------+------+
2 rows in set (0.00 sec)
数据同步成功!


