DRBD
DRBD是由内核模块和相关脚本而构成,用以构建高可用性的集群
drbd 工作原理:DRBD是一种块设备,可以被用于高可用(HA)之中.它类似于一个网络RAID-1功能。
当你将数据写入本地 文件系统时,数据还将会被发送到网络中另一台主机上。以相同的形式记录在一个
文件系统中。 本地(主节点)与远程主机(备节点)的数据可以保证实时同步。当本地系统出现故障时,远
程主机上还会保留有一份相同的数据,可以继续使用。在高可用(HA)中使用DRBD功能,可以代替使用一
个共享盘阵。因为数据同时存在于本地主机和远程主机上,切换时,远程主机只要使用它上面的那份备
份数据,就可以继续进行服务了。
DRBD主要功能:DRBD 负责接收数据,把数据写到本地磁盘,然后通过网络将同样的数据发送给另一
个主机,另一个主机再将数据存到自己的磁盘中。
DRBD 复制模式:
协议A:异步复制协议。本地写成功后立即返回,数据放在发送buffer中,可能丢失。
协议B:内存同步(半同步)复制协议。本地写成功并将数据发送到对方后立即返回,如果双机掉
电,数据可能丢失。
协议C:同步复制协议。本地和对方写成功确认后返回。如果双机掉电或磁盘同时损坏,则数据可能
丢失。
一般用协议C,但选择C协议将影响流量,从而影响网络时延。为了数据可靠性,我们在生产环境中
还是用C协议。
pacemaker+corosync
Corosync主要就是实现集群中Message layer层的功能:完成集群心跳及事务信息传递
Pacemaker主要实现的是管理集群中的资源(CRM),真正启用、停止集群中的服务是RA(资源代理)
这个子组件。RA的类别有下面几种类型:
LSB:位于/etc/rc.d/init.d/*,至少支持start,stop,restart,status,reload,force-reload;
注意:不能开机自动运行;要有CRM来启动 //centos6用这种类型控制
OCF: /usr/lib/ocf/resource.d/provider/,类似于LSB脚本,但支持start,stop,status,
monitor,meta-data;
STONITH:调用stonith设备的功能
systemd:unit file,/usr/lib/systemd/system/ 注意:服务必须设置enable,开启自
启;//centos7支持
service:调用用户的自定义脚本
搭建环境
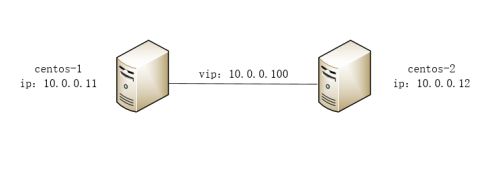
拓扑图
| 主机 | ip | 角色 | |
| centos-1 | 10.0.0.11 | drbd+mariadb+corosync+pacemaker | vip:10.0.0.100 |
| centos-2 | 10.0.0.12 | drbd+mariadb+corosync+pacemaker |
开始配置
1、先配置相关主机和相关时间同步服务器:
同步时间
[root@centos-1 ~]# yum install -y ntpdate
[root@centos-1 ~]# crontab -e
*/5 * * * * ntpdate cn.pool.ntp.org
[root@centos-2 ~]# crontab -e
*/5 * * * * ntpdate cn.pool.ntp.org
修改ssh互信
[root@centos-1 ~]# ssh-keygen
[root@centos-1 ~]# ssh-copy-id 10.0.0.12
[root@centos-2 ~]# ssh-keygen
[root@centos-2 ~]# ssh-copy-id 10.0.0.11
修改hosts文件保证hosts之间能够互相访问
[root@centos-1 ~]# cat /etc/hosts
127.0.0.1   localhost localhost.localdomain localhost4 localhost4.localdomain4
::1         localhost localhost.localdomain localhost6 localhost6.localdomain6
10.0.0.11 centos-1
10.0.0.12 centos-2
[root@centos-1 ~]# scp /etc/hosts 10.0.0.12:/etc/hosts
2、pcs集群的构建
2.1、在两个节点上执行:
[root@centos-1 ~]# yum install -y pacemaker pcs psmisc policycoreutils-python
[root@centos-2 ~]# yum install -y pacemaker pcs psmisc policycoreutils-python
2.2、启动pcs并且让其开机自启:
[root@centos-1 ~]# systemctl start pcsd
[root@centos-1 ~]# systemctl enable pcsd
[root@centos-2 ~]# systemctl start pcsd
[root@centos-2 ~]# systemctl enable pcsd
2.3、修改用户hacluster的密码:
[root@centos-1 ~]# echo 123456 | passwd --stdin hacluster
[root@centos-2 ~]# echo 123456 | passwd --stdin hacluster
2.4、注册pcs集群主机(默认注册使用用户名hacluster)
[root@centos-1 ~]# pcs cluster auth centos-1 centos-2
Username: hacluster
Password:
centos-2: Authorized
centos-1: Authorized
2.5、在集群上注册两台集群:
[root@centos-1 ~]# pcs cluster setup --name mycluster centos-5 centos-6 --force ##设置集群
2.6、在其中一个节点上查看已经生成的corosync配置文件
[root@centos-1 ~]# ls /etc/corosync/
corosync.conf          corosync.conf.example.udpu  uidgid.d
corosync.conf.example  corosync.xml.example
##可以看到生成有corosync.conf的配置文件
2.7、查看注册进来的配置文件
[root@centos-1 ~]# cat /etc/corosync/corosync.conf
totem {
    version: 2
    secauth: off
    cluster_name: mycluster
    transport: udpu
}
nodelist {
    node {
        ring0_addr: centos-1
        nodeid: 1
    }
    node {
        ring0_addr: centos-2
        nodeid: 2
    }
}
quorum {
    provider: corosync_votequorum
    two_node: 1
}
logging {
    to_logfile: yes
    logfile: /var/log/cluster/corosync.log
    to_syslog: yes
}
2.8、启动集群:
[root@centos-1 ~]# pcs cluster start --all       ##相当于用来启动corosync和pacemaker
centos-1: Starting Cluster...
centos-2: Starting Cluster...
##查看是否启动成功
[root@centos-1 ~]# ps -ef | grep corosync
root       2097      1  4 13:50 ?        00:00:00 corosync
root       2114    996  0 13:50 pts/0    00:00:00 grep --color=auto corosync
[root@centos-1 ~]# ps -ef | grep pacemaker
root       2104      1  0 13:50 ?        00:00:00 /usr/sbin/pacemakerd -f
haclust+   2105   2104  0 13:50 ?        00:00:00 /usr/libexec/pacemaker/cib
root       2106   2104  0 13:50 ?        00:00:00 /usr/libexec/pacemaker/stonithd
root       2107   2104  0 13:50 ?        00:00:00 /usr/libexec/pacemaker/lrmd
haclust+   2108   2104  0 13:50 ?        00:00:00 /usr/libexec/pacemaker/attrd
haclust+   2109   2104  0 13:50 ?        00:00:00 /usr/libexec/pacemaker/pengine
haclust+   2110   2104  0 13:50 ?        00:00:00 /usr/libexec/pacemaker/crmd
root       2138    996  0 13:51 pts/0    00:00:00 grep --color=auto pacemaker
2.9、查看集群的状态(显示为no faults即为OK)
[root@centos-1 ~]#  corosync-cfgtool -s
Printing ring status.
Local node ID 1
RING ID 0
        id      = 10.0.0.11
        status  = ring 0 active with no faults
[root@centos-2 ~]# corosync-cfgtool -s
Printing ring status.
Local node ID 2
RING ID 0
        id      = 10.0.0.12
        status  = ring 0 active with no faults
2.10、查看与集群相关的子节点的信息
[root@centos-1 ~]# corosync-cmapctl | grep members
runtime.totem.pg.mrp.srp.members.1.config_version (u64) = 0
runtime.totem.pg.mrp.srp.members.1.ip (str) = r(0) ip(10.0.0.11)
runtime.totem.pg.mrp.srp.members.1.join_count (u32) = 1
runtime.totem.pg.mrp.srp.members.1.status (str) = joined
runtime.totem.pg.mrp.srp.members.2.config_version (u64) = 0
runtime.totem.pg.mrp.srp.members.2.ip (str) = r(0) ip(10.0.0.12)
runtime.totem.pg.mrp.srp.members.2.join_count (u32) = 1
runtime.totem.pg.mrp.srp.members.2.status (str) = joined
2.11、查看当前集群的描述信息
[root@centos-1 ~]#  pcs status
Cluster name: mycluster
WARNING: no stonith devices and stonith-enabled is not false  ##在这里我们得实现隔离设备:stonith
Stack: corosync             ##底层是由哪个来传递信息的
Current DC: centos-1 (version 1.1.16-12.el7_4.4-94ff4df) - partition with quorum    ##DC指定的协调员(DC:是由所有节点选举出来的)
Last updated: Mon Oct 30 13:52:14 2017
Last change: Mon Oct 30 13:51:00 2017 by hacluster via crmd on centos-1
2 nodes configured
0 resources configured
Online: [ centos-1 centos-2 ]
No resources           ##还没有资源
Daemon Status:               ##各守护进程准备正常
  corosync: active/disabled
  pacemaker: active/disabled
  pcsd: active/enabled
2.12、配置全局选项
[root@centos-1 ~]#  pcs property -h
Usage: pcs property [commands]...
Configure pacemaker properties
##查看哪项是可以配置的
[root@centos-1 ~]# pcs property list --all
2.13、查看集群是否有错误
[root@centos-1 ~]# crm_verify -L -V
   error: unpack_resources:     Resource start-up disabled since no STONITH resources have been defined
   error: unpack_resources:     Either configure some or disable STONITH with the stonith-enabled option
   error: unpack_resources:     NOTE: Clusters with shared data need STONITH to ensure data integrity
Errors found during check: config not valid
##出现这个错误是因为我们没有配置STONITH设备,所以,我们要关闭STONITH设备
[root@centos-1 ~]# pcs property set stonith-enabled=false
[root@centos-1 ~]# crm_verify -L -V
[root@centos-1 ~]# pcs property list
Cluster Properties:
 cluster-infrastructure: corosync
 cluster-name: mycluster
 dc-version: 1.1.16-12.el7_4.4-94ff4df
 have-watchdog: false
 stonith-enabled: false
##现在就可以了
2.14、集群的话,我们可以通过下载安装crmsh来操作(从github上面来下载,然后解压并直接安装,我事先已经先下载好放在/usr/local/src下面了),只需要在其中一个节点上安装就可以了,在这里我在centos-1上配置crm :
[root@centos-1 src]# ls
crmsh-2.3.2.tar
[root@centos-1 src]# tar -xf crmsh-2.3.2.tar
[root@centos-1 src]# cd crmsh-2.3.2
[root@centos-1 crmsh-2.3.2]# ls
AUTHORS       crm.conf.in    NEWS              TODO
autogen.sh    crmsh          README.md         tox.ini
ChangeLog     crmsh.spec     requirements.txt  update-data-manifest.sh
configure.ac  data-manifest  scripts           utils
contrib       doc            setup.py          version.in
COPYING       hb_report      templates
crm           Makefile.am    test
[root@centos-1 crmsh-2.3.2]# python setup.py install
2.15、安装完成之后,我们可以查看一下集群的状态
[root@centos-1 ~]# crm status
Stack: corosync
Current DC: centos-1 (version 1.1.16-12.el7_4.4-94ff4df) - partition with quorum
Last updated: Mon Oct 30 13:55:40 2017
Last change: Mon Oct 30 13:53:49 2017 by root via cibadmin on centos-1
2 nodes configured
0 resources configured
Online: [ centos-1 centos-2 ]
No resources
到这里,pcs集群我们就已经配置好了,接下来就开始配置drbd和mariadb了。
3、配置drbd和mariadb
3.1、安装drbd
[root@centos-1 ~]# cd /etc/yum.repos.d/
[root@centos-1 yum.repos.d]# rpm --import https://www.elrepo.org/RPM-GPG-KEY-elrepo.org
[root@centos-1 yum.repos.d]# rpm -Uvh http://www.elrepo.org/elrepo-release-7.0-2.el7.elrepo.noarch.rpm
[root@centos-1 yum.repos.d]# yum install -y kmod-drbd84 drbd84-utils
[root@centos-2 ~]# cd /etc/yum.repos.d/
[root@centos-2 yum.repos.d]# rpm --import https://www.elrepo.org/RPM-GPG-KEY-elrepo.org
[root@centos-2 yum.repos.d]# rpm -Uvh http://www.elrepo.org/elrepo-release-7.0-2.el7.elrepo.noarch.rpm
[root@centos-2 yum.repos.d]# yum install -y kmod-drbd84 drbd84-utils
3.2、配置drbd
##查看主配置文件
[root@centos-1 ~]# cat /etc/drbd.conf
# You can find an example in  /usr/share/doc/drbd.../drbd.conf.example
include "drbd.d/global_common.conf";
include "drbd.d/*.res";

##配置全局文件
[root@centos-1 ~]# cd /etc/drbd.d/
[root@centos-1 drbd.d]# ls
global_common.conf
[root@centos-1 drbd.d]# cp global_common.conf global_common.conf.bak
[root@centos-1 drbd.d]# vim global_common.conf
global {
    usage-count no;  #是否参加DRBD使用统计,默认为yes。官方统计drbd的装机量
    # minor-count dialog-refresh disable-ip-verification
}
common {
    protocol C;      #使用DRBD的同步协议
    handlers {
        pri-on-incon-degr "/usr/lib/drbd/notify-pri-on-incon-degr.sh; /usr/lib/drbd/notify-emergency-reboot.sh; echo b >
/proc/sysrq-trigger ; reboot -f";
        pri-lost-after-sb "/usr/lib/drbd/notify-pri-lost-after-sb.sh; /usr/lib/drbd/notify-emergency-reboot.sh; echo b >
/proc/sysrq-trigger ; reboot -f";
        local-io-error "/usr/lib/drbd/notify-io-error.sh; /usr/lib/drbd/notify-emergency-shutdown.sh; echo o >
/proc/sysrq-trigger ; halt -f";
    }
    startup {
        # wfc-timeout degr-wfc-timeout outdated-wfc-timeout wait-after-sb
    }
    options {
        # cpu-mask on-no-data-accessible
    }
    disk {
        on-io-error detach; #配置I/O错误处理策略为分离
        # size max-bio-bvecs on-io-error fencing disk-barrier disk-flushes
        # disk-drain md-flushes resync-rate resync-after al-extents
        # c-plan-ahead c-delay-target c-fill-target c-max-rate
        # c-min-rate disk-timeout
    }
    net {
        # protocol timeout max-epoch-size max-buffers unplug-watermark
        # connect-int ping-int sndbuf-size rcvbuf-size ko-count
        # allow-two-primaries cram-hmac-alg shared-secret after-sb-0pri
        # after-sb-1pri after-sb-2pri always-asbp rr-conflict
        # ping-timeout data-integrity-alg tcp-cork on-congestion
        # congestion-fill congestion-extents csums-alg verify-alg
        # use-rle
    }
    syncer {
        rate 1024M;    #设置主备节点同步时的网络速率
    }
}
注释: on-io-error 策略可能为以下选项之一
detach 分离:这是默认和推荐的选项,如果在节点上发生底层的硬盘I/O错误,它会将设备运行在Diskless无盘模式下
pass_on:DRBD会将I/O错误报告到上层,在主节点上,它会将其报告给挂载的文件系统,但是在此节点上就往往忽略(因此此节点上没有可
以报告的上层)
-local-in-error:调用本地磁盘I/O处理程序定义的命令;这需要有相应的local-io-error调用的资源处理程序处理错误的命令;这就给管
理员有足够自由的权力命令命令或是脚本调用local-io-error处理I/O错误
定义一个资源
创建配置文件:
[root@centos-1 ~]# cat /etc/drbd.d/mysql.res
resource mysql { #资源名称
protocol C; #使用协议
meta-disk internal;
device /dev/drbd1; #DRBD设备名称
syncer {
verify-alg sha1;# 加密算法
}
net {
allow-two-primaries;
}
on centos-1 {
disk /dev/sdb1; #drbd1使用的磁盘分区为"mysql"
address 10.0.0.11:7789; #设置DRBD监听地址与端口
}
on centos-2 {
disk /dev/sdb1;
address 10.0.0.12:7789;
}
}
##把配置文件copy到对端
[root@centos-1 ~]# scp -rp /etc/drbd.d/* 10.0.0.12:/etc/drbd.d/
在centos-1上启动
[root@centos-1 ~]# drbdadm create-md mysql
initializing activity log
initializing bitmap (96 KB) to all zero
Writing meta data...
New drbd meta data block successfully created.

##查看内核是否已经加载了模块
[root@centos-1 ~]# modprobe drbd
[root@centos-1 ~]#  lsmod | grep drbd
drbd                  396875  0
libcrc32c              12644  2 xfs,drbd

[root@centos-1 ~]# drbdadm up mysql
[root@centos-1 ~]# drbdadm -- --force primary mysql
[root@centos-1 ~]# cat /proc/drbd
version: 8.4.10-1 (api:1/proto:86-101)
GIT-hash: a4d5de01fffd7e4cde48a080e2c686f9e8cebf4c build by mockbuild@, 2017-09-15 14:23:22
 1: cs:WFConnection ro:Primary/Unknown ds:UpToDate/DUnknown C r----s
    ns:0 nr:0 dw:0 dr:912 al:8 bm:0 lo:0 pe:0 ua:0 ap:0 ep:1 wo:f oos:3144572
在对端节点执行
[root@centos-2 ~]# drbdadm create-md mysql
[root@centos-2 ~]# modprobe drbd
[root@centos-2 ~]# drbdadm up mysql
可以看到数据同步的状态
[root@centos-1 ~]# cat /proc/drbd
version: 8.4.10-1 (api:1/proto:86-101)
GIT-hash: a4d5de01fffd7e4cde48a080e2c686f9e8cebf4c build by mockbuild@, 2017-09-15 14:23:22
 1: cs:SyncSource ro:Primary/Secondary ds:UpToDate/Inconsistent C r-----
    ns:1798144 nr:0 dw:0 dr:1799056 al:8 bm:0 lo:0 pe:0 ua:0 ap:0 ep:1 wo:f oos:1346428
        [==========>.........] sync'ed: 57.3% (1346428/3144572)K
        finish: 0:00:32 speed: 40,732 (39,088) K/sec
格式化drbd1并挂载
[root@centos-1 ~]# mkfs.ext4 /dev/drbd1
[root@centos-1 ~]# systemctl start drbd
You have new mail in /var/spool/mail/root
[root@centos-1 ~]# systemctl enable drbd
[root@centos-1 ~]# drbdadm -- --overwrite-data-of-peer primary mysql
[root@centos-1 ~]# drbd-overview
NOTE: drbd-overview will be deprecated soon.
Please consider using drbdtop.
 1:mysql/0  Connected Primary/Secondary UpToDate/UpToDate
[root@centos-1 ~]# mkdir /data     ##创建mariadb数据库的数据存放目录
[root@centos-1 ~]# mount /dev/drbd1 /data
3.3、安装mariadb
##这里使用yum安装
[root@centos-1 ~]# yum install -y mariadb mariadb-server
[root@centos-2 ~]# yum install -y mariadb mariadb-server

##修改目录权限
[root@centos-1 ~]# chown -R mysql:mysql /data   ##修改权限
[root@centos-1 ~]# vim /etc/my.cnf       ##修改数据目录到/data目录下
[mysqld]
datadir=/data
socket=/var/lib/mysql/mysql.sock
# Disabling symbolic-links is recommended to prevent assorted security risks
symbolic-links=0
# Settings user and group are ignored when systemd is used.
# If you need to run mysqld under a different user or group,
# customize your systemd unit file for mariadb according to the
# instructions in http://fedoraproject.org/wiki/Systemd
[mysqld_safe]
log-error=/var/log/mariadb/mariadb.log
pid-file=/var/run/mariadb/mariadb.pid
#
# include all files from the config directory
#
!includedir /etc/my.cnf.d
3.4、测试数据库挂载是否成功
启动数据库
[root@centos-1 ~]# systemctl start mariadb
[root@centos-1 ~]# cd /data/
[root@centos-1 data]# ls
aria_log.00000001  ibdata1      ib_logfile1  mysql               test
aria_log_control   ib_logfile0  lost+found   performance_schema
##可以看到/data目录下已经有数据了
在数据库里创建一个数据库作为测试使用
[root@centos-1 data]# mysql
Welcome to the MariaDB monitor.  Commands end with ; or \g.
Your MariaDB connection id is 2
Server version: 5.5.56-MariaDB MariaDB Server
Copyright (c) 2000, 2017, Oracle, MariaDB Corporation Ab and others.
Type 'help;' or '\h' for help. Type '\c' to clear the current input statement.
MariaDB [(none)]> create database centos_test;   ##创建测试数据库
Query OK, 1 row affected (0.00 sec)
MariaDB [(none)]> show databases;
+---------------------+
| Database            |
+---------------------+
| information_schema  |
| centos_test         |
| #mysql50#lost+found |
| mysql               |
| performance_schema  |
| test                |
+---------------------+
6 rows in set (0.00 sec)
测试让centos-2为主,然后挂载磁盘
##在centos-1上关闭mariadb并对drbd降级
[root@centos-1 data]# systemctl stop mariadb
[root@centos-1 data]# umount /data/
[root@centos-1 ~]# drbdadm secondary mysql
[root@centos-1 ~]# drbd-overview
NOTE: drbd-overview will be deprecated soon.
Please consider using drbdtop.
 1:mysql/0  Connected Secondary/Secondary UpToDate/UpToDate

 ##在centos-2上设置为主,并启动mariadb,查看一下数据
[root@centos-2 ~]# mkdir /data
[root@centos-2 ~]# chown -R mysql:mysql /data
[root@centos-2 ~]# drbdadm primary mysql
[root@centos-2 ~]#  drbd-overview
NOTE: drbd-overview will be deprecated soon.
Please consider using drbdtop.
 1:mysql/0  Connected Primary/Secondary UpToDate/UpToDate
[root@centos-2 ~]# mount /dev/drbd1 /data
[root@centos-2 ~]# systemctl start mariadb
[root@centos-2 ~]# cd /data/
[root@centos-2 data]# ls
aria_log.00000001  centos_test  ib_logfile0  lost+found  performance_schema
aria_log_control   ibdata1      ib_logfile1  mysql       test
[root@centos-2 data]# mysql
Welcome to the MariaDB monitor.  Commands end with ; or \g.
Your MariaDB connection id is 2
Server version: 5.5.56-MariaDB MariaDB Server
Copyright (c) 2000, 2017, Oracle, MariaDB Corporation Ab and others.
Type 'help;' or '\h' for help. Type '\c' to clear the current input statement.
MariaDB [(none)]> show databases;
+---------------------+
| Database            |
+---------------------+
| information_schema  |
| centos_test         |
| #mysql50#lost+found |
| mysql               |
| performance_schema  |
| test                |
+---------------------+
6 rows in set (0.07 sec)

##测试没问题,现在我们把主从切换回来
[root@centos-2 ~]# systemctl stop mariadb
[root@centos-2 ~]# umount /data
[root@centos-2 ~]# drbdadm secondary mysql
[root@centos-2 ~]# systemctl stop drbd
[root@centos-1 ~]# drbdadm primary mysql
[root@centos-1 ~]# systemctl stop drbd
4、配置crm资源
4.1、开始定义资源
[root@centos-1 ~]# crm
crm(live)# configure
crm(live)configure# primitive mysqldrbd ocf:linbit:drbd params drbd_resource=mysql op start timeout=240 op stop timeout=100
op monitor role=Master interval=20 timeout=30 op monitor role=Slave interval=30 timeout=30
crm(live)configure# verify
crm(live)configure# ms ms_mysqldrbd mysqldrbd meta master-max=1 master-node-max=1 clone-max=2 clone-node-max=1 notify=true
crm(live)configure# verify
crm(live)configure# commit
crm(live)configure# cd
crm(live)# status
Stack: corosync
Current DC: centos-1 (version 1.1.16-12.el7_4.4-94ff4df) - partition with quorum
Last updated: Mon Oct 30 14:58:13 2017
Last change: Mon Oct 30 14:58:06 2017 by root via cibadmin on centos-1
2 nodes configured
2 resources configured
Online: [ centos-1 centos-2 ]
Full list of resources:
 Master/Slave Set: ms_mysqldrbd [mysqldrbd]
     Masters: [ centos-2 ]
     Slaves: [ centos-1 ]
##可以看到主从已经有资源了
4.2、添加文件系统资源
crm(live)# configure
crm(live)configure# primitive mystore ocf:heartbeat:Filesystem params device=/dev/drbd1 directory=/data fstype=ext4 op
start timeout=60 op stop timeout=60
crm(live)configure# verify
crm(live)configure# colocation mystore_with_ms_mysqldrbd inf: mystore ms_mysqldrbd:Master
crm(live)configure# verify
crm(live)configure#  order mystore_after_ms_mysqldrbd mandatory: ms_mysqldrbd:promote mystore:start
crm(live)configure# verify
crm(live)configure# commit
crm(live)configure# cd
crm(live)# status
Stack: corosync
Current DC: centos-1 (version 1.1.16-12.el7_4.4-94ff4df) - partition with quorum
Last updated: Mon Oct 30 15:05:21 2017
Last change: Mon Oct 30 15:05:13 2017 by root via cibadmin on centos-1
2 nodes configured
3 resources configured
Online: [ centos-1 centos-2 ]
Full list of resources:
 Master/Slave Set: ms_mysqldrbd [mysqldrbd]
     Masters: [ centos-2 ]
     Slaves: [ centos-1 ]
 mystore        (ocf::heartbeat:Filesystem):    Started centos-2
##注意,在增加资源顺序约束时(order mysql_after_mystore Mandatory: mystore mysqld),要先加mystore ,再到mysql,不然文件转换不过来。
4.3、增加MySQL资源
crm(live)# configure
crm(live)configure# primitive mysqld systemd:mariadb
crm(live)configure# colocation mysqld_with_mystore inf: mysqld mystore
crm(live)configure# verify
WARNING: mysqld: default timeout 20s for start is smaller than the advised 100   ##这个错误可以忽略不计,只是我们设的timeout时间比它默认的要低
WARNING: mysqld: default timeout 20s for stop is smaller than the advised 100
crm(live)configure# commit
WARNING: mysqld: default timeout 20s for start is smaller than the advised 100
WARNING: mysqld: default timeout 20s for stop is smaller than the advised 100
crm(live)configure# cd
crm(live)# status
Stack: corosync
Current DC: centos-1 (version 1.1.16-12.el7_4.4-94ff4df) - partition with quorum
Last updated: Mon Oct 30 15:07:58 2017
Last change: Mon Oct 30 15:07:47 2017 by root via cibadmin on centos-1
2 nodes configured
4 resources configured
Online: [ centos-1 centos-2 ]
Full list of resources:
 Master/Slave Set: ms_mysqldrbd [mysqldrbd]
     Masters: [ centos-2 ]
     Slaves: [ centos-1 ]
 mystore        (ocf::heartbeat:Filesystem):    Started centos-2
 mysqld (systemd:mariadb):      Started centos-2
4.4、增加vip资源
crm(live)# configure
crm(live)configure# primitive myvip ocf:heartbeat:IPaddr params ip="10.0.0.100" op monitor interval=20 timeout=20 on-
fail=restart
crm(live)configure# colocation vip_with_ms_mysqldrbd inf: ms_mysqldrbd:Master myvip
crm(live)configure# verify
WARNING: mysqld: default timeout 20s for start is smaller than the advised 100
WARNING: mysqld: default timeout 20s for stop is smaller than the advised 100
crm(live)configure# commit
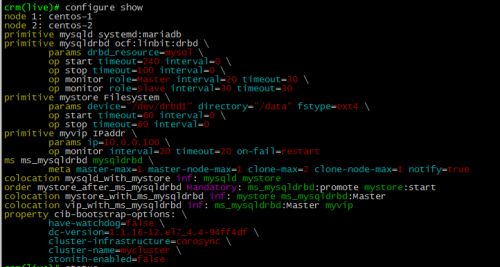
4.5、查看最终配置好的资源和状态
5、测试
5.1、先使用本地ip去查看数据库
##可以看到原来创的数据库centos_test还在,现在我们给这个数据库写一张表test进去,然后使用vip登录,看看能不能看到数据库centos_test和表test。
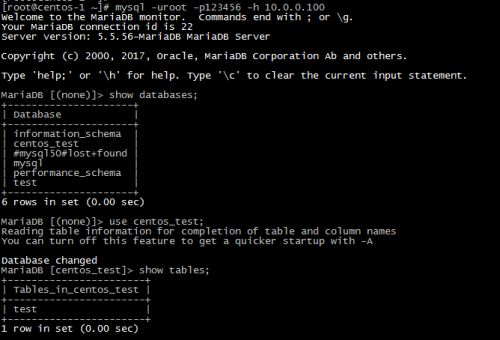
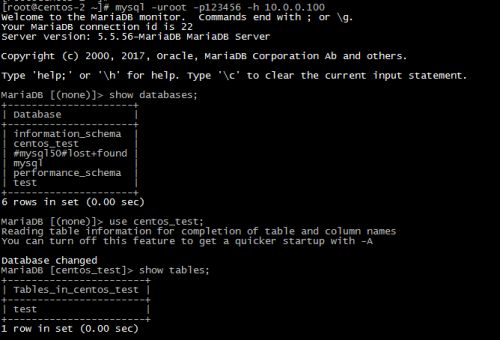
5.2、使用vip登录数据库
##可以发现跟我们使用本地ip登录时,看到的是一样的,然后看看能不能创表或者创数据库
##创建表成功。
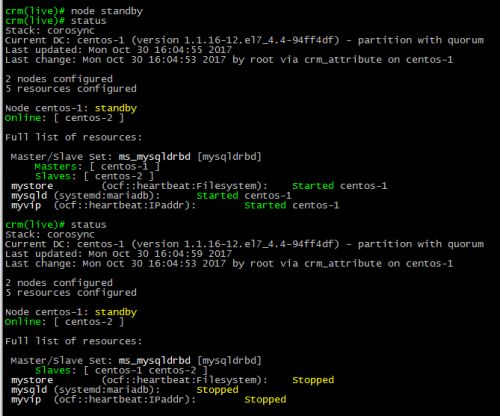
5.3、当centos-1宕机了,centos-1上的服务会转移到centos-2上,所有服务都还能正常运行
##切换成功,现在到centos-2上去看看mariadb服务是否正常运行
##可以看到vip已经切换过来了,而且在centos-1上创建的数据库也能看到
这次的drbd+corosync+pacemaker+MySQL构建高可用的实验就完成了,如果有写错的地方,欢迎各位大神指出来,我会去修改的。如果有写得不好的地方,请多多见谅!!!
