SpringBoot2.X 实战笔记
文章目录
- 多环境配置
- 自定义Starter
- war包方式启动与部署
- Jar包方式运行web项目
- 使用 devtools 热部署
-
- 在pom.xml中引入devtools模块
- IntelliJ IDEA 设置
- properties.yml
- 过滤器(Filter)
-
- 概述
- 第一种方法:FilterRegistrationBean注册
- 第二种方法:@WebServlet+ @ServletComponentScan(推荐)
- 拦截器(Intercepter)
-
- 拦截器的处理流程
- 自定义拦截器
- 过滤器和拦截器比较
- 设置支持跨域请求
- @SpringBootTest单元测试
- 测试进阶之MockMvc
- 全局异常配置
-
- 默认异常机制
- 自定义json格式异常响应
- 自定义异常处理页面
- 整合 Freemaker 模板引擎
- 整合 Thymeleaf 模板引擎
- 整合 Mybatis + MySQL
- Prometheus + Grafana 实现可视化的监控
-
- Prometheus 组件
-
- 下载 & 安装 & 启动
- 集成SpringBoot
-
- Grafana 组件
-
- 下载 & 安装 & 启动
- 整合RabbitMQ
-
- 概述
- SpringBoot Test
-
- java.lang.IllegalStateException Unable to find a @SpringBootConfiguration错误解决方案
多环境配置
yaml 语法参考: https://www.jianshu.com/p/97222440cd08
在线properties转yaml工具: http://www.toyaml.com/index.html
server:
  port: 8181
spring:
  application:
    name: multipart-environment
  profiles:
    active: dev   # 指定启动环境

# 开发环境
---
spring:
  profiles: dev
test:
  env: dev

# 测试环境
---
spring:
  profiles: test
test:
  env: test

# 生产环境
---
spring:
  profiles: prod
test:
  env: prod
自定义Starter

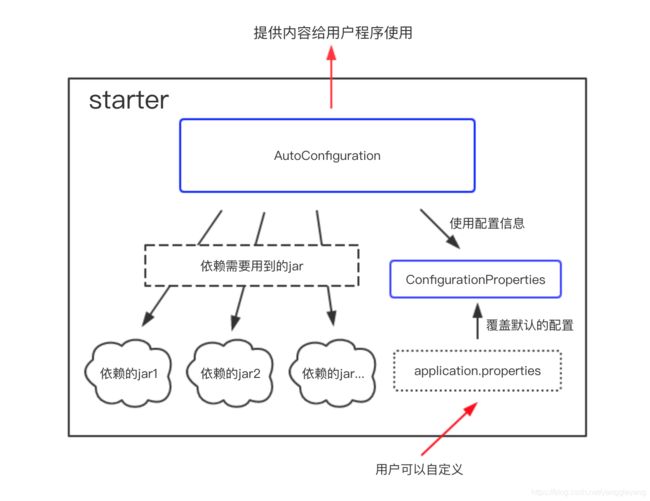
如果你想要自己创建一个starter,那么基本上包含以下几步:
- 创建一个starter项目
- 创建一个ConfigurationProperties用于保存你的配置信息(如果你的项目不使用配置信息则可以跳过这一步,不过这种情况非常少见)
- 创建一个AutoConfiguration,引用定义好的配置信息;在AutoConfiguration中实现所有starter应该完成的操作,并且把这个类加入spring.factories配置文件中进行声明
- 打包项目,之后在一个SpringBoot项目中引入该项目依赖,然后就可以使用该starter了
新建一个Maven项目,设置 pom.xml 文件
<project xmlns="http://maven.apache.org/POM/4.0.0"
         xmlns:xsi="http://www.w3.org/2001/XMLSchema-instance"
         xsi:schemaLocation="http://maven.apache.org/POM/4.0.0 http://maven.apache.org/xsd/maven-4.0.0.xsd">
    <modelVersion>4.0.0modelVersion>
    <artifactId>http-starterartifactId>
    <version>0.0.1-SNAPSHOTversion>


    <parent>
        <groupId>org.springframework.bootgroupId>
        <artifactId>spring-boot-startersartifactId>
        <version>2.2.2.RELEASEversion>
    parent>

    <dependencies>

        <dependency>
            <groupId>org.springframework.bootgroupId>
            <artifactId>spring-boot-starterartifactId>
        dependency>

        <dependency>
            <groupId>org.projectlombokgroupId>
            <artifactId>lombokartifactId>
            <version>1.16.10version>
        dependency>
    dependencies>
project>
创建proterties类来保存配置信息
@ConfigurationProperties(prefix = "http")
@Setter
@Getter
public class HttpProperties {

    // 如果配置文件中配置了http.url属性,则该默认属性会被覆盖
    private String url = "http://www.baidu.com/";
}
创建业务类
@Setter
@Getter
public class HttpClient {

    private String url;
    // 根据url获取网页数据
    public String getHtml() {

        try {

            URL url = new URL(this.url);
            URLConnection urlConnection = url.openConnection();
            BufferedReader br = new BufferedReader(new InputStreamReader(urlConnection.getInputStream(), "utf-8"));
            String line = null;
            StringBuilder sb = new StringBuilder();
            while ((line = br.readLine()) != null) {

                sb.append(line).append("\n");
            }
            return sb.toString();
        } catch (Exception e) {

            e.printStackTrace();
        }
        return "error";
    }
}
创建AutoConfiguration
@Configuration
@EnableConfigurationProperties(HttpProperties.class)
public class HttpAutoConfiguration {

    @Resource
    private HttpProperties properties;
    @Bean
    @ConditionalOnMissingBean
    public HttpClient init() {

        HttpClient client = new HttpClient();
        String url = properties.getUrl();
        client.setUrl(url);
        return client;
    }
}
在 resources 文件夹下新建目录 META-INF,在目录中新建 spring.factories 文件,并且在 spring.factories 中配置AutoConfiguration:
org.springframework.boot.autoconfigure.EnableAutoConfiguration=\
com.nosuchfield.httpstarter.HttpAutoConfiguration
测试
@Component
public class RunIt {

    @Resource
    private HttpClient httpClient;
    public void hello() {

        System.out.println(httpClient.getHtml());
    }
}
war包方式启动与部署
- 在pom.xml中将打包形式修改为war
<packaging>warpackaging>
- 修改SpringBoot启动类
@SpringBootApplication
public class Application extends SpringBootServletInitializer {

   @Override
   protected SpringApplicationBuilder configure(SpringApplicationBuilder application) {

       return application.sources(Application.class);
   }
   public static void main(String[] args) throws Exception {

       SpringApplication.run(Application.class, args);
   }
}
Jar包方式运行web项目
在pom.xml文件中加入如下依赖
<build>
  <plugins>
      <plugin>
          <groupId>org.springframework.bootgroupId>
          <artifactId>spring-boot-maven-pluginartifactId>
      plugin>
  plugins>
build>
- 执行启动环境
java -jar -Xms1024m -Xmx1024m XXX.jar --spring.profiles.active=dev &
使用 devtools 热部署
在pom.xml中引入devtools模块
<dependencies>
    <dependency>
        <groupId>org.springframework.bootgroupId>
        <artifactId>spring-boot-devtoolsartifactId>
        <optional>trueoptional>
    dependency>
dependencies>
IntelliJ IDEA 设置
- 首先,File --> Settings --> Complier --> 选中 Build project automatically
- 使用该组合键 Shift+ALT+Ctrl+/ ,选择 Registry勾选 “complier.automake.allow.when.app.running” 选项
properties.yml
- 自定义排除某些文件,可以通过 spring.devtools.restart.exclude
- 通过spring.devtools.restart.trigger-file 配置监听某个特定的文件触发热部署
过滤器(Filter)
概述
配置在web.xml中,依赖于servlet容器。
优点:
在实现上Filter是基于函数回调,可以对几乎所有请求进行过滤
缺点:
一个过滤器实例只能在容器初始化时调用一次 . 当容器第一次加载该过滤器时,init() 方法将被调用
使用场景:
比如设置编码、过滤敏感词汇、禁止浏览器缓存所有动态页面、实现用户自动登陆、实现URL级别的权限认证等等 ,具体案例参考Filter(过滤器)常见应用
传统的JavaEE项目开发filter的主要2个步骤
- 实现Filter接口,并实现其doFilter方法。
- 在 web.xml 文件中使用和元素对编写的filter类进行注册,并设置它所能拦截的资源。
- 可以开发编写多个Filter,组成一个Filter链,根据Filter在web.xml文件中的注册顺序,决定先调用哪个Filter。
它使用户可以改变一个 request和修改一个response,Filter 不是一个servlet,它不能产生一个response,它能够在一个request到达servlet之前预处理request,也可以在离开 servlet时处理response,换种说法,filter其实是一个 “servlet chaining” (servlet 链)。
一个Filter包括:
1)在servlet被调用之前截获
2)在servlet被调用之前检查servlet request
3)根据需要修改request头和request数据
4)根据需要修改response头和response数据
5)在servlet被调用之后截获
第一种方法:FilterRegistrationBean注册
- 实现Filter方法
public class GlobalFilter implements Filter {

    @Override
    public void init(FilterConfig filterConfig) throws ServletException {

    }

    @Override
    public void doFilter(ServletRequest servletRequest, ServletResponse servletResponse, FilterChain filterChain) throws IOException, ServletException {

        HttpServletRequest request = (HttpServletRequest) servletRequest;
        String requestURI = request.getRequestURI();
        System.out.println(requestURI);
        filterChain.doFilter(request, servletResponse);
    }

    @Override
    public void destroy() {

    }
}
- 加载Filter配置
@Configuration
public class FilterConfig {

    @Bean
    public FilterRegistrationBean filterRegistration(){

        // 新建过滤器注册类
        FilterRegistrationBean registration = new FilterRegistrationBean();
        // 添加自定义过滤器
        registration.setFilter(globalFilter());
        // 设置过滤器的URL模式
        registration.addUrlPatterns("/*");
        //设置过滤器顺序
        registration.setOrder(1);
        return registration;
    }
    @Bean
    public GlobalFilter globalFilter(){

        return new GlobalFilter();
    }
}
第二种方法:@WebServlet+ @ServletComponentScan(推荐)
- 自定义MyFilter
import javax.servlet.*;
import javax.servlet.annotation.WebFilter;
import javax.servlet.http.HttpServletRequest;
import java.io.IOException;

@WebFilter(filterName = "myFilter", urlPatterns = "/*")
public class MyFilter implements Filter {

    @Override
    public void init(FilterConfig filterConfig) throws ServletException {

        System.out.println("init...");
    }

    @Override
    public void doFilter(ServletRequest servletRequest, ServletResponse servletResponse, FilterChain filterChain) throws IOException, ServletException {

        HttpServletRequest request = (HttpServletRequest) servletRequest;
        String requestURI = request.getRequestURI();
        if(requestURI.contains("my")){

            System.out.println("成功啦, 请求URI是:" + requestURI);
        }
        filterChain.doFilter(request, servletResponse);
    }

    @Override
    public void destroy() {

        System.out.println("destroy...");
    }
}
- 在Application 启动类添加@ServletComponentScan注解
在 SpringBootApplication 上使用@ServletComponentScan 注解后,Servlet、Filter、Listener 可以直接通过 @WebServlet、@WebFilter、@WebListener 注解自动注册。
import org.springframework.boot.SpringApplication;
import org.springframework.boot.autoconfigure.SpringBootApplication;
import org.springframework.boot.web.servlet.ServletComponentScan;

@ServletComponentScan
@SpringBootApplication
public class Application {


    public static void main(String[] args) {

        SpringApplication.run(Application.class, args);
    }
}
拦截器(Intercepter)
Interceptor依赖于web框架,我们经常在Spring MVC中用到该配置,在这个场景下Interceptor 就依赖于SpringMVC框架。Interceptor 基于Java的反射机制,属于AOP的一种运用。
优点:
由于拦截器是基于web框架的调用,因此可以使用Spring的依赖注入进行一些业务操作,同时一个拦截器实例在一个controller生命周期之内可以多次调用。
缺点:
只能对controller请求进行拦截,对其他的一些比如直接访问静态资源的请求则没办法进行拦截处理。
拦截器的处理流程

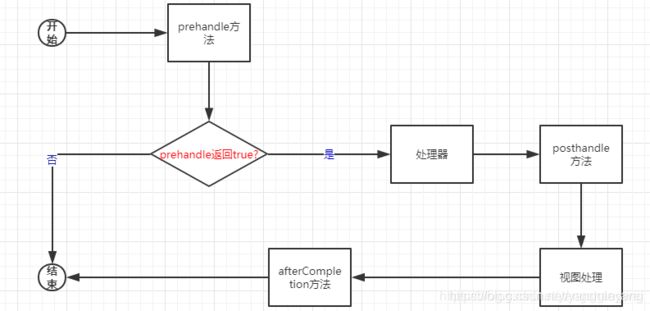
多个拦截器的执行顺序是按照责任链模式的规则,对于处理器前方法采用先注册先执行,而处理器后方法和完成方法则是先注册后执行的规则。
自定义拦截器
- 自定义拦截器
实现接口HandlerInterceptor,或者继承继承HandlerInterceptorAdapter
import org.springframework.stereotype.Component;
import org.springframework.web.servlet.HandlerInterceptor;
import org.springframework.web.servlet.ModelAndView;

import javax.servlet.http.HttpServletRequest;
import javax.servlet.http.HttpServletResponse;

@Component
public class MyInterceptor implements HandlerInterceptor {


    /**
     * 进入controller层之前拦截请求
     */
    @Override
    public boolean preHandle(HttpServletRequest request, HttpServletResponse response, Object handler) {

        System.out.println("getContextPath:" + request.getContextPath());
        System.out.println("getServletPath:" + request.getServletPath());
        System.out.println("getRequestURI:" + request.getRequestURI());
        System.out.println("getRequestURL:" + request.getRequestURL());
        System.out.println("getRealPath:" + request.getSession().getServletContext().getRealPath("image"));
        return true;
    }

    /**
     * 处理请求完成后视图渲染之前的处理操作
     */
    @Override
    public void postHandle(HttpServletRequest request, HttpServletResponse response, Object handler, ModelAndView modelAndView) {

    }

    /**
     * 视图渲染之后的操作
     */
    @Override
    public void afterCompletion(HttpServletRequest request, HttpServletResponse response, Object handler, Exception ex) {

    }
}
-
拦截器注册
可以用来注册拦截器的类和接口:
- WebMvcConfigurerAdapter: 2.0以后的版本已失效
- WebMvcConfigurationSupport: 不需要返回逻辑视图,可以选择继承此类
- WebMvcConfigurer:返回逻辑视图,可以选择实现此方法,重写addInterceptor方法
import com.fxbin.demo.interceptor.MyInterceptor;
import org.springframework.context.annotation.Bean;
import org.springframework.context.annotation.Configuration;
import org.springframework.web.servlet.config.annotation.InterceptorRegistry;
import org.springframework.web.servlet.config.annotation.WebMvcConfigurer;

@Configuration
public class WebConfig implements WebMvcConfigurer {


    @Bean
    public MyInterceptor myInterceptor(){

        return new MyInterceptor();
    }

    @Override
    public void addInterceptors(InterceptorRegistry registry) {

        //添加拦截路径和排除拦截路径
        registry.addInterceptor(myInterceptor()).addPathPatterns("/**").excludePathPatterns("/test");
    }
}
过滤器和拦截器比较
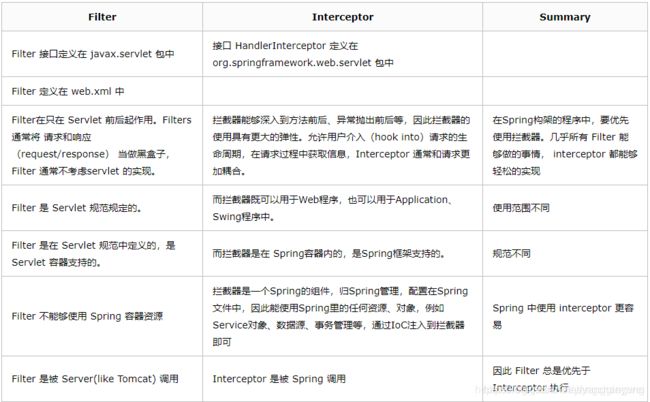
Filter的执行顺序在Interceptor之前 。拦截器(Interceptor)是基于Java的反射机制,而过滤器(Filter)是基于函数回调。从灵活性上说拦截器功能更强大些,Filter能做的事情,Interceptor都能做,而且可以在请求前,请求后执行,比较灵活。

设置支持跨域请求
参考:浏览器同源政策及其规避方法
浏览器安全的基石是"同源政策"(same-origin policy),现代浏览器出于安全的考虑,在http/https请求时必须遵守同源策略,否则跨域的http/https 请求,默认情况下是被禁止的,协议、域名、端口但凡有一个不同都会造成跨域问题。如果发生跨域,则浏览器中每次请求的session都是一个新的,即sessionId肯定不相同。
所谓"同源"指的是"三个相同"
- 协议相同
- 域名相同
- 端口相同
非同源,共有三种行为受到限制
- Cookie、LocalStorage 和 IndexDB 无法读取。
- DOM 无法获得。
- AJAX 请求不能发送。
前端解决方案
- 使用 JSONP 来支持跨域的请求,JSONP 实现跨域请求的原理简单的说,就是动态创建script标签,然后利用script的SRC不受同源策略约束来跨域获取数据。缺点是需要后端配合输出特定的返回信息。
- 利用反向代理的机制来解决跨域的问题,前端请求的时候先将请求发送到同源地址的后端,通过后端请求转发来避免跨域的访问,如通过Nginx反向代理解决跨域问题。
后来 HTML5 支持了 CORS 协议。CORS 是一个 W3C 标准,全称是”跨域资源共享”(Cross-origin resource sharing),允许浏览器向跨源服务器,发出 XMLHttpRequest 请求,从而克服了 AJAX 只能同源使用的限制。它通过服务器增加一个特殊的 Header[Access-Control-Allow-Origin]来告诉客户端跨域的限制,如果浏览器支持 CORS、并且判断 Origin 通过的话,就会允许 XMLHttpRequest 发起跨域请求。
前端使用了 CORS 协议,就需要后端设置支持非同源的请求,对于SpringBoot 对于CORS 同样有着良好的支持。
浏览器和session
- 用户向服务器发送请求,比如登录操作发送用户名和密码
- 服务器验证通过后,通过HttpServletRequest#getSession()#setAttribute等方法保存相关数据
- 服务器向用户返回一个 session_id,浏览器set-cookie Cookie 即Cookie = session_id
- 用户随后的每一次请求,都会通过 Cookie,将 session_id 传回服务器。
- 服务器收到 session_id,找到前期保存的数据,由此得知用户的身份。
集群环境下Session管理思路
- session复制,比如Tomcat支持的Session复制. 优点:tomcat内置支持 缺点:如果集群过大,session 复制为all to all占用带宽,效率不高。
- session 数据持久化,写入redis或者数据库等。优点架构清晰,缺点是工程量大。而且也需要考虑session数据的持久层的高可用,否则单点登录就会失败。
- 服务端不保存 session ,所有数据都保存在客户端,比如 JWT (JSON WEB TOKEN)
小结
- 通过Nginx去解决跨域问题本质上是间接跨域,因为使用反向代理欺骗浏览器,所以浏览器任务客户端和服务端在相同的域名中,可以认为是同源访问,所以session不会丢失。
- 如果使用CORS实现了直接跨域,主要是在服务端通过给response设置header属性,帮助服务器资源进行跨域授权。 因为发生跨域访问,服务器会每次都创建新的Session,会导致session丢失,安全性和灵活性更高,但需要开发人员去解决跨域session丢失的问题。
三种配置方式:
- 过滤器(全局的配置方式)
@Configuration
public class GlobalCorsConfig {

    @Bean
    public CorsFilter corsFilter() {

        CorsConfiguration config = new CorsConfiguration();
          config.addAllowedOrigin("*");
          config.setAllowCredentials(true);
          config.addAllowedMethod("*");
          config.addAllowedHeader("*");
          config.addExposedHeader("*");

        UrlBasedCorsConfigurationSource configSource = new UrlBasedCorsConfigurationSource();
        configSource.registerCorsConfiguration("/**", config);

        return new CorsFilter(configSource);
    }
}
- 拦截器(全局的配置方式)
@Configuration
public class MyConfiguration extends WebMvcConfigurerAdapter  {

    @Override
    public void addCorsMappings(CorsRegistry registry) {

        registry.addMapping("/**")
                .allowCredentials(true)
                .allowedHeaders("*")
                .allowedOrigins("*")
                .allowedMethods("*");

    }
}
- @CrossOrigin 注解
单个请求的跨域通过 @CrossOrigin 注解来实现
@RequestMapping("/hello")
@CrossOrigin("http://localhost:8080")
public String hello( ){

return "Hello World";
}
@SpringBootTest单元测试
在pom.xml文件中加入如下依赖
<dependency>
    <groupId>org.springframework.bootgroupId>
    <artifactId>spring-boot-starter-testartifactId>
    <scope>testscope>
dependency>
@RunWith(SpringRunner.class)
@SpringBootTest(classes={
     Application.class})// 指定启动类
public class ApplicationTests {

     @Test
    public void testOne(){

        System.out.println("test hello one");
    }

    @Before
    public void testBefore(){

        System.out.println("before");
    }

    @After
    public void testAfter(){

        System.out.println("after");
    }
}
测试进阶之MockMvc
@RunWith(SpringRunner.class)
@SpringBootTest(classes = Application.class)
public class MockMvcTest {

    //注入一个web应用环境(容器)
    @Resource
    private WebApplicationContext webApplicationContext;

    //mvc环境对象
    private MockMvc mockMvc;

    @Before
    public void init(){

        mockMvc = MockMvcBuilders.webAppContextSetup(webApplicationContext).build();
    }
}

@Test
public void findObject() throws Exception {

      String str = mockMvc.perform(MockMvcRequestBuilders.get("/1/2")
             .contentType(MediaType.APPLICATION_JSON_UTF8)).andExpect(MockMvcResultMatchers.status().isOk())
             .andExpect(MockMvcResultMatchers.jsonPath("$.length()").value(2))
             .andReturn().getResponse().getContentAsString();

     System.out.println(str);
 }
perform:执行一个RequestBuilder请求,会自动执行SpringMVC的流程并映射到相应的控制器执行处理;
andExpect:添加ResultMatcher验证规则,验证控制器执行完成后结果是否正确;
andDo:添加ResultHandler结果处理器,比如调试时打印结果到控制台;
andReturn:最后返回相应的MvcResult;然后进行自定义验证/进行下一步的异步处理;
测试过程如下:
1、准备测试环境
2、通过MockMvc执行请求
3.1、添加验证断言
3.2、添加结果处理器
3.3、得到MvcResult进行自定义断言/进行下一步的异步请求
4、卸载测试环境
全局异常配置
默认异常机制
SpringBoot 默认提供了两种机制:
- 一种是针对于web浏览器访问的错误页面响应
- 另一种则是针对于 接口测试工具等 的参数响应处理
自定义json格式异常响应
通过 @ControllerAdvice、@RestControllerAdvice、@ExceptionHandler 注解全局异常自定义响应类。
- 定义响应状态码枚举类
public enum ResultCode {

    SUCCESS(200),//成功
    FAIL(400),//失败
    UNAUTHORIZED(401),//未认证(签名错误)
    NOT_FOUND(404),//接口不存在
    INTERNAL_SERVER_ERROR(500);//服务器内部错误

    private final int code;

    ResultCode(int code) {

        this.code = code;
    }

    public int code() {

        return code;
    }
}
定义响应类
public class Result {


    /**
     * 状态响应码
     */
    private int code;

    /**
     * 响应结果 成功/失败
     */
    private boolean success;

    /**
     * 响应信息
     */
    private String message;

    /**
     * 响应数据
     */
    @JsonInclude(JsonInclude.Include.NON_NULL)
    private Object data;

    public Result setCode(ResultCode resultCode) {

        this.code = resultCode.code();
        return this;
    }

    public int getCode() {

        return code;
    }

    public boolean isSuccess() {

        return success;
    }

    public Result setSuccess(boolean success) {

        this.success = success;
        return this;
    }

    public String getMessage() {

        return message;
    }

    public Result setMessage(String message) {

        this.message = message;
        return this;
    }

    public Object getData() {

        return data;
    }

    public Result setData(Object data) {

        this.data = data;
        return this;
    }
}
- 对响应结果封装,做预处理
public class ResultGenerator {


    private static final String DEFAULT_SUCCESS_MESSAGE = "SUCCESS";

    public static Result genSuccessResult() {

        return new Result()
                .setCode(ResultCode.SUCCESS)
                .setSuccess(true)
                .setMessage(DEFAULT_SUCCESS_MESSAGE);
    }

    public static Result genSuccessResult(Object data) {

        return new Result()
                .setCode(ResultCode.SUCCESS)
                .setSuccess(true)
                .setMessage(DEFAULT_SUCCESS_MESSAGE)
                .setData(data);
    }

    public static Result genFailResult(String message) {

        return new Result()
                .setCode(ResultCode.FAIL)
                .setSuccess(false)
                .setMessage(message);
    }
}
- 异常处理类
import com.fxbin123.dto.Result;
import com.fxbin123.dto.ResultGenerator;
import org.springframework.web.bind.annotation.ExceptionHandler;
import org.springframework.web.bind.annotation.RestControllerAdvice;

import javax.servlet.http.HttpServletRequest;

@RestControllerAdvice
public class ExceptionControllerAdvice {

    @ExceptionHandler(Exception.class)
    public Result jsonErrorHandler(HttpServletRequest req, Exception e){

        return ResultGenerator.genFailResult(e.getMessage());
    }
}
自定义异常处理页面
- 添加
thymeleaf依赖
<dependency>
    <groupId>org.springframework.bootgroupId>
    <artifactId>spring-boot-starter-thymeleafartifactId>
dependency>
- resource目录下新建templates,并新建error.html
<html xmlns:th="http://www.thymeleaf.org" xmlns:layout="http://www.w3.org/1999/xhtml" layout:decorator="layout">
<head>
    <title>Spring Boot 自定义异常页面title>
    <script type="text/javascript">
    script>
head>
<body>
<div layout:fragment="content" th:remove="tag">
    <div  id="navbar">
        <h1>系统异常统一处理h1>
        <h3 th:text="'错误信息:'+${msg}">h3>
        <h3 th:text="'请求地址:'+${url}">h3>

        <h2>Debugh2>
        <a th:href="@{
      'https://www.google.com/webhp?hl=zh-CN#safe=strict&hl=zh-CN&q='+${msg}}"
           class="btn btn-primary btn-lg" target="_blank" id="Google">Googlea>
        <a th:href="@{
      'https://www.baidu.com/s?wd='+${msg}}" class="btn btn-info btn-lg"  target="_blank" id="Baidu">Baidua>
        <a th:href="@{
      'http://stackoverflow.com/search?q='+${msg}}"
           class="btn btn-default btn-lg"  target="_blank" id="StackOverFlow">StackOverFlowa>
        <h2>异常堆栈跟踪日志StackTraceh2>
        <div th:each="line:${stackTrace}">
            <div th:text="${line}">div>
        div>
    div>
div>
<div layout:fragment="js" th:remove="tag">
div>
body>
html>
做错误页面异常处理 返回 ModelAndView
@ExceptionHandler(Exception.class)
public Object handleException(Exception e){

        ModelAndView modelAndView = new ModelAndView();
        modelAndView.addObject("msg", e.getMessage());
        modelAndView.addObject("url", req.getRequestURL());
        modelAndView.addObject("stackTrace", e.getStackTrace());
        modelAndView.setViewName("error");
        return modelAndView;
}
整合 Freemaker 模板引擎
官网:https://freemarker.apache.org/
在线手册:http://freemarker.foofun.cn/
- pom.xml
<dependency>
    <groupId>org.springframework.bootgroupId>
    <artifactId>spring-boot-starter-freemarkerartifactId>
dependency>
<dependency>
    <groupId>org.springframework.bootgroupId>
    <artifactId>spring-boot-starter-webartifactId>
dependency>

<dependency>
    <groupId>org.springframework.bootgroupId>
    <artifactId>spring-boot-starter-testartifactId>
    <scope>testscope>
dependency>
- yaml配置
spring:
  application:
    name: freemarker
  freemarker:
    # 禁用模板缓存
    cache: false
    # 编码格式
    charset: UTF-8
    # freemarker模板后缀 默认是 .ftl
    suffix: .html
    # 是否为此技术启用MVC视图分辨率。
    enabled: true
    # Content-Type值
    content-type: text/html
    # #模板加载路径 按需配置 ,默认路径是 classpath:/templates/
    template-loader-path: classpath:/templates/
<html lang="en">
<head>
    <meta charset="UTF-8">
    <title>indextitle>
head>
<body>
Hello ${content}
body>
html>
@Controller
public class FreemarkerController {


    @RequestMapping("/index")
    public String index(Model model){

        model.addAttribute("content", "Freemarker");
        return "index";
    }
}
整合 Thymeleaf 模板引擎
官网:https://www.thymeleaf.org/
- pom.xml
<dependency>
    <groupId>org.springframework.bootgroupId>
    <artifactId>spring-boot-starter-thymeleafartifactId>
dependency>
<dependency>
    <groupId>org.springframework.bootgroupId>
    <artifactId>spring-boot-starter-webartifactId>
dependency>

<dependency>
    <groupId>org.springframework.bootgroupId>
    <artifactId>spring-boot-starter-testartifactId>
    <scope>testscope>
dependency>
- yaml配置
server:
  port: 8081

spring:
  application:
    name: thymeleaf

  thymeleaf:
    # 是否启用模板缓存。
    cache: true
    # 是否检查模板位置是否存在。
    check-template: true
    # 是否为Web框架启用Thymeleaf视图分辨率。
    enabled: true
    # 编码格式, 默认UTF-8
    encoding: UTF-8
    # 应用于模板的模板模式。另请参阅Thymeleaf的TemplateMode枚举。
    mode: HTML
    # 后缀 默认 .html
    suffix: .html
    # 模板文件存放位置  , 默认 classpath:/templates/
    prefix: classpath:/templates/
<html lang="en" xmlns="http://www.w3.org/1999/xhtml"
      xmlns:th="http://www.thymeleaf.org">
<head>
    <meta charset="UTF-8">
    <title>Titletitle>
head>
<body>
   <h1 th:text="${content}">h1>
body>
html>
@Controller
public class ThymeleafController {


    @RequestMapping("/test")
    public String test(Model model){

        model.addAttribute("content", "Hello Thymeleaf");
        return "index";
    }
}
整合 Mybatis + MySQL
- pom.xml
<dependency>
    <groupId>org.springframework.bootgroupId>
    <artifactId>spring-boot-starter-webartifactId>
dependency>

<dependency>
    <groupId>org.mybatis.spring.bootgroupId>
    <artifactId>mybatis-spring-boot-starterartifactId>
    <version>1.3.2version>
dependency>

<dependency>
    <groupId>com.github.pagehelpergroupId>
    <artifactId>pagehelper-spring-boot-starterartifactId>
    <version>1.2.9version>
dependency>

<dependency>
    <groupId>com.alibabagroupId>
    <artifactId>druid-spring-boot-starterartifactId>
    <version>1.1.9version>
dependency>
<dependency>
    <groupId>mysqlgroupId>
    <artifactId>mysql-connector-javaartifactId>
    <scope>runtimescope>
dependency>
<dependency>
    <groupId>org.springframework.bootgroupId>
    <artifactId>spring-boot-starter-testartifactId>
    <scope>testscope>
dependency>

<dependency>
    <groupId>org.projectlombokgroupId>
    <artifactId>lombokartifactId>
dependency>
- application.yml
spring:
  application:
    name: mybatis-curd

  datasource:
    username: root
    password: root
    url: jdbc:mysql://localhost:3306/test?zeroDateTimeBehavior=convertToNull&useUnicode=true&characterEncoding=UTF-8&serverTimezone=UTC&autoReconnect=true
    continue-on-error: true
    sql-script-encoding: UTF-8
    driver-class-name: com.mysql.jdbc.Driver
    type: com.alibaba.druid.pool.DruidDataSource
    druid:
      initial-size: 5
      min-idle: 5
      max-active: 20
      max-wait: 60000
      # 间隔多久进行一次检测,检测需要关闭的空闲连接
      time-between-eviction-runs-millis: 60000
      # 一个连接在池中最小生存的时间
      min-evictable-idle-time-millis: 300000
      validation-query: SELECT 1 FROM DUAL
      test-while-idle: true
      test-on-borrow: false
      test-on-return: false
      pool-prepared-statements: true
      max-pool-prepared-statement-per-connection-size: 20
      connect-properties: druid.stat.mergeSql=true;druid.stat.slowSqlMillis=5000
      use-global-data-source-stat: true
      filters: stat,wall,log4j2

mybatis:
  type-aliases-package: com.yanggle.mybaits.*
  configuration:
    map-underscore-to-camel-case: true
    # 打印sql, 方便调试
    log-impl: org.apache.ibatis.logging.stdout.StdOutImpl
    use-generated-keys: true
    default-statement-timeout: 60
    default-fetch-size: 100
import lombok.Data;
import java.util.Date;
@Data
public class User {

    // 主键ID
    private Integer id;
    // 用户名
    private String username;
    // 密码
    private String password;
    // 创建时间
    private Date gmtCreate;
    // 修改时间
    private Date gmtModified;
}
import com.github.pagehelper.PageHelper;
import org.springframework.context.annotation.Bean;
import org.springframework.context.annotation.Configuration;
import java.util.Properties;
@Configuration
public class MyBatisConfig {


    @Bean
    public PageHelper pageHelper(){

        PageHelper pageHelper = new PageHelper();
        Properties p = new Properties();

        // 设置为true时,会将RowBounds第一个参数offset当成pageNum页码使用
        p.setProperty("offsetAsPageNum","true");

        //设置为true时,使用RowBounds分页会进行count查询
        p.setProperty("rowBoundsWithCount","true");
        p.setProperty("reasonable","true");
        pageHelper.setProperties(p);
        return pageHelper;
    }
}
import com.fasterxml.jackson.databind.ObjectMapper;
import com.fxbin.mybatis.bean.User;
import com.fxbin.mybatis.service.UserService;
import org.springframework.web.bind.annotation.RequestMapping;
import org.springframework.web.bind.annotation.RequestParam;
import org.springframework.web.bind.annotation.RestController;

import javax.annotation.Resource;

@RestController
public class UserController {


    @Resource
    private UserService userService;

    @RequestMapping("/listAll")
    public Object listAll(@RequestParam(value = "page",defaultValue = "1")int page,
                          @RequestParam(value = "size",defaultValue = "10")int size){

        return userService.listAll(page, size);
    }

    @RequestMapping("/insert")
    public int insert (User user){

        return userService.insert(user);
    }

    @RequestMapping("/remove")
    public int remove(Integer userId){

        return userService.remove(userId);
    }

    @RequestMapping("/update")
    public int update(User user){

        return userService.update(user);
    }
}
import com.fxbin.mybatis.bean.User;
import java.util.List;

public interface UserService {

    Object listAll(int page, int size);
    int insert(User user);
    int remove(Integer userId);
    int update(User user);
}
import com.fxbin.mybatis.bean.User;
import com.fxbin.mybatis.mapper.UserMapper;
import com.fxbin.mybatis.service.UserService;
import com.github.pagehelper.PageHelper;
import com.github.pagehelper.PageInfo;
import org.springframework.stereotype.Service;

import javax.annotation.Resource;
import java.util.List;

@Service
public class UserServiceImpl implements UserService {


    @Resource
    private UserMapper userMapper;

    @Override
    public Object listAll(int page, int size) {

        PageHelper.startPage(page, size);
        List<User> userList = userMapper.listAll();
        PageInfo<User> pageInfo = new PageInfo<>(userList);
        return pageInfo;
    }

    @Override
    public int insert(User user) {

        return userMapper.insert(user);
    }

    @Override
    public int remove(Integer userId) {

        return userMapper.remove(userId);
    }

    @Override
    public int update(User user) {

        return userMapper.update(user);
    }
}
import com.fxbin.mybatis.bean.User;
import org.apache.ibatis.annotations.*;

import java.util.List;

@Mapper
public interface UserMapper {


    @Select({

            "select * from user"
    })
    List<User> listAll();

    @Insert({

            "insert into user(`username`, `password`) values(#{username}, #{password})"
    })
    int insert(User user);

    @Delete({

            "delete from user where id = #{userId}"
    })
    int remove(Integer userId);

    @Update({

            "update user set username = #{username}, password = #{password} where id = #{id}"
    })
    int update(User user);
}
Prometheus + Grafana 实现可视化的监控
Prometheus 组件
官网: https://prometheus.io/
下载地址: https://prometheus.io/download/
官方文档: https://prometheus.io/docs/prometheus/latest/getting_started/
Prometheus是一套开源的监控&报警&时间序列数据库的组合,基于应用的metrics来进行监控的开源工具 。
更多信息请参考官网介绍: https://prometheus.io/docs/introduction/overview/
下载 & 安装 & 启动
#下载
[root@artisan ~]# wget http://cactifans.hi-www.com/prometheus/prometheus-2.1.0.linux-amd64.tar.gz
#解压
[root@artisan ~]# tar -xvzf  prometheus-2.1.0.linux-amd64.tar.gz
#创建软连接
[root@artisan ~]# ln -s prometheus-2.1.0.linux-amd64  prometheus
#后台运行 &
[root@artisan prometheus]# ./prometheus --config.file=prometheus.yml  &
集成SpringBoot
#SpringBoot应用配置
job_name: 'app-prometheus-grafana'
  scrape_interval: 5s
  metrics_path: '/actuator/prometheus'
  static_configs:
    targets: ['192.168.0.1:8080']
Grafana 组件
官网:https://grafana.com/
下载地址: https://grafana.com/grafana/download
入门:http://docs.grafana.org/guides/getting_started/
Grafana是一个跨平台的开源的度量分析和可视化工具,可以通过将采集的数据查询然后可视化的展示,并及时通知。它主要有以下六大特点:
- 展示方式:快速灵活的客户端图表,面板插件有许多不同方式的可视化指标和日志,官方库中具有丰富的仪表盘插件,比如热图、折线图、图表等多种展示方式。
- 数据源:Graphite,InfluxDB,OpenTSDB,Prometheus,Elasticsearch,CloudWatch和KairosDB等。
- 通知提醒:以可视方式定义最重要指标的警报规则,Grafana将不断计算并发送通知,在数据达到阈值时通过Slack、PagerDuty等获得通知。
- 混合展示:在同一图表中混合使用不同的数据源,可以基于每个查询指定数据源,甚至自定义数据源。
- 注释:使用来自不同数据源的丰富事件注释图表,将鼠标悬停在事件上会显示完整的事件元数据和标记。
- 过滤器:Ad-hoc过滤器允许动态创建新的键/值过滤器,这些过滤器会自动应用于使用该数据源的所有查询。
下载 & 安装 & 启动
# 下载
[root@artisan ~]# wget http://cactifans.hi-www.com/grafana/grafana-5.4.2-1.x86_64.rpm
# yum本地安装
[root@artisan ~]# yum localinstall grafana-5.4.2-1.x86_64.rpm
# 启动
[root@artisan ~]# systemctl start grafana-server
# 设置为开机启动
[root@artisan ~]# systemctl enable grafana-server
# 查看进程
[root@artisan ~]# ps -ef|grep grafana-server |grep -v grep
整合RabbitMQ
概述
RabbitMQ名词
- Broker:简单来说就是消息队列服务器实体,可以理解为一个节点。
- Exchange:消息交换机,它指定消息按什么规则,路由到哪个队列。
- Queue:消息队列载体,每个消息都会被投入到一个或多个队列。
- Binding:绑定,它的作用就是把exchange和queue按照路由规则绑定起来。
- Routing Key:路由关键字,exchange根据这个关键字进行消息投递。
- vhost:虚拟主机,一个broker里可以开设多个vhost,用作不同用户的权限分离。
- Producer:消息生产者,投递消息的程序。
- Consumer:消息消费者,接受消息的程序。
- Channel:消息通道,在客户端的每个连接里,可建立多个channel,每个channel代表一个会话任务。
SpringBoot Test
java.lang.IllegalStateException Unable to find a @SpringBootConfiguration错误解决方案
将包名改为与其被测试代码分支一样的路径