Three.js 笔记 - 使用dat.GUI简化调试流程
dat.GUI 函数库是由谷歌的一个民间组织所开发的,在他的帮助下,可以很容易的创建出一个简单的界面组件,可以用来修改代码中的变量。
本示例浏览地址:https://ithanmang.gitee.io/threejs/home/201806/20180623/04-datgui.html
1 示例代码
<!DOCTYPE html>
<html lang="en">
<head>
    <meta charset="UTF-8">
    <title>加入dat.GUI调试插件</title>
    <style>
        body {
            margin: 0;
            overflow: hidden;
        }
    </style>

    <script src="../libs/jquery-1.9.1.js"></script>
    <script src="../libs/build/three.js"></script>
    <script src="../libs/examples/js/libs/dat.gui.min.js"></script>

</head>
<body>

<div id="WebGL-output"></div>
<script>

    $(function () {

        // 创建场景
        var scene = new THREE.Scene();

        // 创建相机
        var camera = new THREE.PerspectiveCamera(45, window.innerWidth / window.innerHeight, 0.1, 10000);

        // 创建渲染器
        var webGLRenderer = new THREE.WebGLRenderer();

        // 配置相机
        camera.position.set(200, 150, 200);
        camera.lookAt(new THREE.Vector3(0, 0, 0));

        // 配置渲染器
        webGLRenderer.antialias = true;
        webGLRenderer.autoClear = true;
        webGLRenderer.setClearColor(0x050505);
        webGLRenderer.setSize(window.innerWidth, window.innerHeight);

        webGLRenderer.shadowMap.enabled = true;

        // 创建灯光
        var ambientLight = new THREE.AmbientLight({color: 0x404040});
        scene.add(ambientLight);

        // 添加光源
        var spotLight = new THREE.SpotLight(0xcccccc);
        spotLight.position.set(-100, 300, 10);
        spotLight.castShadow = true;
        scene.add(spotLight);


        // 创建平面
        var planeGeometry = new THREE.PlaneGeometry(200, 400);
        var planeMaterial = new THREE.MeshLambertMaterial({color: 0x9EA89E});
        var plane = new THREE.Mesh(planeGeometry, planeMaterial);
        plane.receiveShadow = true;

        // 绕x轴旋转90度
        plane.rotation.x = -0.5 * Math.PI;
        plane.position.y = -10;
        plane.position.x = -10;
        plane.position.z = -80;
        scene.add(plane);

        // 创建立方体
        var cubeGeometry = new THREE.CubeGeometry(50, 50, 50);
        var cubeMaterial = new THREE.MeshLambertMaterial({color: Math.random() * 0xffffff});
        var cube = new THREE.Mesh(cubeGeometry, cubeMaterial);
        cube.castShadow = true;
         scene.add(cube);

        // 创建球体
        var sphereGeometry = new THREE.SphereGeometry(25,20,20);
        var sphereMaterial = new THREE.MeshLambertMaterial({color : Math.random() * 0xffffff});
        var sphere = new THREE.Mesh(sphereGeometry, sphereMaterial);
        sphere.castShadow = true;

        // 保存可以修改的对象和属性
        var controls = new function(){
            // 立方体可调式属性
            this.cubeRotationSpeed = 0.01;
            this.cubePositionX = 10;
            this.cubePositionY = 35;
            this.cubePositionZ = -30;
            this.cubeWireframe = cubeMaterial.wireframe;
            this.cubeColor = cubeMaterial.color.getStyle();

            // 球体可调试属性
            this.spherePositionX = 8;
            this.spherePositionY = 34;
            this.spherePositionZ = -25;
            this.sphereWireframe = sphereMaterial.wireframe;
            this.sphereColor = sphereMaterial.color.getStyle();

            //平面可调试属性
            this.planeColor = planeMaterial.color.getStyle();

            // 场景可调试属性
            this.sceneBackground = webGLRenderer.getClearColor().getHex();
            // 灯光
            this.spotLight = false;
            // 立方体
            this.cube = false;
            // 平面
            this.plane = false;
            // 下拉选择
            this.selectMesh = "cube";
        }
        // 初始化 dat.GUI对象,便于调试
        var gui = new dat.GUI();

        // 立方对象体调试栏目
        var cubeControls = gui.addFolder("CubeControl");
        cubeControls.add(controls,"cubeRotationSpeed",0, 0.5);
        cubeControls.add(controls,"cubePositionX",-70,70);
        cubeControls.add(controls,"cubePositionY",35,85);
        cubeControls.add(controls,"cubePositionZ",-200,100);
        cubeControls.add(controls,"cubeWireframe").onChange(function (e) {
            cubeMaterial.wireframe = e;
            if (e){
                cube.castShadow = false;
            }else {
                cube.castShadow = true;
            }
        });
        cubeControls.addColor(controls,"cubeColor").onChange(function (e) {
            cubeMaterial.color.setStyle(e);
        });

        // 球体对象调试栏目
        var sphereControls = gui.addFolder("SphereControl");
        sphereControls.add(controls,"spherePositionX",0,100);
        sphereControls.add(controls,"spherePositionY",0,100);
        sphereControls.add(controls,"spherePositionZ",-200,100);
        sphereControls.add(controls,"sphereWireframe").onChange(function (e) {
            sphereMaterial.wireframe = e;
        });
        sphereControls.addColor(controls,"sphereColor").onChange(function (e) {
           sphereMaterial.color.setStyle(e);
        });

        // 平面调试对象
        var planeControls = gui.addFolder("PlaneControl");
        planeControls.addColor(controls,"planeColor").onChange(function (e) {
           planeMaterial.color.setStyle(e);
        });

        // 场景调试对象
        var sceneControls = gui.addFolder("SceneControl");
        sceneControls.addColor(controls,"sceneBackground").onChange(function (e) {
            webGLRenderer.setClearColor(e);
        });
        sceneControls.add(controls,"spotLight").onChange(function (e) {
            e ? scene.remove(spotLight) : scene.add(spotLight);
        });
        sceneControls.add(controls,"cube").onChange(function (e) {
            e ? scene.remove(cube) : scene.add(cube);
        });
        sceneControls.add(controls,"plane").onChange(function (e) {
            e ? scene.remove(plane) : scene.add(plane);
        });
        sceneControls.add(controls,"selectMesh", ["cube","sphere"]).onChange(function (e) {
           scene.remove(cube);
           scene.remove(sphere);

           switch (e){
               case "cube":
                   scene.add(cube);
               break;
               case  "sphere":
                   scene.add(sphere);
               break;
           }
           scene.add(e);
           // close方法,用来折叠controls
            // destroy 用来销毁插件
            //gui.remove("CubeControl");//移除调试目录不能使用
        });


        // 把渲染的页面添加到div
        $("#WebGL-output").append(webGLRenderer.domElement);

        function render(){
            // 让立方体 绕坐标轴旋转
            cube.rotation.x += controls.cubeRotationSpeed;
            cube.rotation.y += controls.cubeRotationSpeed;
            cube.rotation.z += controls.cubeRotationSpeed;

            cube.position.x = controls.cubePositionX;
            cube.position.y = controls.cubePositionY;
            cube.position.z = controls.cubePositionZ;

            sphere.position.x = controls.spherePositionX;
            sphere.position.y = controls.spherePositionY;
            sphere.position.z = controls.spherePositionZ;

            // 开始渲染
            webGLRenderer.render(scene, camera);
        }

        //加入动画效果
        function animate() {
            requestAnimationFrame(animate);
            render();
        }
        animate();

    });

</script>

</body>
</html>
2 使用流程
1 引入就是库
2 初始化对象
var gui = new dat.GUI();
3 创建用于保存需要修对象或变量的对象
// 保存可以修改的对象和属性
var controls = new function(){
    // 立方体可调式属性
    this.cubeRotationSpeed = 0.01;
}
4 将这些属性加入gui对象中
gui.add(controls, 'cubeRotationSpeed ',0,0.5);
3 常用方法
1 gui.add() 方法
这是一个常用的方法,可以添加一个节点,没有顶级栏目。
通常使用方式是gui.add( object,'methodName',[arg1, arg2] );
参数 object 是用来包含需要操作属性的对象,例如面示例中的controls对象,参数 methodName 是object中的属性名,arg1 和 arg2 是可以不用添加的,用来表示一个取值范围。
如上面的旋转速度的取值范围是(0, 0,5)。
2 gui.addFolder() 方法
这是一个用来添加分类栏目的方法,参数是一个字符串,返回一个GUI对象。
gui.addFolder(String),String是需要添加的栏目名称。如下面代码,添加一个Scene的栏目。
var sceneControls = gui.addFolder("SceneControl");
 sceneControls.addColor(controls,"sceneBackground").onChange(function (e) {
     webGLRenderer.setClearColor(e);
 });
如图其中的 SceneControl 就是里面的 那个String 参数名。

获取返回值后,就可以在这个栏目下,继续进行add()操作。
3 gui.addColor() 方法
这个方法使用来添加一个颜色选择器,参数和add()方法类似。
// 平面调试对象
var planeControls = gui.addFolder("PlaneControl");
planeControls.addColor(controls,"planeColor").onChange(function (e) {
   planeMaterial.color.setStyle(e);
});
4 .onChange() 方法
这是一个用来触发回调函数的方法,里面的参数是一个 function 函数的值第一次传过来的时候是上面定义属性对象的默认值。
// 保存可以修改的对象和属性
var controls = new function(){
    this.cubeWireframe = cubeMaterial.wireframe;//此时wireframe 的值是 false
}
// 当点击按钮的时候就会把this.cubeWireframe的值传递到onChange方法中的参数 匿名函数中去
cubeControls.add(controls,"cubeWireframe").onChange(function (e) {
    cubeMaterial.wireframe = e;// 此时的e就会变成 true,然后该变立方体的材质属性的值
});
5 .listen() 方法
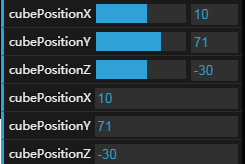
用来监控某个值得变化,例如下面代码来监控立方体的三维坐标的变动。
cubeControls.add(controls,"cubePositionX",-70,70);
cubeControls.add(controls,"cubePositionY",35,85);
cubeControls.add(controls,"cubePositionZ",-200,100);
cubeControls.add(controls,"cubePositionX").listen();
cubeControls.add(controls,"cubePositionY").listen();
cubeControls.add(controls,"cubePositionZ").listen();
6 .close() 方法
这个方法用来 折叠栏目。
7 destroy 方法
用来销毁这个插件,直接从页面上移除。

