Android Glide源码解析
功能介绍
使用文章介绍以及和Picasso的对比分析请参考Introduction to Glide, Image Loader Library for Android, recommended by Google
由于这篇文章使用glide的老版本,因此有些使用方法可能不太一致了。
本文基于github上Glide最新代码4.0.0版本做解析。
最基本的使用方式如下:
Glide.with(this)
                .asDrawable()
                .load("http://i6.topit.me/6/5d/45/1131907198420455d6o.jpg")
                .apply(fitCenterTransform(this))
                .apply(placeholderOf(R.drawable.skyblue_logo_wechatfavorite_checked))
                .into(imageView);
Glide使用了现在非常流行的流氏编码方式,方便了开发者的使用,简明、扼要。
接下来主要对上面这一段流氏操作做拆分。
Glide 主入口
这个类有点像门脸模式的统一代理入口,不过实际作用在4.0.0中很多功能都被放到后面的其他类中,此类关注的点就很少了。虽然整个libray的所有需要的组建都在这个类中,但是实际也只是一个统一初始化的地方。
RequestManager(Glide.with(…))
这个类主要用于管理和启动Glide的所有请求,可以使用activity,fragment或者连接生命周期的事件去智能的停止,启动,和重启请求。也可以检索或者通过实例化一个新的对象,或者使用静态的Glide去利用构建在Activity和Fragment生命周期处理中。它的方法跟你的Fragment和Activity的是同步的。
RequestBuilder
通用类,可以处理设置选项,并启动负载的通用资源类型。
在这个类中,主要是应用请求的很多选项(如下的选项从字面都能看出具体的用处,在ImageView控件中经常也能看到,另外之前版本可不是这么使用的):
public final class RequestOptions extends BaseRequestOptions<RequestOptions> {

  private static RequestOptions skipMemoryCacheTrueOptions;
  private static RequestOptions skipMemoryCacheFalseOptions;
  private static RequestOptions fitCenterOptions;
  private static RequestOptions centerCropOptions;
  private static RequestOptions circleCropOptions;
  private static RequestOptions noTransformOptions;
  private static RequestOptions noAnimationOptions;

  // ...省略...
}
RequestBuilder transition(TransitionOptions transitionOptions){} 这个方法主要是用于加载对象从占位符(placeholder)或者缩略图(thumbnail)到真正对象加载完成的转场动画。
RequestBuilder load(…){}多太方法中,这里可以加载很多类型的数据对象,可以是String,Uri,File,resourceId,byte[]这些。当然这些后面对应的编码方式也是不一样的。
Target into(…){}这个方法是触发Request真正启动的地方,在上边的示例中最后就是调用这个方法发起请求。
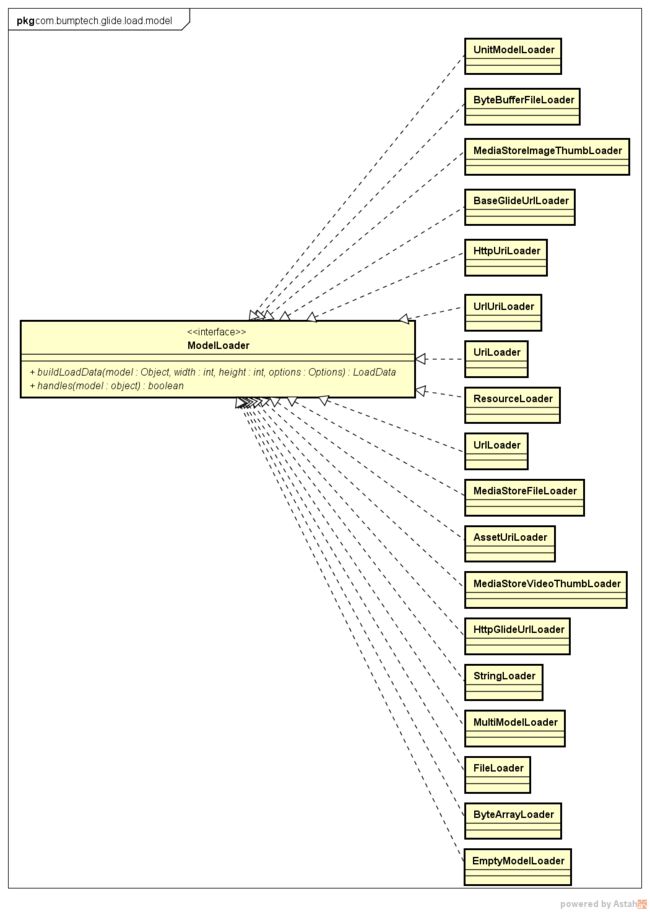
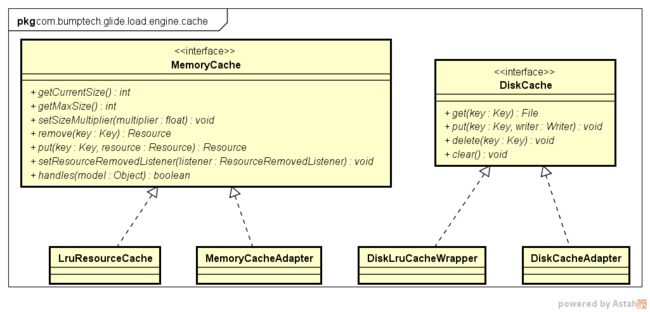
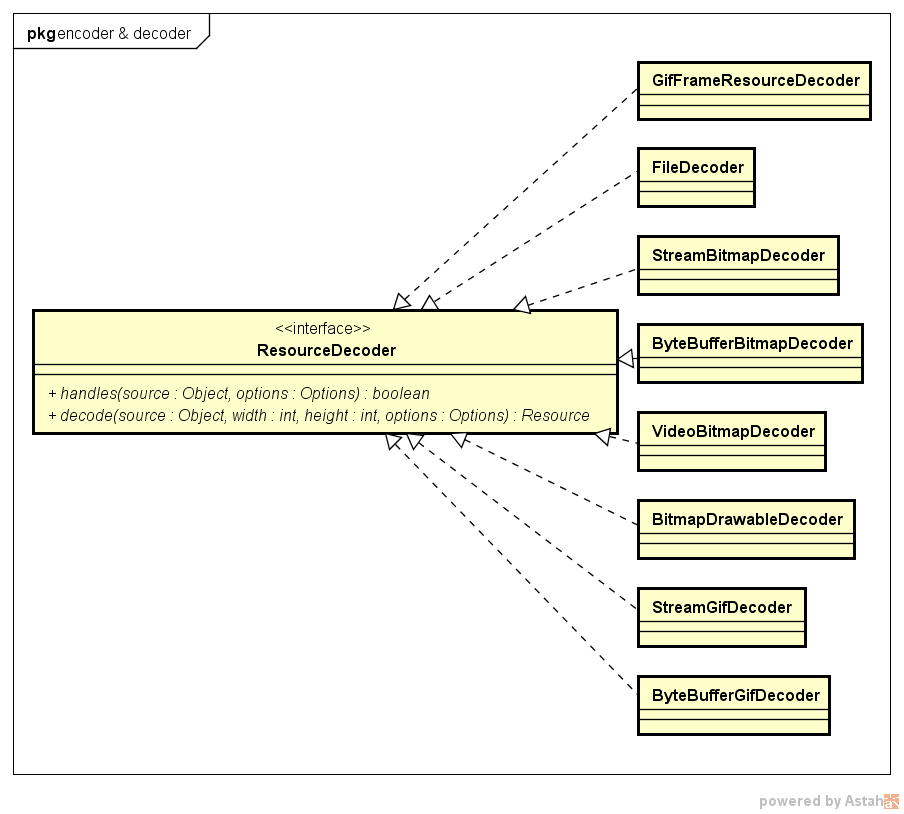
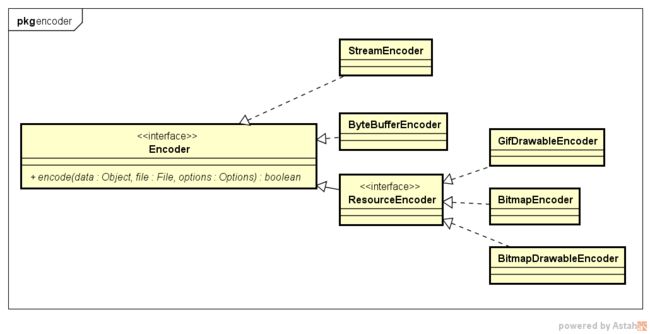
不得不说的registry域,这个域挂载了很多元件,该注册器中囊括了模块加载器(ModelLoader)、编码器(Encoder)、资源解码器(ResourceDecoder)、资源编码器(ResourceEncoder)、数据回转器(DataRewinder)、转码器(Transcoder)。这些都是Glide在对资源编解码中既是基础又是核心功能。
代码结构
这里主要列举一下一些重要的组件以及他们的结构关系:
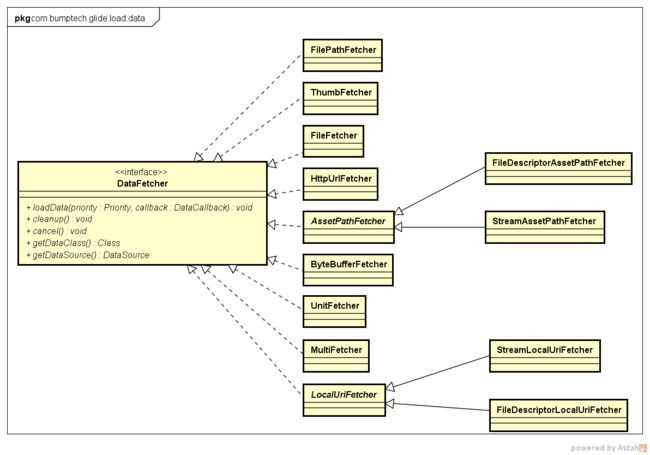
ModelLoader
DataFetcher
Target

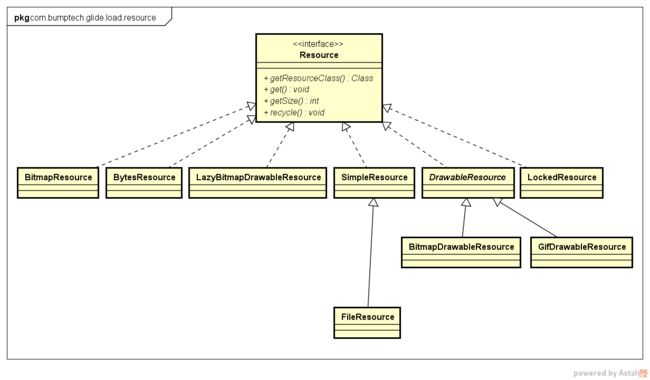
Resource
ResourceTransformation

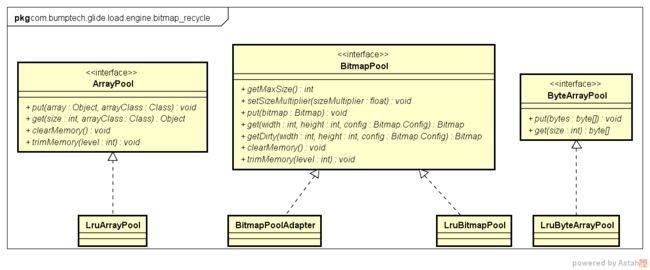
Pool
Cache
Decoder
Encoder
把这些组件代码结构列举出来主要是为了让读者和使用者一目了然的看到自己需要的一些功能。
执行流程
1、根据不同版本的Fragment创建RequestManagerFragment或者SupportRequestManagerFragment,并加入到对应的FragmentManager中。这两种Fragment是不带有任何界面的,主要是用于同步生命周期。具体实现如下:
public static RequestManager with(Context context) {
    RequestManagerRetriever retriever = RequestManagerRetriever.get();
    return retriever.get(context);
  }

// RequestManagerRetriever.get(...)
@TargetApi(Build.VERSION_CODES.HONEYCOMB)
  public RequestManager get(Activity activity) {
    if (Util.isOnBackgroundThread() || Build.VERSION.SDK_INT < Build.VERSION_CODES.HONEYCOMB) {
      return get(activity.getApplicationContext());
    } else {
      assertNotDestroyed(activity);
      android.app.FragmentManager fm = activity.getFragmentManager();
      return fragmentGet(activity, fm, null);
    }
  }
  @TargetApi(Build.VERSION_CODES.HONEYCOMB)
  RequestManager fragmentGet(Context context, android.app.FragmentManager fm,
      android.app.Fragment parentHint) {
    RequestManagerFragment current = getRequestManagerFragment(fm, parentHint);
    RequestManager requestManager = current.getRequestManager();
    if (requestManager == null) {
      requestManager =
          new RequestManager(context, current.getLifecycle(), current.getRequestManagerTreeNode());
      current.setRequestManager(requestManager);
    }
    return requestManager;
  }

  @TargetApi(Build.VERSION_CODES.JELLY_BEAN_MR1)
  RequestManagerFragment getRequestManagerFragment(
      final android.app.FragmentManager fm, android.app.Fragment parentHint) {
    RequestManagerFragment current = (RequestManagerFragment) fm.findFragmentByTag(FRAGMENT_TAG);
    if (current == null) {
      current = pendingRequestManagerFragments.get(fm);
      if (current == null) {
        current = new RequestManagerFragment();
        current.setParentFragmentHint(parentHint);
        pendingRequestManagerFragments.put(fm, current);
        fm.beginTransaction().add(current, FRAGMENT_TAG).commitAllowingStateLoss();
        handler.obtainMessage(ID_REMOVE_FRAGMENT_MANAGER, fm).sendToTarget();
      }
    }
    return current;
  }
2、创建一个RequestBuilder,并添加一个DrawableTransitionOptions类型的转场动画
public RequestBuilder asDrawable() {
    return as(Drawable.class).transition(new DrawableTransitionOptions());
  }
3、加载对象(model域)
public RequestBuilder load(@Nullable Object model) {
    return loadGeneric(model);
  }

private RequestBuilder loadGeneric(@Nullable Object model) {
    this.model = model;
    isModelSet = true;
    return this;
  }
4、装载对象(包含请求的发起点)。
public > Y into(@NonNull Y target) {
    Util.assertMainThread();
    Preconditions.checkNotNull(target);
    if (!isModelSet) {
      throw new IllegalArgumentException("You must call #load() before calling #into()");
    }

    Request previous = target.getRequest();

    if (previous != null) {
      requestManager.clear(target);
    }

    requestOptions.lock();
    Request request = buildRequest(target);
    target.setRequest(request);
    requestManager.track(target, request);

    return target;
  }
一般而言,大部分使用者都是用来装载图片的,因此都会调用如下这个方法:
public Target into(ImageView view) {
    Util.assertMainThread();
    Preconditions.checkNotNull(view);

    if (!requestOptions.isTransformationSet()
        && requestOptions.isTransformationAllowed()
        && view.getScaleType() != null) {
      if (requestOptions.isLocked()) {
        requestOptions = requestOptions.clone();
      }
      switch (view.getScaleType()) {
        case CENTER_CROP:
          requestOptions.optionalCenterCrop(context);
          break;
        case FIT_CENTER:
        case FIT_START:
        case FIT_END:
          requestOptions.optionalFitCenter(context);
          break;
        //$CASES-OMITTED$
        default:
          // Do nothing.
      }
    }

    return into(context.buildImageViewTarget(view, transcodeClass));
  }
这里针对ImageView的填充方式做了筛选并对应设置到requestOptions上。最终的是通过ImageView和转码类型(transcodeClass)创建不通过的Target(例如Bitmap对应的BitmapImageViewTarget和Drawable对应的DrawableImageViewTarget)
4.1 Request的创建buildRequest(target)。
在Request的创建中会针对是否有缩略图来创建不同尺寸的请求,缩略图方法可以使用RequestBuilder.thumbnail(…)方法来添加上。
Glide中的Request都是使用了SingleRequest类,当然缩略图采用的是ThumbnailRequestCoordinator类:
private Request obtainRequest(Target target,
      BaseRequestOptions requestOptions, RequestCoordinator requestCoordinator,
      TransitionOptions transitionOptions, Priority priority,
      int overrideWidth, int overrideHeight) {
    requestOptions.lock();

    return SingleRequest.obtain(
        context,
        model,
        transcodeClass,
        requestOptions,
        overrideWidth,
        overrideHeight,
        priority,
        target,
        requestListener,
        requestCoordinator,
        context.getEngine(),
        transitionOptions.getTransitionFactory());
  }
比较值得推崇的是SingleRequest.obtain写法,个人认为比new关键字更简洁明了吧。
target.setRequest(request)也是一个比较值得注意的地方,如果target是ViewTarget,那么request会被设置到View的tag上。这样其实是有一个好处,每一个View有一个自己的Request,如果有重复请求,那么都会先去拿到上一个已经绑定的Request,并且从RequestManager中清理回收掉。这应该是去重的功能。
4.2 requestManager.track(target, request)
这个方法非常的复杂,主要用于触发请求、编解码、装载和缓存这些功能。下面就一步一步来看吧:
4.2.1 缓存target,并启动Request
void track(Target target, Request request) {
    targetTracker.track(target);
    requestTracker.runRequest(request);
  }
  /**
   * Starts tracking the given request.
   */
  public void runRequest(Request request) {
    requests.add(request); //添加内存缓存
    if (!isPaused) {
      request.begin(); // 开始
    } else {
      pendingRequests.add(request); // 挂起请求
    }
  }
继续看一下SingleRequest中的begin方法:
@Override
  public void begin() {
    stateVerifier.throwIfRecycled();
    startTime = LogTime.getLogTime();
    // 如果model空的,那么是不能执行的。 这里的model就是前面提到的RequestBuilder中的model
    if (model == null) {
      if (Util.isValidDimensions(overrideWidth, overrideHeight)) {
        width = overrideWidth;
        height = overrideHeight;
      }
      // Only log at more verbose log levels if the user has set a fallback drawable, because
      // fallback Drawables indicate the user expects null models occasionally.
      int logLevel = getFallbackDrawable() == null ? Log.WARN : Log.DEBUG;
      onLoadFailed(new GlideException("Received null model"), logLevel);
      return;
    }

    status = Status.WAITING_FOR_SIZE;
    // 如果当前的View尺寸已经加载获取到了,那么就会进入真正的加载流程。
    if (Util.isValidDimensions(overrideWidth, overrideHeight)) {
      onSizeReady(overrideWidth, overrideHeight);
    } else {
    // 反之,当前View还没有画出来,那么是没有尺寸的。
    // 这里会调用到ViewTreeObserver.addOnPreDrawListener。
    // 等待View的尺寸都ok,才会继续
      target.getSize(this);
    }

    // 如果等待和正在执行状态,那么当前会加载占位符Drawable
    if ((status == Status.RUNNING || status == Status.WAITING_FOR_SIZE)
        && canNotifyStatusChanged()) {
      target.onLoadStarted(getPlaceholderDrawable());
    }
    if (Log.isLoggable(TAG, Log.VERBOSE)) {
      logV("finished run method in " + LogTime.getElapsedMillis(startTime));
    }
  }
接下来是target.getSize(this)方法。这里主要说一下尺寸未加载出来的情况(ViewTarget.java):
void getSize(SizeReadyCallback cb) {
      int currentWidth = getViewWidthOrParam();
      int currentHeight = getViewHeightOrParam();
      if (isSizeValid(currentWidth) && isSizeValid(currentHeight)) {
        cb.onSizeReady(currentWidth, currentHeight);
      } else {
        // We want to notify callbacks in the order they were added and we only expect one or two
        // callbacks to
        // be added a time, so a List is a reasonable choice.
        if (!cbs.contains(cb)) {
          cbs.add(cb);
        }
        if (layoutListener == null) {
          final ViewTreeObserver observer = view.getViewTreeObserver();
          layoutListener = new SizeDeterminerLayoutListener(this);
          // 绘画之前加入尺寸的监听。这一点我想大部分Android开发同学应该都知道。
          // 接下来在看看系统触发该Listener时target又干了些什么。
          observer.addOnPreDrawListener(layoutListener);
        }
      }
    }

private static class SizeDeterminerLayoutListener implements ViewTreeObserver
        .OnPreDrawListener {
        // 注意这里是弱引用
      private final WeakReference sizeDeterminerRef;

      public SizeDeterminerLayoutListener(SizeDeterminer sizeDeterminer) {
        sizeDeterminerRef = new WeakReference<>(sizeDeterminer);
      }

      @Override
      public boolean onPreDraw() {
        if (Log.isLoggable(TAG, Log.VERBOSE)) {
          Log.v(TAG, "OnGlobalLayoutListener called listener=" + this);
        }
        SizeDeterminer sizeDeterminer = sizeDeterminerRef.get();
        if (sizeDeterminer != null) {
         // 通知SizeDeterminer去重新检查尺寸,并触发后续操作。
         // SizeDeterminer有点像工具类,又作为尺寸回调的检测接口
          sizeDeterminer.checkCurrentDimens();
        }
        return true;
      }
    }
ok,继续回到SingleRequest.onSizeReady方法,主要就是Engine发起load操作
public void onSizeReady(int width, int height) {
    stateVerifier.throwIfRecycled();
    if (Log.isLoggable(TAG, Log.VERBOSE)) {
      logV("Got onSizeReady in " + LogTime.getElapsedMillis(startTime));
    }
    if (status != Status.WAITING_FOR_SIZE) {
      return;
    }
    status = Status.RUNNING;

    float sizeMultiplier = requestOptions.getSizeMultiplier();
    this.width = Math.round(sizeMultiplier * width);
    this.height = Math.round(sizeMultiplier * height);

    if (Log.isLoggable(TAG, Log.VERBOSE)) {
      logV("finished setup for calling load in " + LogTime.getElapsedMillis(startTime));
    }
    loadStatus = engine.load(
        glideContext,
        model,
        requestOptions.getSignature(),
        this.width,
        this.height,
        requestOptions.getResourceClass(),
        transcodeClass,
        priority,
        requestOptions.getDiskCacheStrategy(),
        requestOptions.getTransformations(),
        requestOptions.isTransformationRequired(),
        requestOptions.getOptions(),
        requestOptions.isMemoryCacheable(),
        this);
    if (Log.isLoggable(TAG, Log.VERBOSE)) {
      logV("finished onSizeReady in " + LogTime.getElapsedMillis(startTime));
    }
  }
特别的,所有的操作都是来之唯一一个Engine,它的创建是来至于Glide的初始化。如果有需要修改缓存配置的同学可以继续看一下diskCacheFactory的创建:
if (engine == null) {
      engine = new Engine(memoryCache, diskCacheFactory, diskCacheExecutor, sourceExecutor);
    }
继续看一下Engine.load的详细过程:
public <R> LoadStatus load(
      GlideContext glideContext,
      Object model,
      Key signature,
      int width,
      int height,
      Class resourceClass,
      Class<R> transcodeClass,
      Priority priority,
      DiskCacheStrategy diskCacheStrategy,
      Map<Class, Transformation> transformations,
      boolean isTransformationRequired,
      Options options,
      boolean isMemoryCacheable,
      ResourceCallback cb) {
    Util.assertMainThread();
    long startTime = LogTime.getLogTime();

    // 创建key,这是给每次加载资源的唯一标示。
    EngineKey key = keyFactory.buildKey(model, signature, width, height, transformations,
        resourceClass, transcodeClass, options);

    // 通过key查找缓存资源 (PS 这里的缓存主要是内存中的缓存,切记,可以查看MemoryCache)
    EngineResource cached = loadFromCache(key, isMemoryCacheable);
    if (cached != null) {
     // 如果有,那么直接利用当前缓存的资源。
      cb.onResourceReady(cached, DataSource.MEMORY_CACHE);
      if (Log.isLoggable(TAG, Log.VERBOSE)) {
        logWithTimeAndKey("Loaded resource from cache", startTime, key);
      }
      return null;
    }

    // 这是一个二级内存的缓存引用,很简单用了一个Map>>装载起来的。
    // 这个缓存主要是谁来放进去呢? 可以参考上面一级内存缓存loadFromCache方法。
    EngineResource active = loadFromActiveResources(key, isMemoryCacheable);
    if (active != null) {
      cb.onResourceReady(active, DataSource.MEMORY_CACHE);
      if (Log.isLoggable(TAG, Log.VERBOSE)) {
        logWithTimeAndKey("Loaded resource from active resources", startTime, key);
      }
      return null;
    }

    // 根据key获取缓存的job。
    EngineJob current = jobs.get(key);
    if (current != null) {
      current.addCallback(cb); // 给当前job添加上回调Callback
      if (Log.isLoggable(TAG, Log.VERBOSE)) {
        logWithTimeAndKey("Added to existing load", startTime, key);
      }
      return new LoadStatus(cb, current);
    }

    // 创建job
    EngineJob<R> engineJob = engineJobFactory.build(key, isMemoryCacheable);
    DecodeJob<R> decodeJob = decodeJobFactory.build(
        glideContext,
        model,
        key,
        signature,
        width,
        height,
        resourceClass,
        transcodeClass,
        priority,
        diskCacheStrategy,
        transformations,
        isTransformationRequired,
        options,
        engineJob);
    jobs.put(key, engineJob);
    engineJob.addCallback(cb);
    // 放入线程池,执行
    engineJob.start(decodeJob);

    if (Log.isLoggable(TAG, Log.VERBOSE)) {
      logWithTimeAndKey("Started new load", startTime, key);
    }
    return new LoadStatus(cb, engineJob);
  }
上面有一些值得注意的地方:
- 内存缓存:在Glide中默认是LruResourceCache。当然你也可以自定义;
- 为何要两级内存缓存(loadFromActiveResources)。个人理解是一级缓存采用LRU算法进行缓存,并不能保证全部能命中,添加二级缓存提高命中率之用;
- EngineJob和DecodeJob各自职责:EngineJob充当了管理和调度者,主要负责加载和各类回调通知;DecodeJob是真正干活的劳动者,这个类实现了Runnable接口。
下面来看看DecodeJob是如何执行的:
private void runWrapped() {
     switch (runReason) {
      case INITIALIZE:
        // 初始化 获取下一个阶段状态
        stage = getNextStage(Stage.INITIALIZE);
        currentGenerator = getNextGenerator();
        // 运行
        runGenerators();
        break;
      case SWITCH_TO_SOURCE_SERVICE:
        runGenerators();
        break;
      case DECODE_DATA:
        decodeFromRetrievedData();
        break;
      default:
        throw new IllegalStateException("Unrecognized run reason: " + runReason);
    }
  }

// 这里的阶段策略首先是从resource中寻找,然后再是data,,再是source
private Stage getNextStage(Stage current) {
    switch (current) {
      case INITIALIZE:
      // 根据定义的缓存策略来回去下一个状态
      // 缓存策略来之于RequestBuilder的requestOptions域
      // 如果你有自定义的策略,可以调用RequestBuilder.apply方法即可
      // 详细的可用缓存策略请参看DiskCacheStrategy.java
        return diskCacheStrategy.decodeCachedResource()
            ? Stage.RESOURCE_CACHE : getNextStage(Stage.RESOURCE_CACHE);
      case RESOURCE_CACHE:
        return diskCacheStrategy.decodeCachedData()
            ? Stage.DATA_CACHE : getNextStage(Stage.DATA_CACHE);
      case DATA_CACHE:
        return Stage.SOURCE;
      case SOURCE:
      case FINISHED:
        return Stage.FINISHED;
      default:
        throw new IllegalArgumentException("Unrecognized stage: " + current);
    }

// 根据Stage找到数据抓取生成器。
private DataFetcherGenerator getNextGenerator() {
    switch (stage) {
      case RESOURCE_CACHE:
       // 产生含有降低采样/转换资源数据缓存文件的DataFetcher。
        return new ResourceCacheGenerator(decodeHelper, this);
      case DATA_CACHE:
       // 产生包含原始未修改的源数据缓存文件的DataFetcher。
        return new DataCacheGenerator(decodeHelper, this);
      case SOURCE:
      // 生成使用注册的ModelLoader和加载时提供的Model获取源数据规定的DataFetcher。
      // 根据不同的磁盘缓存策略,源数据可首先被写入到磁盘,然后从缓存文件中加载,而不是直接返回。
        return new SourceGenerator(decodeHelper, this);
      case FINISHED:
        return null;
      default:
        throw new IllegalStateException("Unrecognized stage: " + stage);
    }
  }
经过很多流程,最后来到了发起实际请求的地方SourceGenerator.startNext()方法:
  public boolean startNext() {
    if (dataToCache != null) {
      Object data = dataToCache;
      dataToCache = null;
      cacheData(data);
    }

    if (sourceCacheGenerator != null && sourceCacheGenerator.startNext()) {
      return true;
    }
    sourceCacheGenerator = null;

    loadData = null;
    boolean started = false;
    // 查找ModelLoader
    while (!started && hasNextModelLoader()) {
      loadData = helper.getLoadData().get(loadDataListIndex++);
      if (loadData != null
          && (helper.getDiskCacheStrategy().isDataCacheable(loadData.fetcher.getDataSource())
          || helper.hasLoadPath(loadData.fetcher.getDataClass()))) {
        started = true;
        根据model的fetcher加载数据
        loadData.fetcher.loadData(helper.getPriority(), this);
      }
    }
    return started;
  }
这里的Model必须是实现了GlideModule接口的,fetcher是实现了DataFetcher接口。有兴趣同学可以继续看一下integration中的okhttp和volley工程。Glide主要采用了这两种网络libray来下载图片。
4.2.2 数据下载完成后的缓存处理SourceGenerator.onDataReady
  public void onDataReady(Object data) {
    DiskCacheStrategy diskCacheStrategy = helper.getDiskCacheStrategy();
    if (data != null && diskCacheStrategy.isDataCacheable(loadData.fetcher.getDataSource())) {
      dataToCache = data;
      // We might be being called back on someone else's thread. Before doing anything, we should
      // reschedule to get back onto Glide's thread.
      cb.reschedule();
    } else {
      cb.onDataFetcherReady(loadData.sourceKey, data, loadData.fetcher,
          loadData.fetcher.getDataSource(), originalKey);
    }
  }
有些小伙伴可能看不太明白为什么就一个dataToCache = data就完了…其实cb.reschedule()很重要,这里的cb就是DecodeJob.reschedule():
public void reschedule() {
    runReason = RunReason.SWITCH_TO_SOURCE_SERVICE;
    callback.reschedule(this);
  }
这里又有一个Callback,继续追踪,这里的Callback接口是定义在DecodeJob内的,而实现是在外部的Engine中(这里会用线程池重新启动当前job,那为什么要这样做呢?源码中的解释是为了不同线程的切换,因为下载都是借用第三方网络库,而实际的编解码是在Glide自定义的线程池中进行的):
  public void reschedule(DecodeJob job) {
    if (isCancelled) {
      MAIN_THREAD_HANDLER.obtainMessage(MSG_CANCELLED, this).sendToTarget();
    } else {
      sourceExecutor.execute(job);
    }
  }
接下来继续DecodeJob.runWrapped()方法。这个时候的runReason是SWITCH_TO_SOURCE_SERVICE,因此直接执行runGenerators(),这里继续执行SourceGenerator.startNext()方法,值得注意的dataToCache域,因为上一次执行的时候是下载,因此再次执行的时候内存缓存已经存在,因此直接缓存数据cacheData(data):
private void cacheData(Object dataToCache) {
long startTime = LogTime.getLogTime();
try {
// 根据不同的数据获取注册的不同Encoder
Encoder继续回到SourceGenerator.startNext()方法,这个时候已经有了sourceCacheGenerator,那么直接执行DataCacheGenerator.startNext()方法:
public boolean startNext() {
    while (modelLoaders == null || !hasNextModelLoader()) {
      sourceIdIndex++;
      if (sourceIdIndex >= cacheKeys.size()) {
        return false;
      }

      Key sourceId = cacheKeys.get(sourceIdIndex);
      Key originalKey = new DataCacheKey(sourceId, helper.getSignature());
      cacheFile = helper.getDiskCache().get(originalKey);
      if (cacheFile != null) {
        this.sourceKey = sourceId;
        modelLoaders = helper.getModelLoaders(cacheFile);
        modelLoaderIndex = 0;
      }
    }

    loadData = null;
    boolean started = false;
    // 这里会通过model寻找注册过的ModelLoader
    while (!started && hasNextModelLoader()) {
      ModelLoader modelLoader = modelLoaders.get(modelLoaderIndex++);
      loadData =
          modelLoader.buildLoadData(cacheFile, helper.getWidth(), helper.getHeight(),
              helper.getOptions());
      // 通过FileLoader继续加载数据
      if (loadData != null && helper.hasLoadPath(loadData.fetcher.getDataClass())) {
        started = true;
        loadData.fetcher.loadData(helper.getPriority(), this);
      }
    }
    return started;
  }
这里的ModelLoader跟之前提到过的Register的模块加载器(ModelLoader)对应是modelLoaderRegistry域,具体执行的操作是Registry.getModelLoaders(…)方法如下:
 public  List?>> getModelLoaders(Model model) {
    List?>> result = modelLoaderRegistry.getModelLoaders(model);
    if (result.isEmpty()) {
      throw new NoModelLoaderAvailableException(model);
    }
    return result;
  }
继续回到DataCacheGenerator.startNext()方法,找到了ModelLoader,这里笔者跟踪到的是FileLoader类(FileFetcher.loadData(…)方法):
 public void loadData(Priority priority, DataCallback super Data> callback) {
        // 读取文件数据
      try {
        data = opener.open(file);
      } catch (FileNotFoundException e) {
        if (Log.isLoggable(TAG, Log.DEBUG)) {
          Log.d(TAG, "Failed to open file", e);
        }
        //失败
        callback.onLoadFailed(e);
        return;
      }
      // 成功
      callback.onDataReady(data);
    }
4.2.3 装载流程
回调通知这里就不打算多讲了,主要线路如下:
-->DataCacheGenerator.onDataReady
-->SourceGenerator.onDataFetcherReady
-->DecodeJob.onDataFetcherReady
-->DecodeJob.decodeFromRetrievedData
-->DecodeJob.notifyEncodeAndRelease
-->DecodeJob.notifyComplete
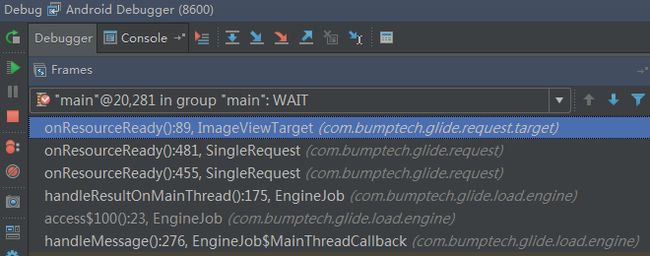
-->EngineJob.onResourceReadyDebug流程图:

需要说明的就是在EngineJob中有一个Handler叫MAIN_THREAD_HANDLER。为了实现在主UI中装载资源的作用,ok继续上边的流程:
      -->EngineJob.handleResultOnMainThread
        -->SingleRequest.onResourceReady
          -->ImageViewTarget.onResourceReady
          -->ImageViewTarget.setResource
            -->ImageView.setImageDrawable/ImageView.setImageBitmap
Debug流程图2:
数据的装载过程中有一个很重要的步骤就是decode,这个操作发生在DecodeJob.decodeFromRetrievedData的时候,继续看代码:
private void decodeFromRetrievedData() {
    if (Log.isLoggable(TAG, Log.VERBOSE)) {
      logWithTimeAndKey("Retrieved data", startFetchTime,
          "data: " + currentData
          + ", cache key: " + currentSourceKey
          + ", fetcher: " + currentFetcher);
    }
    Resource resource = null;
    try {
      resource = decodeFromData(currentFetcher, currentData, currentDataSource);
    } catch (GlideException e) {
      e.setLoggingDetails(currentAttemptingKey, currentDataSource);
      exceptions.add(e);
    }
    if (resource != null) {
      notifyEncodeAndRelease(resource, currentDataSource);
    } else {
      runGenerators();
    }
  }
这中间发生了很多转换主要流程:
-->DecodeJob.decodeFromData
-->DecodeJob.decodeFromFetcher
-->DecodeJob.runLoadPath
  -->LoadPath.load
  -->LoadPath.loadWithExceptionList
  -->LoadPath.decode
  -->LoadPath.decodeResource
  -->LoadPath.decodeResourceWithList
    -->ResourceDecoder.handles
    -->ResourceDecoder.decode
这里讲到了decode,那么encode发生在什么时候呢?直接通过Encoder接口调用发现,在数据缓存的时候才会触发编码。具体调用在DiskLruCacheWrapper和DataCacheWriter中。一些值得参考的写法例如BitmapEncoder对Bitmap的压缩处理。
结束语
最近看开源库Glide关注度一直比较高,因此打算一探究竟。 由于时间比较紧,因此一些应该有的时序图没有画,这里也只能简单用箭头代替。不过个人认为整体执行流程已经表达清楚了。
- 总体来说代码写的挺漂亮的,单从使用者角度来说入手是比较容易的。
- 源码使用了大量的工厂方法来创建对象,就像String.valueof(…)方法一样,这也体现编码的优雅。
- 不过想要对这个库进行改造,可能并非易事,笔者在跟踪代码的过程中发现很多地方有Callback这样的接口,来来回回查找几次很容易就晕头转向了。。。
- 另外一个感觉难受的地方就是构造方法带入参数太多,就拿SingleRequest来说就是12个构造参数。
- 单例的使用感觉还是有些模糊,就比如GlideContext,有些时候通过Glide.get(context).getGlideContext()获取,而有些类中采用构造传入。个人觉得既然让Glide作为单例,那么还这样传入参数是不是有点多余?代码的编写都是可以折中考虑,不过如果整个项目拟定好了一个规则的话,我想最好还是遵循它。另外再吐槽一下单例,很多开发人员喜欢用单例,如果你是有代码洁癖的开发者,那么你肯定很讨厌这样,单例很容易造成代码的散落和结构不清晰。
思考
源码的解析只是把最重要的加载流程走了一遍,有一些比较细节的地方没有关注,如果你有需要,可以自己跟着这个主线debug一下就能查找到。
- 为何要使用额外的无界面的Fragment?
- 如果开发者要使用这个libray作为图片加载库,而且项目本身对App的内存占用和Size都是有要求的话,那么Register是否有过重的嫌疑?