Maven
简介
maven开发的crm项目,jar包不在项目中
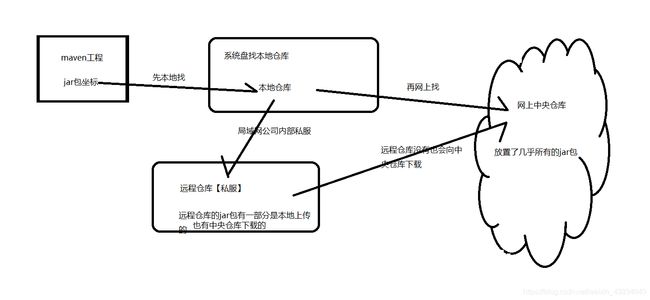
jar包在jar包仓库中,项目中只保留坐标,大大节省空间
Maven安装
idea 2019.1版本之前的安装Maven3.6.1,因为Maven3.6.2使用了JSR-330注解,取代了plexus
step1:官网下载:Maven3.6.1,解压放在非中文路径下即可(F:\jsp\apache-maven-3.6.1-bin\apache-maven-3.6.1)
解压后的安装包包含内容
- bin目录:包含最重要的命令 mvn.cmd
- boot:是maven自身运行所需的类加载器
- conf:包含配置文件,最重要的是setting.xml
- lib:有很多包,一定有自己的tomcat插件构建项目
step2:路径配置:将解压后的路径\b添加到系统变量中, 命令行mvn -v运行显示版本即成功
将本地库由 C:\Users\Willian.m2\repository
换为F:\jsp\apache-maven-3.6.1-bin\my_maven_repository
仓库介绍
maven项目标准目录结构
src/main/java目录 核心代码目录
src/main/resources 配置文件部分
src/test/java目录 测试代码部分
src/test/resources 测试配置文件
src/main/webapp(web项目才有) 页面资源,js,css,图片等
常用命令
mvn clean //删除target目录,拿到别人的代码先删除target目录
mvn compile //生成target目录,删除target目录后自己建立
mvn test //生成target目录,包含compile ,删除target目录后自己建立
mvn package //打包 ,打包打在target里,打包格式是war,这是在pom.xml里决定的war
mvn intall //将项目安装到本地仓库
生命周期
1.清理生命周期
clean 是准备工作
2.五个默认生命周期
| 编译 | 测试 | 打包 | 安装 | 发布 |
|---|---|---|---|---|
| compile | test | package | install | deploy |
| src/main/java | src/main/java 和src/test | src/main/java 和src/test和打包 | 编译测试打包都执行 | 前面四个都执行一次 |
执行后面的命令会执行前面的命令
3.站点生命周期
作用域
| 依赖范围 | 对于编译有效 | 对于测试有效 | 对于运行有效 | 例子 |
|---|---|---|---|---|
| compile | Y | Y | Y | 98%都是 |
| test | - | Y | - | Junit |
| provided | Y | Y | - | servlet-api |
| runtime | - | Y | Y | JDBC驱动,mysql |
| compile | Y | Y | - | 本地的,maven长裤之外的类库 |
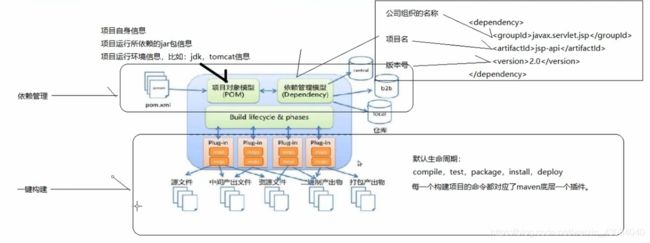
maven概念模型图
pom.xml内部信息
项目自身坐标
<groupId>cn.itcast.maven</groupId>
<artifactId>maven-helloworld</artifactId>
<version>0.0.1-SNAPSHOT</version>
dependencies为java依赖包
组成依赖管理模型
先从local本地仓库下载,没有就去网上central下载,或者表b2b公司私服下载
	<dependencies>
		<dependency>
			<groupId>junit</groupId>
			<artifactId>junit</artifactId>
			<version>4.9</version>
			<scope>test</scope>
		</dependency>
	</dependencies>
jar包基本信息:
groupId:公司名
artifactId:项目名
version:版本号
运行环境信息
<build>
		<!-- 配置了很多插件 -->
		<plugins>

			<plugin>
				<!-- jdk插件 -->
				<groupId>org.apache.maven.plugins</groupId>
				<artifactId>maven-compiler-plugin</artifactId>
				<configuration>
					<source>1.7</source>
					<target>1.7</target>
					<encoding>UTF-8</encoding>
				</configuration>
			</plugin>
			<plugin>
				<!-- tomcat插件 -->
                <groupId>org.apache.tomcat.maven</groupId>
                <artifactId>tomcat7-maven-plugin</artifactId>
                <version>2.1</version>
                <configuration>
                    <port>9090</port>
                    <path>/mgr</path>
                    <uriEncoding>UTF-8</uriEncoding>
                    <server>tomcat7</server>
                </configuration>
            </plugin>
		</plugins>
	</build>
idea配置
config=>setting=>搜索maven=>设置maven home directory、user setting file 、local repositor、runner
idea创建maven的java工程
使用骨架模板
-
create new project =>左侧maven=>create from archetype=>找到quickstart 选项(idea 为maven提供好的创建java工程的骨架)=>下一步=>填写公司名(com.hznu),项目名(随意),
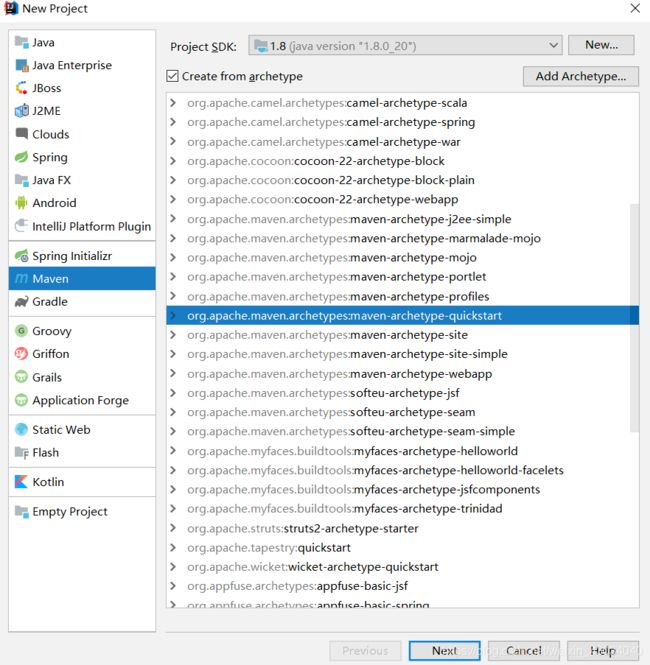
(可选)第一次需要下载插件,很慢。百度到可以从阿里云下载提高速度http://www.voidcn.com/article/p-mdqwyejo-byx.html -
补齐配置文件
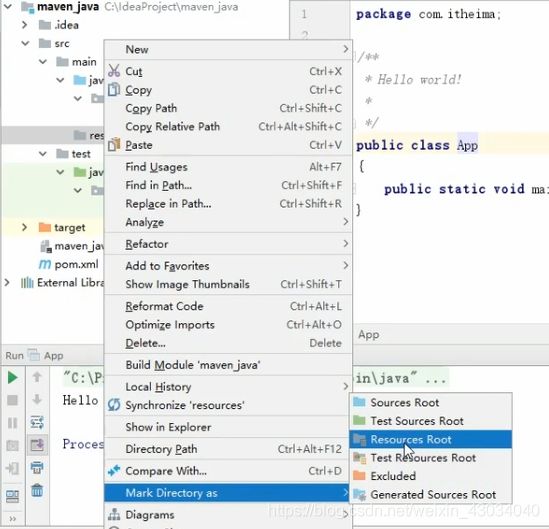
右击main文件夹=>new directory=>填写resources创建一个文件夹
右击resources=>mark directory as =>resourdes root
同样的方式,创建 test
不使用骨架模板(推荐)
1.create new project =>左侧maven=>~~ 删除开始create from archetype=>quickstart (idea 为maven提供好的创建java工程的骨架)=> 删除结尾 ~~下一步=>填写公司名(com.hznu),项目名(随意),
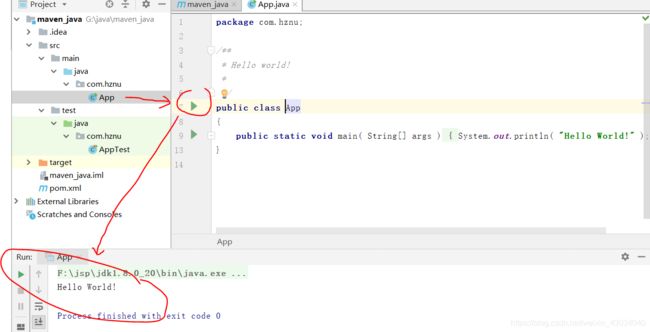
2.创建后的目录结构,有自动加上的resource,但是没有可运行的java文件,需要自己创建

增加自己创建

idea创建maven的web工程
创建
- create new project =>左侧maven=>create from archetype=>找到webapp选项 (idea 为maven提供好的创建java工程的骨架)=>下一步=>填写公司名(com.hznu),项目名(随意),
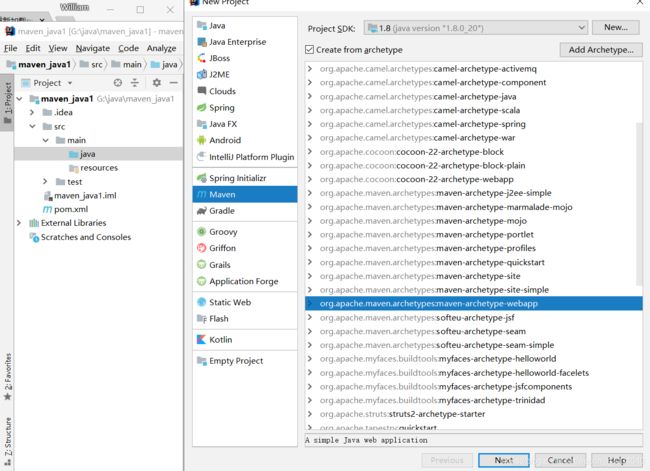
- 创建成功:

补齐
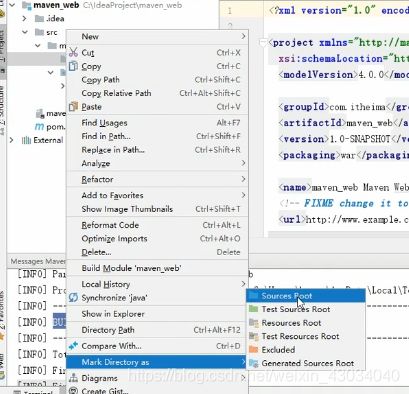
- 手动补齐 src/main/java目录
右击main=>new =>directory=>命名:java
右击java目录=>mark directory as=>sources root
4.配置java目录(其实没必要,就是说这么操作没问题,不规范)
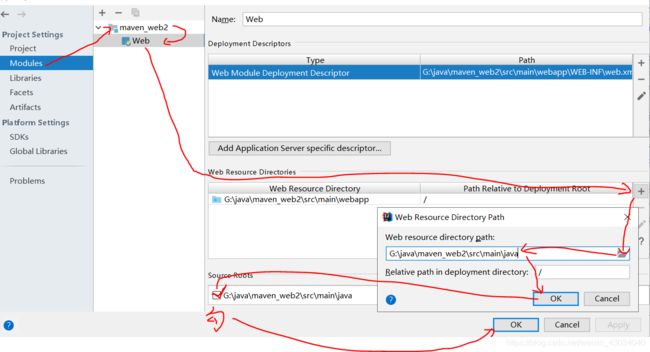
因为idea默认是把jsp文件放在webapp下面,有着严格的控制,所以,要想把文件存放在java里,需要一定的配置。
file=>project structure=>modules=>选择当前项目=>web=>看到web resource directories,点击右侧的+号=>添加src\main\java路径,ok
创建servlet
右击java文件夹,创建包,包名:comg.hznu.servlet=>右击包名,创建servlet,命名Myservlet

5.补充路径
在webapp\WEB-INF\web.xml中
添加jar包
这时,项目会报错,因为:maven不包含jar 包,需要手动导入坐标,jar包放在仓库里,maven导入坐标即可
打开pom.xml文件,添加jar包的坐标
本地仓库有jar包:
在artifactId里输入前几个字母便会有自动提示,选xxx-api后一直回车

本地仓库无jar包:
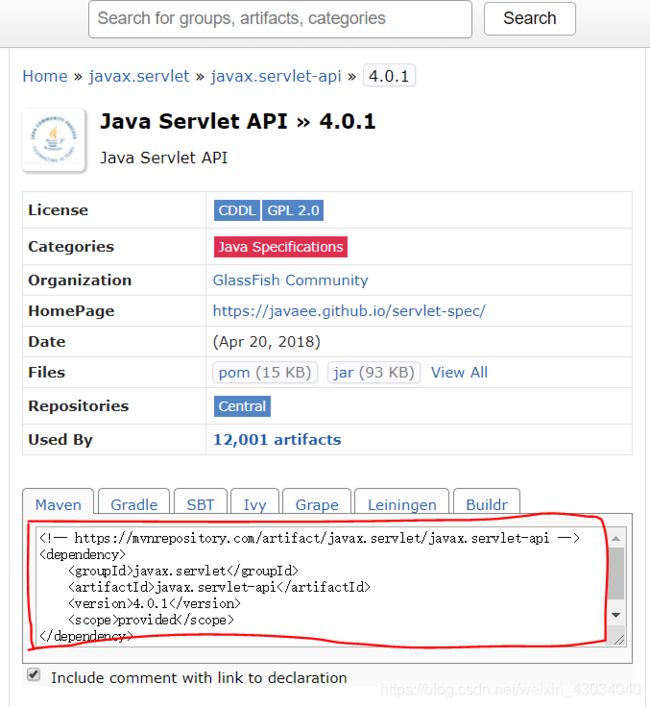
自动提示就会失败,去网上的中央仓库https://mvnrepository.com/

任意选择版本后
复制粘贴即可,idea会自动将包下载到本地
运行
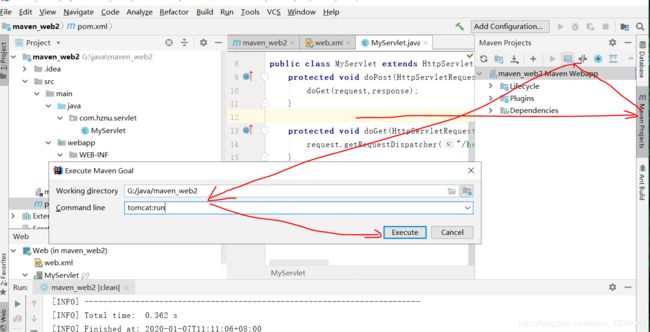
出现:[INFO] Running war on http://localhost:8080/maven_web2代表成功运行
一定会报错哦
修改作用域
只在写代码起作用,只在编译时起作用,运行不起作用,添加作用域scope
 <scope>test</scope>
  <dependencies>
    <dependency>
      <groupId>junit</groupId>
      <artifactId>junit</artifactId>
      <version>4.11</version>
      <scope>test</scope>
    </dependency>
    <!--我:放置的都是项目运行所需的jar包-->
    <dependency>
      <groupId>javax.servlet</groupId>
      <artifactId>servlet-api</artifactId>
      <version>2.5</version>
      <scope>provided</scope>
    </dependency>

    <dependency>
      <groupId>javax.servlet</groupId>
      <artifactId>javax.servlet-api</artifactId>
      <version>4.0.1</version>
      <scope>provided</scope>
    </dependency>

  </dependencies>
maven运行环境更改
tomcat插件
tomcat默认是6,现在想要更改为7,且运行端口为8888
以下代码可以放在模板中

		<plugin>
          <groupId>org.apache.tomcat.maven</groupId>
          <artifactId>tomcat7-maven-plugin</artifactId>
          <version>2.2</version>
          <configuration>
            <port>8888</port>
          </configuration>
        </plugin>
连个端口不冲突,环境可以同时运行
运行tomcat6的命令:tomcat:run
运行tomcat7的命令:tomcat7:run

jdk插件
		<plugin>
          <groupId>org.apache.maven.plugins</groupId>
          <artifactId>maven-compiler-plugin</artifactId>
          <configuration>
          <target>1.8</target><!--编译-->
          <source>1.8</source><!--编译后java文件运行-->
          <encoding>UTF-8</encoding>
          </configuration>
        </plugin>
