云服务器中搭建nginx和fastdfs
关于文件服务器,大家是又爱又恨,而搭建一个文件服务器是一件非常痛苦的事情,尤其是各插件的版本问题是一头雾水,配置文件的修改等都是一个很严重的问题,本人在结合多篇文章,差点把云服务器搞崩的边缘下,终于搭建成功了nginx和fastdfs的文件服务器,在这里主要详细给大家介绍搭建流程,原理大家自己度娘吧,建议大家在整个操作过程中使用超级用户。例如:

1:搭建Fastdfs服务
1.1 安装libfastcommon
/*libfastcommon是FastDFS的一个公共库,在安装FastDFS之前要先安装这个库*/
①:wget https://github.com/happyfish100/libfastcommon/archive/master.zip
②:unzip master.zip
进入master文件夹中
③:./make.sh
④:./make.sh install
1.2 安装FastDFS
/*与安装libfastcommon过程类似*/
①:wget https://github.com/happyfish100/fastdfs/archive/V5.11.zip
②:unzip V5.11.zip
③:./make.sh
④:./make.sh install
1.3 新建目录作为FastDFS文件存储目录
①:cd /home/zhangjl
②:mkdir fs_work
1.4 配置跟踪服务器与存储服务器
	其实到1.2结束后FastDFS就已经安装好了,配置文件放置在/etc/fdfs目录下,可执行文件放置在/usr/bin下。配置文件默认是以.sample结尾的,我们需要将其去掉(用到哪个配置文件去掉哪个sample)
	修改的第一个文件为:
 		cd /etc/fdfs
  		mv tracker.conf.sample tracker.conf
  		vi tracker.conf
	修改内容:
  		base_path=/home/zhangjl/fs_work
	修改的第二个文件为:
	  	cd /etc/fdfs
	  	mv storage.conf.sample storage.conf
	    vi storage.conf
    修改内容
		base_path=/home/zhangjl/fs_work
		store_path0=/home/zhangjl/fs_work
	#注意,这里如果是云服务的选择云服务器内网地址,如果是linux操作系统的选择本地地址
		tracker_server=我的云服务器地址:22122
	修改的第三个文件为:
	  	mv client.conf.sample client.conf
		vi client.conf
	修改内容
		base_path=/home/zhangjl/fs_work
 		tracker_server=我的云服务器地址:22122
 1.5 启动tracker与storage
	cd /usr/bin
	./fdfs_trackerd /etc/fdfs/tracker.conf restart
	./fdfs_storaged /etc/fdfs/storage.conf restart
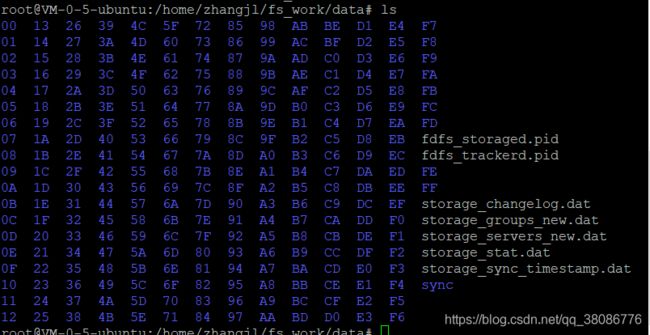
启动成功后,如果查看/home/zhangjl/fs_work可以看到data,logs目录,在data目录中已经具有了文件存储目录结构
 1.7 测试上传
截止目前,fastdfs已经搭建好了,实际上很简单,无非就是linux系统下的软件安装与配置。
cd /usr/bin
./fdfs_upload_file /etc/fdfs/client.conf /home/zhangjl/images/1.jpg
成果会返回这样的结果:

2:搭建nginx服务
2.1 gcc:源码编译依赖环境
	apt-get install build-essential
	apt-get install libtool

	// gcc --version 查看gcc版本
2.2 PCRE:是一个Perl库,包括 perl 兼容的正则表达式库。nginx的http模块使用pcre来解析正则表达式
	wget ftp://ftp.csx.cam.ac.uk/pub/software/programming/pcre/pcre-8.38.tar.gz
	tar -zxvf pcre-8.38.tar.gz
	cd pcre-8.38
	./configure
	make
	make install
2.3 zlib:zlib库提供了很多种压缩和解压缩的方式,nginx使用zlib对http包的内容进行gzip
	wget http://zlib.net/zlib-1.2.11.tar.gz
	tar -zxvf zlib-1.2.11.tar.gz
	cd zlib-1.2.11
	./configure
	make
	make install
2.4 penssl:OpenSSL 是一个强大的安全套接字层密码库,囊括主要的密码算法、常用的密钥和证书封装管理功能及SSL协议,并提供丰富的应用程序供测试或其它目的使用.
nginx不仅支持http协议,还支持https(即在ssl协议上传输http)
	wget https://www.openssl.org/source/openssl-1.0.2n.tar.gz
	tar -zxvf openssl-1.0.2n.tar.gz
2.5 下载 和解压nginx 压缩包
	wget https://nginx.org/download/nginx-1.8.1.tar.gz  //下载
	tar -zxvf nginx-1.8.1.tar.gz	//解压
	解压后 我们通过 cd 命令进入到nginx-1.8.1文件夹下面,安装nginx到 /usr/local/nginx目录下
	cd nginx-1.8.1

	// 配置nginx
	./configure --sbin-path=/usr/local/nginx/nginx \
	--conf-path=/usr/local/nginx/nginx.conf \
	--pid-path=/usr/local/nginx/nginx.pid \
	--with-http_ssl_module \
	--with-pcre=/usr/local/pcre-8.38 \
	--with-zlib=/usr/local/zlib-1.2.11 \
	--with-openssl=/usr/local/openssl-1.0.2n
	// 编译
	make
	// 安装
	make install
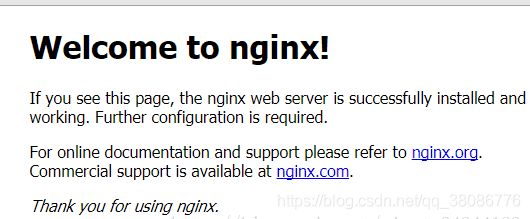
2.6 启动nginx
	cd /usr/local/nginx
	./nginx -c ./nginx.conf
然后通过http://服务器ip:80/ 访问,成功的话就是下面的结果
3: fastdfs-nginx-module安装和配置
在这里需要和大家说明一下,如果你看过别的博客的话,应该会有fastdfs-nginx-module的github地址,你直接克隆到了云服务器,不推荐这样做,因为我一开始也是这样,反反复复折腾了一天,还是报错,最终找到了一个稳定版本的fastdfs-nginx-module。稳定版本(提取码:5urv)
3.1 下载好fastdfs-nginx-module,如过你用的云服务器的话,利用winscp或者filezilla上传到你的家目录,例如:

3.2 将fastdfs-5.11/conf中的http.conf与mime.types拷贝到/etc/fdfs目录中以备fastdfs-nginx-module的配置文件调用。
	 cd /home/zhangjl/fastdfs-5.11/conf
	 cp http.conf /etc/fdfs/
	 cp mime.types /etc/fdfs/
3.3 将fastdfs-nginx-module/src中的mod_fastdfs.conf 也拷贝到/etc/fdfs目录中
	 cd /home/zhangjl/fastdfs-nginx-module/src
	 cp mod_fastdfs.conf /etc/fdfs/
	 修改/etc/fdfs/mod_fastdfs.conf
	 base_path=/home/zhangjl/fs_work
	 tracker_server=服务器ip:22122
	 url_have_group_name = true
	 store_path0=/home/zhangjl/fs_work
3.4 去nginx源码的解压目录,cd /home/zhangjl/nginx-1.8.1 运行下面的命令
①:./configure --sbin-path=/usr/local/nginx/nginx --conf-path=/usr/local/nginx/nginx.conf --pid-path=/usr/local/nginx/nginx.pid --with-http_ssl_module --with-pcre=/usr/local/pcre-8.38 --with-zlib=/usr/local/zlib-1.2.11 --with-openssl=/usr/local/openssl-1.0.2n --add-module=/home/zhangjl/fastdfs-nginx-module/src/
第一步成功后:在结果中可以看到
adding module in /home/zhangjl/fastdfs-nginx-module/src
	 + ngx_http_fastdfs_module was configured
②:make

③:make install
在目录【/usr/local/nginx】下,如果生产了nginx,并把原来的nginx重命名为nginx.old了,则说明安装成功了。
3.5 cd /usr/local/nginx/,vi nginx.conf 配置nginx,也可以直接在(nginx源码的解压目录,cd /home/zhangjl/nginx-1.8.1/conf)中配置。
 这个是fastdfs的配置
location ~/group([0-9])/M00 {ngx_fastdfs_module;}
3.4和3.5步骤可以翻转,
3.5 重启nginx,查看进程
	 ./nginx -c ./nginx.conf 启动nginx
	ps aux | grep nginxps aux | grep nginx
如果查询出来的进程是这样的,恭喜你成功了!!!
 3.6 访问(http://ip:port/group1/M00/00/00/rBAABV3wpu2AM1jFAA7EJqPH6XY018.jpg)