前言:
一到公司报道那时,便着手独立的去完成了一个项目,其中的辛酸泪也是不足为外人道也。这次算是一个新型的app,仍然是独立开发,但心境和想法却是完全的不同。下面说一次以前做开发时常常忽略的知识,也算是一种复习了吧。下面言归正传:
1、自带键盘的next用法
这算是比较常用的了吧,只要我们想到登录和注册界面,就应该自然而然的想到 - 键盘的next用法(当然不排除相当多的软件并没有实现这个功能)。
想法也就是:用户在输入用户名后,点击next跳转到下一个输入框。其实也不用想的如此复杂,在登录界面,我们完全可以用一个 if 语句做判断,去实现键盘的响应和注销响应。
代码如下:
 - (BOOL)textFieldShouldReturn:(UITextField *)textField    {
     UITextField *passTextFiled = (UITextField *)[self.view viewWithTag:201];
   if (textField.tag == 200) {
      [passTextFiled becomeFirstResponder];
     }else{
      [passTextFiled resignFirstResponder];
    }
   return YES;

   }
这样就简单的在变成响应和注销响应之间实现了输入框的切换。
但还是存在一个问题,如果我实现注册界面的跳转输入框,并且在输入框很多的情况下,显然如果我仍是这样判断,会显得啰嗦和冗余。
我曾想过使用计数的方式,记录每一次的点击next后的tag,但实践中失败了,因为当我不通过next而是直接用手去触摸选择输入框时,则无法计数。
这里先留个空白,等把手里的项目完成时再研究这个问题
2、UITextField的纠错和首字母大小写问题
这个问题只是简单的属性问题,在开发时如果忘记,建议多点进去看看,(如:command + UITextField)
 //输入框中是否有个叉号,在什么时候显示,用于一次性删除输入框中的内容    self.clearButtonMode = UITextFieldViewModeWhileEditing;

//是否纠错,本人感觉纠错是一个很反感的东西,但UITextField默认是 YES,这里我改成了NO      self.autocorrectionType = UITextAutocorrectionTypeNo;

 //再次编辑就清空      self.clearsOnBeginEditing = YES;

 //设置自动缩小显示的最小字体大小      self.minimumFontSize = 15;

//设置键盘的样式,本人感觉这个设置对用户体验有影响。比如说我想打电话,Type为UIKeyboardTypeNumberPad,而不是其他
self.keyboardType = UIKeyboardTypeNamePhonePad;
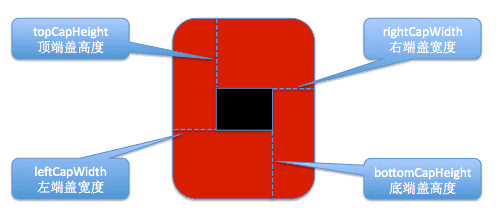
3、iOS中图片的几种拉伸方法的使用
以下是apple给出的3种方法:
   UIImage *image = [UIImage imageNamed:@"picture"];

 //iOS5之前

 // 左端盖宽度

NSInteger leftCapWidth = image.size.width * 0.5f;

 NSInteger topCapHeight = image.size.height * 0.8f;

image = [image stretchableImageWithLeftCapWidth:leftCapWidth topCapHeight:topCapHeight];

//iOS5之后

 UIEdgeInsets insets = UIEdgeInsetsMake(image.size.height * 0.8f,image.size.width * 0.5f, 40, 40);

 image = [image resizableImageWithCapInsets:insets];

 //iOS6之后        UIEdgeInsets insets = UIEdgeInsetsMake(image.size.height * 0.8f,image.size.width * 0.5f, 40, 40);

 image = [image resizableImageWithCapInsets:insets resizingMode:UIImageResizingModeStretch];
下面是使用的解释:
/**

 *  - (UIImage *)stretchableImageWithLeftCapWidth:(NSInteger)leftCapWidth topCapHeight:(NSInteger)topCapHeight;

 *

  *  leftCapWidth代表左端盖宽度,topCapHeight代表顶端盖高度。系统会自动计算出右端盖宽度(rightCapWidth)和底端盖高度(bottomCapHeight)

 * 算法如下:

 * width为图片宽度  rightCapWidth = width - leftCapWidth - 1;

 * height为图片高度 bottomCapHeight = height - topCapHeight - 1

 *

 *经过计算,你会发现中间的可拉伸区域只有1x1

 *

* stretchWidth为中间可拉伸区域的宽度        stretchWidth = width - leftCapWidth - rightCapWidth = 1;

 * stretchHeight为中间可拉伸区域的高度        stretchHeight = height - topCapHeight - bottomCapHeight = 1;

 *

 *因此,使用这个方法只会拉伸图片中间1x1的区域,并不会影响到边缘和角落。

 */

/**

 * - (UIImage *)resizableImageWithCapInsets:(UIEdgeInsets)capInsets

*  这个方法只接收一个UIEdgeInsets类型的参数,可以通过设置UIEdgeInsets的left、right、top、bottom来分别指定左端盖宽度、右端盖宽度、顶端盖高度、底端盖高度

 * */

 /**

 *  - (UIImage *)resizableImageWithCapInsets:(UIEdgeInsets)capInsets resizingMode:(UIImageResizingMode)resizingMode

对比iOS5.0中的方法,只多了一个UIImageResizingMode参数,用来指定拉伸的模式:       UIImageResizingModeStretch:拉伸模式,通过拉伸UIEdgeInsets指定的矩形区域来填充图片    UIImageResizingModeTile:平铺模式,通过重复显示UIEdgeInsets指定的矩形区域来填充图片

 **/
图片拉伸的以上内容参考文章 《iOS图片拉伸技巧》讲的很好,建议大家多看看。
4、iOS中唤起自带浏览器(safari)的方法
也是一个简单的一句代码 ,这种也就是知道了就知道了,不知道就是抓耳挠腮吧
NSURL *url = [NSURL URLWithString:urlStr];
[[UIApplication sharedApplication] openURL:url];
5、iOS中唤起电话界面
app内部唤起电话界面的实现,是找了很多资料才有的一个结论(安全,并且拨打完之后可以返回app)
实现的方法是使用UIWebView 加载电话,目前这种方法是合法的,App Store也允许通过的。
 NSURL *phoneURL = [NSURL URLWithString:[NSString stringWithFormat:@"tel:%@",newPhoneString]];

 if (_phoneCallWebView) {

               [_phoneCallWebView loadRequest:[NSURLRequest requestWithURL:phoneURL]];

 }
但如果使用下面的这种方法,则可能不允许通过审核 [
[UIApplication sharedApplication] openURL:phoneURL];
6、iOS 调用地图的方法
app内部调用第三方app,这里有一个详细的文章《 IOS实现应用内打开第三方地图app进行导航》
- app内部调用地图,需要先检测用户手机上是否已经安装地图app。
我们常用的地图app有:高德、百度;国外有:谷歌(Google Map )。当然还有苹果自带的地图,随着iOS10的发布,苹果地图这块也有很大的完善和进步。
我使用Xcode模拟器实现时,会提示:
 1、-canOpenURL: failed for URL: "iosamap://" - error: "(null)" 。原因是:模拟器上没有高德地图。

2、-canOpenURL: failed for URL: "comgooglemaps://" - error: "This app is not allowed to query for scheme comgooglemaps"。 原因是:LSApplicationQueriesSchemes 我自己马虎设成了字典类型。
首先说好的是iOS9以后,我们在app内部要跳转到其他软件时,需要在 Info.plist 中添加白名单。
方法为:在Info.plist中添加 key :LSApplicationQueriesSchemes 类型为:Array。
将高德、百度、谷歌的值填进去分别是:**iosamap**|**baidumap**|**comgooglemaps**
图片:
至于下面代码中的URLScheme 和appName
是在Info.plist 的URL types中添加 URL Scheme( URL Schemes 是一个数组,允许应用定义多个 URL schemes。 ) 和 URL identifier(建议采用反转域名的方法保证该名字的唯一性,比如 com.yourApp.www)
图片如下:
下面是具体的代码:
 __block NSString *urlScheme = urlScheme;

 __block NSString *appName = appName;

__block CLLocationCoordinate2D coordinate = self.coordinate;

UIAlertController *alert = [UIAlertController alertControllerWithTitle:@"选择地图" message:nil preferredStyle:UIAlertControllerStyleActionSheet];

//apple自带的地图不需要判断

UIAlertAction *action = [UIAlertAction actionWithTitle:@"苹果地图" style:UIAlertActionStyleDefault handler:^(UIAlertAction *action) {

           MKMapItem *currentLocation = [MKMapItem mapItemForCurrentLocation];

           MKMapItem *toLocation = [[MKMapItem alloc] initWithPlacemark:[[MKPlacemark alloc] initWithCoordinate:coordinate addressDictionary:nil]];

 [MKMapItem openMapsWithItems:@[currentLocation, toLocation]                          launchOptions:@{

MKLaunchOptionsDirectionsModeKey: MKLaunchOptionsDirectionsModeDriving,MKLaunchOptionsShowsTrafficKey: [NSNumber numberWithBool:YES]}];

}];

 [alert addAction:action];

 //判断百度地图

 if ( [[UIApplication sharedApplication] canOpenURL:[NSURL URLWithString:@"baidumap://"]])

{        UIAlertAction *action = [UIAlertAction actionWithTitle:@"百度地图" style:UIAlertActionStyleDefault handler:^(UIAlertAction *action) {

 NSString *urlString = [[NSString stringWithFormat:@"baidumap://map/direction?origin={{我的位置}}&destination=latlng:%f,%f|name=目的地&mode=driving&coord_type=gcj02",coordinate.latitude, coordinate.longitude] stringByAddingPercentEscapesUsingEncoding:NSUTF8StringEncoding];

  [[UIApplication sharedApplication] openURL:[NSURL URLWithString:urlString]];

 }];

[alert addAction:action];

}

 //判断高德地图

 if ( [[UIApplication sharedApplication] canOpenURL:[NSURL URLWithString:@"iosamap://"]])

 {

UIAlertAction *action = [UIAlertAction actionWithTitle:@"高德地图" style:UIAlertActionStyleDefault handler:^(UIAlertAction *action) {

NSString *urlString = [[NSString stringWithFormat:@"iosamap://navi?sourceApplication=%@&backScheme=%@&lat=%f&lon=%f&dev=0&style=2",appName,urlScheme,coordinate.latitude, coordinate.longitude] stringByAddingPercentEscapesUsingEncoding:NSUTF8StringEncoding];

        [[UIApplication sharedApplication] openURL:[NSURL URLWithString:urlString]];                    }];

 [alert addAction:action];

}

 //判断谷歌地图

 if ( [[UIApplication sharedApplication] canOpenURL:[NSURL URLWithString:@"comgooglemaps://"]])    {

 UIAlertAction *action = [UIAlertAction actionWithTitle:@"谷歌地图" style:UIAlertActionStyleDefault handler:^(UIAlertAction *action) {

 NSString *urlString = [[NSString stringWithFormat:@"comgooglemaps://?x-source=%@&x-success=%@&saddr=&daddr=%f,%f&directionsmode=driving",appName,urlScheme,coordinate.latitude, coordinate.longitude] stringByAddingPercentEscapesUsingEncoding:NSUTF8StringEncoding];                      [[UIApplication sharedApplication] openURL:[NSURL URLWithString:urlString]];

}];

[alert addAction:action];

}

UIAlertAction *action = [UIAlertAction actionWithTitle:@"取消" style:UIAlertActionStyleCancel handler:nil];    [alert addAction:action];

[self presentViewController:alert animated:YES completion:^{

}];

}


