Binder c++试验、分析与理解
Binder c++试验、分析与理解
本文的文章结构和内容依赖于韦东山老师讲解的Binder系统(免费课程),欢迎前往韦东山老师主站http://www.100ask.org了解详情。
文章目录
- Binder c++试验、分析与理解
-
- 1. Binder系统_c++实现
- 1.1 程序结构
-
- 1.2 程序结构
- 1.3 具体代码
- 1.4 测试
- 2. Binder系统_c++实现_内部机制
-
- 2.1 获取BpServiceManager的对象
- 2.2 获得BpHelloService对象
- 2.3 代理类如何发送数据
1. Binder系统_c++实现
1.1 程序结构
1.2 程序结构
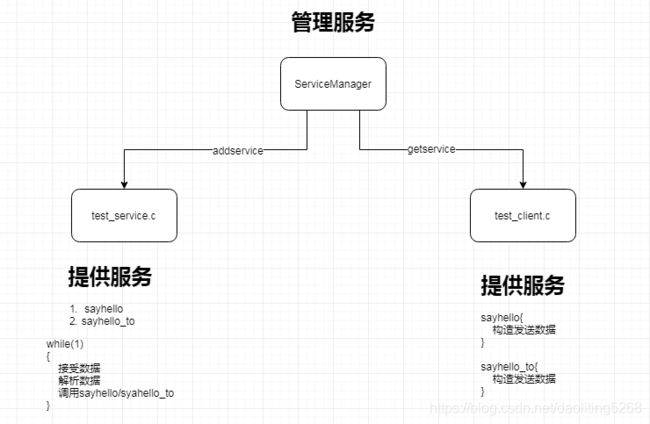
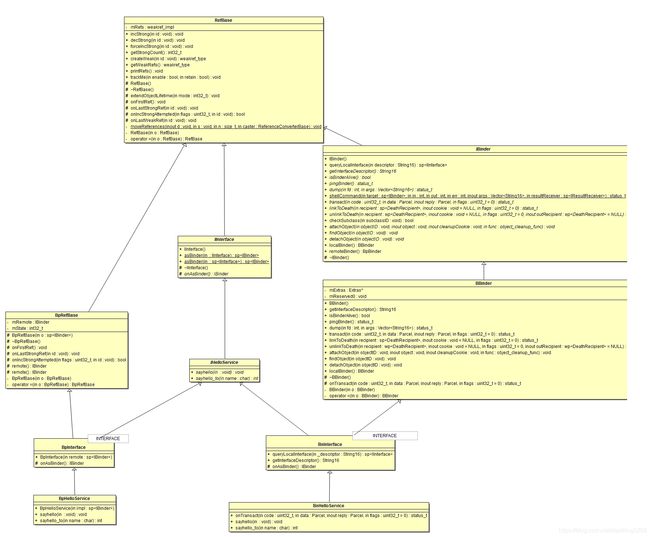
- 抽象共同的部分为接口,BnHelloService实现native方法,实现提供具体的服务。BpHelloservice实现服务的代理,服务使用的实现。
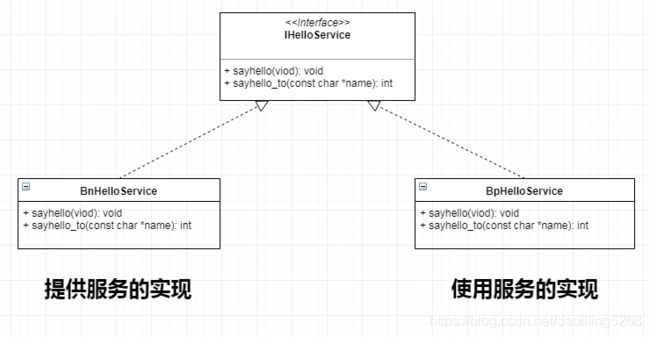
- server端和client端,server端添加服务,进入循环体等待client端调用。client端得到服务,通过得到的服务,调用服务中的函数。

1.3 具体代码
- IHelloService.h
定义IHelloservice接口,声明BnHelloservice。
#define HELLO_SVR_CMD_SAYHELLO 0
#define HELLO_SVR_CMD_SAYHELLO_TO 1

namespace android{


class IHelloService: public IInterface
{

public:
    DECLARE_META_INTERFACE(HelloService);
    virtual void sayhello(viod) = 0;
    virtual int sayhello_to(const char *name) = 0;
};

//继承IHelloService接口
class BnHelloService:public BnInterface<IHelloService>
{

public:
    virtual status_t    onTransact( uint32_t code,
                                    const Parcel& data,
                                    Parcel* reply,
                                    uint32_t flags = 0);
    virtual void sayhello(void);
    virtual int sayhello_to(const char *name);
};
- BnHelloService.cpp
namespace android{

//收到binder调用,来解析传过来的数据
status_t    onTransact( uint32_t code,
                                const Parcel& data,
                                Parcel* reply,
                                uint32_t flags = 0)
{

    /* 解析数据,调用sayhello/sayhello_to*/
    switch (code) {

        case HELLO_SVR_CMD_SAYHELLO: {

            sayhello();
            return NO_ERROR;
        } break;
        case HELLO_SVR_CMD_SAYHELLO_TO: {

            /*取出传入的数据*/
            int32_t policy = data.readInt32();
            String16 name16 = data.readString16();
            String8 name8(name16);

            /*调用执行函数*/
            int ret = sayhello_to(name8);
            /*把返回值返回回去*/
            reply->writeInt32(ret);
            return NO_ERROR;
        } break;
        default:
            return BBinder::onTransact( code, data, reply, flags);
    }
}
void sayhello(void)
{

    static int cnt = 0;
    ALOGD("say hello : %d", cnt++);
}
int sayhello_to(const char *name)
{

    static int cnt = 0;
    ALOGD("say hello to %s : %d", name, cnt++);
}
Binder native实现,收到Binder的Bp端调用后,进入onTransact函数,解析数据并调用native方法。
- BpHelloService.cpp
namespace android{


class BpHelloService: public BpInterface<IHelloService>
{

public:
    BpHelloService(const sp<IBinder>& impl)
        : BpInterface<IHelloService>(impl)
    {

    }
    void sayhello(void)
    {

        Parcel data, reply;
        data.writeInt32(0);
        remote()->transact(HELLO_SVR_CMD_SAYHELLO, data, &reply);
    }
    int sayhello_to(const char *name)
    {

        Parcel data, reply;
        data.writeInterfaceToken(IMediaPlayerService::getInterfaceDescriptor());
        data.writeStrongBinder(IInterface::asBinder(client));
        data.writeInt32(audioSessionId);

        remote()->transact(CREATE, data, &reply);
        return interface_cast<IMediaPlayer>(reply.readStrongBinder());
    }
}
IMPLEMENT_META_INTERFACE(HelloService, "android.media.IHelloService");
}
Binder 代理端,实现了数据构造和消息发送。
- test_server.cpp
using namespace android;

void main(void)
{

    /*addService*/

    /*while(1){读取数据,解析数据,根据数据调用服务函数}*/

    /*打开binder驱动,mmap*/
    sp<ProcessState> proc(ProcessState::self());

    /*获取BpServiceManager*/
    sp<IServiceManager> sm = defaultServiceManager();
    ALOGI("ServiceManager: %p", sm.get());
    /*添加服务*/
    sm->addService(String16("hello"), new BnHelloService());
    /*开启循环,线程池使用场景*/
    ProcessState::self()->startThreadPool();
    IPCThreadState::self()->joinThreadPool();
}
获取ServiceManager的binder代理Bp,然后调用服务中的方法添加服务,为本服务进程创建线程池。进入循环体,等待客户端使用。
- test_client.cpp
int main(int argc, char **argv)
{
if(argc < 2){
ALOGD("Help:");
ALOGD("%s " , argv[0]);
ALOGD("%s " ,argv[0]);
return -1;
}
/*获得service*/
/*打开binder驱动,mmap*/
sp<ProcessState> proc(ProcessState::self());
/*获取BpServiceManager*/
sp<IServiceManager> sm = defaultServiceManager();
sp<IBinder> binder = sm->getService(String16("hello"));
if(binder == 0){
ALOGD("error: can't get hello service");
return -1;
}
//interface_cast(binder句柄),通过句柄转化为服务
sp<IHelloService> service = interface_cast<IHelloService>(binder);
if(argv < 3){
ALOGD("client call sayhello");
service->sayhello();
} else if(argv = 3){
ALOGD("client call sayhello_to : %s", argv[2]);
int ret = service->sayhello_to(argv[2]);
ALOGD("service sayhello_to return ret = %d", ret);
}
}
和service端一样,先获取BpServiceManager,然后调用sm中的方法得到服务。通过interface_cast转化binder句柄得到服务,通过服务调用BpHelloService中的方法,再通过binder调用到BnHelloService中的方法。这部分的具体调用过程下节分析。
1.4 测试
t7-p1:/ # logcat | grep HelloService &
[1] 19137 19138
t7-p1:/ # cd system/bin/
t7-p1:/system/bin # ./test_server &
[2] 22678
t7-p1:/system/bin # 01-01 08:02:05.613 22678 22678 I HelloService: ServiceManager: 0xb6a99360
t7-p1:/system/bin # ./test_client hello
01-01 08:02:20.548 25031 25031 D HelloService: client call sayhello
01-01 08:02:20.548 22678 22678 D HelloService: HelloService :say hello : 0
t7-p1:/system/bin # ./test_client hello cuishang
01-01 08:02:25.947 25684 25684 D HelloService: client call sayhello_to : cuishang
01-01 08:02:25.947 22678 22691 D HelloService: HelloService:say hello to cuishang : 0
01-01 08:02:25.948 25684 25684 D HelloService: service sayhello_to return ret = 1
测试成功,先启动server,然后执行client。能够调用到server的方法。
这里先梳理一波,相比c程序,使用了android的Binder驱动和ServiceManager,抽象出了IHelloService接口,BpHelloService和BnHelloService类,Bp(Binder proxy)属于客户端,Binder的服务代理。app通过调Bp进而调用到BnHelloService。BpHelloService属于服务端,
2. Binder系统_c++实现_内部机制
2.1 获取BpServiceManager的对象
- 无论server端还是client端首先都要,获得BpServiceManager对象过程:
//步骤1
sp<ProcessState> proc(ProcessState::self());
//步骤2
sp<IServiceManager> sm = defaultServiceManager();
步骤1. 在Android系统中,只要涉及到Binder通讯过程都需要存在依据,也就是Android Framework经常出现的一条语句。
ProcessState::self()函数是ProcessState类中的一个静态函数,属于这个类,不属于某个具体的对象。
class ProcessState : public virtual RefBase
{

public:
    static  sp<ProcessState>    self();
...
}
具体函数:
Mutex gProcessMutex;
sp<ProcessState> gProcess;//全局变量
...
sp<ProcessState> ProcessState::self()
{

    Mutex::Autolock _l(gProcessMutex);
    if (gProcess != NULL) {

        return gProcess;
    }
    gProcess = new ProcessState;
    return gProcess;
}
从函数中可以看到单例模式,gProcess是ProcessState类的对象,在每个进程中只有一个。
接下来看下ProcessState的构造函数:
ProcessState::ProcessState(const char *driver)
    : mDriverFD(open_driver(driver))
...
    , mMaxThreads(DEFAULT_MAX_BINDER_THREADS)
...
{

    if (mDriverFD >= 0) {

        // mmap the binder, providing a chunk of virtual address space to receive transactions.
        mVMStart = mmap(0, BINDER_VM_SIZE, PROT_READ, MAP_PRIVATE | MAP_NORESERVE, mDriverFD, 0);
      ...
    }
...
}
首先打开binder驱动,在binder驱动中,会为当前进程创建binder节点,构造binder在内核空间所需要的数据结构。这部分不清楚的可以看文章 《Binder系统_驱动情景分析》
mDriverFD(open_driver(driver))
然后设置当前进程的最大线程数:
mMaxThreads(DEFAULT_MAX_BINDER_THREADS)
然后当打开binder驱动成功,对内核空间的内存进行映射到用户空间:
mVMStart = mmap(0, BINDER_VM_SIZE, PROT_READ, MAP_PRIVATE | MAP_NORESERVE, mDriverFD, 0);
其中mVMStart就是用户空间虚拟内存的首地址。当前进程就可以通过操作此地址来直接操作内核空间的内存。
所以ProcessState::self() == gProcess,ProcessState的对象,包含当前进程的binder信息。
步骤2. 获取sm的服务。
首先分析defaultServiceManager //IServiceManager.cpp
sp<IServiceManager> defaultServiceManager()
{

    if (gDefaultServiceManager != NULL) return gDefaultServiceManager;
    {

        AutoMutex _l(gDefaultServiceManagerLock);
        while (gDefaultServiceManager == NULL) {

            gDefaultServiceManager = interface_cast<IServiceManager>(
                ProcessState::self()->getContextObject(NULL));
            if (gDefaultServiceManager == NULL)
                sleep(1);
        }
    }
    return gDefaultServiceManager;
}
同样也是一个单例模式,获得一个IServiceManager的对象gDefaultServiceManager。
其中interface_cast:把BpBinder(mHandle=0)对象转换为IServiceManager接口实例BpServiceManager的对象。
template<typename INTERFACE>
inline sp<INTERFACE> interface_cast(const sp<IBinder>& obj)
{

    return INTERFACE::asInterface(obj);
}
接下来继续分析 ProcessState::self()->getContextObject(NULL)
由步骤1分析的知ProcessState::self()为当前进程包含binder信息ProcessState的对象。
ProcessState::getContextObject(NULL);
sp<IBinder> ProcessState::getContextObject(const sp<IBinder>& /*caller*/)
{

    return getStrongProxyForHandle(0);
}
继续跟踪getStrongProxyForHandle,传入的参数为0:
sp<IBinder> ProcessState::getStrongProxyForHandle(int32_t handle)
{

...
    handle_entry* e = lookupHandleLocked(handle);
    if (e != NULL) {

...
            b = new BpBinder(handle);
            e->binder = b;
            if (b) e->refs = b->getWeakRefs();
            result = b;
...
    return result;
}
继续跟踪b = new BpBinder(handle);
BpBinder::BpBinder(int32_t handle)
    : mHandle(handle)
    , mAlive(1)
    , mObitsSent(0)
    , mObituaries(NULL)
{

    ALOGV("Creating BpBinder %p handle %d\n", this, mHandle);

    extendObjectLifetime(OBJECT_LIFETIME_WEAK);
    IPCThreadState::self()->incWeakHandle(handle);
}
handle = 0 = mHandle
因为sm的binder节点handle为0。通过interface_cast的转化后最终得到BpServiceManager类的对象,即sm。所以BpServiceManager为sm的代理类。
2.2 获得BpHelloService对象
首先server端添加服务
    /*添加服务*/
    sm->addService(String16("hello"), new BnHelloService());
    /*开启循环,线程池使用场景*/
    ProcessState::self()->startThreadPool();
    IPCThreadState::self()->joinThreadPool();
通过调用sm的方法,传入字符串“hello”和binder本地实现类的对象,添加一个Hello服务。
然后开启线程池使进程进入循环。
然后client端获取服务
步骤1
    sp<IBinder> binder = sm->getService(String16("hello"));
    if(binder == 0){

        ALOGD("error: can't get hello service");
        return -1;
    }
步骤2
    //interface_cast(binder句柄),通过句柄转化为服务
    sp<IHelloService> service = interface_cast<IHelloService>(binder);
步骤1. 调用BpServiceManager的getService函数获得一个flat_binder_object。
    virtual sp<IBinder> getService(const String16& name) const
    {

        unsigned n;
        for (n = 0; n < 5; n++){

            sp<IBinder> svc = checkService(name);
            if (svc != NULL) return svc;
            ALOGI("Waiting for service %s...\n", String8(name).string());
            sleep(1);
        }
        return NULL;
    }
checkService:
    virtual sp<IBinder> checkService( const String16& name) const
    {

        Parcel data, reply;
        data.writeInterfaceToken(IServiceManager::getInterfaceDescriptor());
        data.writeString16(name);
        remote()->transact(CHECK_SERVICE_TRANSACTION, data, &reply);
        return reply.readStrongBinder();
    }
通过 remote()->transact发送数据,经过驱动程序后传递到sm的svcmgr_handler函数。这部分的具体调用放到本章节第三小节中分析。
int svcmgr_handler(struct binder_state *bs,
                   struct binder_transaction_data *txn,
                   struct binder_io *msg,
                   struct binder_io *reply)
{

...
    switch(txn->code) {

    case SVC_MGR_GET_SERVICE:
    case SVC_MGR_CHECK_SERVICE:
        s = bio_get_string16(msg, &len);
        if (s == NULL) {

            return -1;
        }
        handle = do_find_service(s, len, txn->sender_euid, txn->sender_pid);
        if (!handle)
            break;
        bio_put_ref(reply, handle);
        return 0;
...
}
do_find_service查找服务,这里就不继续展开了,跟着这个函数往下追很容易追到,结果是通过扫描一个列表,对名字进行匹配,然后得到一个整数,即hello service的handle值。
分析 reply.readStrongBinder();
status_t Parcel::readStrongBinder(sp<IBinder>* val) const
{

    return unflatten_binder(ProcessState::self(), *this, val);
}

sp<IBinder> Parcel::readStrongBinder() const
{

    sp<IBinder> val;
    readStrongBinder(&val);
    return val;
}

status_t unflatten_binder(const sp<ProcessState>& proc,
    const Parcel& in, sp<IBinder>* out)
{

    const flat_binder_object* flat = in.readObject(false);

    if (flat) {

        switch (flat->type) {

            case BINDER_TYPE_BINDER:
                *out = reinterpret_cast<IBinder*>(flat->cookie);
                return finish_unflatten_binder(NULL, *flat, in);
            case BINDER_TYPE_HANDLE:
                *out = proc->getStrongProxyForHandle(flat->handle);
                return finish_unflatten_binder(
                    static_cast<BpBinder*>(out->get()), *flat, in);
        }
    }
    return BAD_TYPE;
}
一直调用到unflatten_binder,由于是返回handle走的是case BINDER_TYPE_HANDLE,*out = proc->getStrongProxyForHandle(flat->handle);
sp<IBinder> ProcessState::getStrongProxyForHandle(int32_t handle)
{

...
    handle_entry* e = lookupHandleLocked(handle);
    if (e != NULL) {

...
            b = new BpBinder(handle);
            e->binder = b;
            if (b) e->refs = b->getWeakRefs();
            result = b;
...
    return result;
}
有调用到getStrongProxyForHandle,与之前不同的是,之前handle是为0,现在的handle是helllo service在sm中的handle值。
sp<IHelloService> service = interface_cast<IHelloService>(binder);
然后通过interface_cast 把binder转换为IHelloService接口(BpHelloService对象)。
2.3 代理类如何发送数据
以BpHelloService为例:
    int sayhello_to(const char *name)
    {

        Parcel data, reply;
        步骤1
        data.writeInt32(0);
        data.writeString16(String16(name));
        步骤2
        remote()->transact(HELLO_SVR_CMD_SAYHELLO_TO, data, &reply);
        return reply.readInt32();
    }
步骤1. 构造数据。
步骤2. 调用remote->transact来发送数据。
remote的来源:
class BpHelloService: public BpInterface<IHelloService>

class BpInterface : public INTERFACE, public BpRefBase
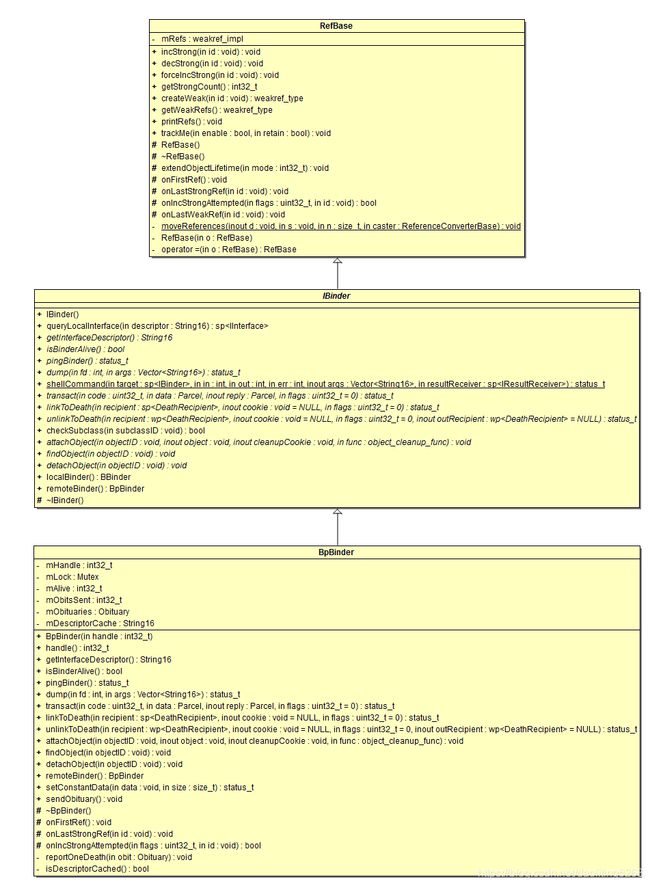
BpHelloService继承自BpInterface,BpInterface继承自BpRefBase。
看下BpRefBase:
class BpRefBase : public virtual RefBase
{

protected:
                            BpRefBase(const sp<IBinder>& o);
    virtual                 ~BpRefBase();
    virtual void            onFirstRef();
    virtual void            onLastStrongRef(const void* id);
    virtual bool            onIncStrongAttempted(uint32_t flags, const void* id);

    inline  IBinder*        remote()                {
      return mRemote; }
    inline  IBinder*        remote() const          {
      return mRemote; }

private:
                            BpRefBase(const BpRefBase& o);
    BpRefBase&              operator=(const BpRefBase& o);

    IBinder* const          mRemote;
    RefBase::weakref_type*  mRefs;
    std::atomic<int32_t>    mState;
};
其中remote = mRemote 返回的是BpBinder的对象,调用BpBinder对象的transact函数。
status_t BpBinder::transact(
    uint32_t code, const Parcel& data, Parcel* reply, uint32_t flags)
{

    // Once a binder has died, it will never come back to life.
    if (mAlive) {

        status_t status = IPCThreadState::self()->transact(
            mHandle, code, data, reply, flags);
        if (status == DEAD_OBJECT) mAlive = 0;
        return status;
    }

    return DEAD_OBJECT;
}
也就是调用binder中的transact发送给hello service。
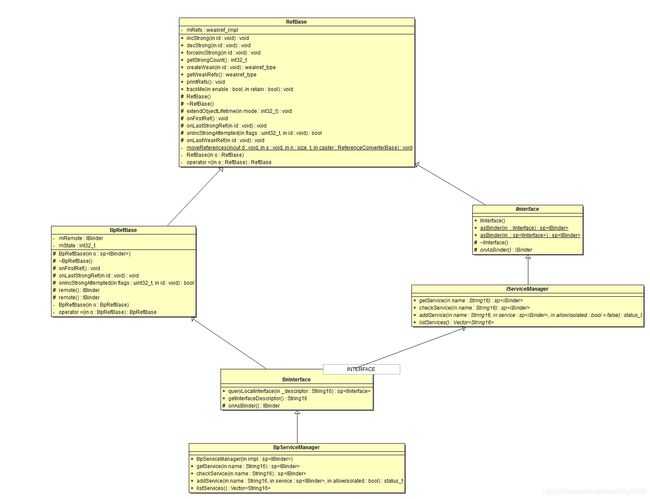
下面是照抄韦东山老师画的类图,对于理解有很大帮助。
BpServiceManager类继承关系:
