Pytorch Mobile 之Android Demo源码分析
现如今,在边缘设备上运行机器学习/深度学习变得越来越流行,它需要更低的时延。
而从Pytorch 1.3开始,我们就可以使用Pytorch将模型部署到Android或者ios设备中。
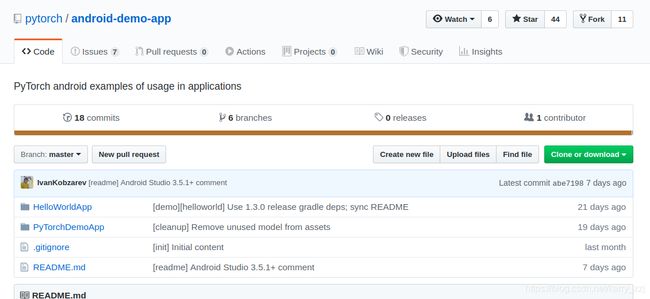
Pytorch官方文档中提供两个关于Pytorch-mobile的Demo: Github地址

主要包含了两个APP应用,一个简单的在神经网络领域中的“hello world"项目,另一个就更复杂了一些,有图形识别和语言识别。
我们接下来研究一下Pytorch Mobile的项目流程。
Demo 1 HelloWorldApp
1 模型准备
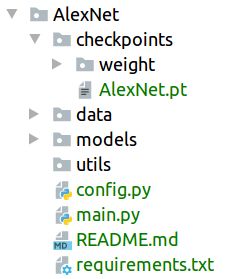
首先我们需要先训练好的模型保存好。比如我在Pycharm写了经典CNN模型AlexNet。

在 checkpoints/ 文件夹中保存了 AlexNet.pt,有了这个模型,我们就可以进行Android的部署了。
2 源码分析
2.1 Clone 源码
我们先在本地clone一下github上的源码(吐槽一下git clone的速度,龟速!):
git clone https://github.com/pytorch/android-demo-app.git
然后便得到这个项目。
前提先确保一下Android安装好了SDK和NDK。
2.2 向 Gradle 添加依赖
然后我们会在 app 下的 build.gradle 中发现这样的依赖:
org.pytorch:pytorch_android: Pytorch Android API 的主要依赖,包含为4个Android abis (armeabi-v7a, arm64-v8a, x86, x86_64) 的 libtorch 本地库。org.pytorch:pytorch_android_torchvision:它是具有将android.media.image和android.graphics.bitmap转换为 Tensor 的附加库。
2.3 读取图片数据
bitmap = BitmapFactory.decodeStream(getAssets().open("image.jpg"));
Bitmap 为位图,其包括像素以及长、宽、颜色等描述信息。长、宽、像素位数用来描述图片,并可以通过这些信息计算出图片的像素占用内存的大小。
通过 BitmapFactory.decodeStream( ) 这一函数加载图像。
2.4 读取模型
同样在 MainActivity.java文件中,有这么一行:

module = Module.load(assetFilePath(this, "model.pt"));
当然我们需要 import org.pytorch.Module
然后通过Module定义一个对象后使用 Module.load() 来读取模型。
2.5 将图像转化为Tensor
在这么一行中:

org.pytorch.torchvision.TensorImageUtils就是org.pytorch:pytorch_android_torchvision库中的一部分,TensorImageUtils.bitmapToFloat32Tensor 创建一个Tensor类型。
inputTensor 的 大小为 1x3xHxW, 其中 H 和 W 分别为 Bitmap 的高和宽。
2.6 运行模型
![]()
将 inputTensor 放到模型中运行,通过 module.forward() 得到一个 outputTensor。
2.7 处理结果
    // getting tensor content as java array of floats
    final float[] scores = outputTensor.getDataAsFloatArray();

    // searching for the index with maximum score
    float maxScore = -Float.MAX_VALUE;
    int maxScoreIdx = -1;
    for (int i = 0; i < scores.length; i++) {
      if (scores[i] > maxScore) {
        maxScore = scores[i];
        maxScoreIdx = i;
      }
    }

    String className = ImageNetClasses.IMAGENET_CLASSES[maxScoreIdx];

    // showing className on UI
    TextView textView = findViewById(R.id.text);
    textView.setText(className);
判断最高分数,并将结果显示到textView中。
Demo2 PytorchDemoApp
这是另一个Demo App,它可以进行图像分类和文字分类。而图像分类就需要利用摄像头。
摄像头API通过使用 org.pytorch.demo.vision.AbstractCameraXActivity 类。
在 AbstractCameraXActivity.java 中的具体源码如下:
  private void setupCameraX() {
    final TextureView textureView = getCameraPreviewTextureView();
    // 实现摄像头预览
    final PreviewConfig previewConfig = new PreviewConfig.Builder().build();
    final Preview preview = new Preview(previewConfig);
    preview.setOnPreviewOutputUpdateListener(output -> textureView.setSurfaceTexture(output.getSurfaceTexture()));

	// 实现数据分析并回调
    final ImageAnalysisConfig imageAnalysisConfig =
        new ImageAnalysisConfig.Builder()
            .setTargetResolution(new Size(224, 224))
            .setCallbackHandler(mBackgroundHandler)
            .setImageReaderMode(ImageAnalysis.ImageReaderMode.ACQUIRE_LATEST_IMAGE)
            .build();
    final ImageAnalysis imageAnalysis = new ImageAnalysis(imageAnalysisConfig);
    imageAnalysis.setAnalyzer(
        (image, rotationDegrees) -> {
          if (SystemClock.elapsedRealtime() - mLastAnalysisResultTime < 500) {
            return;
          }
          final R result = analyzeImage(image, rotationDegrees);
          if (result != null) {
            mLastAnalysisResultTime = SystemClock.elapsedRealtime();
            runOnUiThread(() -> applyToUiAnalyzeImageResult(result));
          }
        });

    CameraX.bindToLifecycle(this, preview, imageAnalysis);
  }
  // analyzeImage函数是用来处理摄像头输出
  void analyzeImage(android.media.Image, int rotationDegrees)
而在 ImageClassificationActivity.java 中的源码如下:
protected AnalysisResult analyzeImage(ImageProxy image, int rotationDegrees) {
    if (mAnalyzeImageErrorState) {
      return null;
    }

    try {
      if (mModule == null) {
        final String moduleFileAbsoluteFilePath = new File(
            Utils.assetFilePath(this, getModuleAssetName())).getAbsolutePath();
        // 导入模型
        mModule = Module.load(moduleFileAbsoluteFilePath);

        mInputTensorBuffer =
            Tensor.allocateFloatBuffer(3 * INPUT_TENSOR_WIDTH * INPUT_TENSOR_HEIGHT);
        mInputTensor = Tensor.fromBlob(mInputTensorBuffer, new long[]{1, 3, INPUT_TENSOR_HEIGHT, INPUT_TENSOR_WIDTH});
      }

      final long startTime = SystemClock.elapsedRealtime();
      // 将以YUV420形式的Image类型转化为输入Tensor
      TensorImageUtils.imageYUV420CenterCropToFloatBuffer(
          image.getImage(), rotationDegrees,
          INPUT_TENSOR_WIDTH, INPUT_TENSOR_HEIGHT,
          TensorImageUtils.TORCHVISION_NORM_MEAN_RGB,
          TensorImageUtils.TORCHVISION_NORM_STD_RGB,
          mInputTensorBuffer, 0);

      final long moduleForwardStartTime = SystemClock.elapsedRealtime();
      // 利用模型进行运算
      final Tensor outputTensor = mModule.forward(IValue.from(mInputTensor)).toTensor();
      final long moduleForwardDuration = SystemClock.elapsedRealtime() - moduleForwardStartTime;

      // 从模型中得到预测分数
      final float[] scores = outputTensor.getDataAsFloatArray();
      // 找到得分最高的前k个类
      final int[] ixs = Utils.topK(scores, TOP_K);
      final String[] topKClassNames = new String[TOP_K];
      final float[] topKScores = new float[TOP_K];
      for (int i = 0; i < TOP_K; i++) {
        final int ix = ixs[i];
        topKClassNames[i] = Constants.IMAGENET_CLASSES[ix];
        topKScores[i] = scores[ix];
      }
      final long analysisDuration = SystemClock.elapsedRealtime() - startTime;
      return new AnalysisResult(topKClassNames, topKScores, moduleForwardDuration, analysisDuration);
    } catch (Exception e) {
      Log.e(Constants.TAG, "Error during image analysis", e);
      mAnalyzeImageErrorState = true;
      runOnUiThread(() -> {
        if (!isFinishing()) {
          showErrorDialog(v -> ImageClassificationActivity.this.finish());
        }
      });
      return null;
    }
  }
最后将得到的前k个类加载到UI上。
protected void applyToUiAnalyzeImageResult(AnalysisResult result) {
    mMovingAvgSum += result.moduleForwardDuration;
    mMovingAvgQueue.add(result.moduleForwardDuration);
    if (mMovingAvgQueue.size() > MOVING_AVG_PERIOD) {
      mMovingAvgSum -= mMovingAvgQueue.remove();
    }

    for (int i = 0; i < TOP_K; i++) {
      final ResultRowView rowView = mResultRowViews[i];
      rowView.nameTextView.setText(result.topNClassNames[i]);
      rowView.scoreTextView.setText(String.format(Locale.US, SCORES_FORMAT,
          result.topNScores[i]));
      rowView.setProgressState(false);
    }

    mMsText.setText(String.format(Locale.US, FORMAT_MS, result.moduleForwardDuration));
    if (mMsText.getVisibility() != View.VISIBLE) {
      mMsText.setVisibility(View.VISIBLE);
    }
    mFpsText.setText(String.format(Locale.US, FORMAT_FPS, (1000.f / result.analysisDuration)));
    if (mFpsText.getVisibility() != View.VISIBLE) {
      mFpsText.setVisibility(View.VISIBLE);
    }

    if (mMovingAvgQueue.size() == MOVING_AVG_PERIOD) {
      float avgMs = (float) mMovingAvgSum / MOVING_AVG_PERIOD;
      mMsAvgText.setText(String.format(Locale.US, FORMAT_AVG_MS, avgMs));
      if (mMsAvgText.getVisibility() != View.VISIBLE) {
        mMsAvgText.setVisibility(View.VISIBLE);
      }
    }
 }
最后显示结果如下:

