Angular5 懒加载(附步骤)
应 @若末lan 的要求 试着写一个简单的懒加载项目,如有发现不对的地方,请斧正。
文章目录
- 1.创建项目
- 2.创建Component
- 3.配置路由
- 4.使用懒加载
- 5.代码文件
- 6.采坑心得
- 404问题
- 通配符
- 跨域问题
1.创建项目
安装nodejs和angular cli我这里就略过了。如果没有安装的话,百度一下就有了。
我用的是webstrom,创建过程如下图:

当然大家也可以用命令创建。
ng new lazyloading
如果用webstorm创建,创建完成后会自动npm install,下载依赖。
如果用命令创建的话,需要自己进入根目录npm install。
这是创建完成后的界面

然后运行项目看一下,因为曾经有遇到过webstorm卡死退出后导致nodejs无法正常关闭导致死机的问题,所以我个人倾向于用cmd在根目录npm start。这里我用的是win10的powershell,在根目录按住shift右键就能打开了。


2.创建Component
我们创建两个Component,用来展示路由切换。
这里我演示webstrom 用 Angular CLI创建。


创建完成后,会默认在module.ts写入

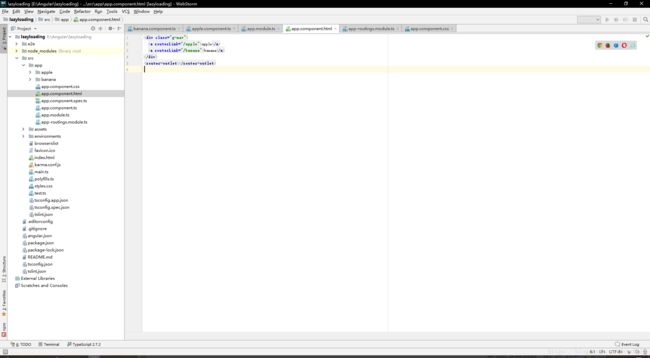
修改app.component.html看一下效果

3.配置路由
我们在app.component.html上加上两个a标签,然后稍微美化一下。

这里你会发现报错了,别急跟我做下一步。
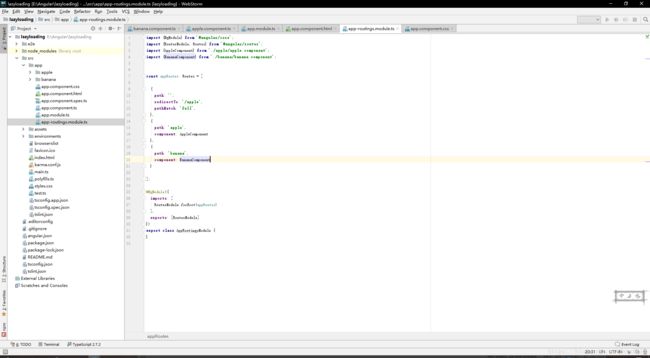
我们创建一个module,名字叫app-routings 这里创建的步骤我就不重复了。
修改代码如下图
最后,在app.module.ts导入AppRoutingsModule

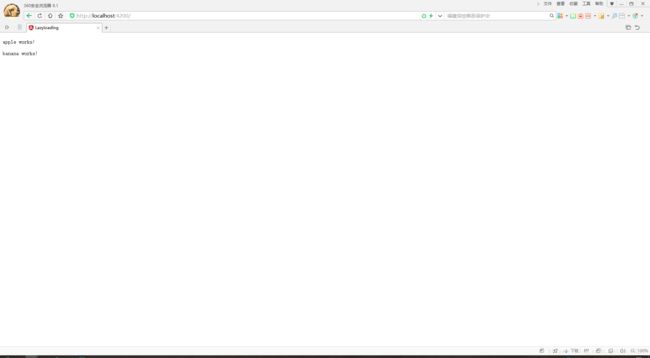
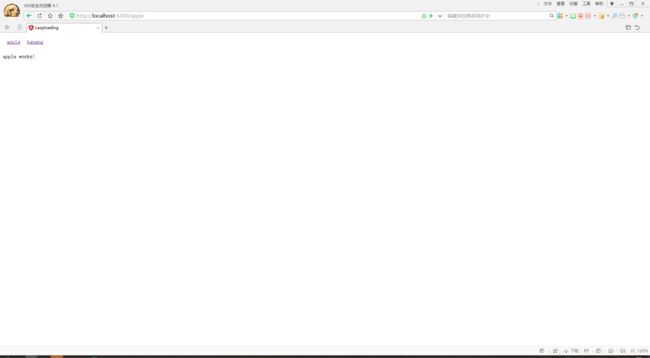
查看界面效果~

4.使用懒加载
1.我们首先为apple和banana两个component 创建对应module并修改对应的代码。

2.然后我们创建2个自路由moduleapple-routings.module.ts和 banana-routings.module.ts修改代码如下:
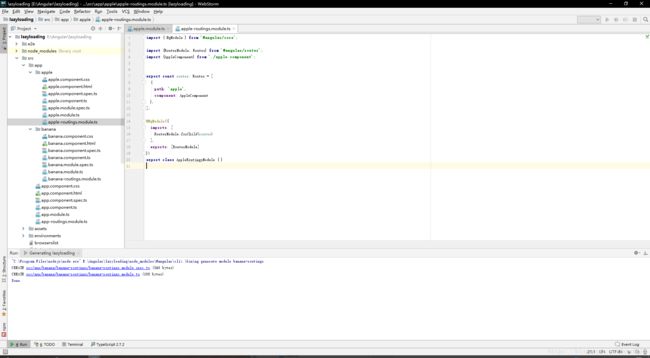
注意:这里是RouterModule.forChild(routes)
3.在对应module引入路由:

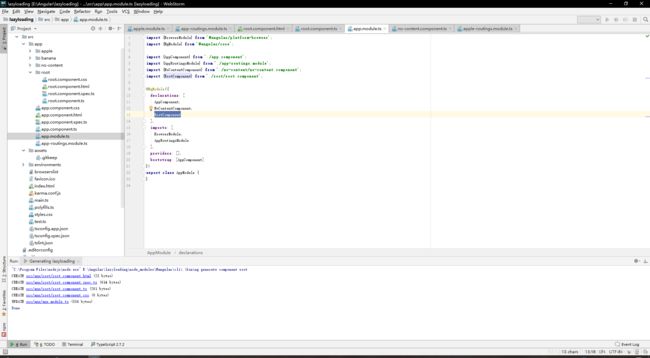
4.在app.module.ts删除 apple 和 banana 的Cmponent

5.修改app-routings.module.ts文件,将path: 'apple'和 path: 'banana'改为 path: ''(重点)。并配置懒加载路径

6.查看效果。
到这里,懒加载基本就完成了。
这里标记一下容易采坑的点:
1.将上级路由中想要懒加载的路径一定要为空,即 path: ''。
2.将上级路由中想要懒加载的component: xxComponent替换为loadChildren: ‘app/component/xx.module#xxModule’ 。
3.在xxModule 的路由中写原上级路由的参数如
// apple-routings.module.ts
export const routes: Routes = [
  {
    path: 'apple',
    component: AppleComponent
  },
];
4.在子路由:
 imports: [
    RouterModule.forChild(routes)
  ],
在根路由
  imports: [
    RouterModule.forRoot(appRoutes)
  ],
5.代码文件
最后,在这里附上代码文件 点击下载
6.采坑心得
顺带写一下自己这方面的踩的坑吧。
404问题
首先,大家打包发布后会发现,Angular路由默认配置会出现一个问题,当你刷新界面的时候会发生404的情况。面对这个情况,我们需要在根路由中RouterModule.forRoot(appRoutes)加上一个参数,修改成 RouterModule.forRoot(appRoutes, {useHash: true})然后我们的路径就变成了

这次,刷新后不会404了。
通配符
一般情况下,我们如果输入了错误的地址,那么我们希望界面跳转到404页面,但是我上面的代码如果输入http://localhost:4200/#/apple121还是会跳转到 http://localhost:4200/#/apple这并不是我们所希望看到的。所以,我们需要改一下路由的匹配规则,让除了正确地址外的所有地址都跳转到404页面。
首先我们创建一个404component。
然后在根路由最后加上
{
    path: '**',
    component: NoContentComponent
  }

最后,我们尝试重新访问http://localhost:4200/#/apple121

显示404我们这里是成功了 ,这里你会发现导航的 apple 和 banana 没有消失,这是因为我们把a标签放在了路由外,所以我们这里再加一层路由。
我们创建一个component 叫 root,并修改代码如下:
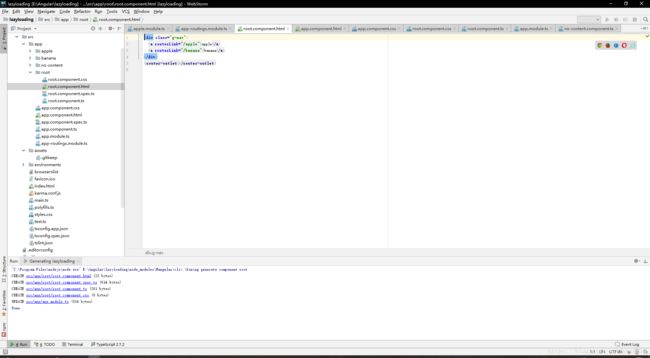

删除app.component.css代码,并修改 app.component.html代码如下

在 app.module.ts中添加 RootComponent:
最后修改app-routings.module.ts代码如下:

测试效果


跨域问题
web项目或多或少,总会遇到跨域问题。这里记录一种简单的解决方法:反向代理。
首先我们在项目根目录创建proxy.config.json文件 并修改代码如下 :

其中target表示要代理的服务器,然后修改package.json文件代码如下:

然后跑项目的时候使用npm start命令就行了。
注意:@CleaningStrings说
package.json 文件 “start”: “ng serve --proxy proxy.config.json”, Unknown option: ‘–proxy’ 改为 “start”: “ng serve --proxy-config proxy.config.json”,
因为我很久没有写Angular了,所以也没有测试新版本兼容问题。如果上面的方法不行,那么大家可以试一下@CleaningStrings的方法
附上全部代码 点击下载