HADOOP分布式开发环境搭建教程
1.基础环境
虚拟机:Vmware Pro 15.5
操作系统:Ubuntu16.04LTS,3台,内存建议分配2G,硬盘大小建议40G
2.系统更新
3.配置JDK
众所周知,Hadoop是基于Java编写,Hadoop、MapReduce运行需要JDK,因此在安装Hadoop之前,必须安装和配置JDK。(JDK可与Oracle官网下载)
(1)下载安装JDK
下载完成后,笔者将JDK放在了/usr/local/jdk目录下,读者可根据自己的情况适当调整:
![]()
(2)解压JDK:
![]()
(3)把解压后的文件名称重命名:
mv jdk1.8.0_251 jdk1.8
export JAVA_HOME=/usr/local/jdk/jdk1.8
export JRE_HOME=$JAVA_HOME/jre
export CLASSPATH=.:$JAVA_HOME/lib:$JRE_HOME/lib
export PATH=$PATH:$JAVA_HOME/bin
4.安装配置Hadoop:
接下来,到Hadoop官网下载Hadoop的执行包,而非源码包,一定要选择binary下载,而非source。
(1)在官网下载安装Hadoop,这里笔者下载的是2.10.0版本。

(2)用户权限配置:
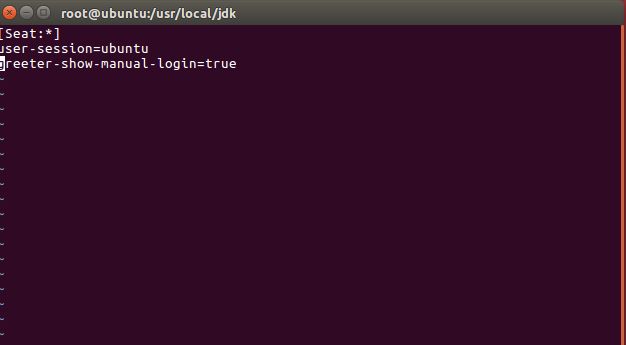
在下载完成后,首先我们先开启Ubuntu的root用户登陆,Ubuntu安装完成后默认不能够使用root用户登陆,开启root登录,需要执行以下指令:
![]()
并在行末添加:
greeter-show-manual-login=true
如图所示:
由于刚刚开启了root账户的登录权限,故需要为root账户设置密码,输入如下指令:
sudo passwd root
完成上述命令后,重新启动Ubuntu,可以看到多用户登录界面,选择root用户,输入密码登录,如图所示:

(3)配置SSH:
接下来需要配置ssh免密码登录,输入以下命令安装ssh:
sudo apt-get install ssh
在安装完成后,输入以下命令检查ssh服务是否启动,如图所示:
ps -e | grep ssh
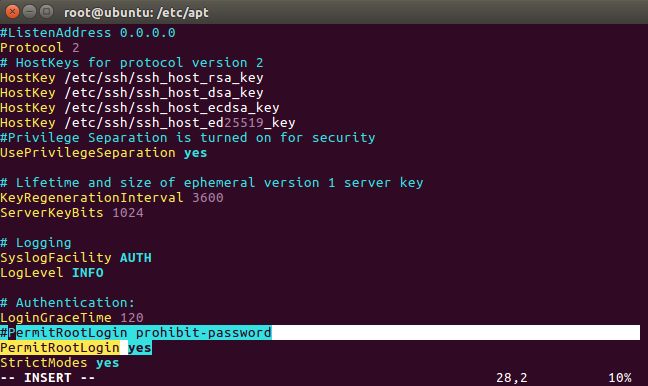
vim /etc/ssh/sshd_config
修改内容如下:
#PermitRootLogin prohibit-password
PermitRootLogin yes
![]()
生成ssh密钥的过程需要在三台中进行,故ssh密钥配置稍后进行。
现在将刚才下载好的Hadoop进行解压,如图所示:
tar -zxvf /home/gege/Download/hadoop-2.10.0.tar.gz
![]()
配置Hadoop环境变量:
export HADOOP_HOME=/home/gege/Downloads/hadoop-2.10.0
export HADOOP_CONF_DIR=$HADOOP_HOME/etc/hadoop
export YARN_CONF_DIR=$HADOOP_HOME/etc/hadoop
export PATH=$PATH:$HADOOP_HOME/bin
source .bashrc
hadoop version

(4)HADOOP文件配置:
配置Hadoop需要配置以下文件,参加文件列表:
core-site.xml
hadoop-env.sh
hdfs-site.xml
mapred-site.xml
slaves
yarn-env.sh
yarn-site.xml
(5)mapred-site.xml文件配置:
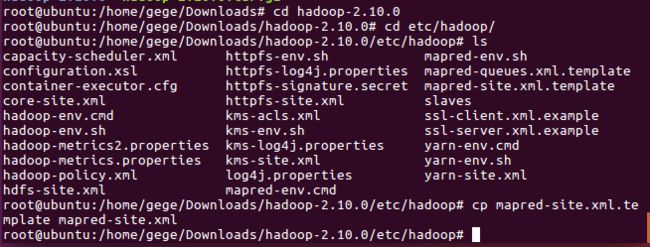
由mapred-site.xml不存在,故打开终端后,使用下列命令创建,如图所示:
    cd hadoop-2.10.0/etc/hadoop/
    cp mapred-site.xml.template mapred-site.xml
(6)core-site.xml配置:
首先,执行下面的命令修改core-site.xml:
vim core-site.xml
        fs.default.name
        hdfs://master:9000


        hadoop.tmp.dir
        /home/hdfs_all/tmp


	fs.trash.interval
	10080

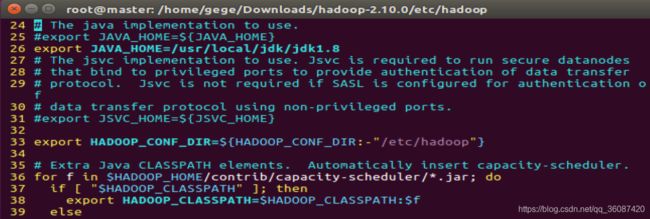
(7)hadoop-env.sh文件配置:
接下来修改hadoop-env.sh,指令同上:
vim hadoop-env.sh
修改内容如下:
#export JAVA_HOME=${JAVA_HOME}
export JAVA_HOME=/usr/local/jdk/jdk1.8
    # Licensed to the Apache Software Foundation (ASF) under one
    # or more contributor license agreements.  See the NOTICE     file
    # distributed with this work for additional information
    # regarding copyright ownership.  The ASF licenses this file
    # to you under the Apache License, Version 2.0 (the
    # "License"); you may not use this file except in compliance
    # with the License.  You may obtain a copy of the License at
    #
    #     http://www.apache.org/licenses/LICENSE-2.0
    #
    # Unless required by applicable law or agreed to in writing, software
    # distributed under the License is distributed on an "AS IS" BASIS,
    # WITHOUT WARRANTIES OR CONDITIONS OF ANY KIND, either express or implied.
    # See the License for the specific language governing permissions and
    # limitations under the License.

    # Set Hadoop-specific environment variables here.

    # The only required environment variable is JAVA_HOME.  All others are
    # optional.  When running a distributed configuration it is best to
    # set JAVA_HOME in this file, so that it is correctly defined     on
    # remote nodes.

    # The java implementation to use.
    # export JAVA_HOME=${JAVA_HOME}
    export JAVA_HOME=/usr/local/jdk/jdk1.8
    # The jsvc implementation to use. Jsvc is required to run secure datanodes
    # that bind to privileged ports to provide authentication of data transfer
    # protocol.  Jsvc is not required if SASL is configured for authentication of
    # data transfer protocol using non-privileged ports.
    #export JSVC_HOME=${JSVC_HOME}

    export HADOOP_CONF_DIR=${HADOOP_CONF_DIR:-"/etc/hadoop"}

    # Extra Java CLASSPATH elements.  Automatically insert capacity-scheduler.
    for f in $HADOOP_HOME/contrib/capacity-scheduler/*.jar; do
      if [ "$HADOOP_CLASSPATH" ]; then
        export HADOOP_CLASSPATH=$HADOOP_CLASSPATH:$f
      else
        export HADOOP_CLASSPATH=$f
      fi
    done

    # The maximum amount of heap to use, in MB. Default is 1000.
    #export HADOOP_HEAPSIZE=
    #export HADOOP_NAMENODE_INIT_HEAPSIZE=""

    # Extra Java runtime options.  Empty by default.
    export HADOOP_OPTS="$HADOOP_OPTS -Djava.net.preferIPv4Stack=true"

    # Command specific options appended to HADOOP_OPTS when specified
    export HADOOP_NAMENODE_OPTS="-Dhadoop.security.logger=${HADOOP_SECURITY_LOGGER:-INFO,RFAS} -Dhdfs.audit.logger=${HDFS_AUDIT_LOGGER:-INFO,NullAppender} $HADOOP_NAMENODE_OPTS"
    export HADOOP_DATANODE_OPTS="-Dhadoop.security.logger=ERROR,RFAS $HADOOP_DATANODE_OPTS"

    export HADOOP_SECONDARYNAMENODE_OPTS="-Dhadoop.security.logger=${HADOOP_SECURITY_LOGGER:-INFO,RFAS} -Dhdfs.audit.logger=${HDFS_AUDIT_LOGGER:-INFO,NullAppender} $HADOOP_SECONDARYNAMENODE_OPTS"

    export HADOOP_NFS3_OPTS="$HADOOP_NFS3_OPTS"
    export HADOOP_PORTMAP_OPTS="-Xmx512m $HADOOP_PORTMAP_OPTS"

    # The following applies to multiple commands (fs, dfs, fsck, distcp etc)
    export HADOOP_CLIENT_OPTS="-Xmx512m $HADOOP_CLIENT_OPTS"
    #HADOOP_JAVA_PLATFORM_OPTS="-XX:-UsePerfData $HADOOP_JAVA_PLATFORM_OPTS"

    # On secure datanodes, user to run the datanode as after dropping privileges.
    # This **MUST** be uncommented to enable secure HDFS if using privileged ports
    # to provide authentication of data transfer protocol.  This **MUST NOT** be
    # defined if SASL is configured for authentication of data transfer protocol
    # using non-privileged ports.
    export HADOOP_SECURE_DN_USER=${HADOOP_SECURE_DN_USER}

    # Where log files are stored.  $HADOOP_HOME/logs by default.
    #export HADOOP_LOG_DIR=${HADOOP_LOG_DIR}/$USER

    # Where log files are stored in the secure data environment.
    export HADOOP_SECURE_DN_LOG_DIR=${HADOOP_LOG_DIR}/${HADOOP_HDFS_USER}

    ###
    # HDFS Mover specific parameters
    ###
    # Specify the JVM options to be used when starting the HDFS Mover.
    # These options will be appended to the options specified as HADOOP_OPTS
    # and therefore may override any similar flags set in     HADOOP_OPTS
    #
    # export HADOOP_MOVER_OPTS=""

    ###
    # Advanced Users Only!
    ###

    # The directory where pid files are stored. /tmp by default.
    # NOTE: this should be set to a directory that can only be written to by
    #       the user that will run the hadoop daemons.  Otherwise there is the
    #       potential for a symlink attack.
    export HADOOP_PID_DIR=${HADOOP_PID_DIR}
    export HADOOP_SECURE_DN_PID_DIR=${HADOOP_PID_DIR}

    # A string representing this instance of hadoop. $USER by default.
    export HADOOP_IDENT_STRING=$USER
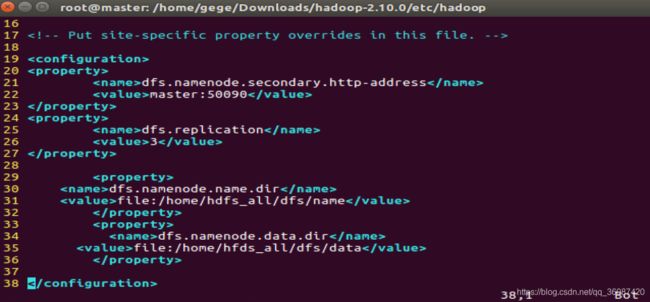
(8)hdfs-site.xml文件配置:
接下来修改hdfs-site.xml,指令同上:
vim hdfs-site.xml
	dfs.namenode.secondary.http-address
	master:50090


                dfs.replication
            3


    dfs.namenode.name.dir
    file:/home/hdfs_all/dfs/name


          dfs.namenode.data.dir
      file:/home/hfds_all/dfs/data
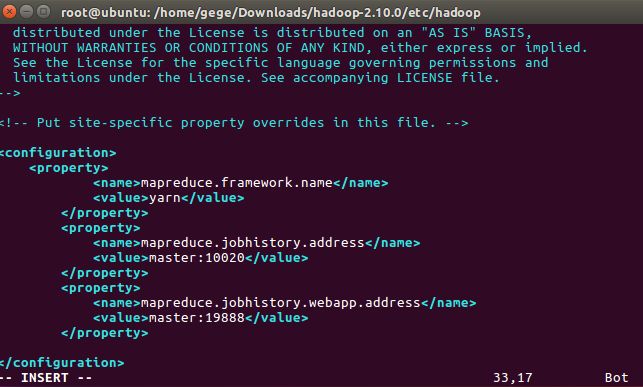
(9)mapred-site.xml文件配置:
接下来修改mapred-site.xml,指令同上:
vim mapred-site.xml
            mapreduce.framework.name
            yarn


            mapreduce.jobhistory.address
            master:10020


            mapreduce.jobhistory.webapp.address
            master:19888
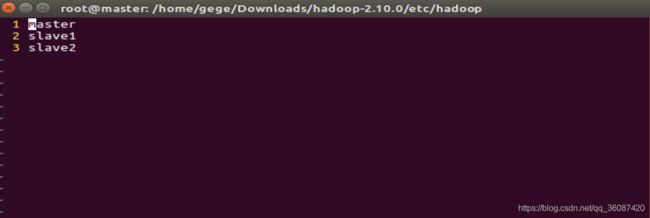
(10)slaves配置:
接下来修改slaves,指令同上:
vim slaves
master
slave1
slave2
注:该文件自带的localhost须去掉,原因:此处填写的是DataNode,而非NameNode。
(11)yarn-env.sh配置:
接下来修改yarn-env.sh,指令同上:
vim yarn-env.sh
export JAVA_HOME=/usr/local/jdk/jdk1.8
文件内容如下:
    # Licensed to the Apache Software Foundation (ASF) under one or more
    # contributor license agreements.  See the NOTICE file distributed with
    # this work for additional information regarding copyright ownership.
    # The ASF licenses this file to You under the Apache License, Version 2.0
    # (the "License"); you may not use this file except in compliance with
    # the License.  You may obtain a copy of the License at
    #
    #     http://www.apache.org/licenses/LICENSE-2.0
    #
    # Unless required by applicable law or agreed to in writing, software
    # distributed under the License is distributed on an "AS IS" BASIS,
    # WITHOUT WARRANTIES OR CONDITIONS OF ANY KIND, either express or implied.
    # See the License for the specific language governing permissions and
    # limitations under the License.

    # User for YARN daemons
    export HADOOP_YARN_USER=${HADOOP_YARN_USER:-yarn}

    # resolve links - $0 may be a softlink
    export YARN_CONF_DIR="${YARN_CONF_DIR:-$HADOOP_YARN_HOME/conf}"

    # some Java parameters
    # export JAVA_HOME=/home/y/libexec/jdk1.6.0/
    export JAVA_HOME=/usr/local/jdk/jdk1.8
    if [ "$JAVA_HOME" != "" ]; then
      #echo "run java in $JAVA_HOME"
      JAVA_HOME=$JAVA_HOME
    fi

    if [ "$JAVA_HOME" = "" ]; then
      echo "Error: JAVA_HOME is not set."
      exit 1
    fi

    JAVA=$JAVA_HOME/bin/java
    JAVA_HEAP_MAX=-Xmx1000m

    # For setting YARN specific HEAP sizes please use this
    # Parameter and set appropriately
    # YARN_HEAPSIZE=1000

    # check envvars which might override default args
    if [ "$YARN_HEAPSIZE" != "" ]; then
      JAVA_HEAP_MAX="-Xmx""$YARN_HEAPSIZE""m"
    fi

    # Resource Manager specific parameters

    # Specify the max Heapsize for the ResourceManager using a numerical value
    # in the scale of MB. For example, to specify an jvm option of -Xmx1000m, set
    # the value to 1000.
    # This value will be overridden by an Xmx setting specified in either YARN_OPTS
    # and/or YARN_RESOURCEMANAGER_OPTS.
    # If not specified, the default value will be picked from either YARN_HEAPMAX
    # or JAVA_HEAP_MAX with YARN_HEAPMAX as the preferred option of the two.
    #export YARN_RESOURCEMANAGER_HEAPSIZE=1000

    # Specify the max Heapsize for the timeline server using a numerical value
    # in the scale of MB. For example, to specify an jvm option of -Xmx1000m, set
    # the value to 1000.
    # This value will be overridden by an Xmx setting specified in either YARN_OPTS
    # and/or YARN_TIMELINESERVER_OPTS.
    # If not specified, the default value will be picked from either YARN_HEAPMAX
    # or JAVA_HEAP_MAX with YARN_HEAPMAX as the preferred option of the two.
    #export YARN_TIMELINESERVER_HEAPSIZE=1000

    # Specify the JVM options to be used when starting the ResourceManager.
    # These options will be appended to the options specified as YARN_OPTS
    # and therefore may override any similar flags set in YARN_OPTS
    #export YARN_RESOURCEMANAGER_OPTS=

    # Node Manager specific parameters

    # Specify the max Heapsize for the NodeManager using a numerical value
    # in the scale of MB. For example, to specify an jvm option of -Xmx1000m, set
    # the value to 1000.
    # This value will be overridden by an Xmx setting specified in either YARN_OPTS
    # and/or YARN_NODEMANAGER_OPTS.
    # If not specified, the default value will be picked from either YARN_HEAPMAX
    # or JAVA_HEAP_MAX with YARN_HEAPMAX as the preferred option of the two.
    #export YARN_NODEMANAGER_HEAPSIZE=1000

    # Specify the JVM options to be used when starting the NodeManager.
    # These options will be appended to the options specified as YARN_OPTS
    # and therefore may override any similar flags set in YARN_OPTS
    #export YARN_NODEMANAGER_OPTS=

    # so that filenames w/ spaces are handled correctly in loops below
    IFS=


    # default log directory & file
    if [ "$YARN_LOG_DIR" = "" ]; then
      YARN_LOG_DIR="$HADOOP_YARN_HOME/logs"
    fi
    if [ "$YARN_LOGFILE" = "" ]; then
      YARN_LOGFILE='yarn.log'
    fi

    # default policy file for service-level authorization
    if [ "$YARN_POLICYFILE" = "" ]; then
      YARN_POLICYFILE="hadoop-policy.xml"
    fi

    # restore ordinary behaviour
    unset IFS


    YARN_OPTS="$YARN_OPTS -Dhadoop.log.dir=$YARN_LOG_DIR"
    YARN_OPTS="$YARN_OPTS -Dyarn.log.dir=$YARN_LOG_DIR"
    YARN_OPTS="$YARN_OPTS -Dhadoop.log.file=$YARN_LOGFILE"
    YARN_OPTS="$YARN_OPTS -Dyarn.log.file=$YARN_LOGFILE"
    YARN_OPTS="$YARN_OPTS -Dyarn.home.dir=$YARN_COMMON_HOME"
    YARN_OPTS="$YARN_OPTS -Dyarn.id.str=$YARN_IDENT_STRING"
    YARN_OPTS="$YARN_OPTS -Dhadoop.root.logger=${YARN_ROOT_LOGGER:-INFO,console}"
    YARN_OPTS="$YARN_OPTS -Dyarn.root.logger=${YARN_ROOT_LOGGER:-INFO,console}"
    if [ "x$JAVA_LIBRARY_PATH" != "x" ]; then
      YARN_OPTS="$YARN_OPTS -Djava.library.path=$JAVA_LIBRARY_PATH"
    fi
    YARN_OPTS="$YARN_OPTS -Dyarn.policy.file=$YARN_POLICYFILE"
(12)yarn-site.xml配置:
接下来修改yarn-site.xml,指令同上:
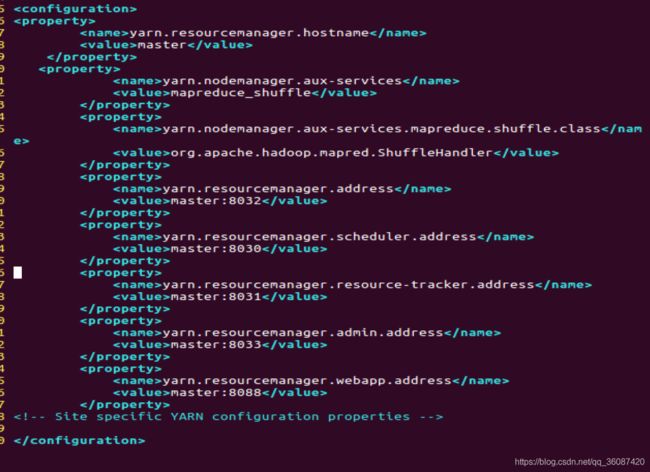
vim yarn-site.xml
	yarn.resourcemanager.hostname
	master


            yarn.nodemanager.aux-services
            mapreduce_shuffle


            yarn.nodemanager.aux-services.mapreduce.shuffle.class
            org.apache.hadoop.mapred.ShuffleHandler


            yarn.resourcemanager.address
            master:8032


            yarn.resourcemanager.scheduler.address
            master:8030


            yarn.resourcemanager.resource-tracker.address
            master:8031


            yarn.resourcemanager.admin.address
            master:8033


            yarn.resourcemanager.webapp.address
            master:8088
至此,Hadoop的配置文件配置完毕。
5.环境变量配置
下一步是配置环境变量,执行以下命令打开环境变量配置文件:
vim /etc/environment
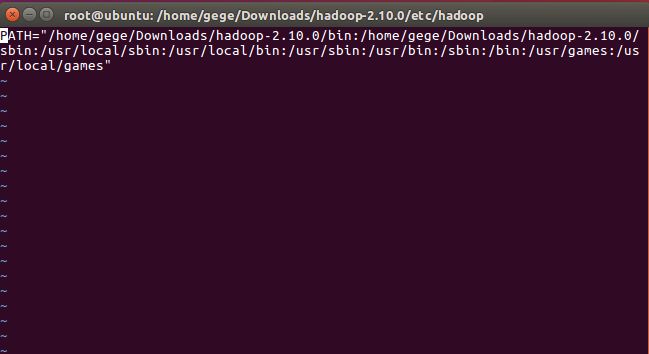
修改前:PATH="/usr/local/sbin:/usr/local/bin:/usr/sbin:/usr/bin:/sbin:/bin:/usr/games:/usr/local/games"
修改后:
 PATH="/home/gege/Downloads/hadoop-2.10.0/bin:/home/gege/Downloads/hadoop-2.10.0/sbin:/usr/local/sbin:/usr/local/bin:/usr/sbin:/usr/bin:/sbin:/bin:/usr/games:/usr/local/games"
注意增加的hadoop路径,然后输入以下命令使当前配置的环境变量生效,若仍没有生效,请尝试重启:
source /etc/environment

到此时为止,配置Hadoop在一台机器需要完成的工作结束,输入poweroff关机。回到VMware pro 12中,对此虚拟机进行二次克隆。
6.克隆虚拟机
点击VMware边栏上的虚拟机,选择管理->克隆->下一步->创建完整克隆,输入克隆后的虚拟机,如图所示:

待克隆完成后,VMware的虚拟机资源列表应如下图所示:

7.启动三个HADOOP节点
接下来需要打开三台虚拟机进行操作了,同时启动三台虚拟机,如图所示:
(1)节点开机:

(2)修改虚拟机名称
修改三台虚拟机名称并重启:


(3)配置SSH密钥
分别打开三台虚拟机的终端,输入ifconfig命令分别查看三台IP地址,按照虚拟机名分配master、slave,并填写在/etc/hosts文件中,如图所示:
查看ip:
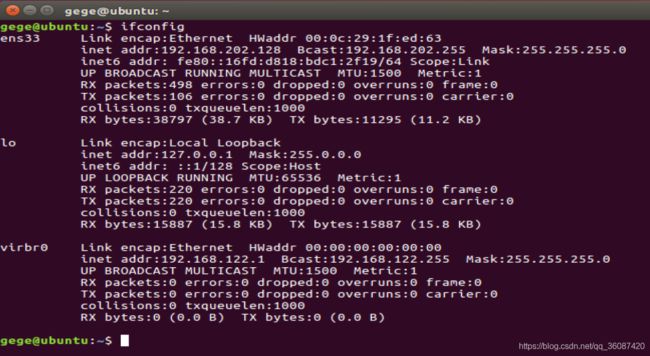
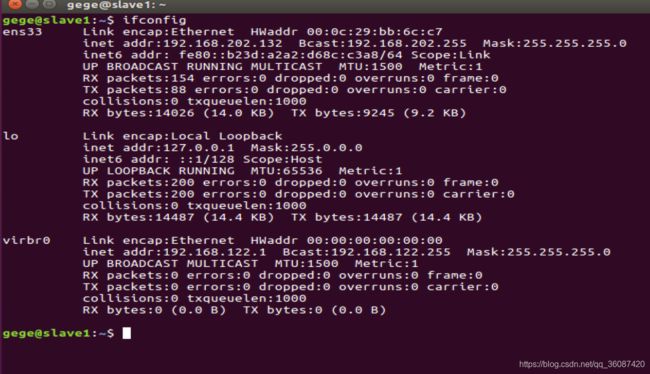
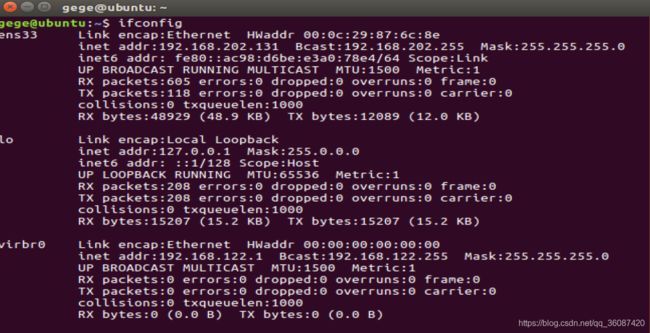
分别在三台虚拟机上执行下列命令配置 /etc/hosts:
sudo vim /etc/hosts


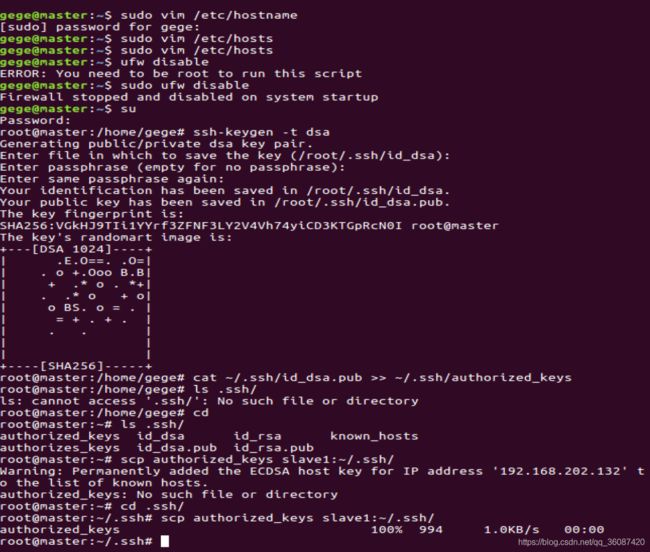
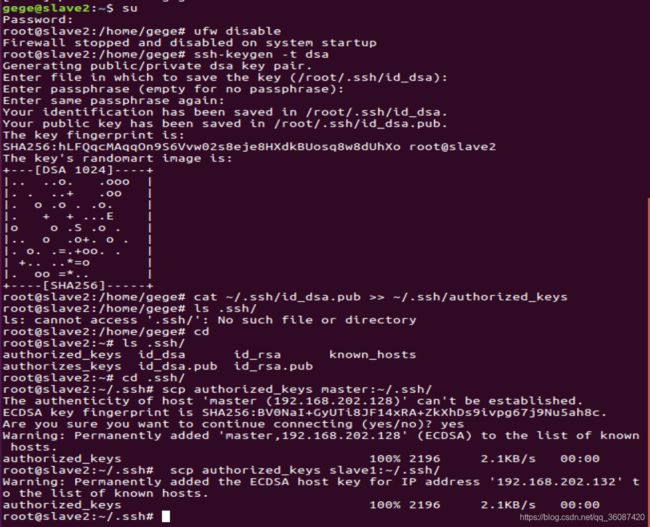
完成后保存hosts文件,并分别在三台主机上配置SSH密钥,在master上执行以下命令:
    ufw disable
    ssh-keygen -t dsa
    cat ~/.ssh/id_dsa.pub >> ~/.ssh/authorized_keys
    ls .ssh/
    scp authorized_keys slave1:~/.ssh/
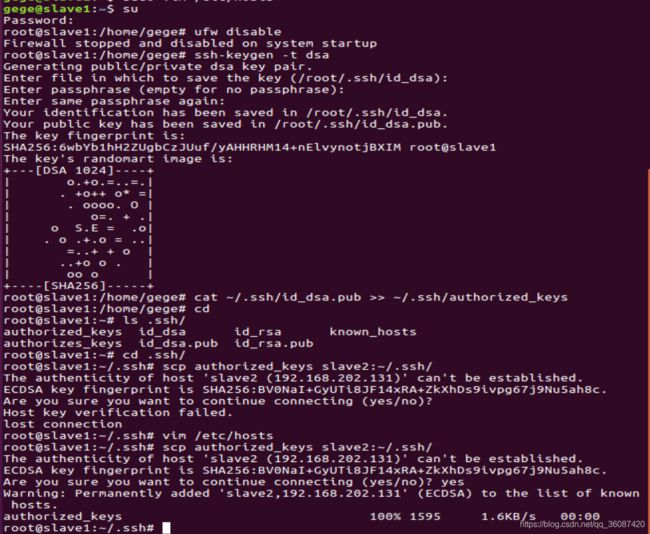
    ufw disable
    ssh-keygen -t dsa
    cat ~/.ssh/id_dsa.pub >> ~/.ssh/authorized_keys
    ls .ssh/
    scp authorized_keys slave2:~/.ssh/
    ufw disable
    ssh-keygen -t dsa
    cat ~/.ssh/id_dsa.pub >> ~/.ssh/authorized_keys
    ls .ssh/
    scp authorized_keys master:~/.ssh/
    scp authorized_keys slave1:~/.ssh/
如图所示:
至此,SSH密钥配置完毕。
(4)格式化NameNode节点
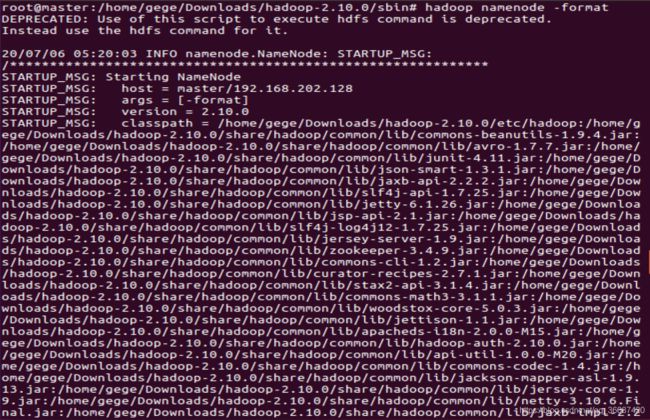
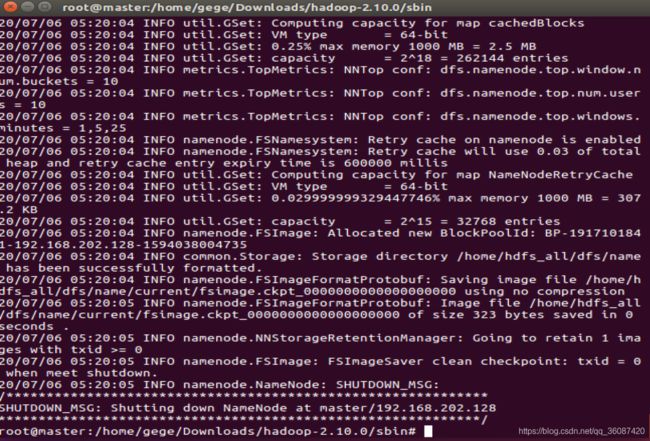
接下来在master节点上执行以下命令格式化namenode节点:
hadoop namenode -format
8.配置完成 启动Hadoop
(1)此时Hadoop已经配置完毕,输入以下命令在master节点上启动Hadoop:
start-all.sh
如图所示:

(2)检测是否启动成功:
分别在三台节点上运行下列命令:
jps


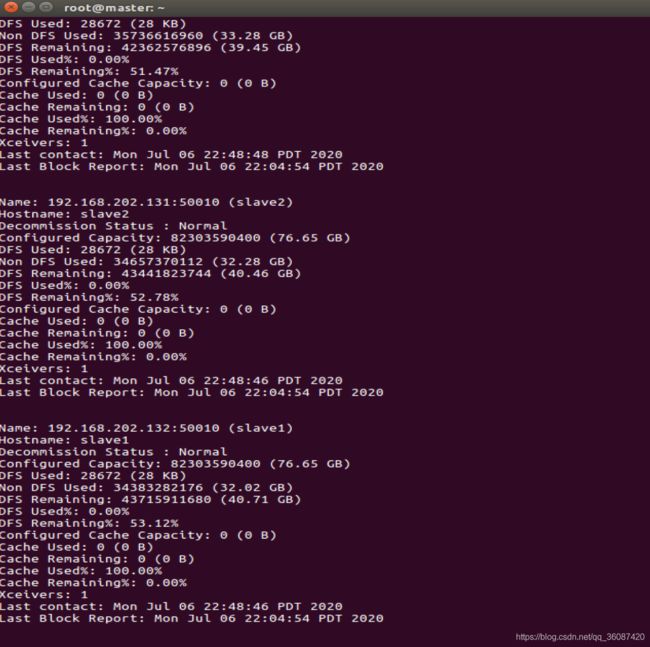
(3)若读者运行的jps和图片上一致,说明配置成功,运行下面的命令查看集群的状态:
hadoop dfsadmin -report
(4)网页报告图:
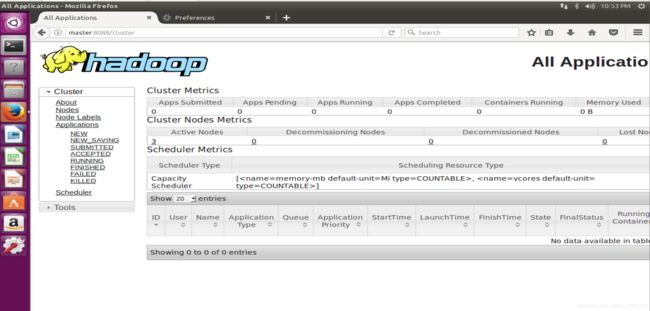
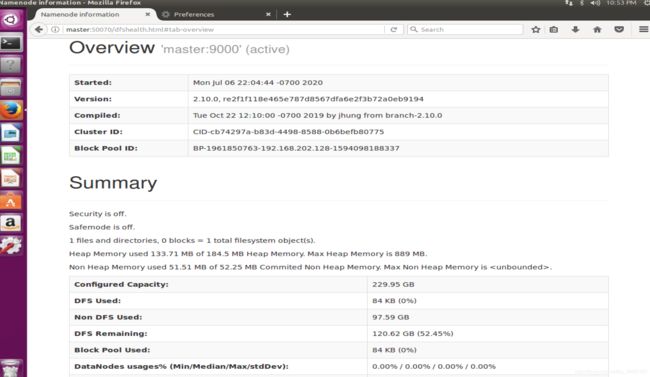
有此图可以看到,Hadoop已配置成功,输入master:8088和master:50070,打开网页查看如下:
9搭建完成及停止服务
至此,Hadoop分布式集群开发环境搭建完毕,若需要停止Hadoop运行,则执行以下命令:
stop-all.sh


