R语言ggplot2绘制分组箱型图和分组柱状图
需求
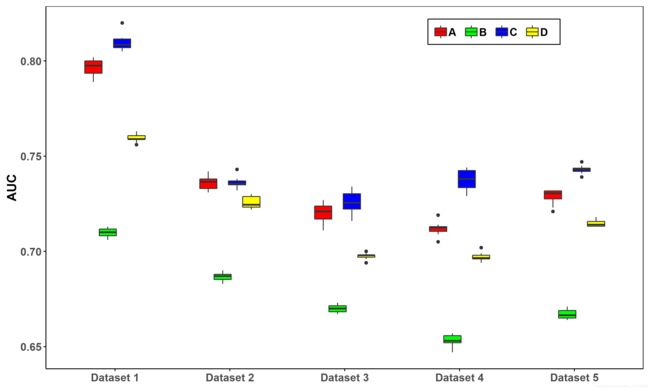
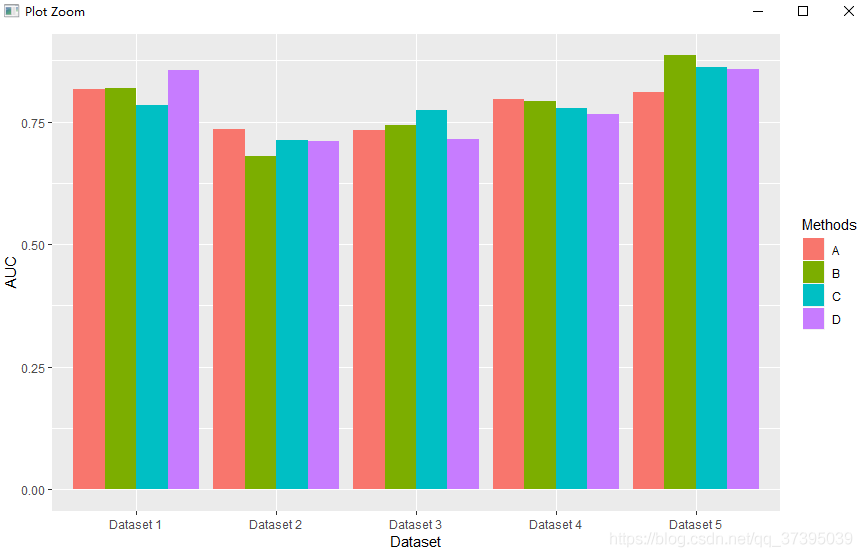
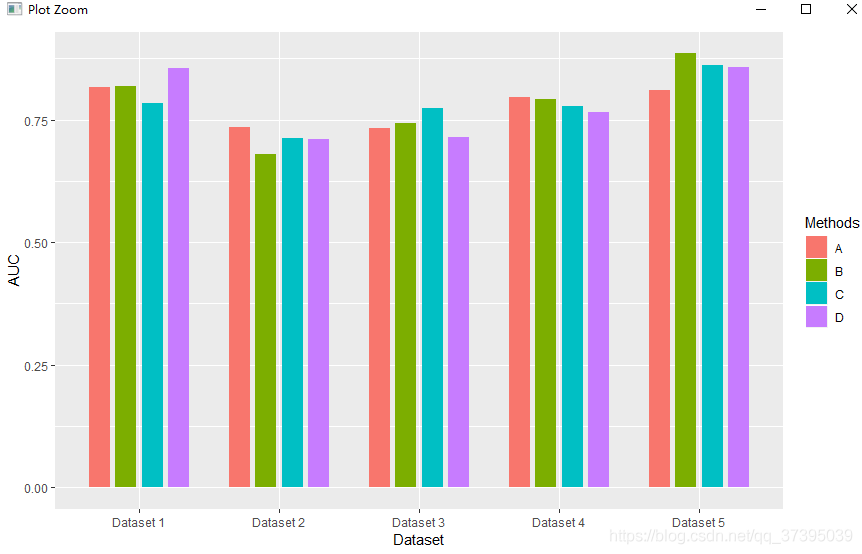
论文中常见的分组箱型图和分组条形图可以直观的比较方法的效果,以一个图显示多个方法在多个数据集上的AUC或AUPR。
抽象出来的数据即包含2个分类变量和1个连续变量,
不同的方法(分类变量1)在不同的条件下(分类变量2)的一个评价指标(数值型,连续变量)上的结果,可进行方法比较,也可进行条件比较。
环境
安装并加载包
library(ggplot2)
分组条形图
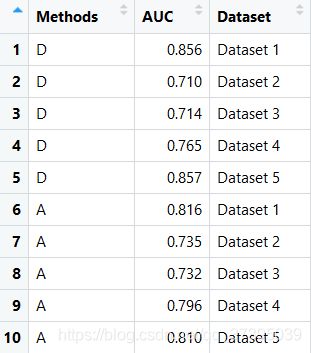
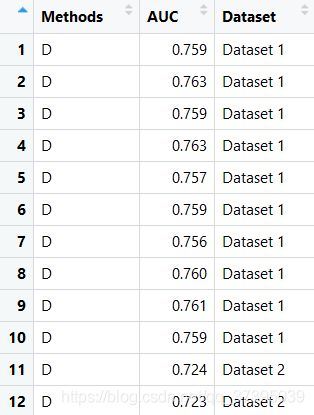
数据:
评价指标:AUC
方法:A、B、C、D
条件:Dataset1-5
作图函数
#读入数据文件
databar=read.csv(file='databar.csv',header = T,stringsAsFactors = F)
q1<-ggplot(data=databar, mapping=aes(x = Dataset, y = AUC,fill=Methods))+
  geom_bar(stat="identity",position=position_dodge(0.75))
q1
关于geom_bar()函数详解见https://www.jianshu.com/p/e443edd76daa
部分内容详解:
1.mapping:
x对应条形图的x轴(条件),y对应y轴数据(评价指标),fill对应图中的分类变量(方法)
2.设置stat="identity",
条形的高度表示数据的值,由aes()函数的y参数决定的
3.position参数:
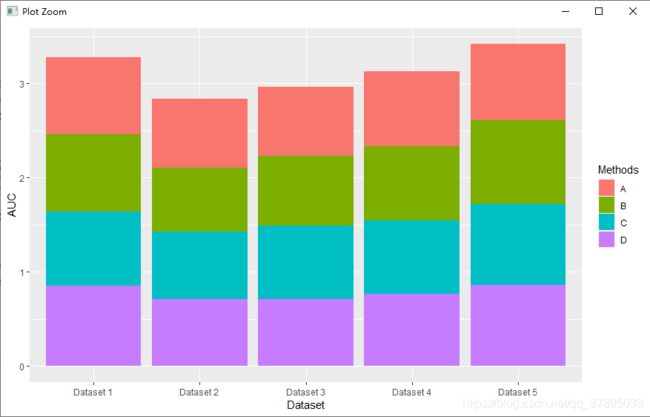
默认position="stack",这时是堆叠条形图
position还可以为以下几种取值:
fill 堆叠元素,并标准化为1;dodge避免重叠;identity不做任何调整;jitter给点添加扰动避免重合;stack将图形元素堆叠起来。
为了表现为分组条形图,设置position="dodge"或position=position_dodge(0.75)表示各个矩形条之间的距离
图形美化
仅靠默认绘出的图是不够的,进行一些必要的美化才能达标嘛
调整条形图的组间间隔
并没有找到能直接调整组间间隔的方法,最终的方式是通过“调节组内间距和bar的宽度”的方式,
通过组内间隔position_dodge(0.7)>矩形条的宽度width=0.5达到的效果
geom_bar(stat="identity",position=position_dodge(0.7),width=0.5)
#width 设置矩形条的宽度
对比原图,可以看出一个数据集内,不同方法的bar之间的间隔拉开了,并且不同数据集上的结果之间的间隔也拉开了。
设置坐标轴范围
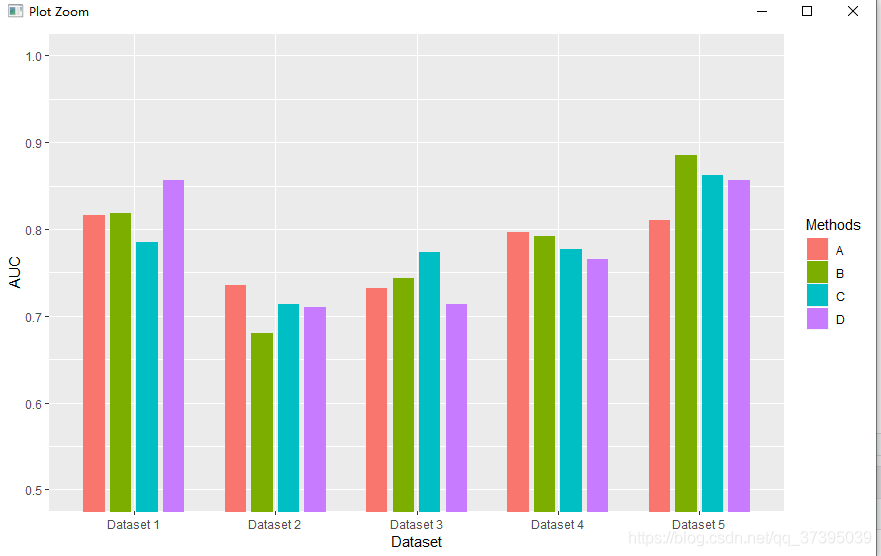
可以通过三种方式设置,但只有coord_cartesian可以设置从非0开始。(参见ggplot2作图——x轴、y轴的值域问题)
- scale_y_continuous(limits=c(0,2.5))
- ylim(0,0.5)
- coord_cartesian(ylim=c(0.5,1))
q1<-ggplot(data=csdn_bar, mapping=aes(x = Dataset, y = AUC,fill=Methods))+
  geom_bar(stat="identity",position=position_dodge(0.75),width=0.6)+
  coord_cartesian(ylim=c(0.5,1))
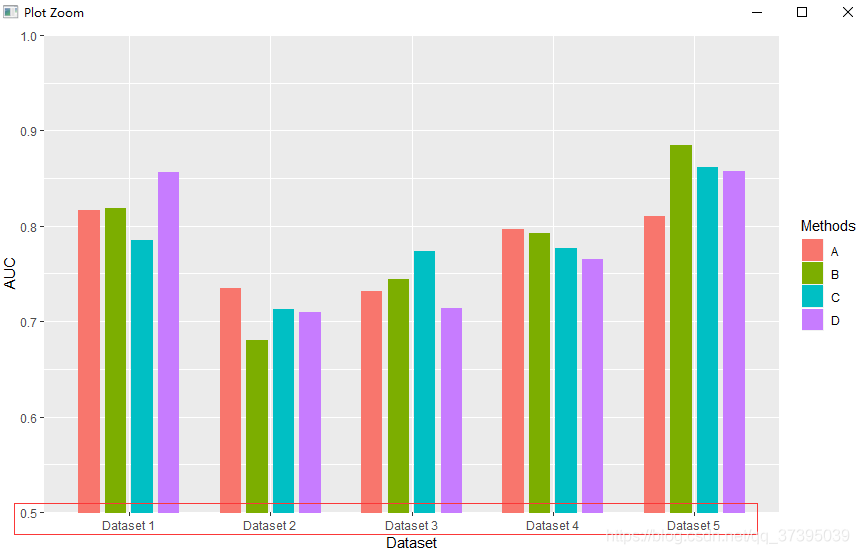
消除作图区域与坐标轴的间隙
scale_y_continuous(expand = c(0, 0))#消除x轴与绘图区的间隙
scale_x_continuous(expand = c(0, 0))#消除y轴与绘图区的间隙
详见关于在ggplot2作图中做到坐标原点对齐至(0,0)点(作图区与坐标轴无间隙)
q1<-ggplot(data=csdn_bar, mapping=aes(x = Dataset, y = AUC,fill=Methods))+
  geom_bar(stat="identity",position=position_dodge(0.75),width=0.6)+
  coord_cartesian(ylim=c(0.5,1))+
  scale_y_continuous(expand = c(0, 0))#消除x轴与绘图区的间隙
修改矩形条配色
1.修改颜色
参见ggplot2 配色笔记
ggplot2可以用已有的RColorBrewer配色方案,见使用 ggplot2 和 RColorBrewer 扩展调色板
q1<-ggplot(data=csdn_bar, mapping=aes(x = Dataset, y = AUC,fill=Methods))+
  geom_bar(stat="identity",position=position_dodge(0.75),width=0.6)+
  coord_cartesian(ylim=c(0.5,1))+
  scale_y_continuous(expand = c(0, 0))+#消除x轴与绘图区的间隙
  scale_fill_brewer(palette="Set1")
也可以自己配色,使用 scale_colour_manual(), scale_fill_manual()函数用于diy配色
q1<-ggplot(data=csdn_bar, mapping=aes(x = Dataset, y = AUC,fill=Methods))+
  geom_bar(stat="identity",position=position_dodge(0.75),width=0.6)+
  coord_cartesian(ylim=c(0.5,1))+
  scale_y_continuous(expand = c(0, 0))+#消除x轴与绘图区的间隙
  scale_fill_manual(values =c("#FC4E07","#00AFBB", "#E7B800","#4682B4" ))#颜色的十六进制代码,或直接用red、blue、green等也可
2.设置颜色的透明度
通过scale_fill_manual()中的alpha参数,来设置颜色的透明度
scale_fill_manual(values=alpha(c("#6495ED","#FFA500","#FF4500"), 0.5))ggplot2主题设置函数theme
其它关于ggplot2的绘图优化,就一定要涉及到ggplot2主题设置函数theme
theme:调整不与数据有关的图的元素的函数,自定义绘图的非数据组件(即标题、标签、字体、背景、网格线和图例)。
这个函数值得好好研究研究,详情可见https://www.cnblogs.com/Mao1518202/p/11417913.html
theme参数:
详细见ggplot2主题theme参数
#参数非常多
theme(line, rect, text, title, aspect.ratio, axis.title, axis.title.x,
  axis.title.x.top, axis.title.y, axis.title.y.right, axis.text, axis.text.x,
  axis.text.x.top, axis.text.y, axis.text.y.right, axis.ticks, axis.ticks.x,
  axis.ticks.y, axis.ticks.length, axis.line, axis.line.x, axis.line.y,
  legend.background, legend.margin, legend.spacing, legend.spacing.x,
  legend.spacing.y, legend.key, legend.key.size, legend.key.height,
  legend.key.width, legend.text, legend.text.align, legend.title,
  legend.title.align, legend.position, legend.direction, legend.justification,
  legend.box, legend.box.just, legend.box.margin, legend.box.background,
  legend.box.spacing, panel.background, panel.border, panel.spacing,
  panel.spacing.x, panel.spacing.y, panel.grid, panel.grid.major,
  panel.grid.minor, panel.grid.major.x, panel.grid.major.y, panel.grid.minor.x,
  panel.grid.minor.y, panel.ontop, plot.background, plot.title, plot.subtitle,
  plot.caption, plot.margin, strip.background, strip.placement, strip.text,
  strip.text.x, strip.text.y, strip.switch.pad.grid, strip.switch.pad.wrap, ...,
  complete = FALSE, validate = TRUE)
theme的参数大致可以总结为几个方面:
- axis:与坐标轴相关的设置
- legend:与图例相关的设置
- panel:绘图区相关设置
theme的参数通常通过以下四种主要函数来设置:
- element_text():设置基于文本的组件,如title,subtitle 和caption等。
- element_line():设置基于线的组件,如轴线,主网格线和次网格线等。
- element_rect():修改基于矩形的组件,如绘图区域和面板区域的背景。
- element_blank():清空任意主题对象,默认返回默认主题。
也是参考了网上,加上自己的需求,把其它利用theme做美化的需求封装到了一个函数中
#theme函数设置
theme_bar <- function(..., bg='white'){
  require(grid)
  theme_classic(...) +
    theme(rect=element_rect(fill=bg),
          plot.margin=unit(rep(0.5,4), 'lines'),
          panel.background=element_rect(fill='transparent', color='black'),
          panel.border=element_rect(fill='transparent', color='transparent'),
          panel.grid=element_blank(),#去网格线
          axis.title.x = element_blank(),#去x轴标签
          axis.title.y=element_text(face = "bold",size = 14),#y轴标签加粗及字体大小
          axis.text = element_text(face = "bold",size = 12),#坐标轴刻度标签加粗
          # axis.ticks = element_line(color='black'),#坐标轴刻度线
          # axis.ticks.margin = unit(0.8,"lines"),
          legend.title=element_blank(),#去除图例标题
          # legend.justification=c(1,0),#图例在画布的位置(绘图区域外)
          legend.position=c(0.28, 0.9),#图例在绘图区域的位置
          # legend.position='top',#图例放在顶部
          legend.direction = "horizontal",#设置图例水平放置
          # legend.spacing.x = unit(2, 'cm'),
          legend.text = element_text(face = "bold",size = 12,margin = margin(r=20)),
          legend.background = element_rect( linetype="solid",colour ="black")
          # legend.margin=margin(0,0,-7,0)#图例与绘图区域边缘的距离
          # legend.box.margin =margin(-10,0,0,0)
    )

}
#绘图
q1<-ggplot(data=csdn_bar, mapping=aes(x = Dataset, y = AUC,fill=Methods))+
  geom_bar(stat="identity",position=position_dodge(0.75),width=0.6)+
  coord_cartesian(ylim=c(0.5,1))+
  scale_y_continuous(expand = c(0, 0))+#消除x轴与绘图区的间隙
  scale_fill_manual(values =c("#FC4E07","#00AFBB", "#E7B800","#4682B4" ))+
  theme_bar()
q1
图片保存
ggplot2提供了ggsave函数,可以快速保存为所需格式的图片,
"eps", "ps", "tex" (pictex), "pdf", "jpeg", "tiff", "png", "bmp", "svg" 和 "wmf"
(有直接保存为eps图像这点超棒)
通过device参数,或直接添加为文件名后缀
ggsave(filename, plot = last_plot(), device = NULL, path = NULL,
  scale = 1, width = NA, height = NA, units = c("in", "cm", "mm"),
  dpi = 300, limitsize = TRUE, ...)
ggsave('Result/bar.png', plot = q1,width=10,height = 4)
分组箱型图
数据
评价指标:AUC
方法:A、B、C、D
条件:Dataset1-5
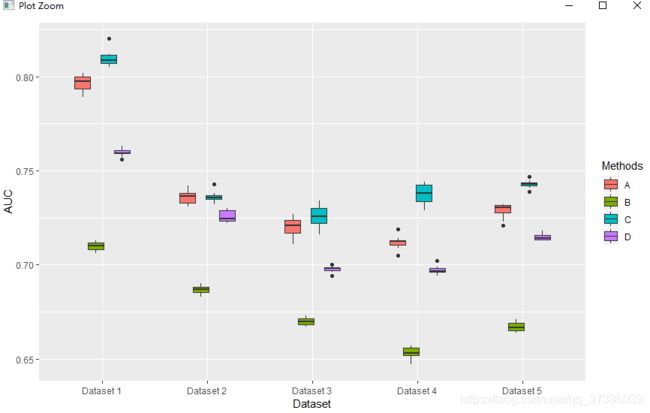
注:箱型图与条形图相比,箱型图可以看出方法的鲁棒性,
条形图显示一个方法在一个数据集上的运行n次的平均AUC
箱型图显示了一个方法在一个数据集上运行n次的AUC的波动(最小值、最大值、均值等)
作图函数
csdn_box=read.csv(file='Result/csdn_box.csv',header = T,stringsAsFactors = F)
e1 <- ggplot(csdn_box, aes(x = Dataset, y = AUC))+
  geom_boxplot(aes(fill = Methods),position=position_dodge(0.5),width=0.6)
e1
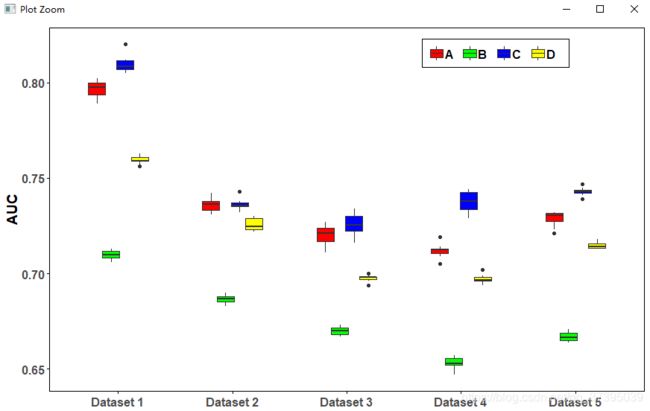
图形美化
分组箱型图的绘图美化和条形图的一致。
#图片美化
theme_zg <- function(..., bg='white'){
  require(grid)
  theme_classic(...) +
    theme(rect=element_rect(fill=bg),
          plot.margin=unit(rep(0.5,4), 'lines'),
          panel.background=element_rect(fill='transparent',color='black'),
          panel.border=element_rect(fill='transparent', color='transparent'),
          panel.grid=element_blank(),#去网格线
          axis.line = element_line(colour = "black"),
          axis.title.x = element_blank(),#去x轴标签
          axis.title.y=element_text(face = "bold",size = 14),#y轴标签加粗及字体大小
          axis.text = element_text(face = "bold",size = 12),#坐标轴刻度标签加粗
          axis.ticks = element_line(color='black'),
          # axis.ticks.margin = unit(0.8,"lines"),
          legend.title=element_blank(),
          legend.position=c(0.75, 0.93),#图例在绘图区域的位置
          legend.direction = "horizontal",
          legend.text = element_text(face = "bold",size = 12,margin = margin(r=8)),
          legend.background = element_rect( linetype="solid",colour ="black")
    )
}

#读入数据
csdn_box=read.csv(file='Result/csdn_box.csv',header = T,stringsAsFactors = F)
e1 <- ggplot(csdn_box, aes(x = Dataset, y = AUC))+
  geom_boxplot(aes(fill = Methods),position=position_dodge(0.5),width=0.6)+
  scale_fill_manual(values = c("red", "green","blue","yellow"))+theme_zg()
e1
#保存图片
ggsave('Result/csdn_box.png', plot = e1,width=10,height = 6)