java并发设计模式:Future与JDK8的CompletableFuture异步编程详解
一. Future
JDK 5引入了Future模式。Future接口是Java多线程Future模式的实现,在java.util.concurrent包中,可以来进行异步计算。
Future模式是多线程设计常用的一种设计模式。Future模式可以理解成:我有一个任务,提交给了Future,Future替我完成这个任务。期间我自己可以去做任何想做的事情。一段时间之后,我就便可以从Future那儿取出结果。
Future的接口很简单,只有五个方法,当然最核心的就是get, 我们便是通过get方法从Future的实体对象中获取执行结果。
首先我们来看一下Future的编程实例:
public static void main(String[] args) throws Exception{
        // 使用线程池,返回的是ThreadPoolExecutor执行器
        ExecutorService executor = Executors.newFixedThreadPool(1);

        //Lambda 是一个 callable, 提交后便立即执行,这里返回的是 FutureTask 实例
        Future future = executor.submit(()->{
            System.out.println("running task");
            Thread.sleep(1000);
            return "hello world";
        });
        // 以上提交不阻塞主线程,立即返回,这里可用来处理其它业务逻辑,用一个sleep代替
        Thread.sleep(2000);

        //等待 future 的执行结果,执行完毕之后打印出来
        System.out.println("返回执行结果:" + future.get());
        //关闭线程池
        executor.shutdown();
}
可以看到submit是核心的提交任务的方法,我们从ThreadPoolExecutor找到submit方法:
protected  RunnableFuture newTaskFor(Callable callable) {
        return new FutureTask(callable);
}

public  Future submit(Callable task) {
        if (task == null) throw new NullPointerException();
        RunnableFuture ftask = newTaskFor(task);
        execute(ftask);
        return ftask;
}
可以看到,FutureTask任务ftask还是会跟随execute执行,定位到ThreadPoolExecutor下的execute:
public void execute(Runnable command) {
        if (command == null)
            throw new NullPointerException();

        int c = ctl.get();
        if (workerCountOf(c) < corePoolSize) {
            if (addWorker(command, true))
                return;
            c = ctl.get();
        }
        if (isRunning(c) && workQueue.offer(command)) {
            int recheck = ctl.get();
            if (! isRunning(recheck) && remove(command))
                reject(command);
            else if (workerCountOf(recheck) == 0)
                addWorker(null, false);
        }
        else if (!addWorker(command, false))
            reject(command);
}
又调用到内部关键接口addWorker:
private boolean addWorker(Runnable firstTask, boolean core) {
        retry:
        for (;;) {
            int c = ctl.get();
            int rs = runStateOf(c);

            // Check if queue empty only if necessary.
            if (rs >= SHUTDOWN &&
                ! (rs == SHUTDOWN &&
                   firstTask == null &&
                   ! workQueue.isEmpty()))
                return false;

            for (;;) {
                int wc = workerCountOf(c);
                if (wc >= CAPACITY ||
                    wc >= (core ? corePoolSize : maximumPoolSize))
                    return false;
                if (compareAndIncrementWorkerCount(c))
                    break retry;
                c = ctl.get();  // Re-read ctl
                if (runStateOf(c) != rs)
                    continue retry;
                // else CAS failed due to workerCount change; retry inner loop
            }
        }

        boolean workerStarted = false;
        boolean workerAdded = false;
        Worker w = null;
        try {
            w = new Worker(firstTask);
            final Thread t = w.thread;
            if (t != null) {
                final ReentrantLock mainLock = this.mainLock;
                mainLock.lock();
                try {
                    // Recheck while holding lock.
                    // Back out on ThreadFactory failure or if
                    // shut down before lock acquired.
                    int rs = runStateOf(ctl.get());

                    if (rs < SHUTDOWN ||
                        (rs == SHUTDOWN && firstTask == null)) {
                        if (t.isAlive()) // precheck that t is startable
                            throw new IllegalThreadStateException();
                        workers.add(w);
                        int s = workers.size();
                        if (s > largestPoolSize)
                            largestPoolSize = s;
                        workerAdded = true;
                    }
                } finally {
                    mainLock.unlock();
                }
                if (workerAdded) {
                    t.start();
                    workerStarted = true;
                }
            }
        } finally {
            if (! workerStarted)
                addWorkerFailed(w);
        }
        return workerStarted;
    }
可以看到,它会先判断队列的当前状态以及队列能够容纳的最大任务数,条件允许,则会往下创建工作线程workers, 然后把firstTask添加到工作线程组当中workers.add(w),接下来可以看到工作线程Worker会调用runWorker方法:
final void runWorker(Worker w) {
        Thread wt = Thread.currentThread();
        Runnable task = w.firstTask;
        w.firstTask = null;
        w.unlock(); // allow interrupts
        boolean completedAbruptly = true;
        try {
            while (task != null || (task = getTask()) != null) {
                w.lock();
                // If pool is stopping, ensure thread is interrupted;
                // if not, ensure thread is not interrupted.  This
                // requires a recheck in second case to deal with
                // shutdownNow race while clearing interrupt
                if ((runStateAtLeast(ctl.get(), STOP) ||
                     (Thread.interrupted() &&
                      runStateAtLeast(ctl.get(), STOP))) &&
                    !wt.isInterrupted())
                    wt.interrupt();
                try {
                    beforeExecute(wt, task);
                    Throwable thrown = null;
                    try {
                        task.run();
                    } catch (RuntimeException x) {
                        thrown = x; throw x;
                    } catch (Error x) {
                        thrown = x; throw x;
                    } catch (Throwable x) {
                        thrown = x; throw new Error(x);
                    } finally {
                        afterExecute(task, thrown);
                    }
                } finally {
                    task = null;
                    w.completedTasks++;
                    w.unlock();
                }
            }
            completedAbruptly = false;
        } finally {
            processWorkerExit(w, completedAbruptly);
        }
}注意看,这里绕了一大圈,最终主要还是调用到task的run方法里去了,前面就追踪过,task是FutureTask的实例那么看FutureTask的run方法:
public void run() {
        if (state != NEW ||
            !UNSAFE.compareAndSwapObject(this, runnerOffset,null, Thread.currentThread()))
            return;
        try {
            Callable c = callable;
            if (c != null && state == NEW) {
                V result;
                boolean ran;
                try {
                    result = c.call();
                    ran = true;
                } catch (Throwable ex) {
                    result = null;
                    ran = false;
                    setException(ex);
                }
                if (ran)
                    set(result);
            }
        } finally {
            ...
        }
    }
我们注意到,最终还是会调用FutureTask的set(V v)方法将result装载到成员变量outcome, 最后通过get方法拿到类对象里面的outcome变量的值,即可获取到执行结果。
protected void set(V v) {
        if (UNSAFE.compareAndSwapInt(this, stateOffset, NEW, COMPLETING)) {
            outcome = v;//这里将result的值放到成员变量outcome中
            UNSAFE.putOrderedInt(this, stateOffset, NORMAL); // final state
            finishCompletion();
        }
}

public V get() throws InterruptedException, ExecutionException {
        int s = state;
        if (s <= COMPLETING)
            s = awaitDone(false, 0L);//get的时候会阻塞await等待任务执行完
        return report(s);
}

private V report(int s) throws ExecutionException {
        //注意看这里x取到outcome的值,并作为后面返回值
        Object x = outcome;
        if (s == NORMAL)
            return (V)x;//返回取到的x
        if (s >= CANCELLED)
            throw new CancellationException();
        throw new ExecutionException((Throwable)x);
}
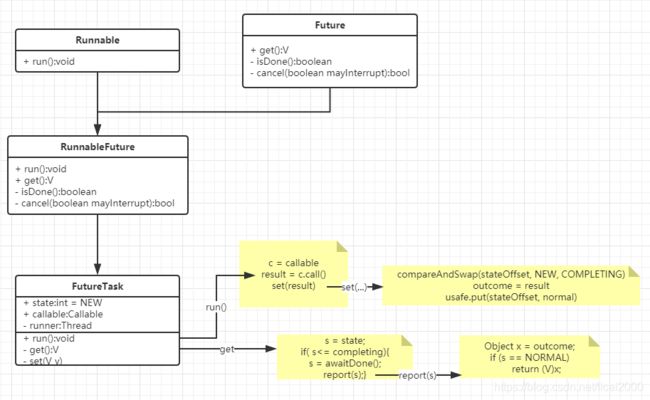
以上便是整个Future的执行过程,如何将结果保存到类成员,以及如何get获取执行结果。这里展示一下类/接口的依赖关系:
二.CompletableFuture
在jdk1.8之后我们引入了一种全新的Future可以弥补之前FutureTask的get阻塞获取结果的不足,这个时候我们的主角CompletableFuture就闪亮登场了。
我们直接先看下它的正确打开方式,上用例代码:
public static void main(String[] args) throws InterruptedException {
        CompletableFuture.supplyAsync(()->{
            //to do thread task
            try {
                Thread.sleep(1000);
            } catch (InterruptedException e) {
                e.printStackTrace();
            }
            //return task execute result
            return "hello world";
        }).thenAccept(result->{
            //这里我们监听任务的执行结果,并对其做响应的处理
            System.out.println("print async task result:"+result);
        });
        //由于以上是异步线程执行的,在这里我们主线程等待3秒,保证我们的任务线程能执行完
        Thread.sleep(3000);
}
好了,我们仅仅数十行代码就展示清楚了它的基本使用方法了。
