WheelView地区选择三级联动详解
1. 效果
最近需要做一个地区选择的功能,但是在网上和github上找了很久都没找到满意的,然后朋友推荐了一个给我,我花了点时间把代码大致看懂并改成我想要的,并写上我的理解。效果如图:

2. 注意
a. 首先我们要明白,网上这写三级联动的demo,不管是把数据库文件放在raw还是assets中,我们都要进行复制,将这个文件复制到app目录下,即
/data/data/"+context.getPackageName()+"/databases/至于到底放在raw还是assets中哪里好些,我也在网上查了下,见这篇博客这里点击 ,但是按照这里面说的好像.db文件最好放在assets中,但是这个demo中拿过来,原来的.db文件就是放在raw中,所以我也没改了。
b. 最重要的一点,因为我们一般都是将选择完以后的数据都要上传到服务器中,但是因为每个后台要求的不一样,所以对于这个地区的.db文件也要求不一样,所以我们最主要的是学会读取数据库文件然后通过代码形成联动,举个例子,比如美团有自己的一个数据库,我们定位湖南长沙芙蓉区,然后进行地区选择,将岳麓区上传服务器并且请求数据下来,但是我们一般不会直接上传文字,一个是怕重名,还有一个就是文字不会绝对的准确,比如两个字的地名黄山 和 黄 山,看起来都对,但是你们的后台服务器接受的参数是黄山,而且使用别人的数据库中使黄 山,那就出事了,所以我们一般都是传编码,但是每个数据库中城市编码一般都是不一样,所以我们需要找后台拿匹配的数据库文件或者js文件。如图所示,两份数据库,一份是朋友推荐自带的,例外一份是我们的。
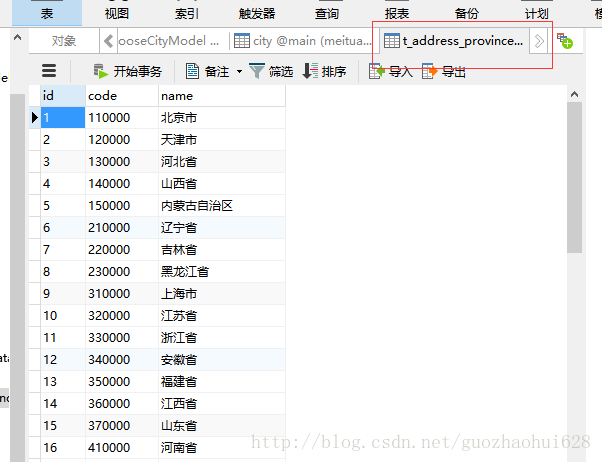
我的数据库中省市区只有一个表,而那份却有三个表,省 市 区三个表。并且编码也不一样,可以明显看出来。
3. 干货
a. 布局就直接贴代码了,很简单,mainactivity中就一个按钮,而popupwindow中是三个wheelview,
<LinearLayout xmlns:android="http://schemas.android.com/apk/res/android"
    android:orientation="vertical"
    android:background="#00000000"
    android:gravity="bottom"
    android:layout_width="match_parent"
    android:layout_height="match_parent">

    <LinearLayout
        android:id="@+id/ly_myinfo_changeaddress_child"
        android:layout_width="match_parent"
        android:layout_height="wrap_content"
        android:layout_alignParentBottom="true"
        android:background="#ffffff"
        android:orientation="vertical" >


        <RelativeLayout
            android:layout_width="match_parent"
            android:layout_height="44dp"
            >

            <View
                android:background="@color/silver"
                android:layout_width="match_parent"
                android:layout_height="0.5dp" />

            <TextView
                android:id="@+id/btn_myinfo_cancel"
                android:layout_width="wrap_content"
                android:layout_height="match_parent"
                android:paddingLeft="18dp"
                android:text="取消"
                android:gravity="center"
                android:layout_alignParentLeft="true"
                android:layout_marginRight="15dip"
                android:textColor="#e84515"
                android:textSize="14sp" />


            <TextView
                android:id="@+id/btn_myinfo_sure"
                android:layout_width="wrap_content"
                android:layout_height="match_parent"
                android:layout_alignParentRight="true"
                android:gravity="center"
                android:text="完成"
                android:textColor="#e84515"
                android:paddingRight="18dp"
                android:textSize="14sp" />

        RelativeLayout>

        <View android:layout_width="match_parent"
            android:layout_height="1dp"
            android:background="#d8d8d8"/>

        <LinearLayout
            android:layout_width="match_parent"
            android:layout_height="190dip"
            android:orientation="horizontal"
            android:gravity="center_vertical">

          <guozhaohui.com.wlylocationchoose.locationchoose.WheelView
              android:id="@+id/provinceView"
              android:layout_width="match_parent"
              android:layout_height="match_parent"
              android:layout_weight="1"/>


            <guozhaohui.com.wlylocationchoose.locationchoose.WheelView
                android:id="@+id/cityView"
                android:layout_width="match_parent"
                android:layout_height="match_parent"
                android:layout_weight="1"/>
            <guozhaohui.com.wlylocationchoose.locationchoose.WheelView
                android:id="@+id/districtView"
                android:layout_width="match_parent"
                android:layout_height="match_parent"
                android:layout_weight="1"/>
        LinearLayout>

    LinearLayout>

LinearLayout>
b. 因为上面说了,需要将文件copy到app目录下,所以直接最好这代码在application中写,
package guozhaohui.com.wlylocationchoose;

import android.app.Application;

import java.io.InputStream;

import guozhaohui.com.wlylocationchoose.locationchoose.CityDataHelper;

/**
 * Created by ${GuoZhaoHui} on 2017/2/13.
 * Abstract:
 */

public class MyApplication extends Application {

    private CityDataHelper dataHelper;

    @Override
    public void onCreate() {
        super.onCreate();

        /**
         * 放在application中,让app一启动就把raw中文件copy到 "/data/data/"+context.getPackageName()+"/databases/"
         * 这是app读取数据的方法,不管是将数据库文件放在raw或者assets中都是一样
         */
        dataHelper=CityDataHelper.getInstance(this);
        InputStream in = this.getResources().openRawResource(R.raw.city);
        dataHelper.copyFile(in,CityDataHelper.DATABASE_NAME,CityDataHelper.DATABASES_DIR);

    }
}
c. popupwindow不是本次的重点也直接贴代码,
 View popupView = LayoutInflater.from(this).inflate(R.layout.popup_locationchoose, null);
        mPopupWindow = new PopupWindow(popupView, ViewGroup.LayoutParams.MATCH_PARENT, ViewGroup.LayoutParams.WRAP_CONTENT, true);
        mPopupWindow.setTouchable(true);
        mPopupWindow.setFocusable(true);
        mPopupWindow.setOutsideTouchable(true);
        mPopupWindow.setAnimationStyle(R.style.popup_locationchoose_bottom);

        //  pickText = (TextView)popupView.findViewById(R.id.tv_pickText);
        provinceView = (WheelView)popupView.findViewById(R.id.provinceView);
        cityView = (WheelView)popupView.findViewById(R.id.cityView);
        districtView = (WheelView)popupView.findViewById(R.id.districtView);

        //确定或者取消
        btn_myinfo_sure = (TextView)popupView.findViewById(R.id.btn_myinfo_sure);
        btn_myinfo_cancel = (TextView) popupView.findViewById(R.id.btn_myinfo_cancel);
        btn_myinfo_cancel.setOnClickListener(this);
        btn_myinfo_sure.setOnClickListener(this);
设置三个wheelview的可见条目数
        provinceView.setVisibleItems(7);
        cityView.setVisibleItems(7);
        districtView.setVisibleItems(7);
为三个 wheelview添加滑动事件
    // 添加change事件
        provinceView.addChangingListener(this);
        // 添加change事件
        cityView.addChangingListener(this);
        // 添加change事件
        districtView.addChangingListener(this);
c. 拿到操作数据的对象SQLiteDatabase
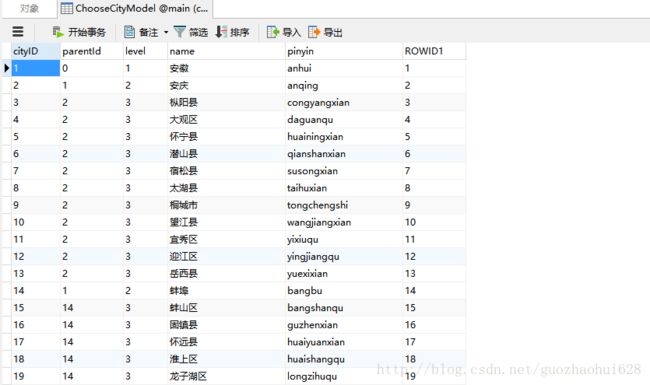
db = dataHelper.openDataBase();观察数据库文件可知这表中是根据字段level来判断省市区的,如图

同时我们也可知这省市区三个模型中的字段都是一样的,都是
    private int cityID;
    private int parentId;
    private int level;
    private String name;
    private String pinyin;
不清楚的可以自己查下表,如图,我查一个省
所以我们建立一样的模型,虽然三个字段是一样的,建一个就可以了,但是为了标准最好还是建三个。
package guozhaohui.com.wlylocationchoose.locationchoose.model;

public class ProvinceModel {

    private int cityID;
    private int parentId;
    private int level;
    private String name;
    private String pinyin;

    public int getCityID() {
        return cityID;
    }

    public void setCityID(int cityID) {
        this.cityID = cityID;
    }

    public int getParentId() {
        return parentId;
    }

    public void setParentId(int parentId) {
        this.parentId = parentId;
    }

    public int getLevel() {
        return level;
    }

    public void setLevel(int level) {
        this.level = level;
    }

    public String getName() {
        return name;
    }

    public void setName(String name) {
        this.name = name;
    }

    public String getPinyin() {
        return pinyin;
    }

    public void setPinyin(String pinyin) {
        this.pinyin = pinyin;
    }


}
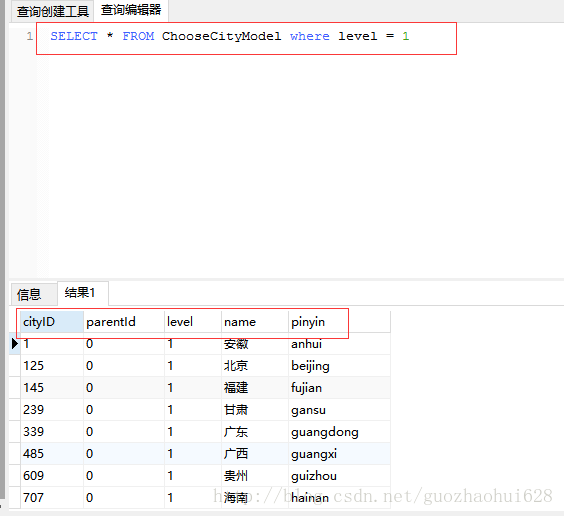
进行sql查询,将查询到的结果保存在cursor中,然后进行一行行的循环遍历,然后将遍历一行的对象添加到这个对象的集合中。这里得到省的集合。
 public List getProvice(SQLiteDatabase db){
        String sql="SELECT * FROM ChooseCityModel where level = 1 ORDER BY cityID";
        Cursor cursor = db.rawQuery(sql,null);
        List list=new ArrayList();
        if (cursor!=null&&cursor.getCount() > 0) {
            while (cursor.moveToNext()){
                ProvinceModel provinceModel=new ProvinceModel();
                provinceModel.setCityID(cursor.getInt(cursor.getColumnIndex("cityID")));
                provinceModel.setParentId(cursor.getInt(cursor.getColumnIndex("parentId")));
                provinceModel.setLevel(cursor.getInt(cursor.getColumnIndex("level")));
                provinceModel.setName(cursor.getString(cursor.getColumnIndex("name")));
                provinceModel.setPinyin(cursor.getString(cursor.getColumnIndex("pinyin")));
                list.add(provinceModel);
            }
        }
        return list;
    }
根据表的结构,得到相应的sql语句,希望根据上一级省的cityId得到下面的市,其实换句话说本级市的parentId就是上一级的cityid,不清楚的可以将sql语句查一遍,验证下对不对,如图
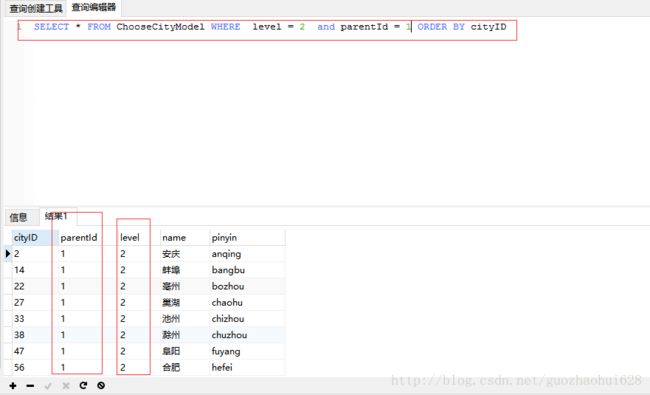
得到相应省下面市的集合
 public List getCityByParentId(SQLiteDatabase db, String code){
        String sql="SELECT * FROM ChooseCityModel WHERE  level = 2  and parentId = ? ORDER BY cityID";
        Cursor cursor = db.rawQuery(sql,new String[]{code});
        List list=new ArrayList();

        if (cursor!=null&&cursor.getCount() > 0) {

            while (cursor.moveToNext()){
                CityModel cityModel=new CityModel();
                cityModel.setCityID(cursor.getInt(cursor.getColumnIndex("cityID")));
                cityModel.setParentId(cursor.getInt(cursor.getColumnIndex("parentId")));
                cityModel.setLevel(cursor.getInt(cursor.getColumnIndex("level")));
                cityModel.setName(cursor.getString(cursor.getColumnIndex("name")));
                cityModel.setPinyin(cursor.getString(cursor.getColumnIndex("pinyin")));
                list.add(cityModel);
            }
        }
        return list;
    }
区也是一样的,直接贴代码了
   public List getDistrictById(SQLiteDatabase db, String code){
        //注意这里的parentId其实就是上一级的cityID
        String sql="SELECT * FROM ChooseCityModel WHERE  level = 3  and parentId = ? ORDER BY cityID";
        Cursor cursor = db.rawQuery(sql,new String[]{code});
        List list=new ArrayList();
        if (cursor!=null&&cursor.getCount() > 0) {
            while (cursor.moveToNext()){
                DistrictModel districtModel=new DistrictModel();
                districtModel.setCityID(cursor.getInt(cursor.getColumnIndex("cityID")));
                districtModel.setParentId(cursor.getInt(cursor.getColumnIndex("parentId")));
                districtModel.setLevel(cursor.getInt(cursor.getColumnIndex("level")));
                districtModel.setName(cursor.getString(cursor.getColumnIndex("name")));
                districtModel.setPinyin(cursor.getString(cursor.getColumnIndex("pinyin")));
                list.add(districtModel);
            }
        }
        return list;
    }
d. 对弹出popuwindow显示的wheelview进行初始化,注释都写在代码里,
 private void initpopData() {
        //初始化数据
        dataHelper = CityDataHelper.getInstance(this);
        db = dataHelper.openDataBase();
        provinceDatas = dataHelper.getProvice(db);
        if (provinceDatas.size() > 0) {

            //弹出popup时,省wheelview中当前的省其实就是省集合的第一个
            mCurrentProvince = provinceDatas.get(0).getName();

            //根据省cityid查询到第一个省下面市的集合
            cityDatas = dataHelper.getCityByParentId(db, provinceDatas.get(0).getCityID()+"");
        }
        if (cityDatas.size() > 0) {
            //根据市cityid查询到第一个市集合下面区的集合
            districtDatas = dataHelper.getDistrictById(db, cityDatas.get(0).getCityID()+"");

        }
        //wheelview的适配器代码
        provinceAdapter = new ProvinceAdapter(this, provinceDatas);
        provinceAdapter.setTextSize(TEXTSIZE);//设置字体大小
        provinceView.setViewAdapter(provinceAdapter);

        updateCitys();
        updateAreas();
    }
更新省下面市的wheelview内容,注释很清楚,直接上代码
   private void updateCitys() {
        int pCurrent = provinceView.getCurrentItem();
        if (provinceDatas.size() > 0) {
            //这里是必须的的,上面得到的集合只是第一个省下面所有市的集合及第一个市下面所有区的集合
            //这里得到的是相应省下面对应市的集合
            cityDatas = dataHelper.getCityByParentId(db, provinceDatas.get(pCurrent).getCityID()+"");
        } else {
            cityDatas.clear();
        }
        citysAdapter = new CitysAdapter(this, cityDatas);
        citysAdapter.setTextSize(TEXTSIZE);
        cityView.setViewAdapter(citysAdapter);
        if (cityDatas.size() > 0) {
            //默认省下面 市wheelview滑动第一个,显示第一个市
            cityView.setCurrentItem(0);
            mCurrentCity = cityDatas.get(0).getName();
        } else {
            mCurrentCity = "";
        }
        updateAreas();
    }
第三个wheelview和第二个一样的,代码直接上
  private void updateAreas() {
        int cCurrent = cityView.getCurrentItem();
        if (cityDatas.size() > 0) {
            districtDatas = dataHelper.getDistrictById(db, cityDatas.get(cCurrent).getCityID()+"");
        } else {
            districtDatas.clear();
        }
        areaAdapter = new AreaAdapter(this, districtDatas);
        areaAdapter.setTextSize(TEXTSIZE);
        districtView.setViewAdapter(areaAdapter);
        if (districtDatas.size() > 0) {
            mCurrentDistrict = districtDatas.get(0).getName();
            districtView.setCurrentItem(0);
        } else {
            mCurrentDistrict = "";
        }
    }
4. 道友留步
1.因为我朋友也是在网上哪里找到的demo,所以这原版是谁的也不知道了。
2. 源码地址这里点击