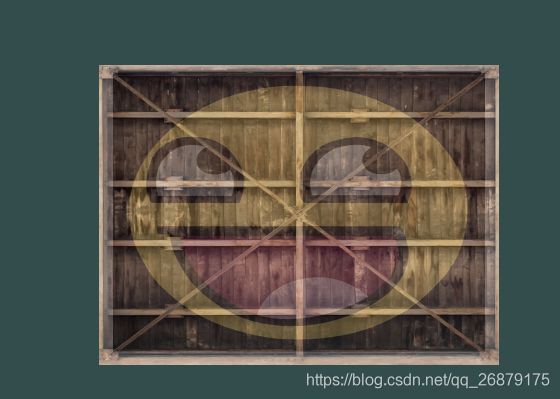
6 开心的箱子。加纹理。
在第五个程序的基础上,只改动了两个文件。
test.cpp文件:
/*
环境:glfw+glad
opengl第六个程序,创建一个窗口,并渲染为墨绿色,按esc键退出。
绘制两个三角形,三个顶点颜色不同。
加纹理,开心的箱子
*/

#define STB_IMAGE_IMPLEMENTATION //解决这个问题”无法解析的外部符号 _stbi_load,该符号在函数 _main 中被引用”
#include
#include //顺序不能换
#include
#include
#include
//using namespace std;

void framebuffer_size_callback(GLFWwindow* window, int width, int height);
void processInput(GLFWwindow *window);


int main() {
	glfwInit();//初始化glfw


	//创建一个窗口对象
	GLFWwindow* window = glfwCreateWindow(800, 600, "我的第一个 OpenGL", NULL, NULL);
	if (window == NULL) {
		std::cout << "创建窗口失败" << std::endl;
		glfwTerminate();
		return -1;
	}
	glfwMakeContextCurrent(window);//设置当前的窗口上下文
	glfwSetFramebufferSizeCallback(window, framebuffer_size_callback);//设置回调函数,改变窗口大小

	//glad
	//GLAD是用来管理OpenGL的函数指针的,所以在调用任何OpenGL的函数之前我们需要初始化GLAD
	if (!gladLoadGLLoader((GLADloadproc)glfwGetProcAddress)) {
		std::cout << "初始化glad失败" << std::endl;
		return -1;
	}

	//构建并编译我们的着色程序
	Shader ourShader("4.3.shader.vs", "4.3.shader.fs");


	//三角形三个顶点
	float vertices[] = {
		// positions          // colors           // 纹理坐标
		 0.5f,  0.5f, 0.0f,   1.0f, 0.0f, 0.0f,   1.0f, 1.0f, // top right
		 0.5f, -0.5f, 0.0f,   0.0f, 1.0f, 0.0f,   1.0f, 0.0f, // bottom right
		-0.5f, -0.5f, 0.0f,   0.0f, 0.0f, 1.0f,   0.0f, 0.0f, // bottom left
		-0.5f,  0.5f, 0.0f,   1.0f, 1.0f, 0.0f,   0.0f, 1.0f  // top left
	};
	unsigned int indices[] = {
		0, 1, 3, // 第一个三角形
		1, 2, 3  // 第二个三角形
	};

	//创建一个VAO
	unsigned int VBO,VAO,EBO;
	glGenVertexArrays(1, &VAO);
	glGenBuffers(1, &VBO);//使用glGenBuffers函数和一个缓冲ID生成一个VBO对象
	glGenBuffers(1, &EBO);

	// 1. 绑定VAO
	glBindVertexArray(VAO);
	// 2. 把顶点数组复制到缓冲中供OpenGL使用
	glBindBuffer(GL_ARRAY_BUFFER, VBO);
	glBufferData(GL_ARRAY_BUFFER, sizeof(vertices), vertices, GL_STATIC_DRAW);

	glBindBuffer(GL_ELEMENT_ARRAY_BUFFER, EBO);
	glBufferData(GL_ELEMENT_ARRAY_BUFFER, sizeof(indices), indices, GL_STATIC_DRAW);
	// 3. 设置顶点属性指针
	glVertexAttribPointer(0, 3, GL_FLOAT, GL_FALSE, 8 * sizeof(float), (void*)0);
	glEnableVertexAttribArray(0);

	glVertexAttribPointer(1, 3, GL_FLOAT, GL_FALSE, 8 * sizeof(float), (void*)(3*sizeof(float)));
	glEnableVertexAttribArray(1);
	//纹理坐标属性
	glVertexAttribPointer(2, 2, GL_FLOAT, GL_FALSE, 8 * sizeof(float), (void*)(6 * sizeof(float)));
	glEnableVertexAttribArray(2);

	//加载并创建纹理
	unsigned int texture1,texture2;
	//texture1
	//---------------------
	glGenTextures(1, &texture1);
	glBindTexture(GL_TEXTURE_2D, texture1); // all upcoming GL_TEXTURE_2D operations now have effect on this texture object
	// 设置纹理环绕参数
	glTexParameteri(GL_TEXTURE_2D, GL_TEXTURE_WRAP_S, GL_REPEAT);	// set texture wrapping to GL_REPEAT (default wrapping method)
	glTexParameteri(GL_TEXTURE_2D, GL_TEXTURE_WRAP_T, GL_REPEAT);
	// 设置纹理过滤参数
	glTexParameteri(GL_TEXTURE_2D, GL_TEXTURE_MIN_FILTER, GL_LINEAR);
	glTexParameteri(GL_TEXTURE_2D, GL_TEXTURE_MAG_FILTER, GL_LINEAR);
	// 加载图像,创建纹理并生成mipmap
	int width, height, nrChannels;
	stbi_set_flip_vertically_on_load(true);//告诉stb_image.h翻转Y轴上加载的纹理。
	unsigned char *data = stbi_load("resources/textures/container.jpg", &width, &height, &nrChannels, 0);

	if (data)
	{
		glTexImage2D(GL_TEXTURE_2D, 0, GL_RGB, width, height, 0, GL_RGB, GL_UNSIGNED_BYTE, data);
		glGenerateMipmap(GL_TEXTURE_2D);
	}
	else
	{
		std::cout << "加载纹理失败" << std::endl;
	}
	stbi_image_free(data);

	// texture 2
	// ---------
	glGenTextures(1, &texture2);
	glBindTexture(GL_TEXTURE_2D, texture2);
	// set the texture wrapping parameters
	glTexParameteri(GL_TEXTURE_2D, GL_TEXTURE_WRAP_S, GL_REPEAT);	// set texture wrapping to GL_REPEAT (default wrapping method)
	glTexParameteri(GL_TEXTURE_2D, GL_TEXTURE_WRAP_T, GL_REPEAT);
	// set texture filtering parameters
	glTexParameteri(GL_TEXTURE_2D, GL_TEXTURE_MIN_FILTER, GL_LINEAR);
	glTexParameteri(GL_TEXTURE_2D, GL_TEXTURE_MAG_FILTER, GL_LINEAR);
	// load image, create texture and generate mipmaps
	data = stbi_load("resources/textures/awesomeface.png", &width, &height, &nrChannels, 0);
	if (data)
	{
		// note that the awesomeface.png has transparency and thus an alpha channel, so make sure to tell OpenGL the data type is of GL_RGBA
		glTexImage2D(GL_TEXTURE_2D, 0, GL_RGBA, width, height, 0, GL_RGBA, GL_UNSIGNED_BYTE, data);
		glGenerateMipmap(GL_TEXTURE_2D);
	}
	else
	{
		std::cout << "加载纹理失败" << std::endl;
	}
	stbi_image_free(data);

	ourShader.use(); //使用glUniform1i设置每个采样器的方式告诉OpenGL每个着色器采样器属于哪个纹理单元
	glUniform1i(glGetUniformLocation(ourShader.ID, "texture1"), 0); // 手动设置
	ourShader.setInt("texture2", 1); // 或者使用着色器类设置


	//渲染循环
	while (!glfwWindowShouldClose(window)) {//glfwWindowShouldClose函数在我们每次循环的开始前检查一次GLFW是否被要求退出
		processInput(window);

		//渲染命令
		glClearColor(0.2f, 0.3f, 0.3f, 1.0f); //设置清空屏幕所用的颜色
		glClear(GL_COLOR_BUFFER_BIT);//只清空颜色缓冲

		// 将纹理绑定到相应的纹理单元上
		glActiveTexture(GL_TEXTURE0);
		glBindTexture(GL_TEXTURE_2D, texture1);
		glActiveTexture(GL_TEXTURE1);
		glBindTexture(GL_TEXTURE_2D, texture2);

		//渲染三角形
		ourShader.use();
		glBindVertexArray(VAO);	// 绑定VAO
		glDrawElements(GL_TRIANGLES, 6, GL_UNSIGNED_INT, 0);


		glfwSwapBuffers(window);//交换颜色缓冲
		//glfwPollEvents函数检查有没有触发什么事件(比如键盘输入、鼠标移动等)、更新窗口状态,并调用对应的回调函数(可以通过回调方法手动设置)
		glfwPollEvents();
	}

	//可选:一旦资源超出其用途,就取消分配
	glDeleteVertexArrays(1, &VAO);
	glDeleteBuffers(1, &VBO);
	glDeleteBuffers(1, &EBO);

	glfwTerminate();//当渲染循环结束后我们需要正确释放/删除之前的分配的所有资源
	//std::cout << "你发的" << std::endl;
	return 0;
}

//对窗口注册一个回调函数,它会在每次窗口大小被调整的时候被调用
void framebuffer_size_callback(GLFWwindow* window, int width, int height) {
	//视口:告诉OpenGL渲染窗口的尺寸大小
	glViewport(0, 0, width, height);//前两个参数控制窗口左下角的位置。第三个和第四个参数控制渲染窗口的宽度和高度(像素)
}

//在GLFW中实现一些输入控制
void processInput(GLFWwindow *window) {
	if (glfwGetKey(window, GLFW_KEY_ESCAPE) == GLFW_PRESS) {//检查用户是否按下了返回键(Esc)(如果没有按下,glfwGetKey将会返回GLFW_RELEASE
		glfwSetWindowShouldClose(window, true);//如果按下,关闭glfw。下一次while循环的条件检测将会失败,程序将会关闭
	}
}
4.3.shader.fs文件:
#version 430 core
out vec4 FragColor;

in vec3 ourColor;
in vec2 TexCoord;

//纹理采样器
uniform sampler2D texturel;
uniform sampler2D texture2;


void main()
{
    //FragColor = texture(texturel, TexCoord);

	//FragColor = texture(texturel, TexCoord) * vec4(ourColor, 1.0);
	//纹理颜色与顶点颜色混合,来获得更有趣的效果。我们只需把纹理颜色与顶点颜色在片段着色器中相乘来混合二者的颜色:

	FragColor = mix(texture(texturel, TexCoord), texture(texture2, TexCoord), 0.2);
	//两个纹理进行线性插值
}
