从零开始入门JavaWeb
一.基本概念
1.1 前言
web开发:
- web,网页的意思 www.baidu.com
- 静态web
- html,css
- 提供给所有人看的数据始终不会发生变化!
- 动态web
- 淘宝,几乎是所有的网站!
- 提供给所有人看的数据始终会发生变化!每个人在不同的时间,不同的地点看到的信息各不相同!
- 技术栈:Servlet/JSP,ASP,PHP;
在java中,动态web资源开发的技术统称为javaWeb;
1.2 web应用程序
web应用程序:可以提供浏览器访问的程序;
- a.html b.html …多个wen资源,这些web资源可以被外界访问,对外界提供服务;
- 你们能访问到的任何一个页面或者资源,都存在于这个世界的某一个角落的计算机上;
- URL
- 这些统一的web资源会被放在同一个文件夹下,web应用程序---->Tomcat:服务器
- 一个web应用由多部分组成(静态web,动态web)
- html,css,js
- jsp,servlet
- java程序
- jar包
- 配置文件(Properties)
web应用程序编写完毕后,若想提供给外界访问:需要一个服务器来统一管理;
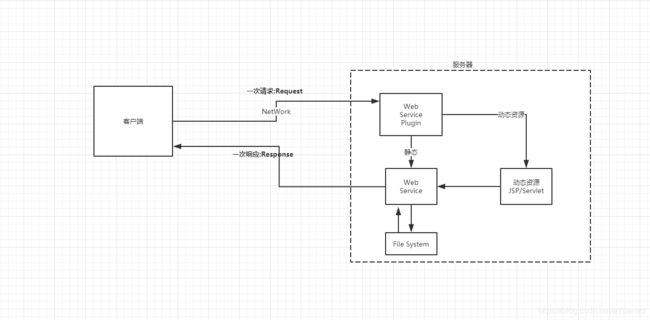
1.3 静态web
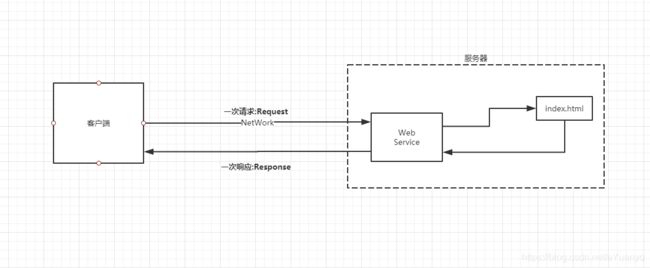
- *.htm , *.html 这些都是网页的后缀,如果服务器上一直存在这些东西,我们就可以直接进行读取,通络;
- 静态web存在的缺点
- web页面无法动态更新,所有用户看到都是同一个页面
- 轮播图,点击特效:伪冬天
- JavaScript [ 实际开发中用的最多 ]
- VBScript
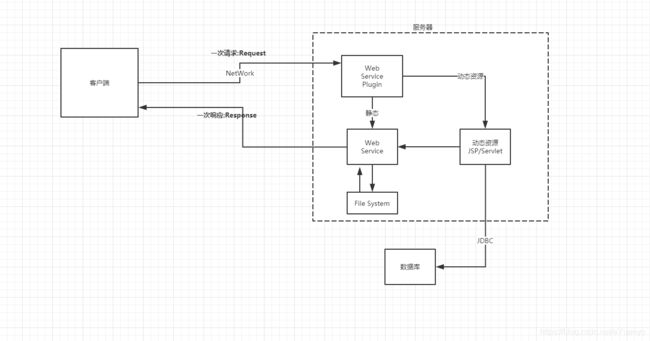
- 无法和数据库交互(数据无法持久化,用户无法交互)
- web页面无法动态更新,所有用户看到都是同一个页面
1.4动态web
缺点
- 加入服务器的动态web资源出现了错误,我们需要重新编写我们的后台程序 ,重新发布;
- 停机维护
优点:
二.Web服务器
2.1 技术讲解
ASP
- 微软的,国内最早流行的
- 在html中嵌入了VB的脚本, ASP+COM;
- 在ASP开发中,基本一个页面都有几千行的代码,页面极其乱;
- 维护成本高
- C#
- IIS
PHP
- PHP开发速度很快,功能很强大,跨平台,代码很简单
- 无法承载大访问量的情况(局限性)
JSP/Servlet
B/S :浏览器和服务器
C/S :客户端和服务器
- sun公司主推的B/S架构
- 基于Java语言的(所有的大公司,或者开源的组件都是用Java写的)
- 可以承载三高带来的影响(高并发 高可用 高性能)
- 语法像ASP, 方便ASP–>JSP
…
2.2 web服务器
服务器是一种被动的操作,用来处理用户的请求和给用户响应信息
- IIS
微软的;ASP… windows自带的
- Tomcat
Tomcat是Apache 软件基金会(Apache Software Foundation)的Jakarta 项目中的一个核心项目,由于有了Sun 的参与和支持,最新的Servlet 和JSP 规范总是能在Tomcat 中得到体现,因为Tomcat 技术先进、性能稳定,而且免费,因而深受Java 爱好者的喜爱并得到了部分软件开发商的认可,成为目前比较流行的Web 应用服务器。
Tomcat 服务器是一个免费的开放源代码的Web 应用服务器,属于轻量级应用服务器,在中小型系统和并发访问用户不是很多的场合下被普遍使用,是开发和调试JSP 程序的首选。对于一个初学者来说,它是最佳选择;
Tomcat 实际上运行JSP 页面和Servlet,目前Tomcat最新版本为9.0;
工作3-5年后,可以尝试手写Tomcat服务器;
下载Tomcat
1.安装 or 解压
2.了解配置文件及目录结构
3.这个东西的作用
三.Tomcat
3.1 安装Tomcat链接
3.2 Tomcat启动和配置
- 文件夹

bin:启动,关闭的脚本文件
conf:配置
lib:依赖的jar包
logs:日志
webapps:存放网站的地方 - Tomcat的启动和关闭
启动:startup.bat
关闭:shutdown.bat
访问测试:http://localhost:8080/
可能遇到的问题:
1.java环境变量没有配置
2.闪退问题:需要配置兼容性
3.乱码问题:配置文件中设置
3.3 配置
核心配置文件server.xml
可以配置启动的端口号
- tomcat默认的端口号为 : 8080
- mysql :3306
- http :80
- https : 443
<Connector port="8080" protocol="HTTP/1.1"
           connectionTimeout="20000"
           redirectPort="8443" />
可以配置主机的名称
- 默认的主机名为 : localhost->127.0.0.1
- 默认网站应用存放的位置为 : webapps
  <Host name="localhost"  appBase="webapps"
        unpackWARs="true" autoDeploy="true">
高难度面试题
请你谈谈网站是如何进行访问的!
1.输入一个域名;回车
2.检查本机的C:\Windows\System32\etc\hosts配置文件下有没有这个域名的映射;
3.4 发布一个web网站
- 将自己写的网站,放到服务器(tomcat)中指定的web应用的文件夹(webapps)下,就可以访问了
网站应该有的结构
--webapps:Tomcat服务器的web目录
	--ROOT
	--yuanjinyo:网站的目录名
		--WEB-INF
			--classes: java程序
			--lib:  web应用所依赖的jar包
			--web.xml 网站的配置文件
		--index.html 默认的首页
		--static
			--css
				--style.css
			--js
			--img
		--...
四.Http
4.1什么是Http
HTTP–Hyper Text Transfer Protocol(超文本传输协议)是一个简单的请求-响应协议,它通常运行在TCP之上
- 文本 : html , 字符串, ~…
- 超文本 : 图片 , 音乐 ,视频 , 定位 ,地图 …
- 80
https:安全的
- 443
4.2两个时代
- http1.0
- HTTP/1.0 : 客户端可以与web服务器连接后,只能获得一个web资源,断开连接;
- http2.0
- HTTP/1.1 : 客户端可以与web服务器连接后,可以获得多个web资源;
4.3http请求
- 客户端—发请求(Request)—服务器
百度:
Request URL: https://www.baidu.com/               //请求地址
Request Method: GET                               //get方法/post方法
Status Code: 200 OK                               //状态码:200
Remote Address: 183.232.231.172:443               //远程地址
Accept: text/html
Accept-Encoding: gzip, deflate, br
Accept-Language: zh,en-US;q=0.9,en;q=0.8,zh-CN;q=0.7    //语言
Cache-Control: max-age=0
Connection: keep-alive
请求行
- 请求行中的请求方式:GET
- 请求方式:Get,Post, HEAD,DELETE,PUT,TRACT…
- get : 请求能够携带的参数比较少,大小有限制,会在浏览器的URL地址栏显示数据内容 ,不安全,但是高效
- post : 请求能够携带的参数没有限制,大小没有限制,不会在浏览器的URL地址栏显示数据内容 ,安全,但是不高效
消息头
Accept              //告诉浏览器,它所支持的数据类型
Accept-Encoding     //支持哪种编码格式  GBK UTF8  GB2312  ISO8859-1
Accept-Language     //告诉浏览器,它的语言环境
Cache-Control       //缓存控制
Connection          //告诉浏览器,请求断开还是保持连接
HOST                //主机
...
4.4http响应
- 服务器响应给客户端
百度:
Cache-Control: private                 //缓存控制
Connection: Keep-Alive                 // 连接
Content-Encoding: gzip                 // 编码
Content-Type: text/html;charset=utf-8  //类型
4.4.1响应体
Accept              //告诉浏览器,它所支持的数据类型
Accept-Encoding     //支持哪种编码格式  GBK UTF8  GB2312  ISO8859-1
Accept-Language     //告诉浏览器,它的语言环境
Cache-Control       //缓存控制
Connection          //告诉浏览器,请求断开还是保持连接
HOST                //主机
Refresh 		    //告诉客户端,多久刷新一次
Location 			//让网页重新定位;
4.4.2响应状态码(重要)
- 200 : 请求响应成功 200
- 3xx : 请求重定向
- 重定向:你重新到我给你的新位置去
- 4xx : 找不到资源 404
- 资源不存在
- 5xx : 服务器代码错误 500 502 : 网关错误
常见面试题:
当你的浏览器中地址栏输入地址并回车的一瞬间到页面能够展示,经历了什么?
五.Maven
我为什么要学习这个技术?
- 在javaweb开发中,需要大量的jar包,我们要手动导入;
- 如何能够让一个东西自动帮我导入和配置这个jar包
由此Maven诞生了!
5.1Maven项目架构管理工具
我们目前用来就是方便导入jar包;
Maven的核心思想:约定大于配置
- 有约束,不要去违反;
Maven会规定好你该如何去编写我们的java代码,必须要按照这个规范来;
5.2下载安装Maven
官网
Download----Files----Link----apache-maven-3.6.2-bin.zip
下载完成后,解压即可
5.3环境变量配置
我的电脑—属性—高级系统设置—环境变量
在我们的系统变量中
配置如下配置
- M2_HOME ----maven目录下的bin目录
- MAVEN_HOME---- maven的目录
- 在path中配置%MAVEN_HOME%\bin
- 镜像:mirrors
- 作用:加速我们的下载
- 国内建议使用阿里云的镜像
<mirror>
	<id>alimavenid>
	<mirrorOf>centralmirrorOf>
	<name>aliyun mavenname>
	<url>http://maven.aliyun.com/nexus/content/groups/public/url>
mirror>
5.5本地仓库
在本地的仓库,远程仓库;
建议一个本地仓库;
<localRepository>D:\apache-maven-3.6.1\repolocalRepository>
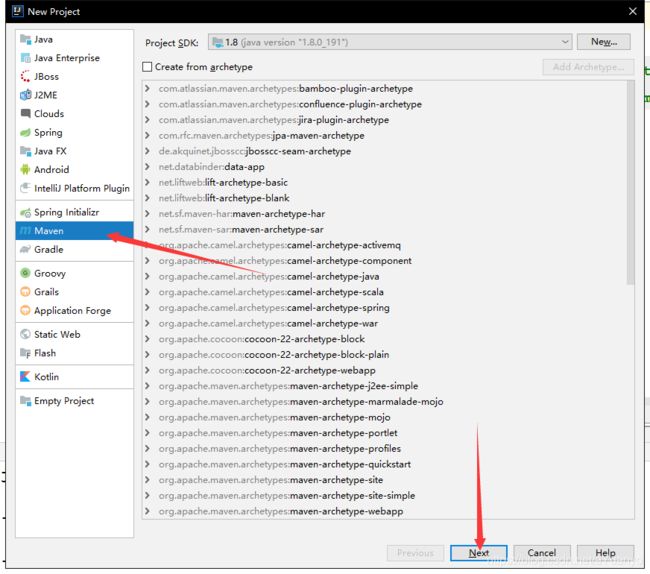
5.6在IDEA中使用Maven
1.启动IDEA
2.创建一个MavenWeb项目
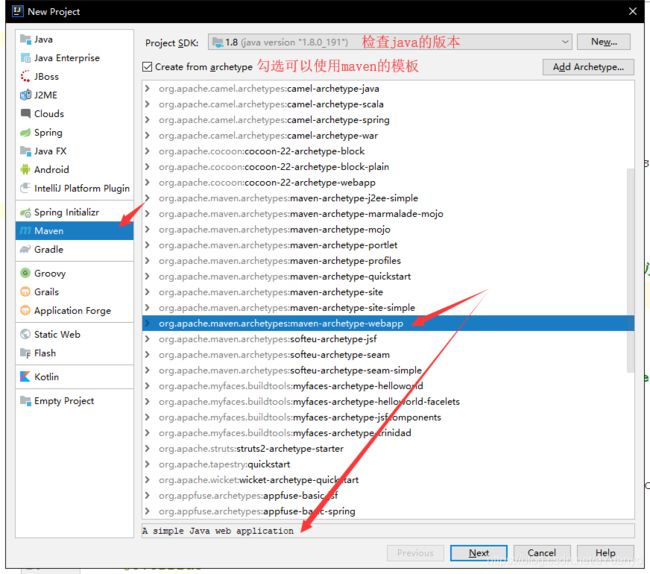
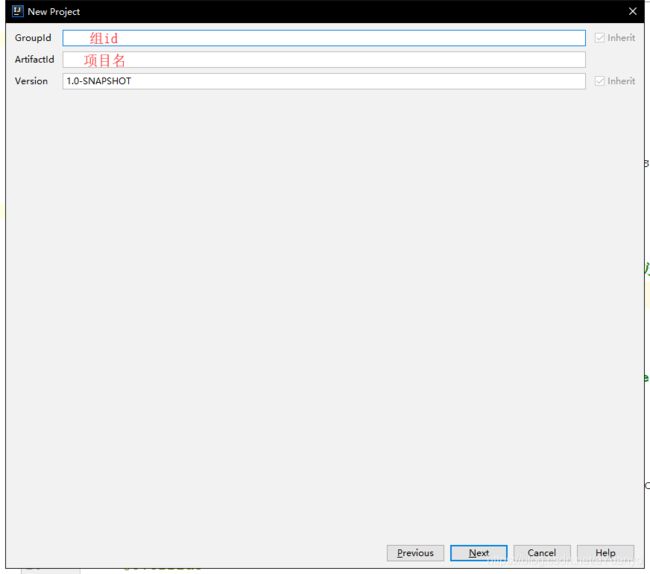
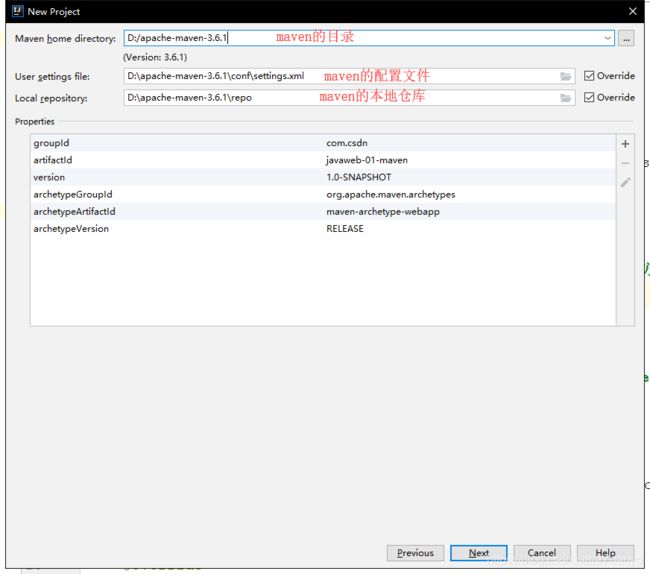
3.等待项目初始化完毕

4.观察maven本地仓库多了什么东西?
5.IDEA中的maven设置
IDEA创建成功后,看下Maven的配置.
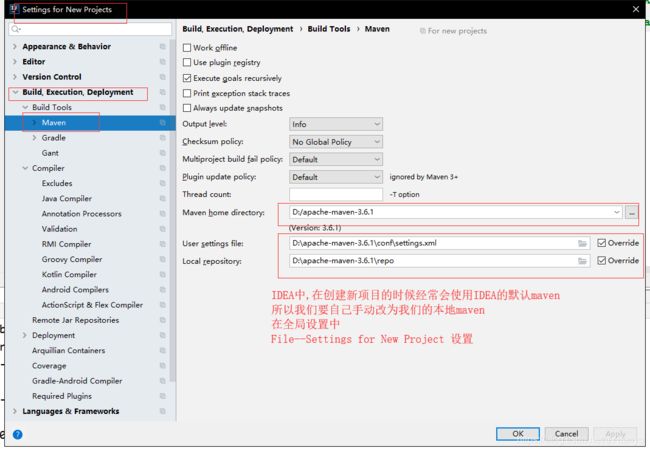
6.到这里,Maven在IDEA中的配置和使用就OK了!
- 一个干净的maven项目

- 这个只有在web应用下才有
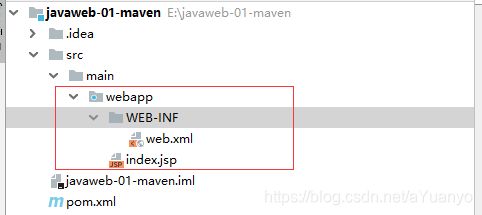
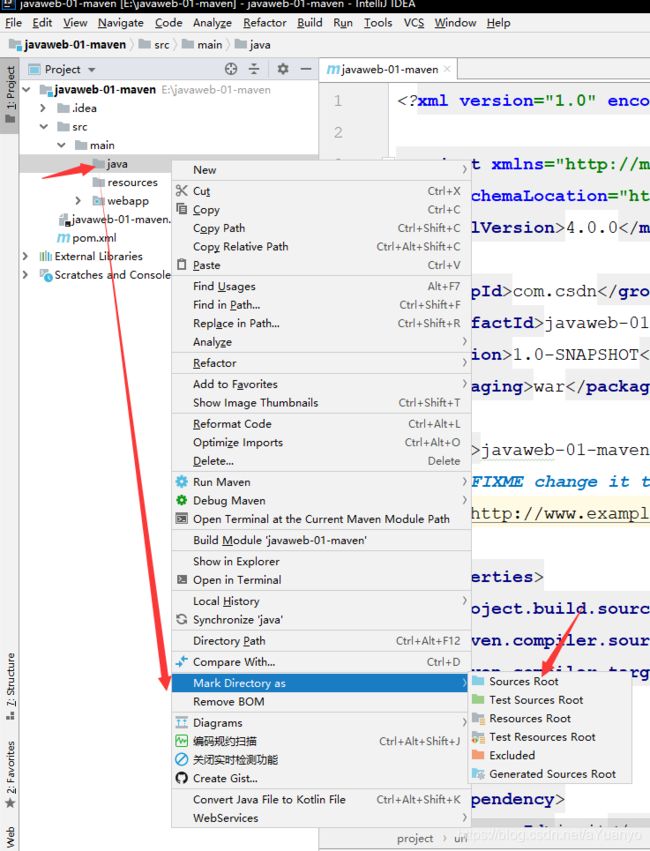
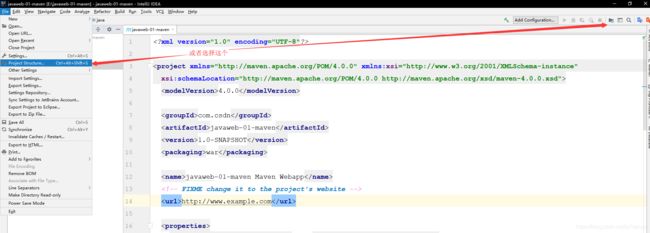
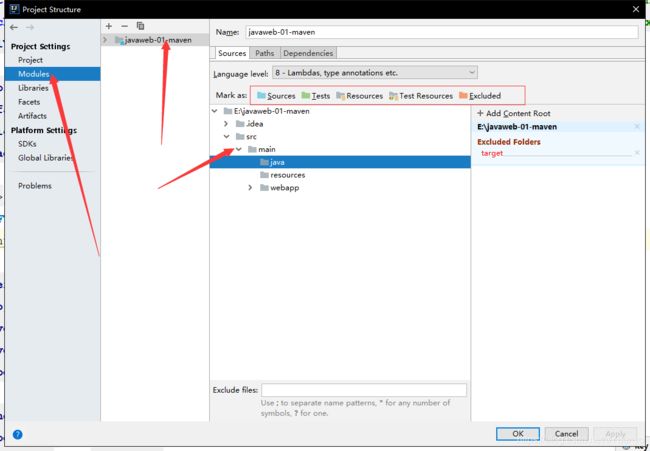
5.8 标记文件夹功能
或者
5.9在IDEA中配置tomcat


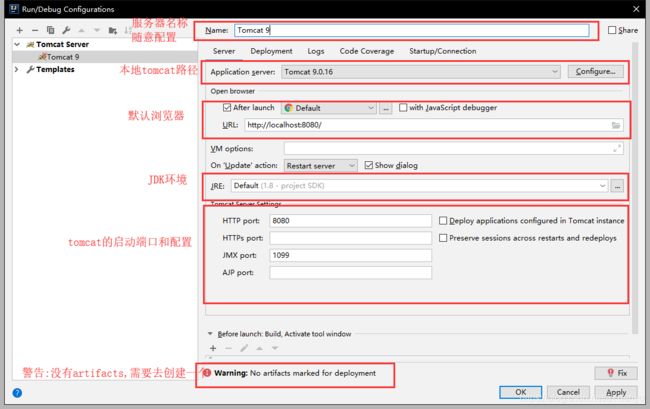
警告解决:
必须要的配置: 为什么我们会有这个问题: 我们访问一个网站,需要指定一个文件夹的名字;


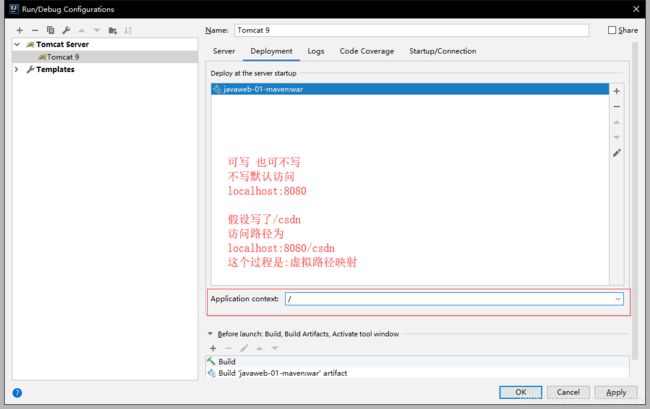

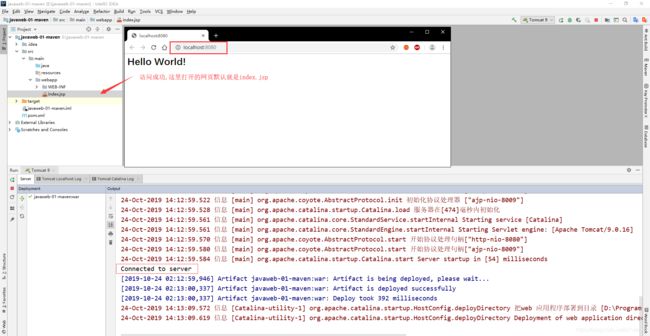
5.10 pom文件
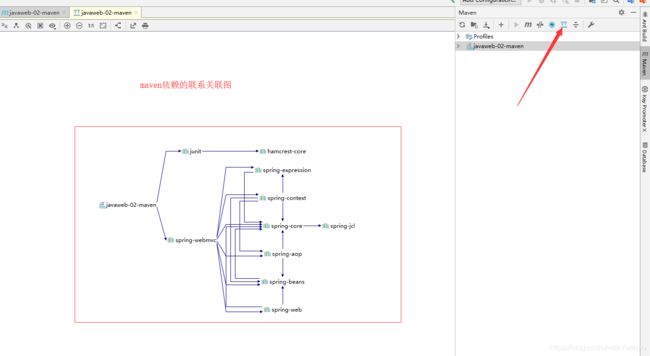
pom.xml是maven的核心配置文件
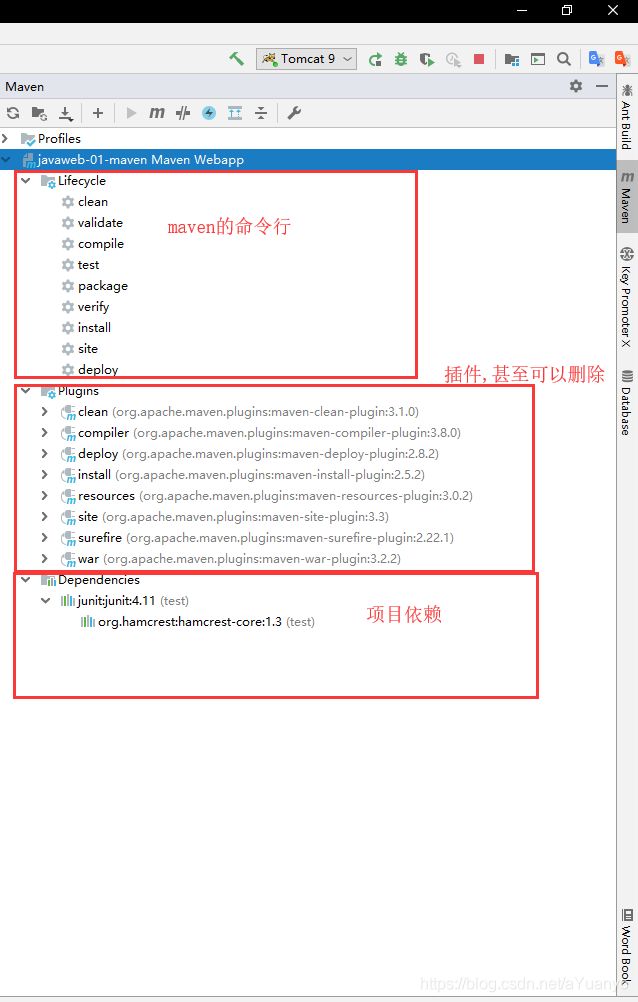
<project xmlns="http://maven.apache.org/POM/4.0.0" xmlns:xsi="http://www.w3.org/2001/XMLSchema-instance"
  xsi:schemaLocation="http://maven.apache.org/POM/4.0.0 http://maven.apache.org/xsd/maven-4.0.0.xsd">
  <modelVersion>4.0.0modelVersion>


  <groupId>com.csdngroupId>
  <artifactId>javaweb-01-mavenartifactId>
  <version>1.0-SNAPSHOTversion>

  <packaging>warpackaging>


  <properties>

    <project.build.sourceEncoding>UTF-8project.build.sourceEncoding>

    <maven.compiler.source>1.8maven.compiler.source>
    <maven.compiler.target>1.8maven.compiler.target>
  properties>


  <dependencies>

    <dependency>
      <groupId>junitgroupId>
      <artifactId>junitartifactId>
      <version>4.11version>
      <scope>testscope>
    dependency>
  dependencies>


  <build>
    <finalName>javaweb-01-mavenfinalName>
    <pluginManagement>
      <plugins>
        <plugin>
          <artifactId>maven-clean-pluginartifactId>
          <version>3.1.0version>
        plugin>

        <plugin>
          <artifactId>maven-resources-pluginartifactId>
          <version>3.0.2version>
        plugin>
        <plugin>
          <artifactId>maven-compiler-pluginartifactId>
          <version>3.8.0version>
        plugin>
        <plugin>
          <artifactId>maven-surefire-pluginartifactId>
          <version>2.22.1version>
        plugin>
        <plugin>
          <artifactId>maven-war-pluginartifactId>
          <version>3.2.2version>
        plugin>
        <plugin>
          <artifactId>maven-install-pluginartifactId>
          <version>2.5.2version>
        plugin>
        <plugin>
          <artifactId>maven-deploy-pluginartifactId>
          <version>2.8.2version>
        plugin>
      plugins>
    pluginManagement>
  build>

project>
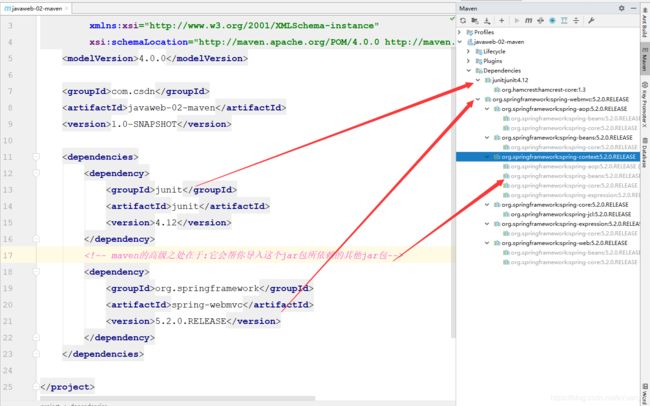
maven由于它的约定大于配置,我们之后可能会遇到我们写的配置文件无法被导出或者生效的问题,解决方案:
    <build>
        <resources>
            <resource>
                <directory>src/main/resourcesdirectory>
                <includes>
                    <include>**/*.xmlinclude>
                    <include>**/*.propertiesinclude>
                includes>
                <filtering>truefiltering>
            resource>
        resources>
    build>
六.Servlet
6.1 Servlet简介
- Servlet 就是Sun公司开发动态web的一门技术;
- sun在这些API中提供了一个接口叫做:Servlet,如果你想开发一个Servlet程序,只需要完成两个小步骤
- 编写一个类,实现Servlet接口
- 把开发好的java类部署到web服务器中
把实现Servlet接口的java程序叫做----Servlet
6.2 HelloServlet
Servlet接口Sun公司提供了两个默认的实现类:HttpServlet,
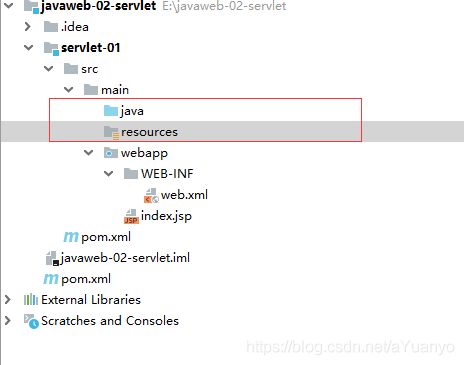
- 构建一个普通的maven项目,将src目录删除,将此作为一个主工程,以后直接在这里面创建module;
- 关于maven父子工程的理解
- 父项目中会有
    <modules>
        <module>servlet-01module>
    modules>
- 子项目中会有
    <parent>
        <artifactId>javaweb-02-servletartifactId>
        <groupId>com.csdngroupId>
        <version>1.0-SNAPSHOTversion>
    parent>
- 父项目中的java子项目可以直接使用
类似son extends father
- 使用maven自带的webapp模板创建module
- maven环境优化
- 修改web.xml为最新的
<web-app xmlns="http://xmlns.jcp.org/xml/ns/javaee"
         xmlns:xsi="http://www.w3.org/2001/XMLSchema-instance"
         xsi:schemaLocation="http://xmlns.jcp.org/xml/ns/javaee
                       http://xmlns.jcp.org/xml/ns/javaee/web-app_4_0.xsd"
         version="4.0"
         metadata-complete="true">


web-app>
public class MyServlet extends HttpServlet {

    //由于get或者post只是请求实现不同的方式,可以相互调用,因为业务逻辑都一样;
    @Override
    protected void doGet(HttpServletRequest req, HttpServletResponse resp) throws ServletException, IOException {

        PrintWriter writer = resp.getWriter(); //响应流
        writer.print("Hello Servlet!");
    }

    @Override
    protected void doPost(HttpServletRequest req, HttpServletResponse resp) throws ServletException, IOException {

        super.doPost(req, resp);
    }
}
- 编写Servlet的映射
- 为什么需要映射:我们写的是java程序,但是要通过浏览器访问,而浏览器需要连接web服务器,所以我们需要在web服务器中注册我们写的Servlet,还需要给它一个浏览器能够访问的路径;
<web-app xmlns="http://xmlns.jcp.org/xml/ns/javaee"
         xmlns:xsi="http://www.w3.org/2001/XMLSchema-instance"
         xsi:schemaLocation="http://xmlns.jcp.org/xml/ns/javaee
                       http://xmlns.jcp.org/xml/ns/javaee/web-app_4_0.xsd"
         version="4.0"
         metadata-complete="true">

    <servlet>
        <servlet-name>MyServletservlet-name>
        <servlet-class>com.csdn.servlet.MyServletservlet-class>
    servlet>

    <servlet-mapping>
        <servlet-name>MyServletservlet-name>
        <url-pattern>/hellourl-pattern>
    servlet-mapping>
web-app>
- 配置Tomcat
- 注意:配置项目发布的路径即可
- 测试
6.3 Mapping问题
- 一个Servlet可以指定一个映射路径
    <servlet-mapping>
        <servlet-name>MyServletservlet-name>
        <url-pattern>/hellourl-pattern>
    servlet-mapping>
- 一个Servlet可以指定多个映射路径
    <servlet-mapping>
        <servlet-name>MyServletservlet-name>
        <url-pattern>/hellourl-pattern>
    servlet-mapping>
    <servlet-mapping>
        <servlet-name>MyServletservlet-name>
        <url-pattern>/hello1url-pattern>
    servlet-mapping>
    <servlet-mapping>
        <servlet-name>MyServletservlet-name>
        <url-pattern>/hello2url-pattern>
    servlet-mapping>
    <servlet-mapping>
        <servlet-name>MyServletservlet-name>
        <url-pattern>/hello3url-pattern>
    servlet-mapping>
- 一个Servlet可以指定通用映射路径
    <servlet-mapping>
        <servlet-name>MyServletservlet-name>
        <url-pattern>/hello/*url-pattern>
    servlet-mapping>
- 默认请求路径
    <servlet-mapping>
        <servlet-name>MyServletservlet-name>
        <url-pattern>/*url-pattern>
    servlet-mapping>
- 指定一些后缀或者前缀等等…
    <servlet-mapping>

        <servlet-name>MyServletservlet-name>
        <url-pattern>*.dourl-pattern>
    servlet-mapping>
- 优先级问题
- 指定了固有的映射路径优先级最高,如果找不到就会走默认的处理请求;
    <servlet>
        <servlet-name>errorservlet-name>
        <servlet-class>com.csdn.servlet.ErrorServletservlet-class>
    servlet>
    <servlet-mapping>
        <servlet-name>errorservlet-name>
        <url-pattern>/*url-pattern>
    servlet-mapping>
6.4 ServletContext
web容器在启动的时候,它会为每个web程序创建一个对应ServletContext对象,它代表了当前的web应用;
- 共享数据
我在这个Servlet中保存的数据,可以在另外一个Servlet中被拿到;
public class Servlet2 extends HttpServlet {

    @Override
    protected void doGet(HttpServletRequest req, HttpServletResponse resp) throws ServletException, IOException {


        //this.getInitParameter();   初始化参数
        //this.getServletConfig();   Servlet配置
        //this.getServletContext();  Servlet上下文

        ServletContext context = this.getServletContext();

        String username="聚梦啊源";   //数据
        context.setAttribute("username",username);  //将一个数据保保存在ServletContext中,名字为username ,值为username
        System.out.println("hello");
    }

    @Override
    protected void doPost(HttpServletRequest req, HttpServletResponse resp) throws ServletException, IOException {

        doGet(req, resp);
    }
}
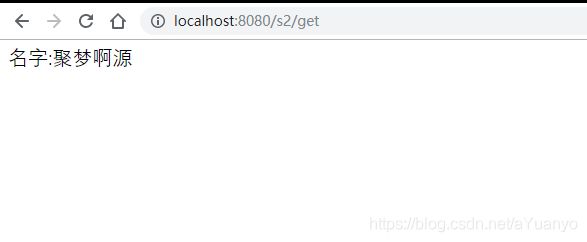
public class Servlet2Read  extends HttpServlet {

    @Override
    protected void doGet(HttpServletRequest req, HttpServletResponse resp) throws ServletException, IOException {

        ServletContext context=this.getServletContext();
        String username = (String) context.getAttribute("username");
        resp.setContentType("text/html");
        resp.setCharacterEncoding("utf-8");
        resp.getWriter().print("名字:"+username);
    }

    @Override
    protected void doPost(HttpServletRequest req, HttpServletResponse resp) throws ServletException, IOException {

        doGet(req, resp);
    }
}
    <servlet>
    <servlet-name>helloservlet-name>
    <servlet-class>com.csdn.servlet.Servlet2servlet-class>
    servlet>
    <servlet-mapping>
        <servlet-name>helloservlet-name>
        <url-pattern>/hellourl-pattern>
    servlet-mapping>

    <servlet>
        <servlet-name>getservlet-name>
        <servlet-class>com.csdn.servlet.Servlet2Readservlet-class>
    servlet>
    <servlet-mapping>
        <servlet-name>getservlet-name>
        <url-pattern>/geturl-pattern>
    servlet-mapping>
- 获取初始化参数
    <context-param>
        <param-name>urlparam-name>
        <param-value>jdbc:mysql://locahost:3306/mybatisparam-value>
    context-param>
    protected void doGet(HttpServletRequest req, HttpServletResponse resp) throws ServletException, IOException {

        ServletContext context = this.getServletContext();
        String initParameter = context.getInitParameter("url");
        resp.getWriter().print(initParameter);
    }
- 请求转发
    @Override
    protected void doGet(HttpServletRequest req, HttpServletResponse resp) throws ServletException, IOException {

        ServletContext context = this.getServletContext();
//        RequestDispatcher requestDispatcher = context.getRequestDispatcher("/gp");//转发的请求路径
//        requestDispatcher.forward(req,resp); //调用forward实现请求转发
        context.getRequestDispatcher("/gp").forward(req,resp);
    }
username=wyj
password=123456
    @Override
    protected void doGet(HttpServletRequest req, HttpServletResponse resp) throws ServletException, IOException {

        ServletContext context = this.getServletContext();
        InputStream is = context.getResourceAsStream("/WEB-INF/classes/db.properties");
        Properties prop=new Properties();
        prop.load(is);
        String user = prop.getProperty("username");
        String pass = prop.getProperty("password");
        resp.getWriter().print(user+"="+pass);
    }
    <servlet>
        <servlet-name>propservlet-name>
        <servlet-class>com.csdn.servlet.PropertiesServletservlet-class>
    servlet>
    <servlet-mapping>
        <servlet-name>propservlet-name>
        <url-pattern>/propurl-pattern>
    servlet-mapping>
6.5 HttpServletResponse
web服务器接收到客户端的http请求,针对这个请求,分别创建一个代表请求的HttpServletRequest对象,代表响应的一个HttpServletResponse对象;
- 如果要获取客户端请求过来的参数: 找HttpServletRequest
- 如果要给客户端响应一些信息: 找HttpServletResponse
1.简单分类
负责向浏览器发送数据的方法
public ServletOutputStream getOutputStream() throws IOException;
public PrintWriter getWriter() throws IOException;
负责向浏览器发送发送响应头的方法
public void setCharacterEncoding(String charset);
public void setContentLength(int len);
public void setContentLengthLong(long len);
public void setContentType(String type);
public void setDateHeader(String name, long date);
public void addDateHeader(String name, long date);
public void setHeader(String name, String value);
public void addHeader(String name, String value);
public void setIntHeader(String name, int value);
public void addIntHeader(String name, int value);
2.常见应用
-
向浏览器输出消息
-
下载文件
- 要获取下载文件的路径
- 下载的文件名是啥
- 设置想办法让浏览器能够支持下载我们需要东西
- 获取下载文件的输入流
- 创建缓冲区
- 获取OutputStream对象
- 将FileOutputStream流写入到buffer缓冲区
- 使用OutputStream将缓存区的数据输出到客户端
@Override
    protected void doGet(HttpServletRequest req, HttpServletResponse resp) throws ServletException, IOException {

        //1.要获取下载文件的路径
        String realPath = "E:\\javaweb-02-servlet\\response\\target\\classes\\奇偶性.png";
        System.out.println("下载文件的路径"+realPath);
        //2.下载的文件名是啥
        String fileName = realPath.substring(realPath.lastIndexOf("\\") + 1);
        //3.设置想办法让浏览器能够支持下载我们需要东西,中文文件名URLEncoder.encode编码,否则可能会乱码
        resp.setHeader("Content-Disposition","attachment;filename="+ URLEncoder.encode(fileName,"utf-8"));
        // 4.获取下载文件的输入流
        FileInputStream in = new FileInputStream(realPath);
        //5.创建缓冲区
        int len=0;
        byte[] buffer=new byte[1024];
        //6.获取OutputStream对象
        ServletOutputStream out = resp.getOutputStream();
        //7.将FileOutputStream流写入到buffer缓冲区,使用OutputStream将缓存区的数据输出到客户端
        while((len=in.read(buffer))>0){

            out.write(buffer,0,len);
        }
        in.close();
        out.close();
    }
- 验证码功能
- 实现重定向
    protected void doGet(HttpServletRequest req, HttpServletResponse resp) throws ServletException, IOException {

        /*
         resp.setHeader("Location","/r/down");
         resp.setStatus(302);
         */
        resp.sendRedirect("/r/down"); //重定向
    }
常用场景:
- 用户登录
public class RequestServlet extends HttpServlet {

    @Override
    protected void doGet(HttpServletRequest req, HttpServletResponse resp) throws ServletException, IOException {

       //处理请求
        String username = req.getParameter("username");
        String password = req.getParameter("password");
        if(username.equals("admin")&&password.equals("admin")){

            //路径问题一定要注意 否则404
            resp.sendRedirect("/r/success.jsp");
        }else{

            System.out.println("defeat");
        }
    }
<html>
<body>
<h2>Hello World!h2>
    <%--这里提交的路径,需要寻找到项目的路径--%>
    <%-- ${pageContext.request.contextPath}代表当前的项目   --%>
    <form action="${pageContext.request.contextPath}/login" method="get">
        <input type="text" name="username"><br>
        <input type="password" name="password"><br>
        <input type="submit" >
    form>
body>
html>
<%@ page contentType="text/html;charset=UTF-8" language="java" %>
<html>
<head>
    <title>Titletitle>
head>
<body>
    <h1>success!!!h1>
body>
html>
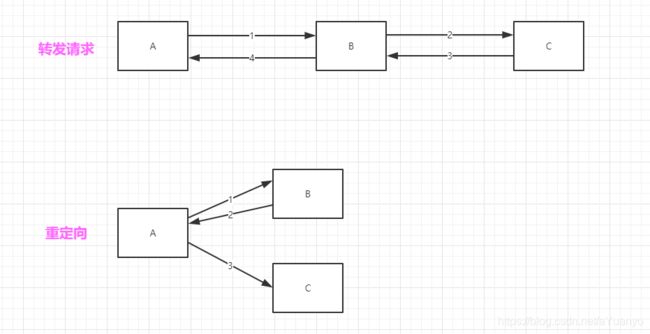
面试题:请你聊聊重定向和转发的区别?
相同点:
- 页面都会实现跳转
不同点:
- 请求转发的时候,url不会发生变化
- 重定向的时候,url地址栏会发生变化
6.6 HttpServletRequest
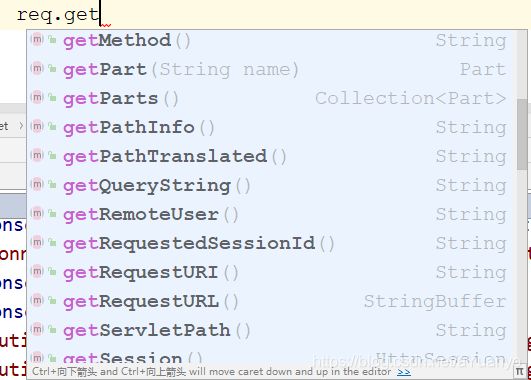
HttpServletRequest代表客户端的请求,用户通过Http协议访问服务器,HTTP请求中的所有信息会被封装到HttpServletRequest,通过这个方法可以获得客户端的所有信息;

public class RequestDemo01 extends HttpServlet {

    @Override
    protected void doPost(HttpServletRequest req, HttpServletResponse resp) throws ServletException, IOException {

        req.setCharacterEncoding("UTF-8");
        resp.setCharacterEncoding("UTF-8");
        String user = req.getParameter("username");
        String pass = req.getParameter("password");
        String[] hobbys = req.getParameterValues("hobbys");
        System.out.println(user);
        System.out.println(pass);
        System.out.println(Arrays.toString(hobbys));
        req.getRequestDispatcher("/success.jsp").forward(req,resp);

    }
面试题:请你聊聊重定向和转发的区别?
相同点:
- 页面都会实现跳转
不同点:
- 请求转发的时候,url不会发生变化 307
- 重定向的时候,url地址栏会发生变化 302
七.Cookie,Session
7.1 会话
会话:用户打开了一个浏览器,点击了很多超链接,访问多个web资源,关闭浏览器,这个过程称之为会话
有状态会话:一个同学来过教室,下次再来教室,我们会知道这个同学曾经来过。称之为有状态会话;
你能怎么证明你是一个学生?
- 你----------学校给你学生证
- 学校登记---------学校标记你来过了
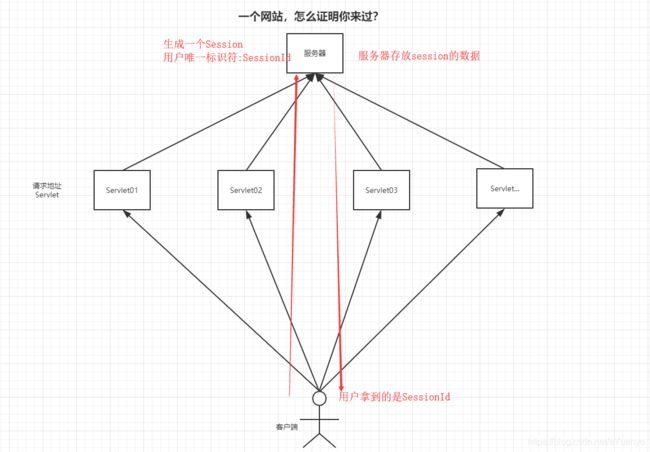
一个网站,怎么证明你来过?
客户端-------------服务端
- 服务端给客户端一个信件,客户端下次访问服务端带上信件就可以了; cookie
- 服务端登记你来过了,下次你来的时候我来匹配你; session
7.2 保存会话的两种技术
cookie
- 客户端技术(响应,请求)
session
- 服务器技术,利用这个技术,可以保存用户的会话信息,我们可以把信息或者数据放在session中!
常见常见:网站登陆之后下次不用再登陆,第二次访问直接上去!
7.3 Cookie
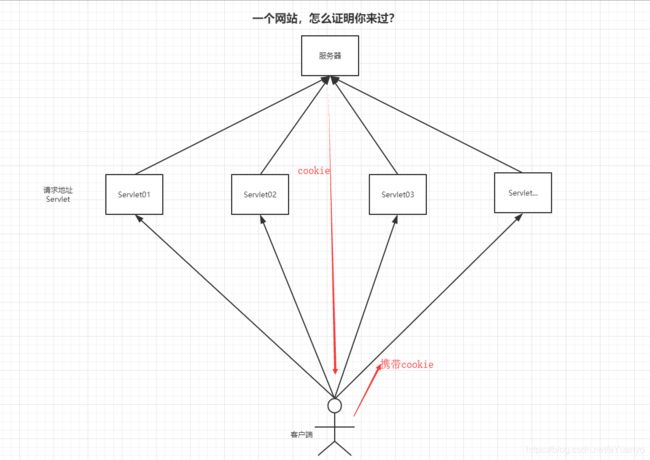
1.从请求中拿到cookie信息
2.服务端响应给客户端cookie
protected void doGet(HttpServletRequest req, HttpServletResponse resp) throws ServletException, IOException {

        //解决中文乱码
        resp.setCharacterEncoding("utf-8");
        resp.setContentType("text/html;charset=utf-8");

        PrintWriter out = resp.getWriter();
        //获取cookie 且cookie不止一个(数组)
        Cookie[] cookies = req.getCookies();
        //判断是否为空
        if(cookies!=null){

            out.print("你上一次访问的时间是:");
            //遍历 并查询是否有对应名字的cookie
            for (Cookie cookie : cookies) {

                if("LastTime".equals(cookie.getName())){

                    Long l=Long.parseLong(cookie.getValue());
                    Date date = new Date(l);
                    out.write(date.toLocaleString());
                }
            }
        }else{

            out.print("第一次访问");
        }
        //每执行一次就运行一次add 动态更新cookie
        Cookie cookie=new Cookie("LastTime",System.currentTimeMillis()+"");
        //设置cookie的有效期
        cookie.setMaxAge(24*60*60);
        resp.addCookie(cookie);
    }
cookie:一般会保存在本地的用户目录下的appdata;
一个网站cookie是否存在上限!聊聊细节问题
- 一个cookie只能保存一个信息;
- 一个web站点可以给浏览器发送多个cookie,最多存放20个cookie;
- cookie有大小限制4kb
- 300个为浏览器上限
删除Cookie
- 不设置有效期,关闭浏览器,自动失效;
- 设置有效期为0;
编码解码:
//编码
Cookie cookie=new Cookie("Name",URLEncoder.encode("聚梦阿源","utf-8"));
//解码
out.write(URLDecoder.decode(cookie.getValue(),"utf-8"));
- 服务器会给每一个用户(浏览器)创建一个Session;
- 一个Session独占一个浏览器,只要浏览器没有关闭,这个Session就存在;
- 用户登录之后,整个网站它都可以访问!----》保存用户的信息;保存购物车的信息…
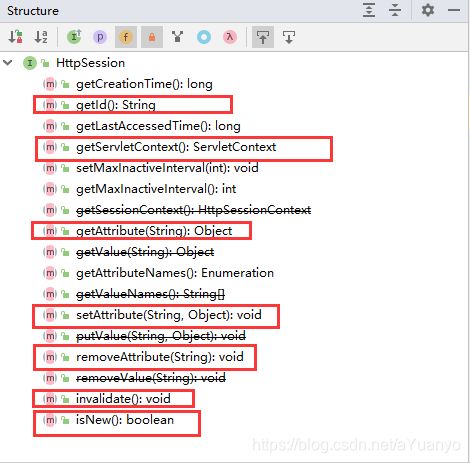
Session和Cookie的区别: - Cookie是把用户的数据写给用户的浏览器,浏览器保存;(可以保存多个)
- Session把用户的数据写到用户独占Session中,服务器端保存;(保存重要的信息,减少服务器资源的浪费)
- Session对象由服务创建;
使用场景:
- 保存一个登陆用户的信息;
- 购物车信息;
- 在整个网站中经常会使用的数据,我们将它保存在Session中;
使用Session
public class SessionDemo1 extends HttpServlet {

    @Override
    protected void doGet(HttpServletRequest req, HttpServletResponse resp) throws ServletException, IOException {

        //解决中文乱码
        req.setCharacterEncoding("utf-8");
        resp.setCharacterEncoding("utf-8");
        resp.setContentType("text/html;charset=utf-8");
        //得到session
        HttpSession session = req.getSession();
        //给session添加数据
        User user=new User(1,"我调年迈的");
        session.setAttribute("user",user);
        //获得session的id
        String sessionId = session.getId();
        //判断session是不是新创建的
        if(session.isNew()){

            resp.getWriter().write("session创建成功,ID:"+sessionId);
        }else{

            resp.getWriter().write("session已经在服务器中存在,ID:"+sessionId);
        }

    }
        //得到session
        HttpSession session = req.getSession();
        //获取session
        User user = (User) session.getAttribute("user");
        System.out.println(user);
        //得到session
        HttpSession session = req.getSession();
        //删除数据
        session.removeAttribute("user");
        //手动注销session
        session.invalidate();
会话自动过期:
    <session-config>

        <session-timeout>1session-timeout>
    session-config>
八.JSP(了解 不细说)
8.1 什么是JSP?
Java Server Pages : Java服务器端页面,也和Servlet一样用于开发动态web;
最大的特点:
- 写JSP就像在写HTML
- 区别:
- HTML只给用户提供提供静态的数据
- JSP中可以嵌入JAVA代码,为用户提供动态数据;
8.2 JSP原理
思路:JSP到底怎么执行的!
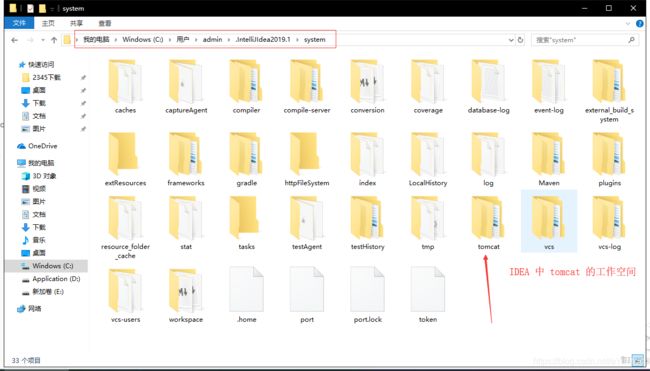
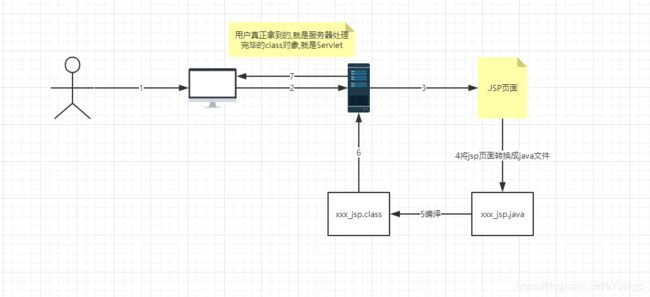
C:\Users\admin\.IntelliJIdea2019.1\system\tomcat\Unnamed_javaweb-session-cookie\work\Catalina\localhost\sc\org\apache\jsp
发现JSP页面变成了java程序
浏览器向服务器发送请求,不管访问什么资源,其实都是在访问Servlet;
JSP最终也会被转换成java类!
JSP本质上就是一个Servlet
//初始化
public void _jspInit() {
      }
//销毁
public void _jspDestroy() {
      }
//JSP Servlet
public void _jspService(HttpServletRequest request, HttpServletResponse response)
      throws java.io.IOException, javax.servlet.ServletException {
     }
1.判断请求
2.内置一些对象
    final javax.servlet.jsp.PageContext pageContext;  //页面上下文
    javax.servlet.http.HttpSession session = null;    //session
    final javax.servlet.ServletContext application;   //applicationContext
    final javax.servlet.ServletConfig config;		//config
    javax.servlet.jsp.JspWriter out = null;				//out
    final java.lang.Object page = this;					//page:代表当前页
    HttpServletRequest request							//请求
     HttpServletResponse response						//响应
3.输出页面前增加的代码
      response.setContentType("text/html;charset=UTF-8");     //设置响应的页面类型
      pageContext = _jspxFactory.getPageContext(this, request, response,
      			null, true, 8192, true);
      _jspx_page_context = pageContext;
      application = pageContext.getServletContext();
      config = pageContext.getServletConfig();
      session = pageContext.getSession();
      out = pageContext.getOut();
      _jspx_out = out;
4.以上的这些对象我们可以在JSP页面中直接使用
在JSP页面中,
只要是JAVA代码就会原封不动的输出;
如果是HTML代码,就会被转换为
out.write("\r\n");
这样的格式,输出到前端!
8.3 JSP基础语法
任何语言都是自己的语法,JAVA中有,JSP作为java技术的一种应用,它拥有一些自己扩充的语法(了解,知道即可!),java所有语法都支持!
JSP表达式
8.4 JSP指令
8.5 9大内置对象
8.6 JSP标签 JSTL标签 EL表达式
九.JavaBean
实体类
JavaBean有特定的写法
- 必要要有一个无参构造;
- 属性必须私有化;
- 必须有对应的get/set方法;
一般用来和数据库的字段做映射 ORM;
ORM : 对象关系映射;
- 表------------>类
- 字段--------->属性
- 行记录------>对象
people表
| id | name | age | address |
|---|---|---|---|
| 1 | 一号选手 | 11 | 广东汕头 |
| 2 | 二号选手 | 22 | 广东广州 |
| 3 | 三号选手 | 33 | 广东深圳 |
public class People {

    private int id;
    private String name;
    private int age;
    private String address;
    public People() {

    }

    public People(int id, String name, int age, String address) {

        this.id = id;
        this.name = name;
        this.age = age;
        this.address = address;
    }

    public int getId() {

        return id;
    }

    public void setId(int id) {

        this.id = id;
    }

    public String getName() {

        return name;
    }

    public void setName(String name) {

        this.name = name;
    }

    public int getAge() {

        return age;
    }

    public void setAge(int age) {

        this.age = age;
    }

    public String getAddress() {

        return address;
    }

    public void setAddress(String address) {

        this.address = address;
    }

    @Override
    public String toString() {

        return "People{" +
                "id=" + id +
                ", name='" + name + '\'' +
                ", age=" + age +
                ", address='" + address + '\'' +
                '}';
    }
}

//对象
public class Test {

    public static void main(String[] args) {

        new People(1,"选手一号",11,"广东汕头");
        new People(2,"选手二号",22,"广东广州");
        new People(3,"选手三号",33,"广东深圳");
    }
}
- 过滤器
- 文件上传
- 邮件发送
- JDBC复习:如何使用JDBC,JDBC crud,jdbc事务;
十.MVC三层架构
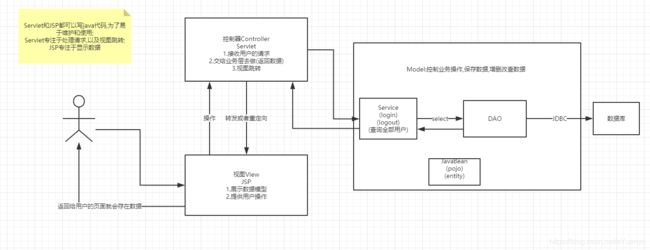
什么是MVC: Model View Controller 模型视图控制
10.1 早些年
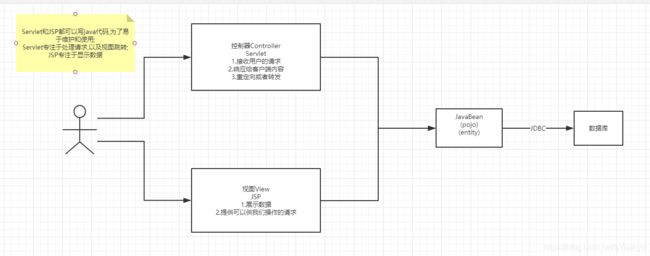
用户层直接访问控制层,控制层就可以直接操作数据库;
Servlet---->CRUD------->数据库
弊端:程序十分臃肿,不利于维护 ..... servlet的代码中:处理请求,响应,视图跳转,处理JDBC,处理逻辑代码


架构:没什么是加一层解决不了的!
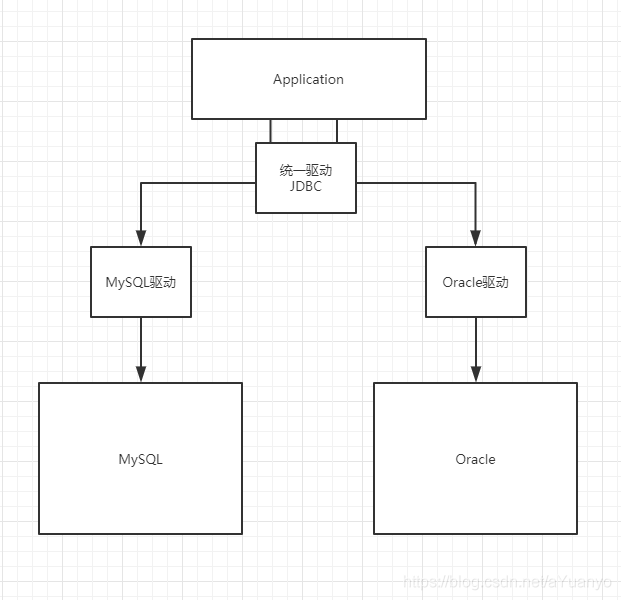
程序猿调用
|
JDBC
|
Mysql Oracle sqlServer...
- 业务处理:业务逻辑(Service)
- 数据持久层:CRUD (Dao)
View - 展示数据
- 提供链接发起Servlet ( a , form , img … )
Controller - 接收用户的请求: ( req : 请求参数,session信息… )
- 交给业务层处理业务的代码
- 控制视图的跳转
登陆---->接收用户登陆的请求------>处理用户的请求(获取登陆登陆的参数 user ,pass )
----->交给业务层处理登陆业务(判断用户名密码是否正确:事务)
--------->Dao层查询用户名和密码是否正确---------->数据库
十一. Filter(重点)
shiro安全框架
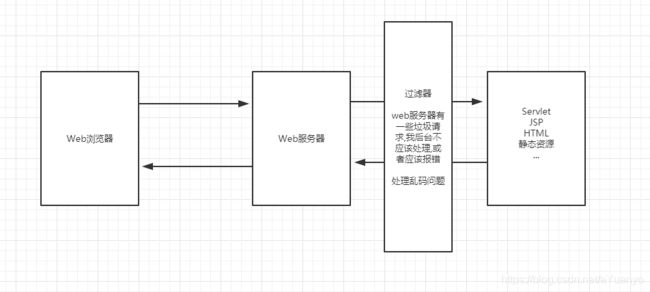
Filter:过滤器,用来过滤网站的数据;
import javax.servlet.*;
import java.io.IOException;

public class CharacterEncodingFilter implements Filter {

    @Override
    //初始化  web服务器启动,就已经初始化,随时等待过滤对象出现!
    public void init(FilterConfig filterConfig) throws ServletException {

        System.out.println("CharacterEncodingFilter init..");
    }

    @Override
    //Chain : 链
    /*
    1.  过滤器中的所有代码,在过滤特定请求的时候都会执行
    2.  必须要让过滤器继续通行
        Chain.doFilter(req,resp);
     */
    public void doFilter(ServletRequest req, ServletResponse resp, FilterChain Chain) throws IOException, ServletException {

            req.setCharacterEncoding("utf-8");
            resp.setCharacterEncoding("utf-8");
            resp.setContentType("text/html;charset=utf-8");
            System.out.println("FilterChain 执行前");
            Chain.doFilter(req,resp);//让我们的请求继续走,如果不写,程序到这里就被拦截停止!
            System.out.println("FilterChain 执行后");

    }

    @Override
    //销毁  web服务器关闭的时候,过滤器会销毁
    public void destroy() {

        System.out.println("CharacterEncodingFilter destroy...");
    }
}
3.在web.xml中配置Filter过滤器
    <filter>
        <filter-name>MyFilterfilter-name>
        <filter-class>com.csdn.filter.CharacterEncodingFilterfilter-class>
    filter>
    <filter-mapping>
        <filter-name>MyFilterfilter-name>

        <url-pattern>/servlet/*url-pattern>

    filter-mapping>
十二. 监听器 (了解)
实现一个监听器的接口;(N种)
1.编写一个监听器
- 实现监听器的接口;
import javax.servlet.ServletContext;
import javax.servlet.http.HttpSessionEvent;
import javax.servlet.http.HttpSessionListener;

//统计在线人数:统计session
public class CountListener  implements HttpSessionListener {

    @Override
    //创建session的监听:看你的一举一动
    //一旦创建一个session 就会触发一次这个事件!
    public void sessionCreated(HttpSessionEvent httpSessionEvent) {

        ServletContext servletContext = httpSessionEvent.getSession().getServletContext();
        Integer count = (Integer) servletContext.getAttribute("Count");
        if(count==null){

            count=new Integer(1);
        }else{

            count++;
        }
        servletContext.setAttribute("Count",count);
    }

    @Override
    //销毁session的监听
    //一旦销毁session 就会触发一次这个事件!
    public void sessionDestroyed(HttpSessionEvent httpSessionEvent) {

        ServletContext servletContext = httpSessionEvent.getSession().getServletContext();
        Integer count = (Integer) servletContext.getAttribute("Count");
        if(count==null){

            count=new Integer(0);
        }else{

            count--;
        }
        servletContext.setAttribute("Count",count);

    }
    /*
    session的销毁:
    1.手动销毁  httpSessionEvent.getSession().invalidate();
    2.自动销毁

            15  //单位min

     */
}
2.配置监听器
    <listener>
        <listener-class>com.csdn.listener.CountListenerlistener-class>
    listener>
3.看情况是否使用!
十三.监听器 .过滤器常见应用
监听器:GUI编程中经常使用
用户登陆之后才可以进入主页!用户注销后就不能进入主页了!
1.用户登录之后,向Session种放入用户的数据;
2.进入主页的时候要判断用户是否已经登陆; 在过滤器中实现
    @Override
    public void doFilter(ServletRequest servletRequest, ServletResponse servletResponse, FilterChain filterChain) throws IOException, ServletException {

        HttpServletRequest req=(HttpServletRequest) servletRequest;
        HttpServletResponse resp=(HttpServletResponse) servletResponse;
        Object userSession = req.getSession().getAttribute(Constant.USER_SESSION);
        if(userSession==null){

            resp.sendRedirect("/login.jsp");
        }
        filterChain.doFilter(servletRequest,servletResponse);
    }
十四.JDBC
- java.sql
- javax.sql
- mysql-connect… 必须要导的连接驱动
    <dependencies>
        <dependency>
            <groupId>mysqlgroupId>
            <artifactId>mysql-connector-javaartifactId>
            <version>5.1.47version>
        dependency>
    dependencies>
JDBC固定步骤
public class TestJdbc {

    public static void main(String[] args) throws Exception {

        //配置信息
        //解决中文乱码
        String url="jdbc:mysql://localhost:3306/jdbc?useUnicode=true&characterEncoding=utf-8";
        String username="root";
        String password="root";
        //1.加载驱动
        Class.forName("com.mysql.jdbc.Driver");
        //2.连接数据库,代表数据库
        Connection connection = DriverManager.getConnection(url, username, password);
        //3.向数据库发送sql的对象Statement:CRUD
        Statement statement = connection.createStatement();
        //4.编写SQL
        String sql="select * from users";
        // 5.执行SQL,返回一个resultSet:结果集
        ResultSet rs = statement.executeQuery(sql);
        //6.遍历结果集输出
        while(rs.next()){

            System.out.println("id="+rs.getObject("id"));
            System.out.println("name="+rs.getObject("name"));
            System.out.println("password="+rs.getObject("password"));
            System.out.println("email="+rs.getObject("email"));
            System.out.println("birthday="+rs.getObject("birthday"));
        }
        //7.关闭连接,释放资源(一定要) 先开后关
        rs.close();
        statement.close();
        connection.close();

    }
}
预编译SQL
public class TestJdbc2 {

    public static void main(String[] args) throws Exception {

        //配置信息
        //解决中文乱码
        String url="jdbc:mysql://localhost:3306/jdbc?useUnicode=true&characterEncoding=utf-8";
        String username="root";
        String password="root";
        //1.加载驱动
        Class.forName("com.mysql.jdbc.Driver");
        //2.连接数据库,代表数据库
        Connection connection = DriverManager.getConnection(url, username, password);
        //3.编写SQL
        String sql="insert into users (id, name, password, email, birthday) values (?,?,?,?,?);";
        //4.预编译
        PreparedStatement ps = connection.prepareStatement(sql);

        ps.setInt(1,4); //给第一个占位符?的值 赋值
        ps.setString(2,"赵六"); //给第二个占位符?的值 赋值
        ps.setString(3,"123466"); //给第三个占位符?的值 赋值
        ps.setString(4,"[email protected]"); //给第四个占位符?的值 赋值
        ps.setString(5,"2020-06-06"); //给第五个占位符?的值 赋值
        //5.执行SQL
        int i = ps.executeUpdate();
        if(i>0){

            System.out.println("插入成功 i="+i);
        }
        //6.关闭连接,释放资源(一定要) 先开后关
        ps.close();
        connection.close();

    }
}
事务
要么都成功,要么都失败!
ACID原则:保证数据的安全;
开启事务
事务提交 commit()
事务回滚 rollback()
关闭事务

转账:
A:1000    B:1000
A(900)--->100--->B(1100)
搭建测试环境
import org.junit.Test;

import java.sql.Connection;
import java.sql.DriverManager;
import java.sql.SQLException;

public class TestJdbc3 {

    @Test
    public void test(){

        String url="jdbc:mysql://localhost:3306/jdbc?useUnicode=true&characterEncoding=utf-8";
        String username="root";
        String password="root";
        Connection connection=null;
        //1.加载驱动
        try {

            Class.forName("com.mysql.jdbc.Driver");
            //2.连接数据库,代表数据库
            connection = DriverManager.getConnection(url, username, password);
            //3.通知数据库开启事务 false: 开启
            connection.setAutoCommit(false);
            String sql1="update account set money=money-100 where name='A'";
            connection.prepareStatement(sql1).executeUpdate();

            //制造错误
            //int i=1/0;
            String sql2="update account set money=money+100 where name='B'";
            connection.prepareStatement(sql2).executeUpdate();
            connection.commit(); //以上两条事务都成功,就提交事务!
            System.out.println("success ");
        } catch (Exception e) {

            try{

                connection.rollback();
            }catch (SQLException e1){

                e1.printStackTrace();
            }
            e.printStackTrace();
        }finally {

            try {

                connection.close();
            } catch (SQLException e) {

                e.printStackTrace();
            }
        }

    }
}
