springmv 文件上传和下载
springMVC的文件上传下载
1.准备工作
2.普通单文件上传
1.创建index.jsp

2.创建FileUploadController
*/
@Controller
@RequestMapping("upload")
public class FileUploadController {

	/**
	 * 单文件上传
	 */
	@RequestMapping("upload01")
	public String upload01(MultipartFile mf,HttpSession session){

		System.out.println(mf);
		System.out.println(mf.getContentType()); //文件类型
		System.out.println(mf.getName());//input里面的name属性名 mf
		System.out.println(mf.getOriginalFilename());//文件名
		System.out.println(mf.getSize());//文件大小
//		System.out.println(mf.getInputStream());//得到文件流
		//1,得到文件上传的目录
		String realPath=session.getServletContext().getRealPath("/upload");
		//2,得到文件名
		String oldName=mf.getOriginalFilename();
		//3,构造文件对象
		File file=new File(realPath, oldName);
		//4,上传文件
		try {

			mf.transferTo(file);
		} catch (IllegalStateException | IOException e) {

			// TODO Auto-generated catch block
			e.printStackTrace();
		}
		return "success";
	}
}
3.配置springmvc.xml对文件上传的支持
	<bean id="multipartResolver" class="org.springframework.web.multipart.commons.CommonsMultipartResolver">

		<property name="defaultEncoding" value="UTF-8">property>

		<property name="maxUploadSize" value="21474836480">property>

		<property name="uploadTempDir" value="/upload/temp">property>
	bean>
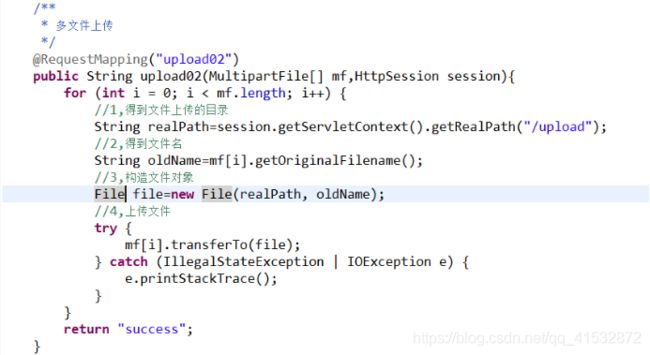
3.普通多文件上传
1.修改index.jsp

2.修改FileUploadController

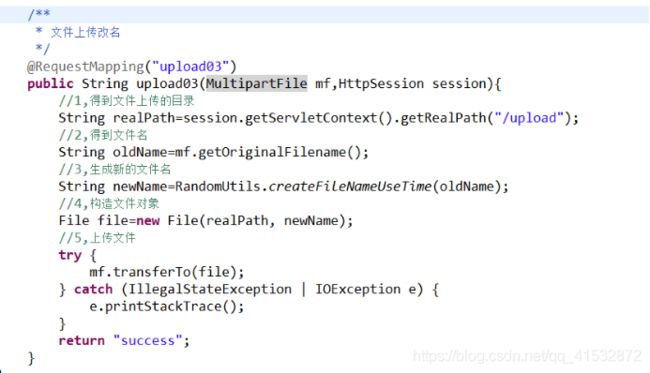
4.普通文件上传改名字
为什么要改名字
因为不改名,那么上传的文件名如果相同,内容不同就会被覆盖
1.修改index.jsp

2.修改FileUploadController

3.创建RandomUtils
/**
 * 生成字符串的工具类
 * @author LJH
 *
 */
public class RandomUtils {


	//时间生成规则
	private static SimpleDateFormat format1=new SimpleDateFormat("yyyyMMddHHmmssSSS");

	//生成随机数对象
	private static Random random=new Random();

	/**
	 * 使用时间+四位随机数生成新的文件名
	 * @param oldName  dsfadsafdsafsdafads.fdsaf.sda.fdsa.f.sda.fdsa.fdsa.doc
	 * @return
	 */
	public static String createFileNameUseTime(String oldName) {

		//1,得到文件的后缀
		String suffix=oldName.substring(oldName.lastIndexOf("."), oldName.length());
		//2,得到时间的字符串
		String time=format1.format(new Date());
		//3,得到四位随机数
		Integer num=random.nextInt(9000)+1000;
		//4,拼接
		return time+"_"+num+suffix;
	}


	/**
	 * 使用uuid生成新的文件名
	 * @param oldName
	 * @return
	 */
	public static String createFileNameUseUUID(String oldName) {

		//1,得到文件的后缀
		String suffix=oldName.substring(oldName.lastIndexOf("."), oldName.length());
		//2,得到uuid
		String uuid=UUID.randomUUID().toString().replace("-", "");
		return uuid+suffix;
	}

}
5.普通文件上传改名字并分文件夹管理
为什么要分文件夹管理
如果整项目的文件都放一起,那么对文件夹的管理会非常困难
1.修改index.jsp

2.修改FileUploadController
/**
	 * 文件上传改名并分文件夹管理
	 */
	@RequestMapping("upload04")
	public String upload04(MultipartFile mf,HttpSession session){

		//1,得到文件上传的目录
		String realPath=session.getServletContext().getRealPath("/upload");
		//2,得到文件夹的名字
		String dirName=RandomUtils.createDirNameUserDate();
		//3,构造文件夹对象
		File dirFile=new File(realPath,dirName);
		//4,判断文件夹是否存在
		if(!dirFile.exists()){

			dirFile.mkdirs();//创建文件夹
		}
		//5,得到文件名
		String oldName=mf.getOriginalFilename();
		//6,生成新的文件名
		String newName=RandomUtils.createFileNameUseTime(oldName);
		//7,构造文件对象
		File file=new File(dirFile, newName);
		//5,上传文件
		try {

			mf.transferTo(file);
		} catch (IllegalStateException | IOException e) {

			e.printStackTrace();
		}
		return "success";
	}
6.文件上传改名字并分文件夹管理并保存路径到数据库
在实际开发,我们的文件是保存到服务器硬盘上,而文件的地址是存在数据库里
在实际开发,文件的存放是有专门的服务器,文件服务器
1.修改index.jsp

2.创建数据库并集成ssm

1,导包
2,修改applicaiton-dao.xml
3,修改applicaiton-service.xml
4,修改applicaitonContext.xml
5,修改web.xml
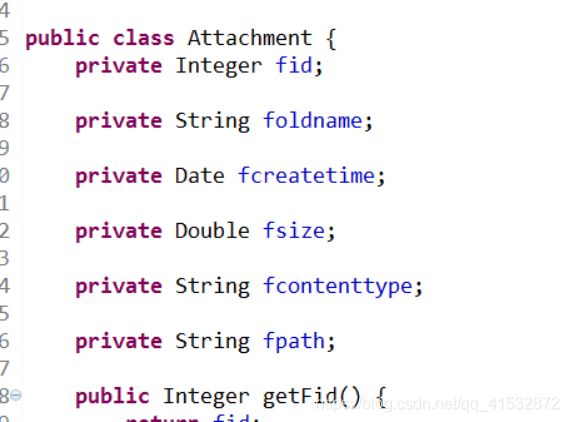
3.创建Attachment

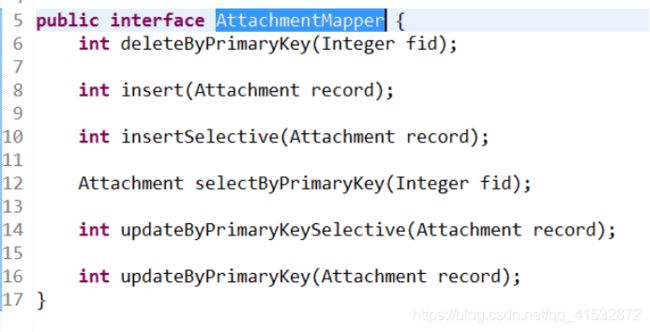
4.创建AttachmentMapper

5.创建AttachmentMapper.xml
生成的
6.创建AttachmentVo

7.创建AttachmentService

8.创建AttachmentServiceIpml

9.创建AttachmentController
/**
 * 文件管理控制器
 * @author LJH
 *
 */
@Controller
@RequestMapping("attachment")
public class AttachmentController {


	@Autowired
	private AttachmentService attachmentService;
	/**
	 * 文件上传改名并分文件夹管理
	 */
	@RequestMapping("addAttachment")
	public String addAttachment(MultipartFile mf,HttpSession session){

		//1,得到文件上传的目录
		String realPath=session.getServletContext().getRealPath("/upload");
		//2,得到文件夹的名字
		String dirName=RandomUtils.createDirNameUserDate();
		//3,构造文件夹对象
		File dirFile=new File(realPath,dirName);
		//4,判断文件夹是否存在
		if(!dirFile.exists()){

			dirFile.mkdirs();//创建文件夹
		}
		//5,得到文件名
		String oldName=mf.getOriginalFilename();
		//6,生成新的文件名
		String newName=RandomUtils.createFileNameUseTime(oldName);
		//7,构造文件对象
		File file=new File(dirFile, newName);
		//5,上传文件
		try {

			mf.transferTo(file);
			AttachmentVo attachmentVo=new AttachmentVo();
			attachmentVo.setFoldname(oldName);
			attachmentVo.setFcontenttype(mf.getContentType());
			attachmentVo.setFcreatetime(new Date());
			attachmentVo.setFsize(Double.valueOf(mf.getSize()));
			//存放相对路径
			attachmentVo.setFpath("upload/"+dirName+"/"+newName);
			//说明文件上传成功
			attachmentService.addAttachment(attachmentVo);
		} catch (IllegalStateException | IOException e) {

			e.printStackTrace();
		}
		return "success";
	}
}
7.查询文件列表
2.修改AttachmentController

3.修改AttachmentService

4.修改AttachmentServiceImpl

5.修改AttachmentMapper

6.修改AttachmentMapper.xml

7.创建WEB-INF/view/list.jsp
<%@ page language="java" import="java.util.*" pageEncoding="UTF-8"%>
<%@taglib prefix="c" uri="http://java.sun.com/jsp/jstl/core" %>
<%@taglib prefix="fmt" uri="http://java.sun.com/jsp/jstl/fmt" %>
<%
	String path = request.getContextPath();
	String basePath = request.getScheme() + "://"
			+ request.getServerName() + ":" + request.getServerPort()
			+ path + "/";
%>

<!DOCTYPE HTML PUBLIC "-//W3C//DTD HTML 4.01 Transitional//EN">
<html>
<head>
<base href="<%=basePath%>">

<title>文件列表</title>
<meta http-equiv="pragma" content="no-cache">
<meta http-equiv="cache-control" content="no-cache">
<meta http-equiv="expires" content="0">
<meta http-equiv="keywords" content="keyword1,keyword2,keyword3">
<meta http-equiv="description" content="This is my page">
<!--
	<link rel="stylesheet" type="text/css" href="styles.css">
	-->
</head>

<body>
	<h1>
		所有文件
	</h1>
	<hr>
	<table border="1" width="100%" cellpadding="5" cellspacing="5">
		<tr>
			<th>编号</th>
			<th>老名字</th>
			<th>上传时间</th>
			<th>文件大小</th>
			<th width="30%">文件类型</th>
			<th>操作</th>
		</tr>
		<c:forEach var="sn" items="${list }">
			<tr>
				<td align="center">${
     sn.fid }</td>
				<td align="center">${
     sn.foldname }</td>
				<td align="center">
					<fmt:formatDate value="${sn.fcreatetime }" pattern="yyyy-MM-dd HH:mm:ss"/>
				</td>
				<td align="center">${
     sn.fsize }</td>
				<td align="center">${
     sn.fcontenttype }</td>
				<td align="center">
					<a href="">下载1</a>||
					<a href="">下载2</a>
				</td>
			</tr>
		</c:forEach>
	</table>
</html>
8.文件下载
下载方式
	1,直接使用路径下载
			|--优点:不能写后台代码
			|--缺点:丢失了文件老名字
					暴露了文件在服务器里面的路径
	2,使用后台下载
			|--优点:可以显示文件老名字  隐藏了文件在服务器的路径
			|--缺点:要写代码


