准备
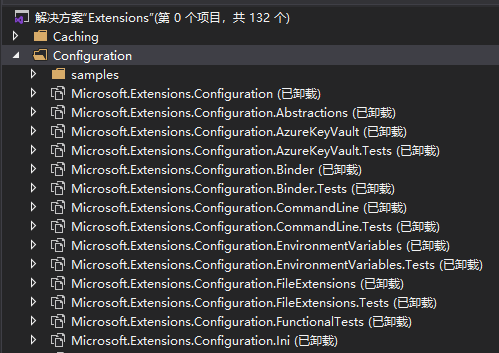
.NET core和.NET项目配置上有了很大的改变,支持的也更加丰富了比如命令行,环境变量,内存中.NET对象,设置文件等等。.NET项目我们常常把配置信息放到webConfig 或者appConfig中。配置相关的源码https://github.com/aspnet/Extensions;如果打开源码项目如果遇到以下错误,未遇到直接跳过。
错误提示:error : The project file cannot be opened by the project system, because it is missing some critical imports or the referenced SDK cannot be found. Detailed Information:
解决办法:查看本地安装的sdk 与 global.json中制定的版本是否一致:然后修改即可
开始
新建个Asp.net Core web应用程序系统默认创建了appsettings.json ;在应用启动生成主机时调用CreateDefaultBuilder方法,默认会加载appsettings.json。代码如下:
public static IHostBuilder CreateDefaultBuilder(string[] args)
{
var builder = new HostBuilder();
builder.UseContentRoot(Directory.GetCurrentDirectory());
builder.ConfigureHostConfiguration(config =>
{
config.AddEnvironmentVariables(prefix: "DOTNET_");
if (args != null)
{
config.AddCommandLine(args);
}
});
builder.ConfigureAppConfiguration((hostingContext, config) =>
{
var env = hostingContext.HostingEnvironment;
config.AddJsonFile("appsettings.json", optional: true, reloadOnChange: true)
.AddJsonFile($"appsettings.{env.EnvironmentName}.json", optional: true, reloadOnChange: true);
if (env.IsDevelopment() && !string.IsNullOrEmpty(env.ApplicationName))
{
var appAssembly = Assembly.Load(new AssemblyName(env.ApplicationName));
if (appAssembly != null)
{
config.AddUserSecrets(appAssembly, optional: true);
}
}
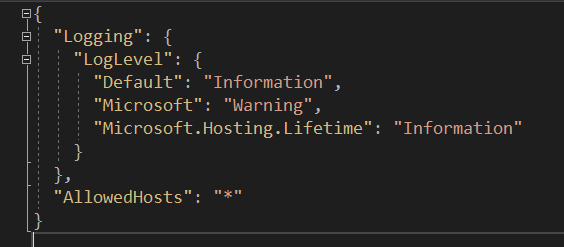
利用GetValue,GetSection,GetChildren读取appsettings.json 键值对 。我们打开appsettings.json文件:
将文件读入配置时,会创建一下唯一的分层健来保存配置值:
- Logging:LogLevel:Default
- Logging:LogLevel:System
- Logging:LogLevel:Microsoft
- Logging:LogLevel:Microsoft.Hosting.Lifetime
- AllowedHosts
var jsonValue = $"AllowedHosts:{_config["AllowedHosts"]}"+ "\r\n";
jsonValue += "Logging:LogLevel:Default:" + _config.GetValue("Logging:LogLevel:Default")+ "\r\n";
//GetSection 返回IConfigurationSection;如果未匹配到 返回null
//jsonValue += "---" + _config.GetSection("Logging:LogLevel:System");
jsonValue += "Logging:LogLevel:System:" + _config.GetSection("Logging:LogLevel:System").Value+ "\r\n\n";
var logSection = _config.GetSection("Logging:LogLevel");
var configurationSections = logSection.GetChildren();
foreach (var sections in configurationSections)
{
jsonValue += $"{sections.Path}:{sections.Value}";
jsonValue += "\r\n";
}
jsonValue += "\r\n";
配置指定json文件绑定至类
新建一个json文件-AAAppSettings.json
{
 "AA": {
  "RabbitMqHostUrl": "rabbitmq://localhost:5672",
  "RabbitMqHostName": "localhost",
  "RabbitMqUserName": "admin",
  "RabbitMqPassword": "123"
 }
}
使用ConfigureAppConfiguration方法配置指定的json文件
public static IHostBuilder CreateHostBuilder(string[] args) =>
      Host.CreateDefaultBuilder(args)
      .ConfigureAppConfiguration((hostingContext, config) =>
      {
        config.SetBasePath(Directory.GetCurrentDirectory());
        config.AddJsonFile("AAAppSettings.json", optional: true, reloadOnChange: true);
      })
使用bind方法绑定到新建的类上如:
public partial class AAConfig
  {
    public string RabbitMqHostUrl { get; set; }
    public string RabbitMqHostName { get; set; }
    public string RabbitMqUserName { get; set; }
    public string RabbitMqPassword { get; set; }
  }
var aaConfig = new AAConfig();
_config.GetSection("AA").Bind(aaConfig);
jsonValue += aaConfig.RabbitMqHostUrl + "\r\n";
jsonValue += aaConfig.RabbitMqHostName + "\r\n";
jsonValue += aaConfig.RabbitMqUserName + "\r\n";
jsonValue += aaConfig.RabbitMqPassword + "\r\n";
return jsonValue;
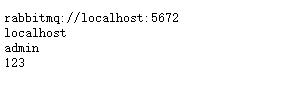
运行输出:
到此这篇关于.Net Core3.0 配置Configuration的实现的文章就介绍到这了,更多相关.Net Core3.0 配置Configuration内容请搜索脚本之家以前的文章或继续浏览下面的相关文章希望大家以后多多支持脚本之家!


