Android实战——简单网络视频播放器
安卓实现视频播放有四种方法,分别为VideoView、SurfaceView+Mediaplayer、自定义流媒体、第三方框架。通过视频学习,使用github第三方框架完成一个简单的网络视频播放器。
步骤如下
1.添加bulid.gradle(app)依赖
implementation 'cn.jzvd:jiaozivideoplayer:7.2.0'
implementation 'com.squareup.picasso:picasso:2.5.2'
implementation 'com.google.code.gson:gson:2.8.5'
2.编写布局文件
主界面使用LinearLayout布局,只有一个简答的ListView,用来展示视频内容。
再写ListView中每个item的布局,每个item中是组件包括视频、发布者、详情、点赞数、评论数,用了比较简单的线性布局和约束布局,此部分代码不单独贴出。
特别说明:
该项目使用的是github上的JZVideo提供的自定义视频框架,具体可查看链接github链接
此处我们直接使用,在item布局中添加
3.MainActivity
需要注意:此处使用接口来获取视频数据源,接口如下
String url = "http://baobab.kaiyanapp.com/api/v4/tabs/selected?udid=11111&vc=168&vn=3.3.1&deviceModel=Huawei6&first_channel=eyepetizer_baidu_market&last_channel=eyepetizer_baidu_market&system_version_code=20
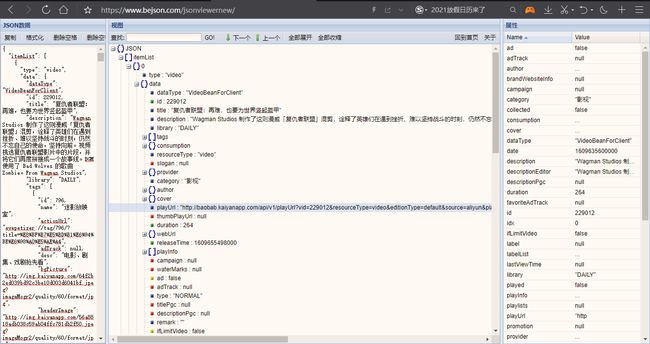
可以通过bejson.com这个网站来格式化Json数据,后续进行数据分析。
完成数据源获取、创建适配器对象、设置适配器的代码编写
    @Override
    protected void onCreate(Bundle savedInstanceState) {
        super.onCreate(savedInstanceState);
        setContentView(R.layout.activity_main);
        setTitle("开眼视频");
        mainLv = findViewById(R.id.main_lv);
//        数据源
        mDatas = new ArrayList<>();
//        创建适配器对象
        adapter = new com.example.new2.VideoAdapter(this, mDatas);
//        设置适配器
        mainLv.setAdapter(adapter);
    }
4.生成数据解析的bean
使用AS的GsonFormat插件自动生成bean类,此处代码不贴出。
5.编写列表适配器
创建一个新的类VideoAdapter,继承BaseAdapter。
在VideoAdapter再写一个ViewHolder类,用于声明item视图中的控件,减少findViewById的次数,优化栈内存。
class ViewHolder{
    JzvdStd jzvdStd;
    ImageView iconIv;
    TextView nameTv,descTv,heartTv,replyTv;
    public ViewHolder(View view){
        jzvdStd = view.findViewById(R.id.item_main_jzvd);
        iconIv = view.findViewById(R.id.item_main_iv);
        nameTv = view.findViewById(R.id.item_main_tv_name);
        descTv = view.findViewById(R.id.item_main_tv_des);
        heartTv = view.findViewById(R.id.item_main_iv_heart);
        replyTv = view.findViewById(R.id.item_main_iv_reply);
    }
}
用getView方法来返回视频对象,主要代码如下
 @Override
    public View getView(int position, View convertView, ViewGroup parent) {
        ViewHolder holder = null;
        if (convertView == null) {
            convertView = LayoutInflater.from(context).inflate(R.layout.item_mainlv,parent,false);
            holder = new ViewHolder(convertView);
            convertView.setTag(holder);
        }else {
            holder = (ViewHolder) convertView.getTag();
        }
//        获取指定位置的数据源
        VideoBean.ItemListBean.DataBean dataBean = mDatas.get(position).getData();
//        设置发布者的信息
        VideoBean.ItemListBean.DataBean.AuthorBean author = dataBean.getAuthor();
        holder.nameTv.setText(author.getName());
        holder.descTv.setText(author.getDescription());
        String iconURL = author.getIcon();
        if (!TextUtils.isEmpty(iconURL)) {
            Picasso.with(context).load(iconURL).into(holder.iconIv);
        }
//     获取点赞数和评论数
        VideoBean.ItemListBean.DataBean.ConsumptionBean consumpBean = dataBean.getConsumption();
        holder.heartTv.setText(consumpBean.getRealCollectionCount()+"");
        holder.replyTv.setText(consumpBean.getReplyCount()+"");
//      设置视频播放器的信息
        holder.jzvdStd.setUp(dataBean.getPlayUrl(),dataBean.getTitle(), JzvdStd.SCREEN_NORMAL);
        String thumbUrl = dataBean.getCover().getFeed();  //缩略图的网络地址
        Picasso.with(context).load(thumbUrl).into(holder.jzvdStd.thumbImageView);
        holder.jzvdStd.positionInList = position;
        return convertView;
    }
6.写完上面的几步后,需要加载网络数据
此处使用安卓原生的方法来加载网络数据。封装自带的HttpUtils方法。
public static String getJsonContent(String path){
    ByteArrayOutputStream baos = new ByteArrayOutputStream();
    try {
        URL url = new URL(path);
        //自带的http连接对象
        HttpURLConnection conn = (HttpURLConnection) url.openConnection();
        conn.connect();//连接
        InputStream is = conn.getInputStream();//读取输入流
        byte[]buf = new byte[1024];//暂时读入数组中
        int hasRead = 0;
        while ((hasRead = is.read(buf))!=-1){
            baos.write(buf,0,hasRead);
        }
    } catch (Exception e) {
        e.printStackTrace();
    }
    return baos.toString();
}
7.在MainActivity中调用上面的方法
    private void loadData() {
        /* 创建新的线程,完成数据的获取*/
        new Thread(new Runnable() {
            @Override
            public void run() {
                String jsonContent = HttpUtils.getJsonContent(url);
//                子线程不能更新UI,需要通过handler发送数据回到主线程
                Message message = new Message();   //发送的消息对象
                message.what = 1;
                message.obj = jsonContent;
                //子线程发送回去
                handler.sendMessage(message);
            }
        }).start();
    }
此处用到Handler机制
Handler handler = new Handler(){
        @Override
        public void handleMessage(Message msg) {
            if (msg.what == 1) {
                String json = (String) msg.obj;
//               使用Gson 解析数据
                com.example.new2.VideoBean videoBean = new Gson().fromJson(json, com.example.new2.VideoBean.class);
//                过滤了不需要的数据
                List itemList = videoBean.getItemList();
                for (int i = 0; i < itemList.size(); i++) {
                    com.example.new2.VideoBean.ItemListBean listBean = itemList.get(i);
                    if (listBean.getType().equals("video")) {
                        mDatas.add(listBean);
                    }
                }
//                提示适配器更新数据
                adapter.notifyDataSetChanged();
            }
        }
    };
8.AndroidManifest添加网络请求
在application中添加android:usesCleartextTraffic=“true”,进行全局配置。
**9.注意:**该框架需要在JDK1.8版本,在bulid.gradle(app)的android中添加声明
compileOptions {
    targetCompatibility = 1.8
    sourceCompatibility = 1.8
}
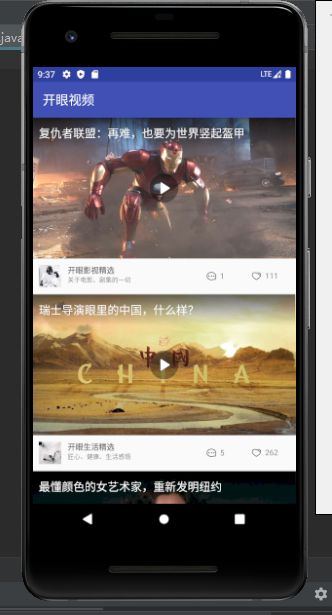
10.最终运行效果
学习视频链接https://www.bilibili.com/video/BV1X7411n7SL?p=1&share_medium=android&share_plat=android&share_source=COPY&share_tag=s_i×tamp=1609666763&unique_k=wVwU7W
本项目参考了视频链接的教程,视频中包含了项目的源码,有需要的小伙伴可以点击查看。
作者: 林秋婷
原文链接


