NodeJS实战:Express+Mongoose+ejs
元宵还没到,先向所有朋友拜一个晚年~~~
文章目录:
1、组件版本号
-- --node
-- --express
-- --Mongoose
2、初始化项目 firstblood
-- --用 express 自动初始化(推荐)
-- --附:手动初始化 package.json
3、关于 express 的 app.js
4、前端模板 Handlebars Ejs Jade
-- --以 Ejs 模板为例
-- --体验一把: route 路由是如何工作的
5、CSS、JS框架支持
-- --bootstrap2.3.2 + jquery 1.11.1 为例
-- --头部尾部重用
6、增删改查少不了
-- --mongodb 小回顾
-- --node 操作 Mongoose 【挑战:一个后台登陆验证+展示mongodb中现有会员信息的小案例】
-- --增强案例:支持登陆并新增修改会员信息的系统,还得支持 session ~
1、组件版本号:
1.1、node: 资料大全
$ node -v
v0.10.35
1.2、express: 3x api
$ express -V
3.0.0
1.3、Mongoose : 3.8.24 api
$ npm info mongoose version
3.8.24

//$ npm install mongoose
//注:在Windows下安装 **报错(兼容性错误)** 没事的!
//如果你有强迫症 请安装 Microsoft Visual Studio 2010 即可
//向坚持在 windows 平台的同学致敬……(唉,我的 mac 本本也只是看看电影,没事!)
[email protected] node_modules\mongoose
├── [email protected]
├── [email protected]
├── [email protected]
├── [email protected]
├── [email protected]
├── [email protected]
├── [email protected]
├── [email protected] ([email protected])
└── [email protected] ([email protected], [email protected], 9, [email protected])
再次重申: 在 Windows 下安装Mongoose 报错(兼容性错误) 没事的! 没事的!!!
如果你有强迫症 请安装 Microsoft Visual Studio 2010 即可 ( Win7 64bit 推荐 )
2、初始化项目 firstblood
2.1、用 express 自动初始化(推荐)
1、先全局安装 express:(来自于淘宝国内镜像)
以 3.2.2 为例:
$ npm install -g [email protected] --registry=https://registry.npm.taobao.orgtips:
关于 4.0 呢,中间件全被独立出来,网上 download 下来的代码大都是3.x,可能会出错……
建议用3.x。教程也多,一搜一大堆容易解决不常见的坑。
2、创建项目:
快速熟悉下 express 的指令:
Usage: express [options]

Options:

  -h, --help          输出帮助信息
  -V, --version       输出版本号
  -e, --ejs           添加 ejs 模板引擎支持 (默认为jade)
  -H, --hogan         添加 hogan.js模板引擎支持
  -c, --css   样式 <引擎> 支持 (less|stylus) (默认为css)
  -f, --force         强制在非空目录执行
开始安装:
//-e 即支持 ejs; 你喜欢 **ejs** 还是 **jade** ?
$ express firstblood -e

     express firstblood -e

      create : firstblood
      create : firstblood/package.json
      create : firstblood/app.js
      create : firstblood/public
      create : firstblood/routes
      create : firstblood/routes/index.js
      create : firstblood/routes/user.js
      create : firstblood/views
      create : firstblood/views/index.ejs
      create : firstblood/public/javascripts
      create : firstblood/public/images
      create : firstblood/public/stylesheets
      create : firstblood/public/stylesheets/style.css

      install dependencies:
        $ cd firstblood && npm install

      run the app:
        $ node app

//安装组件
$ cd firstblood && npm install

    [email protected] node_modules\ejs

    [email protected] node_modules\express
    ├── [email protected]
    ├── [email protected]
    ├── [email protected]
    ├── [email protected]
    ├── [email protected]
    ├── [email protected]
    ├── [email protected]
    ├── [email protected]
    ├── [email protected]
    ├── [email protected] ([email protected])
    ├── [email protected] ([email protected])
    └── [email protected] ([email protected], [email protected], [email protected]
这时候 可以启动 node app.js 项目,可以浏览 http://localhost:3000/
按 Ctrl + c结束;
tips:
每次代码改动都需要重启 node! 不过安装 npm install supervisor 后可以偷懒;它会在你每次修改完代码后自动重启。 神器哦!
3、安装 mongoose
package.json 文件自动更新 dependencies 字段:
npm install mongoose --save2.2、附:手动初始化 package.json
$ mkdir firstblood && cd firstblood
$ npm init
依次填写: name、version、description、entry point(入口index.js或app.js)、test command(启动指令 node index.js)、git repository(git库)、keywords、author、license(ISC)…… 大胆随便填写,最后 输入 yes 生成 package.json 文件。
接下来安装 mongoose,express,修改 package.json
"dependencies": {
    "mongoose": "^3.8.24",
    "express": "3.x"
},
然后在 当前目录下执行 npm install 安装组件
3、关于 express的 app.js
小解释:
/**
 * Module dependencies. 依赖的模块(处理路由,业务逻辑)
 */
var express = require('express')
  , routes = require('./routes')
  , user = require('./routes/user')
  , http = require('http')
  , path = require('path');

//实例化 express 并赋值app变量
var app = express();

// all environments 依赖的环境(配置参数)
app.set('port', process.env.PORT || 3000);
app.set('views', __dirname + '/views');
app.set('view engine', 'ejs');
app.use(express.favicon());
app.use(express.logger('dev'));

//bodyParser 改成 urlencoded 可以忽略一些 Node窗口里的警告
  app.use(express.urlencoded());
//app.use(express.bodyParser());

app.use(express.methodOverride());
app.use(app.router);
app.use(express.static(path.join(__dirname, 'public')));

// development only 开发模式(检查错误)
if ('development' == app.get('env')) {
  app.use(express.errorHandler());
}

// 路由解析
app.get('/', routes.index);
app.get('/users', user.list);

// 创建一个http server 启动端口
http.createServer(app).listen(app.get('port'), function(){
  console.log('Express server listening on port ' + app.get('port'));
});
4、前端模板 Handlebars Ejs Jade
关于这个话题移步:
Jade、EJS、Handlebars 万行代码解释效率比较
Jade和ejs,哪一个更胜一筹
John大神写的20行模板
楼主总结: 项目个人秀当然是 jade、商业化的肯定是 Ejs、Handlebars; 楼主喜欢后者……
4.1、以 Ejs 模板为例
让ejs模板文件 支持 html 格式:
a:修改app.js
//让Ejs支持 html
app.engine('.html', ejs.__express);
app.set('view engine', 'html');
//app.set('view engine', 'ejs');
b:引入 ejs 模块
//手动添加 ejs 以便支持 .html
ejs = require('ejs');
c:修改 /views 目录下的入口文件后缀为 index.html
重启app即可
4.2、体验一把: route 路由是如何工作的
1、在app.js文件中 找到 路由解析部分;添加
app.get('/lu-you-qing-qiu', routes.luyou);它负责处理你的请求 "/lu-you-qing-qiu"
2、找到: /routes/index.js 文件;添加
exports.luyou = function(req, res){
  res.render('lu-you-ye-mian', { title: '“路由”是长这样的!' });
};
找一个名为 "lu-you-ye-mian.html" (注:上面已经把ejs改成html了哦)去渲染
关于模块化写法,请移步这里: NodeJS 菜鸟入门
3、渲染页面;在 /views/ 目录增加 lu-you-ye-mian.html :
<!DOCTYPE html>
<html>
<head>
<title><%= title %></title>
<link rel='stylesheet' href='/stylesheets/style.css' />
</head>
<body>
<h1><%= title %></h1>
</body>
</html>
愉快的启动app.js吧!
5、CSS、JS框架支持
5.1、以 bootstrap2.3.2 + jquery 1.11.1 为例:
1、将 bootstrap 文件夹中的 /css/目录下的所有文件 复制到 /public/stylesheets/
2、将 /js/目录下的所有文件加上再下载一个 jquery 复制到 /public/javascripts/
3、将 /img/ 目录下所有文件复制到 /public/images/
5.2、头部尾部重用
新建 header.html :
<!DOCTYPE html>
<html lang="en">
<head>
<meta charset="utf-8">
<title><%= title %></title>
<!-- Bootstrap -->
<link href="/stylesheets/bootstrap.min.css" rel="stylesheet" media="screen">
<!-- <link href="css/bootstrap-responsive.min.css" rel="stylesheet" media="screen"> -->
</head>
<body screen_capture_injected="true">
新建 footer.html :
<script src="/javascripts/jquery-1.11.1.min.js"></script>
<script src="/javascripts/bootstrap.min.js"></script>
</body>
</html>
那么 index.html 可以改成这样:
<% include header.html %>

    <h1><%= title %></h1>
    <p>Welcome to <%= title %></p>

<% include footer.html %>
6、增删改查少不了
mongodb 安装、启动、常见指令……移步这里 Mongodb For Windows
6.1、mongodb 小回顾
接下来为 firstblood 项目创建一点数据 (mongodb 版本号:2.6.6)
> use firstblood
switched to db firstblood
> var listArr = [];for(i=0;i<5;i++){listArr.push({"user":"test"+i,"password":"sa
"+i,"age":i})}
5
> db.admins.insert(listArr)
BulkWriteResult({
        "writeErrors" : [ ],
        "writeConcernErrors" : [ ],
        "nInserted" : 5,
        "nUpserted" : 0,
        "nMatched" : 0,
        "nModified" : 0,
        "nRemoved" : 0,
        "upserted" : [ ]
})
> db.admins.find()
{ "_id" : ObjectId("54f3f267c0d71446ee04a7f6"), "user" : "test0", "password" : "
sa0", "age" : 0 }
{ "_id" : ObjectId("54f3f267c0d71446ee04a7f7"), "user" : "test1", "password" : "
sa1", "age" : 1 }
{ "_id" : ObjectId("54f3f267c0d71446ee04a7f8"), "user" : "test2", "password" : "
sa2", "age" : 2 }
{ "_id" : ObjectId("54f3f267c0d71446ee04a7f9"), "user" : "test3", "password" : "
sa3", "age" : 3 }
{ "_id" : ObjectId("54f3f267c0d71446ee04a7fa"), "user" : "test4", "password" : "
sa4", "age" : 4 }
>_
OK 成功了,暂且多多回顾下其他指令吧
6.2、node 操作 Mongoose 【挑战:一个后台登陆验证+展示mongodb中现有会员信息的小案例】
1、新建目录: mkdir db;添加数据集合的结构 firstblood_schema.js
// 链接 firstblood 集合
var mongoose = require('mongoose');
var db = mongoose.createConnection('mongodb://127.0.0.1:27017/firstblood');
// 链接错误
db.on('error', function(error) {
    console.log(error);
});
// Schema 结构
var Schema = mongoose.Schema;
var userlistScheMa = new Schema({
    user     : {type : String},
    password : {type : String},
    //content  : {type : String},
    //time     : {type : Date, default: Date.now},
    age      : {type : Number}
});

// 关联 firstblood -> admins 表
exports.userlist = db.model('admins', userlistScheMa);
exports.db = db;
关于 Schema 、Model 、Entity 以及 Mongoose 其他APi参考,可以移步这里:
2、在 /routes/ 目录,修改 index.js (当然也可以新建一个文件)
/*
 * GET home page.
 */
var firstblood = require('./../db/firstblood_schema.js');
/**/
exports.index = function (req, res){
    res.render('index', {
        title: 'Express',
    });
}
exports.luyou = function(req, res){
    res.render('lu-you-ye-mian', { title: '“路由”是长这样的!' });
}
exports.login = function (req, res){
    res.render('login', {
        title: 'login'
    });
}
/* home */
exports.home = function(req, res) {
    var query = {user: req.body.user, password: req.body.password};
    firstblood.userlist.count(query, function(err, doc){
        if (doc==1) {
            var findResult = firstblood.userlist.find(function(error, result){
                if (error) {
                    res.send(error);
                }else{
                    res.render('home', {
                        title : '后台',
                        status: doc,
                        username : query.user,
                        adminlist : result,
                        date : new Date()
                    });

                }
            });
        }else{
            res.render('home', {
                title : '后台',
                status: doc,
            });
            //res.redirect('/');
        }
    });
}
4、在 app.js 中添加模块依赖(如果新建路由模块的话)和路由:
// 路由解析
// firstblood 项目路由
app.get('/login',routes.login);//增加
app.post('/home',routes.home);//提交
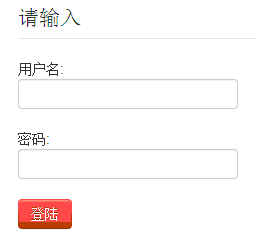
5、在 /views/ 目录,添加 login.html
<% include header.html %>
    <div class="container-fluid">
        <div class="row-fluid">
        <form class="span12" action="home" method="post">
            <fieldset>
                <legend>请输入</legend>
            <p>
                <span>用户名:</span>
                <br>
                <input id="user" name="user" type="text">
            </p>
            <p>
                <span>密码:</span>
                <br>
                <input id="password" name="password" type="password">
            </p>
            <p><input type="submit" value="登陆" class="btn btn-danger"></p>
            </fieldset>
        </form>
        </div>
    </div>
<% include footer.html %>
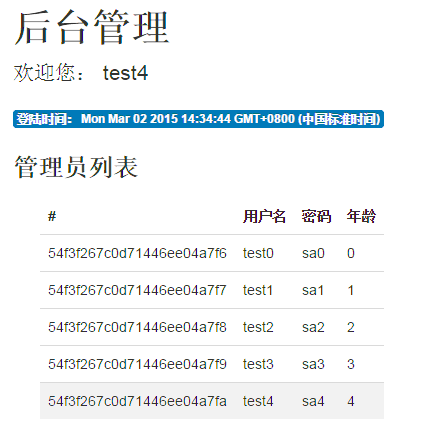
再添加 home.html
<% include header.html %>
<div class="container-fluid">
    <div class="row-fluid">
        <h1>后台管理</h1>
    <% if (status) { %>
        <p class="lead">欢迎您: <%=username%></p>
        <p class="label label-info">登陆时间: <%=date%></p>
        <h3>管理员列表</h3>
        <% if (adminlist.length) { %>
            <table class="table table-hover span12">
                <thead>
                <tr>
                    <th>#</th>
                    <th>用户名</th>
                    <th>密码</th>
                    <th>年龄</th>
                </tr>
                </thead>
                <tbody>
                <% adminlist.forEach(function(data){ %>
                    <tr>
                        <td><%= data.id %></td>
                        <td><%= data.user %></td>
                        <td><%= data.password %></td>
                        <td><%= data.age %></td>
                    </tr>
                <% }) %>
                </tbody>
            </table>
        <% } %>
    <% } else {%>
        <strong>登录失败 <a href="/">回首页</a></strong>
    <% } %>
    </div>
</div>
<% include footer.html %>
此时启动 app 打开 http://localhost:3000/ 尝试登陆(用户名密码自然在上文哦~)
小练习:获取 Express 中 HTTP 请求参数:query、body、params
放个小图:


案例小结:以上数据库操作 CURD 只是用到了 Retrieve ,其实API大同小异
6.3、增强案例:支持登陆并新增修改会员信息的系统,还得支持 session ~
待续
本次练习源码: nodejs-exercise
本次扩展: NodeJS+Mongodb+Express做CMS博客系统(符合MVC)
本文参考: THE DEAD-SIMPLE STEP-BY-STEP GUIDE FOR FRONT-END DEVELOPERS TO GETTING UP AND RUNNING WITH NODE.JS, EXPRESS, JADE, AND MONGODB By Christopher Buecheler
本节完