20201111-jetson nano系统安装+输入法+codeoss+联调舵机
这里写目录标题
- jetson nano系统安装
-
- 安装系统到SD卡
- 首次启动
- 安装拼音输入法
-
- 以下是另一种方法,没用上
- 安装fcitx输入法框架
- 安装Code OSS
-
- python插件安装
- 大舵机的控制
-
- 安装串口模块
- 添加串口权限:
- 运行
- 出现错误No module named 'serial'
- 出现错误pip:command not found
- GPIO控制电机
-
- GPIO
- 环境配置和安装库
-
- 安装PIP工具:
- 下载安装Jetson.GPIO库:
- 设置用户权限:
- python控制GPIO代码
- 同一程序控制的实现
- 剧照
- 参考文章:
- 其他的
-
- 谷歌浏览器密码
- ubuntu截图
- ubuntu 以管理员权限打开文件夹
jetson nano系统安装
安装系统到SD卡
PC端:
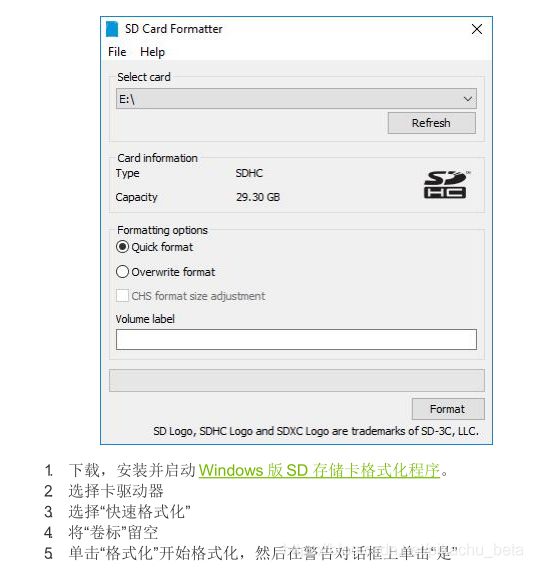
用下图SD Card Formatter格式化SD卡
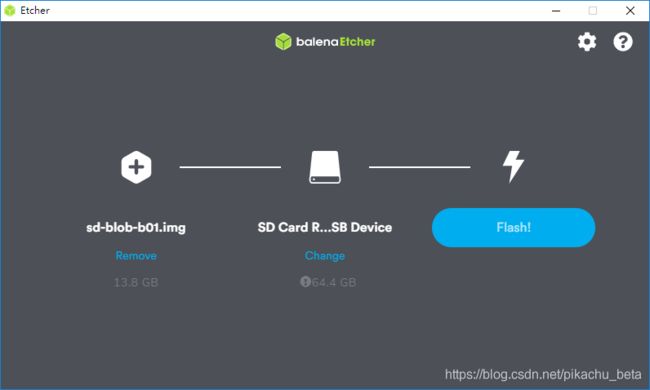
再使用etther烧录系统镜像,【选择img后再选择SDCard最后选Flash】
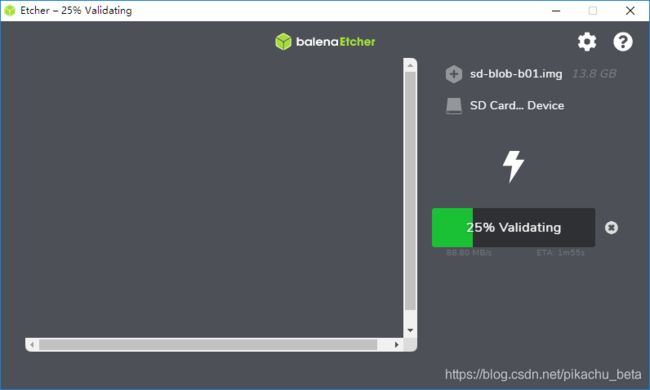
等待:
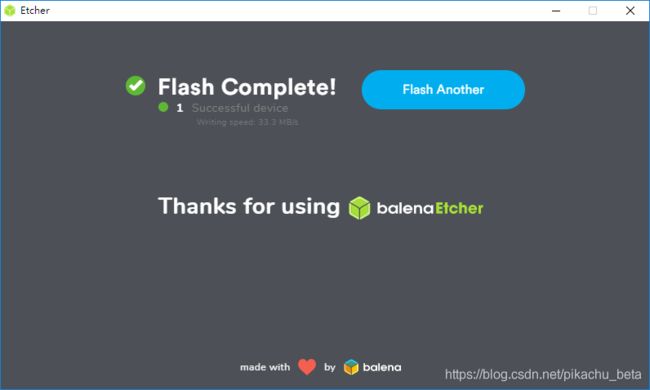
完成后拔下sd卡插入jetson nano,,将 microSD 卡(已写入系统映像)插入 Jetson Nano 模块底部的插槽中
首次启动
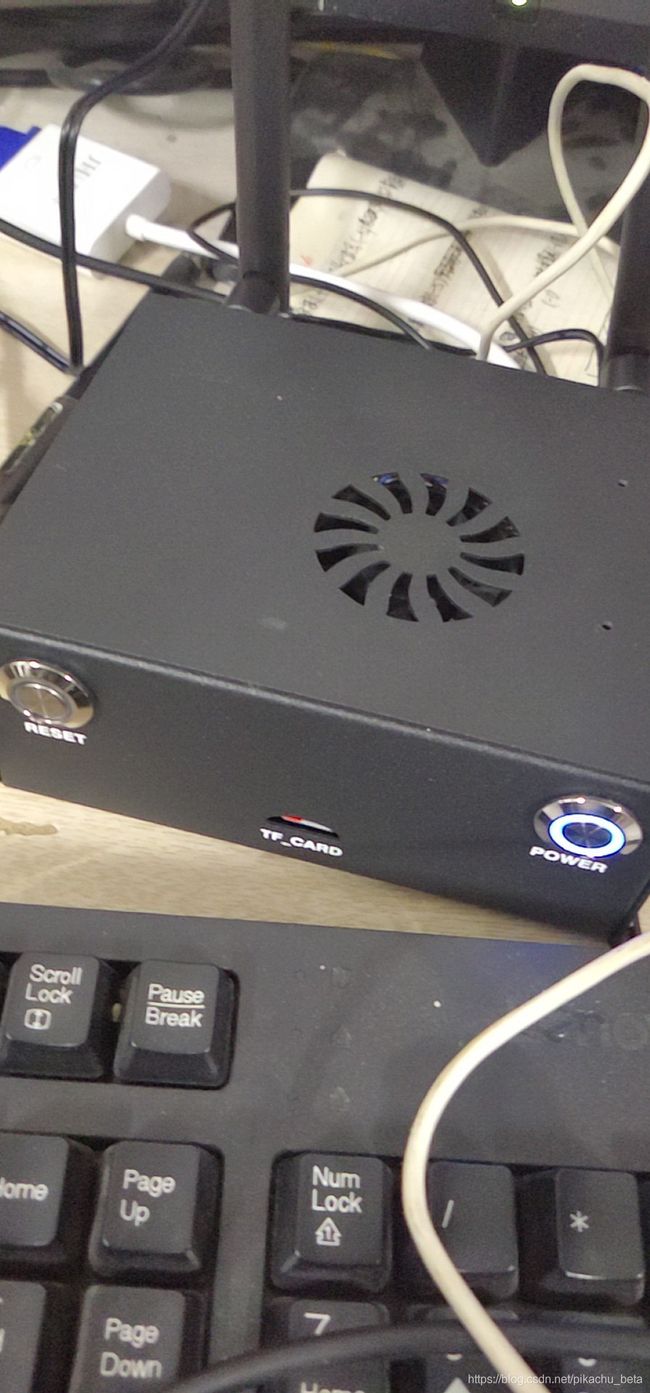
SD卡插入进铁壳内,不要露出来
开发人员工具箱打开电源后,Micro-USB 连接器旁边的绿色 LED 就会点亮。首
次启动时,Jetson Nano Developer Kit 将带您进行一些初始设置,包括:
查看并接受 NVIDIA Jetson 软件 EULA
选择系统语言,键盘布局和时区
创建用户名,密码和计算机名
登录
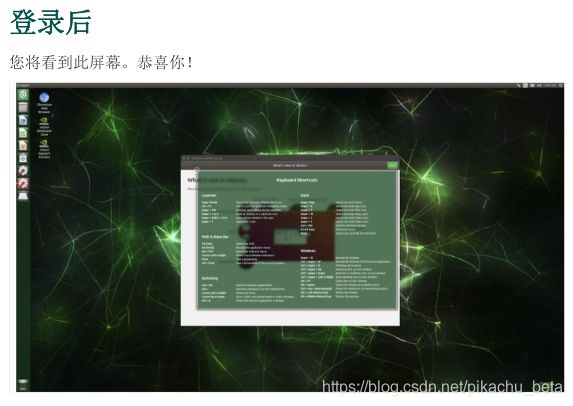
安装拼音输入法
Jetson Nano 是arm64结构,不是amd64结构
所以安装的软件需要适配arm64
Jetson nano官方镜像系统为Ubuntu
Ubuntu里常用的输入法有 谷歌拼音输入法与搜狗中文输入法
其中 sougoupinyin 支持amd64,不支持arm64
googlepinyin 支持arm64
具体步骤:
sudo apt-get install fcitx-googlepinyin -y
或者
sudo apt-get install fcitx-googlepinyin fcitx-module-cloudpinyin fcitx-sunpinyin-y
上句运行失败
安装完成后,在ubuntu右上角的系统设置里面点击 语言支持(language Support),选择fcitx,系统初始默认为ibus

在终端输入 reboot
配置 fcitx:
点击右上方小键盘,左键单击 配置 fcitx
点左下加号,取消勾选 仅显示当前输入法 选择google拼音

切换输入法时:按 shift 或者 ctrl+ space
以下是另一种方法,没用上
安装fcitx输入法框架
打开Ubuntu软件中心,在搜索栏输入fcitx,将会搜出fcitx,然后按照一般软件安装步骤安装即可。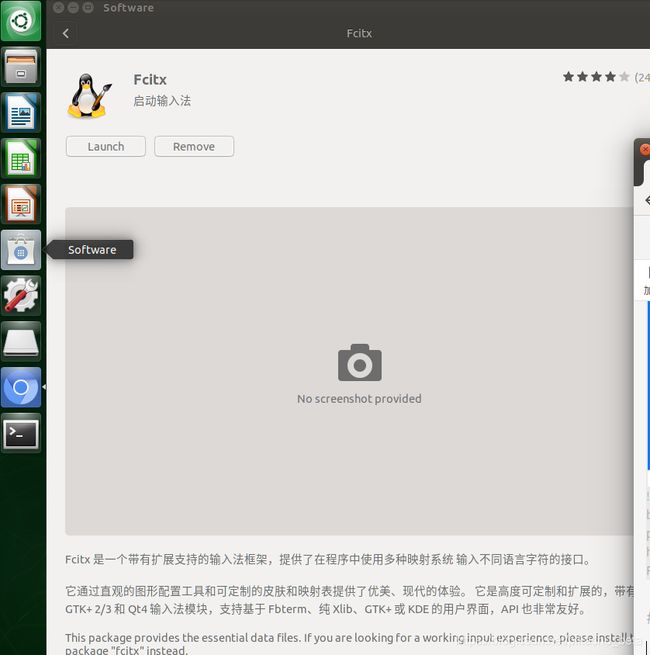
激活Fcitx
Fcitx是Linux平台下的一款输入法框架,为Linux提供各种语言的输入支持。搜狗输入法就是基于fcitx开发的,因此想要让Fcitx运行,必须先激活它,然而Ubuntu 18.04原生版默认激活的是另一款输入法框架IBus,Fcitx处于禁用状态。
打开文件管理器,按Ctrl+L,输入路径/usr/share/applications/,回车进入。这里罗列了当前桌面环境里所有应用程序的入口。找到Input Method/输入法,双击它,进入输入法配置。
作者:爱拼安小匠
链接:
来源:简书 著作权归作者所有。商业转载请联系作者获得授权,非商业转载请注明出处。
安装Code OSS
Visual Studio Code(VS Code)是一个免费的集成开发环境(IDE),适用于Windows,Mac和Linux。VS Code近年来获得了越来越多的关注,成为广大编程开发者的首选编译环境。它作为微软推出的开源项目,吸引了无数第三方开发者和终端用户,成为顶尖开源项目之一。它功能强大、速度快,更在拥有海量插件的情况下做到了简洁流畅的用户体验,属于一款非常优秀的IDE。
原生的VS Code并不适用于Jetson Nano,当前,还没有针对Jetson Nano这样的ARM设备的VS Code正式版本。但是,由于它是开源的,所以任何人都可以编译一个版本。其中,Code-OSS就是这样一款嵌入式环境下的“VS Code”。Code-OSS基于VS Code,它并不仅仅是一个代码编辑器,它具有用于管理整个项目文件夹而不是单个脚本的内置资源管理器功能以及丰富的第三方插件。实际上Code-OSS几乎具备了VS Code的所有完整功能,因此用它作为代码编辑器来编辑代码,例如python,会使得整个开发过程更加便捷。下面讲解具体的安装方法。
已经下载好deb安装包的:
sudo dpkg -i code-oss_1.32.3-arm64.deb
code-oss
软件会打开,开始可能黑屏一会,是正常的。
没有安装包的:
打开Chromiun浏览器,输入网址:
https://packagecloud.io/headmelted/codebuilds
点击Packsges,查看列出来的包名,选择后缀带有arm64(aarch64)的
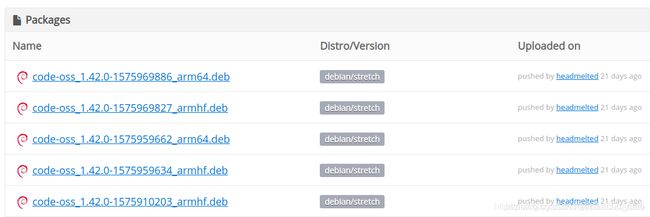
单击后进入详情页面,找到对应的wget命令,如下图所示:

该命令演示了如何下载该安装包,具体如下:
wget --content-disposition https://packagecloud.io/headmelted/codebuilds/packages/debian/stretch/code-oss_1.42.0-1575969886_arm64.deb/download.deb
将该命令复制到终端中实现安装包下载。如下图所示:
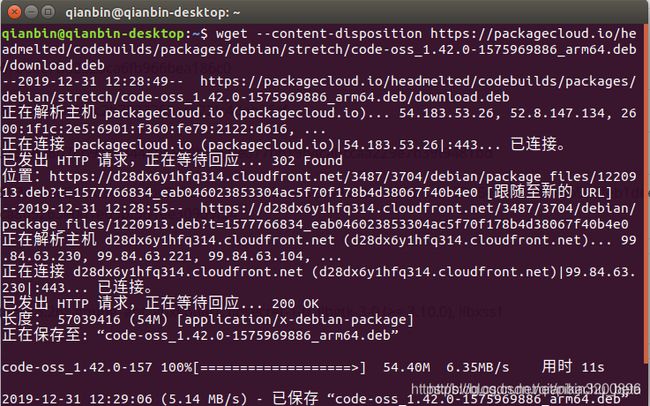
此时,安装包已经下载到home根目录下,可以通过文件资源管理器查看下载的deb安装包,如下所示:
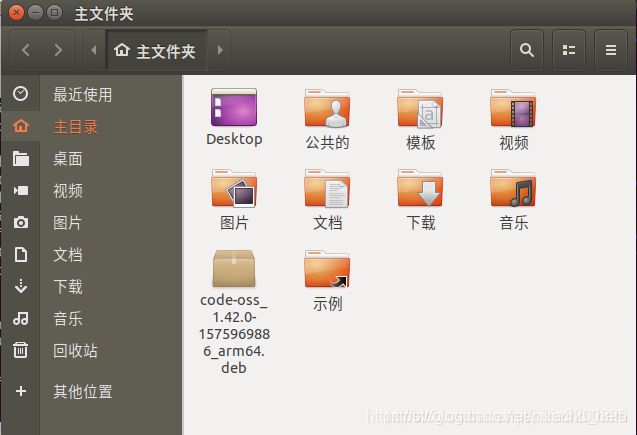
在终端中输入下述命令完成最终的安装:
sudo dpkg -i code-oss_1.42.0-1575969886_arm64.deb
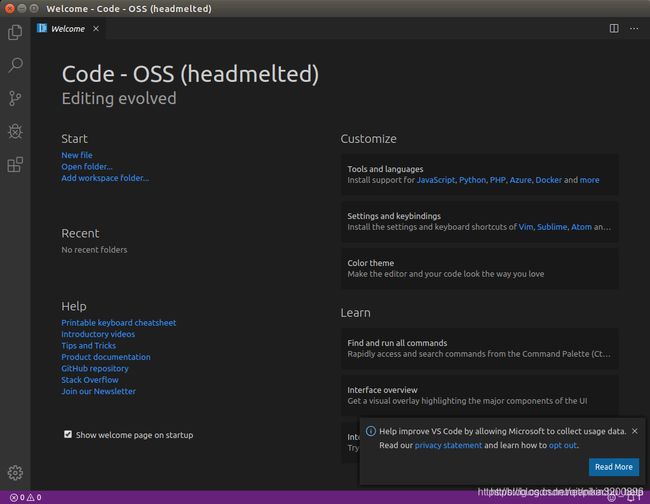
安装完成后从可以在搜索中搜索Code OSS,会弹出Code OSS应用程序,这个即为我们需要的Python编程IDE。单击应用程序打开如下图所示:
python插件安装
下面简单演示下如何使用Code OSS执行Python脚本。
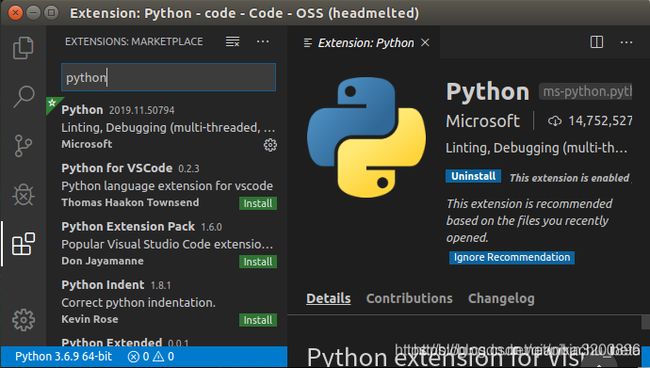
首先在Code OSS中安装Python插件,其插件安装方法和普通的VS Code完全相同,不熟悉VS Code的读者可以先在桌面PC上熟悉VS Code基本用法再切换到Jetson Nano环境中来。插件安装如下图所示,在Extensions面板中搜索python,选择第一个弹出的插件进行安装即可:
接下来在home目录下新建一个code文件夹,该文件夹用于存放Python代码脚本。然后在Code OSS中打开刚才创建的code文件夹,然后新建一个文件,按ctrl+s键保存文件,将文件命名为main.py,然后输入下面的代码:
a = 36
b = 64
print(a+b)
然后按ctrl+F5键即可运行脚本
大舵机的控制
H54-200-S500R「dynamixel pro」
安装串口模块
由于舵机由串口控制,需要安装串口模块,终端运行:
pip3 install -i https://pypi.tuna.tsinghua.edu.cn/simple serial
pip3 install -i https://pypi.tuna.tsinghua.edu.cn/simple pyserial
若出现pip:command not found错误见下面的链接解决。可以先pip pip3都试试
添加串口权限:
sudo gedit /etc/udev/rules.d/70-ttyusb.rules
文件内容为:
KERNEL=="ttyUSB[0-9]*", MODE="0666"
增加访问权限:
sudo chmod 666 /dev/ttyUSB0
重新插入USB转串口设备,普通用户就有权限访问了。
串口编程中使用open()函数就能打开串口了.
link
运行
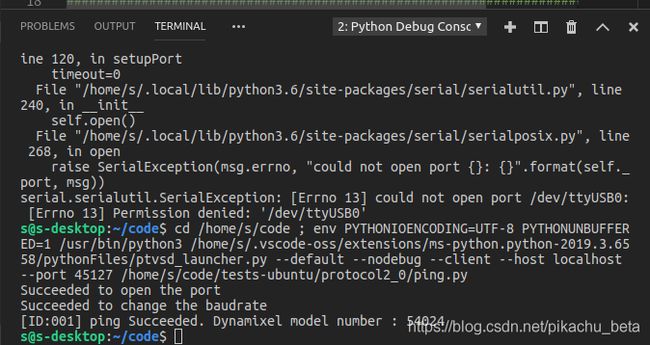
code-oss界面打开ping.py 按ctrl+F5运行
可见成功输出舵机号码54024
运行其他程序,发现舵机已经转起来了。
/
按照上面步骤安装可以避免下面出现的错误
出现错误No module named ‘serial’
pip3 install -i https://pypi.tuna.tsinghua.edu.cn/simple serial
pip3如果不行换为pip
安装完成后错误变为module ‘serial’ has no attribute ‘Serial’
pip3 install -i https://pypi.tuna.tsinghua.edu.cn/simple pyserial
错误变为[Errno 13] Permission denied: ‘/dev/ttyUSB0’
出现错误pip:command not found
Linux报错:bash: pip: command not found
$ wget https://bootstrap.pypa.io/get-pip.py
$ python get-pip.py
$ pip -V #查看pip版本
接下来就可以随便pip安装东西了
首先查下安装路径:
find / -name pip
然后做个软连接
ln -sv /usr/local/python/bin/pip /usr/bin/pip
https://www.cnblogs.com/wujf-myblog/p/9644278.html
一下方法经测试无效
××××××××××××××××××××××××××××××××××××××××
python3
sudo apt-get install python3-pip
python2
sudo apt-get install python-pip
如果还是不行,则按照下面操作
原因:编译sudo的时候加入了–with-secure-path 选项。
解决:在环境配置文件里加一个alias(path环境变量设置)
(1) 在终端输入:
$ sudo gedit ~/.bashrc
添加如下内容:
alias sudo=‘sudo env PATH=$PATH’
保存文件,注销再登录,变量生效。
该方式添加的变量只对当前用户有效。
(2)source ~/.bashrc
GPIO控制电机
控制思路:jetsonnano的GPIO发送脉冲信号给A 4988驱动模块,进而控制两相四线直流步进电机
GPIO
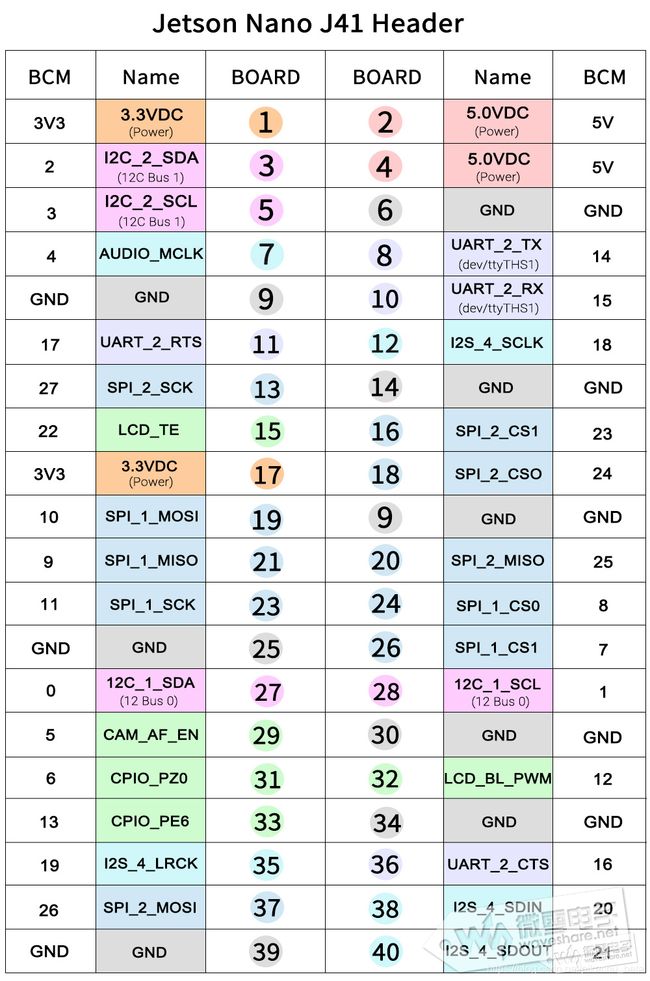
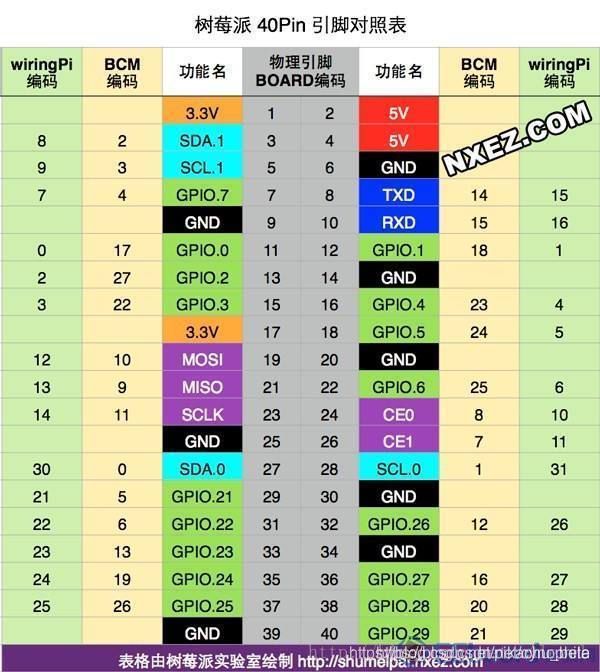
程序中setmode设置为BCM ,那么引脚号就是下表的bcm
如果设置为 GPIO.setmode(GPIO.BOARD)那么引脚号就是BOARD
#setmode为BCM
# Pin Definitions
input_pin = 18  # BCM pin 18, BOARD pin 12
NVIDIA官方提供了了JetsonGPIO库(Python)方便用户来控制GPIO,Jetson.GPIO库运用了跟RPi.GPIO库一样的API,因此对于用惯了树莓派的用户来说应该不难上手。本章就如何使用jetson.gpio库操作GPIO做一下说明
关于该函数库的具体说明,你可以在https://pypi.org/project/Jetson.GPIO/中了解
环境配置和安装库
安装PIP工具:
sudo apt-get update
sudo apt-get install python-pip
sudo apt-get install python3-pip
下载安装Jetson.GPIO库:
sudo pip install Jetson.GPIO
sudo pip3 install Jetson.GPIO
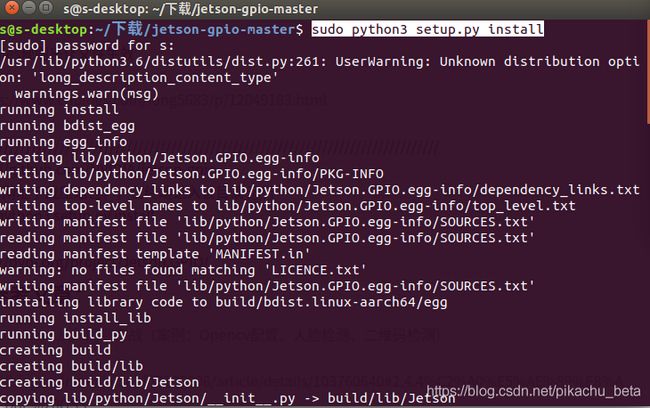
····命令执行出现黄色警告,不知道是否安装成功,如下图:
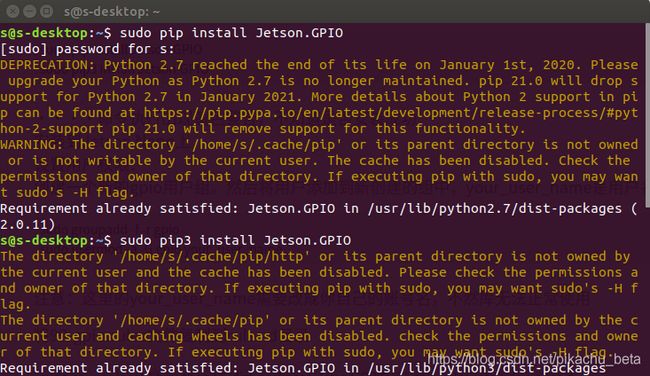
于是采用了下载gpio包然后手动安装的方法》
//
https://github.com/NVIDIA/jetson-gpio
从上面网址下载压缩包,,在终端进入该目录 运行
sudo python3 setup.py install
设置用户权限:
创建一个新的gpio用户组。然后将用户添加到新创建的组中,your_user_name是用户名。
sudo groupadd -f -r gpio
sudo usermod -a -G gpio your_user_name
注意:这里的your_user_name需要改成你自己的账号名,不然库无法正常使用
将99-gpio.rules文件复制到rules.d目录
sudo cp /usr/local/lib/python3.6/dist-packages/Jetson/GPIO/99-gpio.rules /etc/udev/rules.d/
···上面命令直接运行提示找不到文件(也没有这个路径文件夹),可以进入下载的gpio压缩包解压的位置,在按照/usr/local/lib/python3.6/dist-packages/Jetson/GPIO/99-gpio.rules 将该文件拷贝到/etc/udev/rules.d/
提示:要修改上面命令在终端下拷贝,直接拷贝不行,主要修改cp后面的路径。
这里要注意自己的python包里rules文件所在的位置
重载rules规则来让文件生效
重新加载udev规则:
sudo udevadm control --reload-rules && sudo udevadm trigger
重启:
sudo reboot now
https://www.cnblogs.com/long5683/p/12049183.html
https://blog.csdn.net/cynophile/article/details/99310678
//
https://pypi.org/project/Jetson.GPIO/
https://www.cnblogs.com/long5683/p/12049183.html
https://blog.csdn.net/qq21497936/article/details/79758560?utm_medium=distribute.pc_relevant.none-task-blog-BlogCommendFromMachineLearnPai2-1.channel_param&depth_1-utm_source=distribute.pc_relevant.none-task-blog-BlogCommendFromMachineLearnPai2-1.channel_param
https://blog.csdn.net/github_35160620/article/details/52140967
python控制GPIO代码
文件名modelCtrl2.py
import RPi.GPIO as GPIO
import time
# Pin Definitions
motor2output_pin = 11 # BOARD pin 11
motor2dir_Pin          = 13  #J41_BOARD_PIN13---gpio14/GPIO.B06/SPI2_SCK
motor2enable_pin = 15  # BOARD pin 15                                                     #使能引脚低电平有效。
def motor2init():
    # Pin Setup:
    # Board pin-numbering scheme
    GPIO.setmode(GPIO.BOARD)
    # set pin as an output pin with optional initial state of HIGH
    GPIO.setup(motor2output_pin, GPIO.OUT, initial=GPIO.HIGH)
    GPIO.setup(motor2dir_Pin, GPIO.OUT, initial=GPIO.HIGH)
    GPIO.setup(motor2enable_pin, GPIO.OUT, initial=GPIO.HIGH)   #使能引脚低电平有效。


def motor2mov_test():
    x=0.001                                                                                        # x 控制脉冲速度,进而影响电机转动速度
    pluseNum=1000                                                                       # 控制转动距离
    GPIO.output(motor2enable_pin, GPIO.LOW)              #开始控制
    curr_value = GPIO.HIGH
    while(pluseNum>0):
        pluseNum=pluseNum-1
        print("Outputting {} to pin {}".format(curr_value, motor2output_pin))
        GPIO.output(motor2output_pin, curr_value)
        curr_value ^= GPIO.HIGH
        time.sleep(x)
    GPIO.output(motor2enable_pin, GPIO.HIGH)              #停止控制


 #motor2mov函数负责控制直流电机转动
 #共3个传入参数。依次控制:
 # 电机转动距离[参数小转动不明显]           默认1000
 # 电机转动方向                                                  传入1转动远离电机侧  传入2转动靠近电机侧
 # 电机转动速度[参数越小速度越快]           默认0.0001
def motor2mov(pluseNum,dir,x):                                                                        #距离  方向  速度
                                                                                           # x 控制脉冲速度,进而影响电机转动速度
    if dir==1:
        GPIO.output(motor2dir_Pin, GPIO.HIGH)
    elif dir==2:
        GPIO.output(motor2dir_Pin, GPIO.LOW)
    else:
        return 1
    GPIO.output(motor2enable_pin, GPIO.LOW)              #开始控制
    curr_value = GPIO.HIGH
    while(pluseNum>0):
        pluseNum=pluseNum-1
        print("Outputting {} to pin {}".format(curr_value, motor2output_pin))
        GPIO.output(motor2output_pin, curr_value)
        curr_value ^= GPIO.HIGH
        time.sleep(x)
    GPIO.output(motor2enable_pin, GPIO.HIGH)              #停止控制
motor2init()
def main():

    # Pin Setup:
    motor2init()

    print("Starting demo now! Press CTRL+C to exit")
    try:
        while True:
            motor2mov(1000,1,0.0001)
            time.sleep(5)
            motor2mov(1000,2,0.0001)
            time.sleep(5)
    finally:
        GPIO.cleanup()  # cleanup all GPIO
        print("finishi")


if __name__ == '__main__':
    main()
小知识点:异或操作
设GPIO.HIGH为1
curr_value为0时,异或操作为curr_value=1
再次循环执行时。curr_value=1,与1异或结果为curr_value=0
实现了curr_value变量的翻转

同一程序控制的实现
main.py
import modelCtr    as model1
import modelCtrl2 as model2
#import time
# if __name__=="__main__":
model1.DEVICENAME                  = '/dev/ttyUSB0'    # Check which port is being used on your controller
                                                # ex) Windows: "COM1"   Linux: "/dev/ttyUSB0" Mac: "/dev/tty.usbserial-*
#################################################################################################
#舵机控制函数turnmotor 和turnmotorangle   负责控制舵机
# 第一个参数都是舵机ID,默认为1,主要用于多舵机控制
#第二个参数分别为目标位置,目标角度······都是指电机转动完成后的位置和角度

 #motor2mov  函数负责控制直流电机转动
 #共3个传入参数。依次控制:
 # 电机转动距离[参数小转动不明显]           默认1000
 # 电机转动方向                                                  传入1转动远离电机侧  传入2转动靠近电机侧
 # 电机转动速度[参数越小速度越快]           默认0.0001

 #全部任务完成后可以调用下面函数释放占用的资源,调用后不能再次控制电机
#model1.closResources()
#model2.GPIO.cleanup()  # cleanup all GPIO
#################################################################################################
model1.turnmotor(1,230000)#转动到230000
model1.getch()
model1.turnmotor(1,270000)#转动到6000
model1.getch()
model1.turnmotorangle(1,0)#转动到0度位置----对应不是位置0,,是250950【设置0度位置为250950」
model1.getch()
model1.turnmotorangle(1,90)#转动到90度位置
model1.getch()
model1.turnmotorangle(1,-90)#转动到-90度位置
model1.getch()
# 可运动距离全长约51CM    移动1000大约为实际2CM
model2.motor2mov(1000,2,0.0001)
model1.getch()
model2.motor2mov(1000,1,0.0001)


#任务完成,释放资源
model1.closResources()
model2.GPIO.cleanup()  # cleanup all GPIO
modelCtr.py内容:
#!/usr/bin/env python
# -*- coding: utf-8 -*-

################################################################################
# 这个模块导入后会打开串口,并设置波特率
#有三个函数:
#舵机id 移动的位置
#def turnmotor(DXL_ID,PRO_GOAL_POSITION):
#舵机id 转动角度
#def turnmotorangle(DXL_ID,PRO_GOAL_ANGLE):
#使用完成 关闭相关资源
#def closResources():
################################################################################

# Author: Ryu Woon Jung (Leon)

#
# *********     Read and Write Example      *********
#
#
# Available Dynamixel model on this example : All models using Protocol 2.0
# This example is designed for using a Dynamixel PRO 54-200, and an USB2DYNAMIXEL.
# To use another Dynamixel model, such as X series, see their details in E-Manual(emanual.robotis.com) and edit below variables yourself.
# Be sure that Dynamixel PRO properties are already set as %% ID : 1 / Baudnum : 1 (Baudrate : 57600)
#

import os

if os.name == 'nt':
    import msvcrt
    def getch():
        return msvcrt.getch().decode()
else:
    import sys, tty, termios
    fd = sys.stdin.fileno()
    old_settings = termios.tcgetattr(fd)
    def getch():
        try:
            tty.setraw(sys.stdin.fileno())
            ch = sys.stdin.read(1)
        finally:
            termios.tcsetattr(fd, termios.TCSADRAIN, old_settings)
        return ch

from dynamixel_sdk import *                    # Uses Dynamixel SDK library

# # Control table address
ADDR_OPERATING_MODE         = 11               # Control table address is different in Dynamixel model
ADDR_PRO_TORQUE_ENABLE      = 562               # Control table address is different in Dynamixel model
ADDR_PRO_GOAL_POSITION      = 596
ADDR_PRO_PRESENT_POSITION   = 611

# Protocol version
PROTOCOL_VERSION            = 2.0               # See which protocol version is used in the Dynamixel

# Default setting
DXL_ID                      = 1                 # Dynamixel ID : 1
BAUDRATE                    = 57600             # Dynamixel default baudrate : 57600
DEVICENAME                  = '/dev/ttyUSB0'    # Check which port is being used on your controller
                                                # ex) Windows: "COM1"   Linux: "/dev/ttyUSB0" Mac: "/dev/tty.usbserial-*"

TORQUE_ENABLE               = 1                 # Value for enabling the torque
TORQUE_DISABLE              = 0                 # Value for disabling the torque
DXL_MINIMUM_POSITION_VALUE  = 10           # Dynamixel will rotate between this value
DXL_MAXIMUM_POSITION_VALUE  = 4000            # and this value (note that the Dynamixel would not move when the position value is out of movable range. Check e-manual about the range of the Dynamixel you use.)
# DXL__POSITION_VALUE  =126539            # and this value (note that the Dynamixel would not move when the position value is out of movable range. Check e-manual about the range of the Dynamixel you use.)
MAX_POSITION_VALUE          = 4000#1048575
globleposition=[0,8000]#,16000,44000,16000]#4294909297]
DXL_MOVING_STATUS_THRESHOLD = 20                # Dynamixel moving status threshold
EXT_POSITION_CONTROL_MODE   = 4                 # Value for extended position control mode (operating mode)

ESC_ASCII_VALUE             = 0x1b
SPACE_ASCII_VALUE           = 0x20

index = 0
dxl_goal_position = [DXL_MINIMUM_POSITION_VALUE, DXL_MAXIMUM_POSITION_VALUE]         # Goal position

# def getmovepos(jiaodu):
#     if jiaodu>=0:
#         movepos=125475.0/90*jiaodu
#         dxl_present_position=250950+movepos
#     else:
#         movepos=125475.0/90*(-jiaodu)
#         dxl_present_position=250950-movepos
#     return dxl_present_position


# Initialize PortHandler instance
# Set the port path
# Get methods and members of PortHandlerLinux or PortHandlerWindows
portHandler = PortHandler(DEVICENAME)

# Initialize PacketHandler instance
# Set the protocol version
# Get methods and members of Protocol1PacketHandler or Protocol2PacketHandler
packetHandler = PacketHandler(PROTOCOL_VERSION)

# Open port
if portHandler.openPort():
    print("Succeeded to open the port")
else:
    print("Failed to open the port")
    print("Press any key to terminate...")
    getch()
    quit()


# Set port baudrate
if portHandler.setBaudRate(BAUDRATE):
    print("Succeeded to change the baudrate")
else:
    print("Failed to change the baudrate")
    print("Press any key to terminate...")
    getch()
    quit()


#舵机id 移动的位置
def turnmotor(DXL_ID,PRO_GOAL_POSITION):
    # Disable Dynamixel Torque
    dxl_comm_result, dxl_error = packetHandler.write1ByteTxRx(portHandler, DXL_ID, ADDR_PRO_TORQUE_ENABLE, TORQUE_DISABLE)
    if dxl_comm_result != COMM_SUCCESS:
        print("%s" % packetHandler.getTxRxResult(dxl_comm_result))
    elif dxl_error != 0:
        print("%s" % packetHandler.getRxPacketError(dxl_error))

    # Set operating mode to extended position control mode
    dxl_comm_result, dxl_error = packetHandler.write1ByteTxRx(portHandler, DXL_ID, ADDR_OPERATING_MODE, EXT_POSITION_CONTROL_MODE)
    if dxl_comm_result != COMM_SUCCESS:
        print("%s" % packetHandler.getTxRxResult(dxl_comm_result))
    elif dxl_error != 0:
        print("%s" % packetHandler.getRxPacketError(dxl_error))
    else:
        print("Operating mode changed to extended position control mode.")

    # Enable Dynamixel Torque
    dxl_comm_result, dxl_error = packetHandler.write1ByteTxRx(portHandler, DXL_ID, ADDR_PRO_TORQUE_ENABLE, TORQUE_ENABLE)
    if dxl_comm_result != COMM_SUCCESS:
        print("%s" % packetHandler.getTxRxResult(dxl_comm_result))
    elif dxl_error != 0:
        print("%s" % packetHandler.getRxPacketError(dxl_error))
    else:
        print("Dynamixel has been successfully connected")

    # Write goal position
    dxl_comm_result, dxl_error = packetHandler.write4ByteTxRx(portHandler, DXL_ID, ADDR_PRO_GOAL_POSITION, PRO_GOAL_POSITION)
    if dxl_comm_result != COMM_SUCCESS:
        print("%s" % packetHandler.getTxRxResult(dxl_comm_result))
    elif dxl_error != 0:
        print("%s" % packetHandler.getRxPacketError(dxl_error))
    elif dxl_comm_result== COMM_SUCCESS:
        # print("write4")

     while 1:
        # time.sleep(0.1)
        # break
        # Read present position
        dxl_present_position, dxl_comm_result, dxl_error = packetHandler.read4ByteTxRx(portHandler, DXL_ID, ADDR_PRO_PRESENT_POSITION)
        if dxl_comm_result != COMM_SUCCESS:
            print("%s" % packetHandler.getTxRxResult(dxl_comm_result))
        elif dxl_error != 0:
            print("%s" % packetHandler.getRxPacketError(dxl_error))
        print("[ID:%03d] GoalPos:%03d  PresPos:%03d" % (DXL_ID,PRO_GOAL_POSITION, dxl_present_position))

        if not abs(PRO_GOAL_POSITION- dxl_present_position) > DXL_MOVING_STATUS_THRESHOLD:
            return 0
            # break
#舵机id 转动角度
def turnmotorangle(DXL_ID,PRO_GOAL_ANGLE):
    if PRO_GOAL_ANGLE>=0:
        movepos=125475.0/90*PRO_GOAL_ANGLE
        dxl_present_position=250950+movepos
    else:
        movepos=125475.0/90*(-PRO_GOAL_ANGLE)
        dxl_present_position=250950-movepos
    return turnmotor(DXL_ID,int(dxl_present_position))


def reboot():
    print("See the Dynamixel LED flickering")
    # Try reboot
    # Dynamixel LED will flicker while it reboots
    dxl_comm_result, dxl_error = packetHandler.reboot(portHandler, DXL_ID)
    if dxl_comm_result != COMM_SUCCESS:
        print("%s" % packetHandler.getTxRxResult(dxl_comm_result))
    elif dxl_error != 0:
        print("%s" % packetHandler.getRxPacketError(dxl_error))

    print("[ID:%03d] reboot Succeeded\n" % DXL_ID)

#使用完成 关闭相关资源
def closResources():
    # Close port
    portHandler.closePort()


# # Disable Dynamixel Torque
# dxl_comm_result, dxl_error = packetHandler.write1ByteTxRx(portHandler, DXL_ID, ADDR_PRO_TORQUE_ENABLE, TORQUE_DISABLE)
# if dxl_comm_result != COMM_SUCCESS:
#     print("%s" % packetHandler.getTxRxResult(dxl_comm_result))
# elif dxl_error != 0:
#     print("%s" % packetHandler.getRxPacketError(dxl_error))

# # Close port
# portHandler.closePort()
结合前面的modelCtrl2.py 这三个文件和dynamixel_sdk文件夹(api)即可通过main.py同时控制两个电机。
剧照
参考文章:
Jetson Nano 从入门到实战(案例:Opencv配置、人脸检测、二维码检测)
https://blog.csdn.net/qianbin3200896/article/details/103760640#2.4.4%C2%A0%E5%AE%89%E8%A3%85Code%20OSS
这篇也很好:
JetsonNano指南 | spaceman
https://nu-ll.github.io/2020/08/20/JetsonNano%E6%8C%87%E5%8D%97/
其他链接:
1
https://www.ubuntupianshen.com/article/1574401480/
https://blog.csdn.net/weixin_41275422/article/details/104501255
https://zhuanlan.zhihu.com/p/144233616
http://www.360doc.cn/article/9200790_748368502.html
http://www.360doc.cn/article/32196507_916445261.html
https://www.codeleading.com/article/14361954455/
http://www.gpus.cn/gpus_list_page_techno_support_content?id=140
https://www.dogedoge.com/results?q=jetson+nano%E5%AE%89%E8%A3%85vscode&p=5&lang=cn
https://blog.csdn.net/qq_45321807/article/details/109428777?utm_medium=distribute.pc_relevant_download.none-task-blog-baidujs-1.nonecase&depth_1-utm_source=distribute.pc_relevant_download.none-task-blog-baidujs-1.nonecase
2
Ubuntu Linux 各个环境变量配置文件详解, 环境变量PATH设置
https://www.jianshu.com/p/b16f9fe441b2
其他的
谷歌浏览器密码
ubuntu 谷歌浏览器打开时需要输入密码来解锁密码环
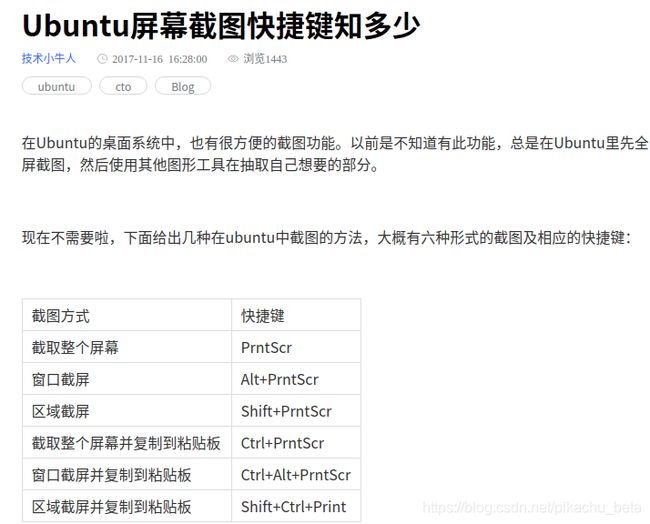
ubuntu截图
ubuntu 以管理员权限打开文件夹
此操作适合于文件夹有小锁,在root文件夹下操作等。
ubuntu 以管理员权限打开文件夹:
1,右键->在终端打开
2, 在终端中直接输入sudo nautilus
3,想干嘛干嘛,可以删除,查看等。

