Python—爬取并分析数据绘图发送到邮箱
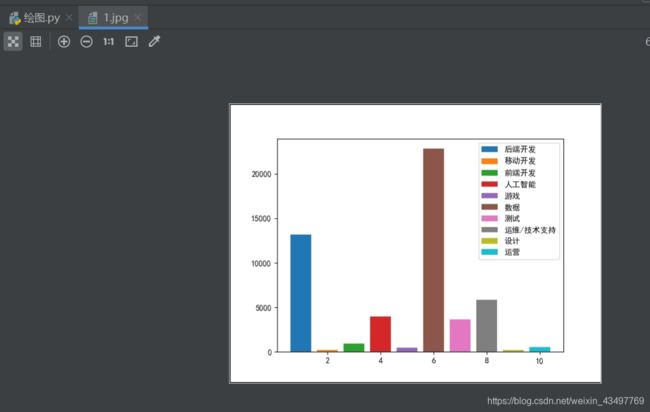
实验目的:将51Job网上python不同职位的数量爬取出来,然后绘制成柱状图,发送到QQ邮箱
文章目录
-
- 绘图技术介绍
- 绘图实例
- selenium爬取51Job网上的数据
- 图片如何发送到邮箱
- 项目代码汇总
- 实验结果
绘图技术介绍
python爬取数据的时候,需要对一些数据进行分析整合,使数据可视化。绘图过程中,需要导入matplotlib模块,matplotlib是一个Python 2维绘图库,已经成为python中公认的数据可视化工具,通过matplotlib我们可以很轻松地画一些或简单或复杂地图形,几行代码即可生成线图、直方图、功率谱、条形图、错误图、散点图等等。
绘图实例
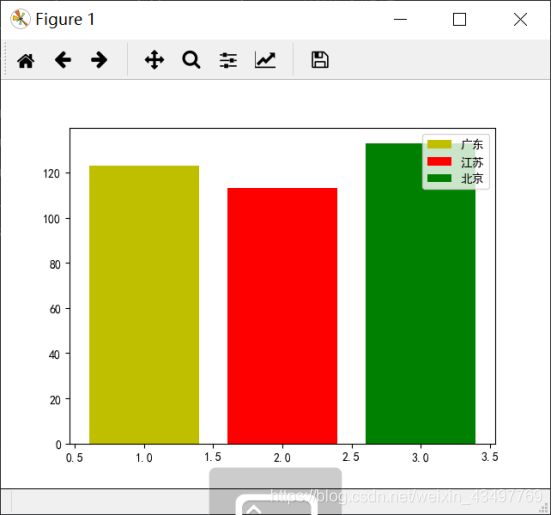
如何绘制柱状图呢?
绘图的时候需要配置字体(matplotlib.rcParams[“font.sans-serif”]=[“simhei”] ,matplotlib.rcParams[“font.family”]=“sans-serif”)
import matplotlib   #绘图
import matplotlib.pyplot as plt  #数据可视化
matplotlib.rcParams["font.sans-serif"]=["simhei"]   #配置字体
matplotlib.rcParams["font.family"]="sans-serif"

plt.bar([1],[123],label=u"广东",color="y")    #柱状图
plt.bar([2],[113],label=u"江苏",color="r")
plt.bar([3],[133],label=u"北京",color="g")
plt.legend()    #绘制
plt.show()
selenium爬取51Job网上的数据
from selenium import webdriver
from selenium.webdriver.support.ui import WebDriverWait   #显示等待
from selenium.webdriver.support import expected_conditions as EC #条件
from selenium.webdriver.common.by import By
import time
from lxml import html
etree=html.etree
import re
class Spider():
    def __init__(self):
        self.login_url='https://login.51job.com/login.php'
        self.my_url='https://i.51job.com/userset/my_51job.php'
        self.job_url='https://www.51job.com/'
    def _wait_page(self):
        self.region=input('请输入地区:')
    def _login_page(self):
        driver.get(self.login_url)
        WebDriverWait(driver,1000).until(
            EC.url_to_be(self.my_url)
        )
        print('登录成功!')
    def position_page(self):
        driver.find_element_by_xpath('//*[@id="topIndex"]/div/p/a[1]').click()
        WebDriverWait(driver,1000).until(
            EC.url_to_be(self.job_url)
        )
        driver.find_element_by_xpath('//*[@id="kwdselectid"]').send_keys('python')
        WebDriverWait(driver,1000).until(
            EC.text_to_be_present_in_element_value((By.XPATH,'//p[@id="work_position_click"]/input'),self.region)
        )
        driver.find_element_by_xpath('/html/body/div[3]/div/div[1]/div/button').click()
        time.sleep(0.5)
    def detail_position(self):
        for i in range(0,len(position_list)):
            WebDriverWait(driver, 1000).until(
                EC.text_to_be_present_in_element_value((By.XPATH, '//div[@id="funtype_click"]/input'),position_list[i])
            )
            driver.find_element_by_xpath('/html/body/div[2]/form/div/div[1]/button').click()
            response=driver.page_source
            res=etree.HTML(response)
            response_count=''.join(res.xpath('//div[@class="dw_tlc"]/div[4]/text()')).strip()
            position_count=''.join(re.findall('共(.*?)条职位',response_count))

            print(position_list[i]+''+position_count)
图片如何发送到邮箱
1.python的smtplib提供了一种很方便的途径发送电子邮件。它对smtp协议进行了简单的封装。
2.Python创建 SMTP 对象
3.port: 如果你提供了 host 参数, 你需要指定 SMTP 服务使用的端口号,一般情况下 SMTP 端口号为25。local_hostname: 如果 SMTP 在你的本机上,你只需要指定服务器地址为 localhost 即可
4.msg 是字符串,表示邮件。我们知道邮件一般由标题,发信人,收件人,邮件内容,附件等构成,发送邮件的时候,要注意 msg 的格式。这个格式就是 smtp 协议中定义的格式。
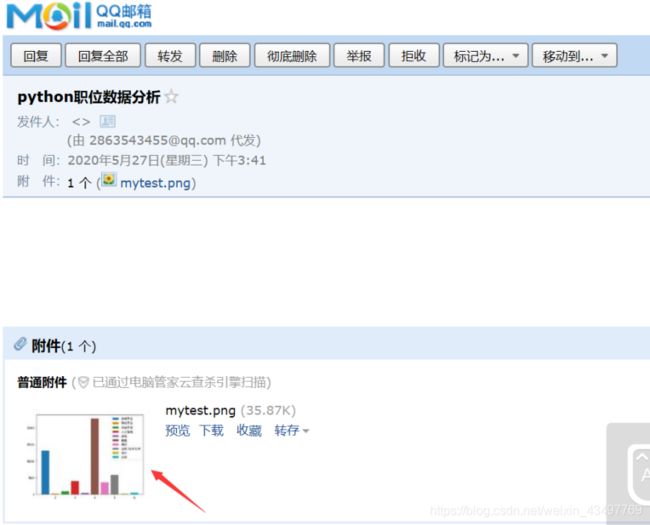
5.发送图片需要添加(message_image.add_header(‘content-disposition’, ‘attachment’, filename=‘mytest.png’),文本类型为base64,不然邮箱中没有图片
import smtplib
from email.mime.text import MIMEText
from email.header import Header  #发邮箱
global mailbox,password,receiver         #设置为全局变量
mailbox = input('请输入你的邮箱:')
password = input('请输入你的密码:')
receiver = input('请输入收件人的邮箱:')
mailhost = 'smtp.qq.com'  # 发信服务器
qqmail = smtplib.SMTP()  # 开启发信服务,这里使用的是加密传输
qqmail.connect(mailhost, 25)  # 25是端口号
qqmail.login(mailbox, password)  # 登录发信邮箱
content = open('1.jpg', 'rb').read()  # 设定发送文本
message_image = MIMEText(content, 'base64', 'utf-8')  # 传入文本,文本类型(plain)、文本编码
message_image.add_header('content-disposition', 'attachment', filename='mytest.png')
subject = 'python职位数据分析'  # 设定邮件标题
message_image['subject'] = Header(subject, 'utf-8')  # 设定邮件头信息
# 使用异常捕捉机制
try:
    qqmail.sendmail(mailbox, receiver, message_image.as_string())  # 开始发送邮件
    print('邮件发送成功')
except:
    print('邮件发送失败')
qqmail.quit()  # 关闭服务器
项目代码汇总
from selenium import webdriver
from selenium.webdriver.support.ui import WebDriverWait   #显示等待
from selenium.webdriver.support import expected_conditions as EC #条件
from selenium.webdriver.common.by import By
import time
from lxml import html
etree=html.etree
import re
import smtplib
from email.mime.text import MIMEText
from email.header import Header  #发邮箱
import matplotlib   #绘图
import matplotlib.pyplot as plt  #数据可视化
matplotlib.rcParams["font.sans-serif"]=["simhei"]   #配置字体
matplotlib.rcParams["font.family"]="sans-serif"
global mailbox,password,receiver         #设置为全局变量
driver=webdriver.Chrome(executable_path="F:\\Download\\chromedriver.exe")
position_list=['后端开发','移动开发','前端开发','人工智能','游戏','数据','测试','运维/技术支持','设计','运营']
class Spider():
    def __init__(self):
        self.login_url='https://login.51job.com/login.php'
        self.my_url='https://i.51job.com/userset/my_51job.php'
        self.job_url='https://www.51job.com/'
    def _wait_page(self):
        self.region=input('请输入地区:')
    def _login_page(self):
        driver.get(self.login_url)
        WebDriverWait(driver,1000).until(
            EC.url_to_be(self.my_url)
        )
        print('登录成功!')
    def position_page(self):
        driver.find_element_by_xpath('//*[@id="topIndex"]/div/p/a[1]').click()
        WebDriverWait(driver,1000).until(
            EC.url_to_be(self.job_url)
        )
        driver.find_element_by_xpath('//*[@id="kwdselectid"]').send_keys('python')
        WebDriverWait(driver,1000).until(
            EC.text_to_be_present_in_element_value((By.XPATH,'//p[@id="work_position_click"]/input'),self.region)
        )
        driver.find_element_by_xpath('/html/body/div[3]/div/div[1]/div/button').click()
        time.sleep(0.5)
    def detail_position(self):
        for i in range(0,len(position_list)):
            WebDriverWait(driver, 1000).until(
                EC.text_to_be_present_in_element_value((By.XPATH, '//div[@id="funtype_click"]/input'),position_list[i])
            )
            driver.find_element_by_xpath('/html/body/div[2]/form/div/div[1]/button').click()
            response=driver.page_source
            res=etree.HTML(response)
            response_count=''.join(res.xpath('//div[@class="dw_tlc"]/div[4]/text()')).strip()
            position_count=''.join(re.findall('共(.*?)条职位',response_count))
            digital=eval(position_count)
            print(position_list[i]+''+position_count)
            a=i+1
            plt.bar([a], [digital], label=position_list[i])
        matplotlib.use("Agg")
        plt.legend()  # 绘制
        plt.savefig("1.jpg")   #保存图片
    def send_email(self):
        mailbox = input('请输入你的邮箱:')
        password = input('请输入你的密码:')
        receiver = input('请输入收件人的邮箱:')
        mailhost = 'smtp.qq.com'  # 发信服务器
        qqmail = smtplib.SMTP()  # 开启发信服务,这里使用的是加密传输
        qqmail.connect(mailhost, 25)  # 25是端口号
        qqmail.login(mailbox, password)  # 登录发信邮箱
        content = open('1.jpg', 'rb').read()  # 设定发送文本
        message_image = MIMEText(content, 'base64', 'utf-8')  # 传入文本,文本类型(plain)、文本编码
        message_image.add_header('content-disposition', 'attachment', filename='mytest.png')
        subject = 'python职位数据分析'  # 设定邮件标题
        message_image['subject'] = Header(subject, 'utf-8')  # 设定邮件头信息
        # 使用异常捕捉机制
        try:
            qqmail.sendmail(mailbox, receiver, message_image.as_string())  # 开始发送邮件
            print('邮件发送成功')
        except:
            print('邮件发送失败')
        qqmail.quit()  # 关闭服务器
    def run(self):
        self._wait_page()
        self._login_page()
        self.position_page()
        self.detail_position()
        self.send_email()
if __name__ == '__main__':
    spider=Spider()
    spider.run()


