【微信开发】微信公众号网页授权获取用户基本信息实现微信登录
微信公众号网页授权获取用户基本信息实现微信登录
- 一、准备工作
-
- 1.1 开发环境和工具
- 1.2 登录微信公众平台接口测试账号
- 1.3 创建项目
- 二、添加需要的依赖并启动项目
-
- 2.1 修改 pom.xml
- 2.2 修改 web.xml
- 2.3 创建servlet和基本的工具类
- 三、代码效果
- 四、GitHub仓库地址
一、准备工作
建议在已经学会基础的Servlet和Maven、IDEA的使用方法的情况下阅读此博客。如果不会的话参考下面的操作步骤也是可以实现相关功能的。
1.1 开发环境和工具
- Java 1.8
- IDEA 2020.3
- Maven 3.6.3
- uTools(或者其他内网穿透工具)
1.2 登录微信公众平台接口测试账号
微信公众平台接口测试账号地址:https://mp.weixin.qq.com/debug/cgi-bin/sandbox?t=sandbox/login
用微信登录即可,然后记下自己的appid和appsecret
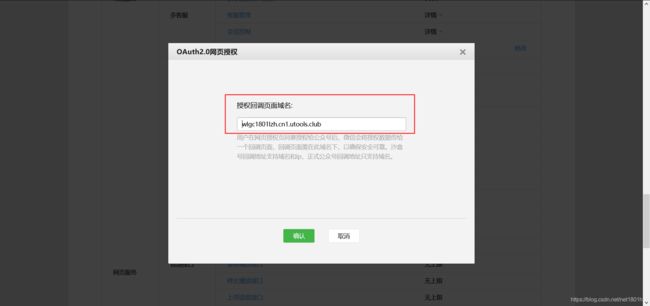
 然后在下面找一下这个修改按钮
 然后填写一个回调页面的域名,注意这里是要写域名,不要加http://www.或者https://www.,直接从域名开始写,这里安利一个非常非常好用的软件uTools,这个软件里有一个内网穿透的功能,可以直接在自己电脑上本地测试微信公众号的接口,不用再找一个服务器部署了,十分方便。

1.3 创建项目
使用maven创建一个java web项目
- 选择左侧maven选项
- 勾选Create from archetype
- 选择maven-archetype-webapp
- 下一步 next
 起一个项目名,选择项目的存放位置,下面三个选项保持默认即可
 此处保持默认即可,点击finish项目创建完成
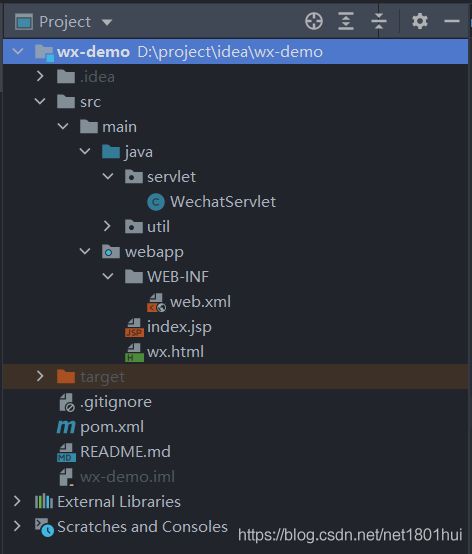
 项目创建完成后补全项目结构,按下图步骤在main文件夹下创建java和resources两个文件夹。
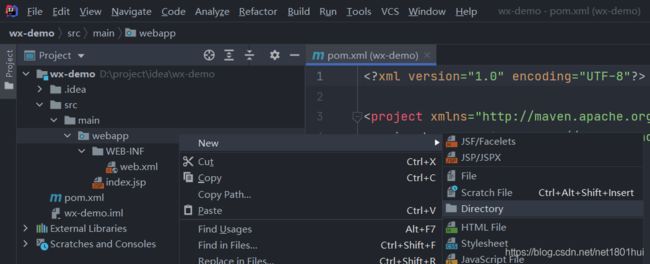 需要注意的是New Directory的时候不需要手动打这两个单词,直接在下面选,两个都创建上。

二、添加需要的依赖并启动项目
2.1 修改 pom.xml
在pom.xml的properties修改maven.compiler.source和maven.compiler.target的值为1.8
<properties>
    <project.build.sourceEncoding>UTF-8project.build.sourceEncoding>
    <maven.compiler.source>1.8maven.compiler.source>
    <maven.compiler.target>1.8maven.compiler.target>
properties>
在pom.xml的dependencies中添加servlet、httpclient、jackson三个依赖
<dependencies>

    <dependency>
        <groupId>javax.servletgroupId>
        <artifactId>javax.servlet-apiartifactId>
        <version>4.0.1version>
        <scope>providedscope>
    dependency>

    <dependency>
        <groupId>org.apache.httpcomponentsgroupId>
        <artifactId>httpclientartifactId>
        <version>4.5.12version>
    dependency>

    <dependency>
        <groupId>com.fasterxml.jackson.coregroupId>
        <artifactId>jackson-databindartifactId>
        <version>2.11.1version>
    dependency>
dependencies>
2.2 修改 web.xml
<web-app xmlns="http://xmlns.jcp.org/xml/ns/javaee"
         xmlns:xsi="http://www.w3.org/2001/XMLSchema-instance"
         xsi:schemaLocation="http://xmlns.jcp.org/xml/ns/javaee
          http://xmlns.jcp.org/xml/ns/javaee/web-app_4_0.xsd"
         version="4.0">
web-app>
2.3 创建servlet和基本的工具类
这里只贴出关键部分的代码,其余部分可从我的GitHub仓库中下载
WechatServlet.java
package servlet;

import com.fasterxml.jackson.databind.JsonNode;
import util.HttpClientUtil;
import util.JsonUtil;

import javax.servlet.ServletException;
import javax.servlet.annotation.WebServlet;
import javax.servlet.http.HttpServlet;
import javax.servlet.http.HttpServletRequest;
import javax.servlet.http.HttpServletResponse;
import javax.servlet.http.HttpSession;
import java.io.IOException;

/**
 * 微信登录控制器
 *
 * @author hui
 * @date 2021-01-15 18:26:42
 */
@WebServlet("/wechat")
public class WechatServlet extends HttpServlet {

    @Override
    protected void doGet(HttpServletRequest request, HttpServletResponse response) throws ServletException, IOException {

        //自己公众号的appid和appsecret
        String appid = "换成自己的appid";
        String appsecret = "换成自己的appsecret";
        //获取微信返回的code
        String code = request.getParameter("code");
        //通过code换取网页授权access_token
        String tokenApi = "https://api.weixin.qq.com/sns/oauth2/access_token?appid=" + appid +
                "&secret=" + appsecret +
                "&code=" + code +
                "&grant_type=authorization_code";
        JsonNode tokenNode = JsonUtil.parse2json(HttpClientUtil.doGet(tokenApi));
        //获取openid
        String openid = tokenNode.get("openid").asText();
        //获取access_token
        String accessToken = tokenNode.get("access_token").asText();
        //拉取用户信息
        String userinfoApi = "https://api.weixin.qq.com/sns/userinfo" +
                "?access_token=" + accessToken +
                "&openid=" + openid +
                "&lang=zh_CN";
        JsonNode userinfoNode = JsonUtil.parse2json(HttpClientUtil.doGet(userinfoApi));
        //页面跳转
        request.setAttribute("nickname", userinfoNode.get("nickname").asText());
        request.setAttribute("avatar", userinfoNode.get("headimgurl").asText());
        request.setAttribute("province", userinfoNode.get("province").asText());
        request.setAttribute("city", userinfoNode.get("city").asText());
        request.setAttribute("openid", openid);
        request.getRequestDispatcher("index.jsp").forward(request, response);
    }

    @Override
    protected void doPost(HttpServletRequest request, HttpServletResponse response) throws ServletException, IOException {


    }
}
wx.html
<html lang="en">
<head>
    <meta charset="UTF-8">
    <meta name="viewport" content="width=device-width, user-scalable=no, initial-scale=1.0, maximum-scale=1.0, minimum-scale=1.0">
    <meta http-equiv="X-UA-Compatible" content="ie=edge">
    <title>微信登录title>
    <style>
        #wx {

            height: 100%;
            width: 100%;
        }

        #wx #login {

            position: absolute;
            left: 50%;
            top: 50%;
            transform: translate(-50%, -50%);
            background-color: #2ecc71;
            color: #ffffff;
            padding: 10px 15px;
            border: 0;
            border-radius: 5px;
        }
    style>
head>
<body>
    <div id="wx">
        <button id="login" onclick="wechatLogin()">微信登录button>
    div>
body>
<script>
    function wechatLogin() {

        // 公众号appid
        var appid = "换成自己的appid";
        // 授权接口地址
        var redirect_uri = "换成自己的授权回调地址";
        // 状态标识
        var state = "wx";
        // 以snsapi_userinfo为scope发起的网页授权
        var scope = "snsapi_userinfo";
        // 返回类型,请填写code
        var response_type = "code";
        // 微信登录URL
        var loginUrl = "https://open.weixin.qq.com/connect/oauth2/authorize" +
            "?appid=" + appid +
            "&redirect_uri=" + redirect_uri +
            "&response_type=" + response_type +
            "&scope=" + scope +
            "&state=" + state +
            "#wechat_redirect";
        window.location.href = loginUrl;
    }
script>
html>
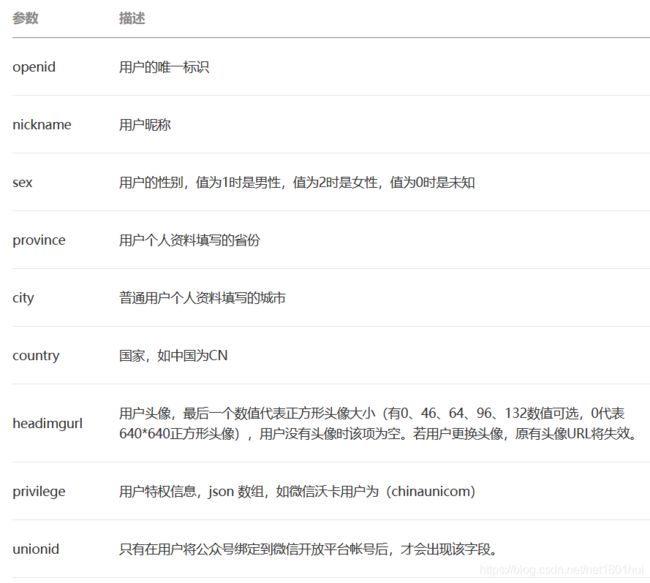
用access_token和openid拉取用户的基本信息返回值如下:
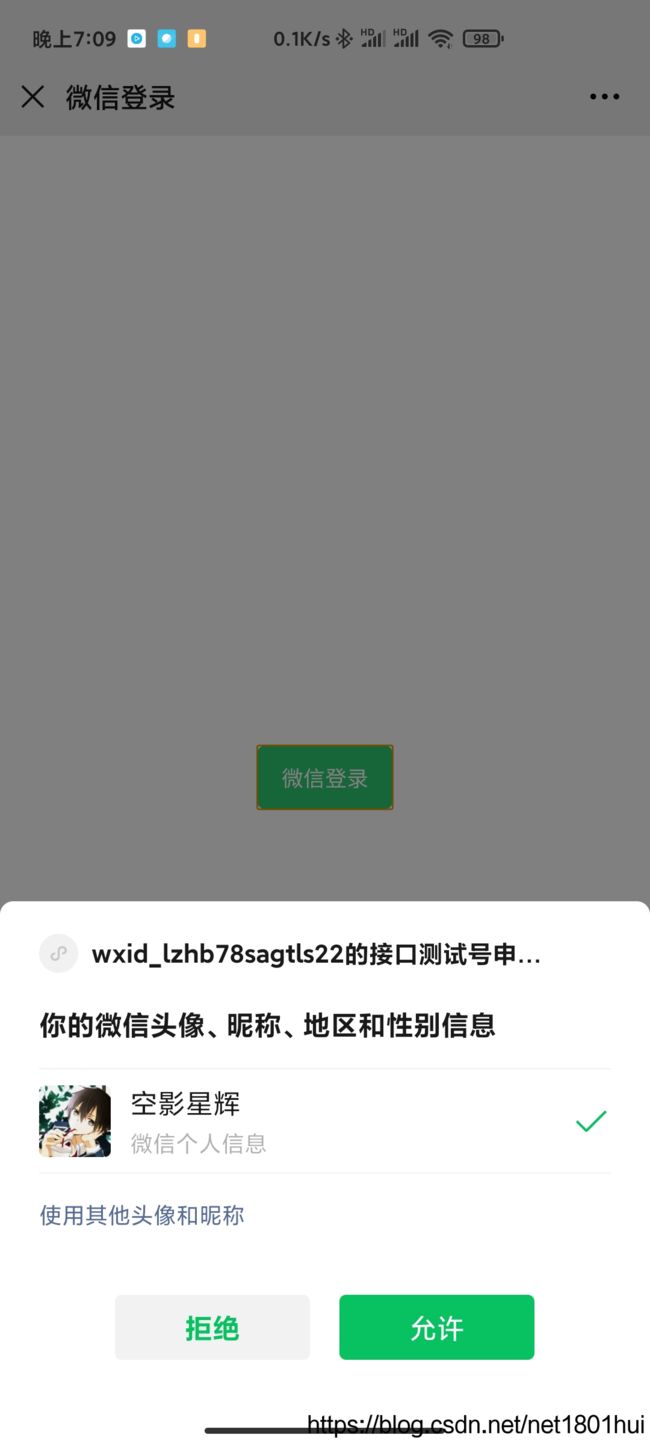
三、代码效果
在微信里访问登录按钮所在页面的地址,我这里是http://wlgc1801lzh.cn1.utools.club/wx_demo/wx.html,在手机上的实际运行效果如下

四、GitHub仓库地址
https://github.com/wlgc1801lzh/wx-demo
最后致谢我温柔可爱、秀外慧中的姐姐在学习过程中给予我的鼓励和帮助

