python之路day4_【Python之路Day4】基础篇
今日目录:
1. Python内置函数
2. 装饰器
一. Python内置函数
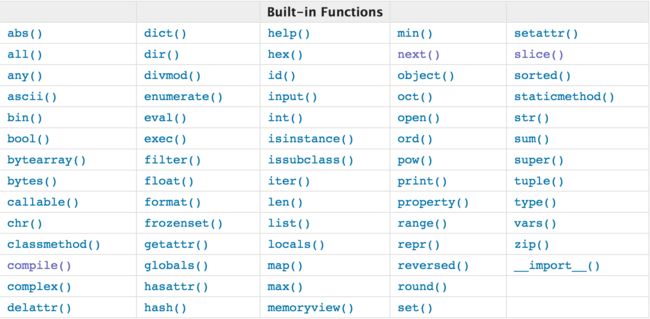
内置函数主要是使用比较频繁的或者是元操作,所以Python通过内置函数的方式提供给开发者,如下表:
下面现阶段只介绍一些目前学到的知识,涉及到面向对象的内置函数等先不讨论,待下次再续;
abs() 取绝对值
![]()
![]()
#取绝对值,和数值内部的内置方法__abs__()是一样的
>>> a = -130
>>>abs(a)130
>>> a.__abs__()130
>>> b = 20
>>>abs(b)20
>>> b.__abs__()20
abs
all() 所有为真,则为真,否则为假
![]()
![]()
#所有为真,则为真
>>> c = ['a','b','c',0,None,False,]>>>all(c)
False>>> d = ['a','b','c',]>>>all(d)
True
all
any() 至少有一个为真,就为真,否则为假
![]()
![]()
>>> c = ['a','b','c',0,None,False,]>>>all(c)
False>>> d = ['a','b','c',]>>>all(d)
True>>>any(c)
True>>>any(d)
True#e的元素有False,None,但是有个1位真,所以结果为真
>>> e = [False,None,1]>>>any(e)
True
any
ascii() 和repr()一样,返回一个对象的可打印的字符串表示方式,如果遇到非ASCII字符串,使用\\x, \\u 或者\\U表示,与Python2李的repr()等效;
![]()
![]()
#赋值a为一大串字符串,查看ascii之后的显示
>>> a = 'I am daniel\n%^%@#$^*@#$Age: 18\nSex: M'
>>>ascii(a)"'I am daniel\\n%^%@#$^*@#$Age: 18\\nSex: M'"
#再次使用中文(非Ascii码),出来好多\\u之类的
>>> b = '我是谁?'
>>>ascii(b)"'\\u6211\\u662f\\u8c01\\uff1f'"
View Code
callable() 判断函数是否可以被调用,如果可以返回True,否则返回False
![]()
![]()
#先定义一个函数
>>> deff1():
...print('balabala')
...>>> result =callable(f1)#如果可以调用,返回True,否则返回值为False
>>> print(result)
True#如下f2是一个字符串,执行后返回false
>>> f2 = 'name'
>>>callable(f2)
False
callable
bin() 将十进制数转换为二进制表示
![]()
![]()
#0b代表binary
>>> i = 20
>>>bin(i)'0b10100'
View Code
hex() 将十进制的数值转换为十六进制
>>> i = 28
>>>hex(i)'0x1c'
oct() 将十进制数值转换为8进制
>>>oct(i)'0o34'
#0后面是o,表示8进制
bool() 返回给定元素的布尔值
![]()
![]()
#可以看出所有空值都是False
>>>bool(False)
False>>>bool(0)
False>>> bool('')
False>>>bool(None)
False>>>bool([])
False>>>bool({})
False>>>bool(())
False>>> bool(1)
True
View Code
bytes() str() 各种编码转换
Python3中对文本(字符串)和二进制数据做了比较清晰的区分。文本总是使用unicode,由str类型表示,二进制数据用bytes类型表示。
Python3不会以任何隐式的方式混用str和bytes,因此这两者区分特别清晰。所以,不能拼接字符串和字节包,也无法在字节包里搜索字符串,也不能将字符串传入参数为字符包的函数等等。
![]()
![]()
#设置一个原始字符串
>>> s1 = '[1,2,3,4,5,6,]'
>>>type(s1)
#设置一个bytes数据类型
>>> s2 = bytes('[1,2,3,4,5,6,]','ascii')>>>type(s2)
>>>s1'[1,2,3,4,5,6,]'
>>>s2
b'[1,2,3,4,5,6,]'
#按utf-8编码,转换成bytes
>>> s1_bytes = s1.encode(encoding='utf-8')>>>type(s1_bytes)
>>>s1_bytes
b'[1,2,3,4,5,6,]'
#按照GB2312编码格式转换s1
>>>
>>> s1_gb2312 = s1.encode(encoding='gb2312')>>>s1_gb2312
b'[1,2,3,4,5,6,]'
>>>type(s1_gb2312)
#解码成string,默认为空
>>> s1_string =s1_bytes
s1_bytes>>> s1_string =s1_bytes.decode()>>>s1_string'[1,2,3,4,5,6,]'
>>>type(s1_string)
#也可以使用gb2312的方式解码成gb2312的string
>>> s1_string_gb2312 = s1_gb2312.decode('gb2312')>>>s1_string_gb2312'[1,2,3,4,5,6,]'
>>>type(s1_string_gb2312)
#也可以使用下面转换方式:#创建bytes
>>> s3 = b'www.dbq168.com'
>>>type(s3)
>>>s3
b'www.dbq168.com'
#创建str
>>> s4 = 'www.dbq168.com'
>>>type(s4)
>>>s4'www.dbq168.com'
#str转换成bytes
>>> bytes(s4,encoding='utf-8')
b'www.dbq168.com'
#bytes转到str
>>> str(s3,encoding = 'utf-8')'www.dbq168.com'
#>>>type(s3)
>>>type(s4)
#str to bytes
>>>str.encode(s4)
b'www.dbq168.com'
#bytes to str
>>>bytes.decode(s3)'www.dbq168.com'
View Code
bytearray() 返回一个bytes数组,bytearray类型是一个可变的序列,并且序列中的元素取值范围是0~256之间;
![]()
![]()
#可迭代类型,元素范围不能超过256,否则报错
>>> d = bytearray((333,222,251,288))
Traceback (most recent call last):
File"", line 1, in ValueError: byte must bein range(0, 256)>>> c = bytearray([1,2,3,4,])>>>c[0]1
>>> c[1]2
>>> c[2]3
>>> c[3]4
>>>c
bytearray(b'\x01\x02\x03\x04')#传入的是字符串,则按照指定的encoding将字符串转为字符序列;
>>> a = 'www.dbq.com, blog.dbq.com'
>>> b = bytearray(a,encoding='utf-8')>>>b
bytearray(b'www.dbq.com, blog.dbq.com')>>>b[0]119
>>> b[1]119
View Code
chr() 和 ord()
chr 返回一个元素在ASCII表里对应的关系的字符串,如str(65)返回的是大写字母“A“ ,反查是 ord()
![]()
![]()
#这哥俩就是一个查询,一个反查询
>>> chr(65)'A'
>>> chr(68)'D'
>>> chr(69)'E'
>>> chr(77)'M'
>>> chr(12)'\x0c'
>>> chr(33)'!'
>>> chr(45)'-'
>>> chr(90)'Z'
>>> chr(933)'Υ'
>>> chr(93)']'
>>> ord(']')93
>>> ord('Z')90
>>> ord('Z')
View Code
对照ASCII码对照表,完成一个小需求,比如现在用的比较多的验证码程序(非12306,哈哈),如何生成一个字母带数字组合的6位随机码?
![]()
![]()
#分析下需求,可以用个for循环,每次调用random模块的randrange方法,让其从65-90之间任取一个随机数,#然后用chr找到在ascii对照表中的大写字母,追加到列表中,而后把列表拼接起来即可!如下面代码:
#!/usr/bin/env python3#-*- coding: utf-8 -*-#Author: DBQ(Du Baoqiang)
importrandom
l1=[]for i in range(6):
num= random.randrange(65,90)
num=chr(num)
l1.append(num)
result= "".join(l1)print(result)#增强版,在生成一个随机数,把随机数字插入到列表中去:
importrandom
l1=[]for i in range(6):
I= random.randrange(0,6)
num= random.randrange(65,90)
num=chr(num)if i == I or I == 3 or I == 4:
l1.append(str(I))else:
l1.append(num)
result= "".join(l1)print(result)
View Code
divmod() 相除,返回商和余数,返回值是一个元组
![]()
![]()
#使用场景,比如说总共有102个文章,现在要分页显示,每页只显示15个文章,就可以基于这个来做,而后对元组内的商和余数进行判断等等后续操作
>>> a = 102
>>> divmod(a,15)
(6, 12)
View Code
max() 取最大值
![]()
![]()
>>> l1 = [11,22,33,44,55,66,666,]>>>max(l1)666
#当然Python3中字符串和数字是不能比较的,否则会报错
>>> l1 = [11,22,33,44,55,66,666,'a']>>>max(l1)
Traceback (most recent call last):
File"", line 1, in TypeError: unorderable types: str()> int()
View Code
min() 取最小值
![]()
![]()
>>> l1 = [11,22,33,44,55,66,666]>>>min(l1)11
View Code
sum() 求和
![]()
![]()
>>> l1 = [11,22,33,44,55,66,666]>>>sum(l1)897
View Code
dict() 字典函数
![]()
![]()
>>> d1 = dict(name='daniel',age=18)>>>d1
{'name': 'daniel', 'age': 18}
View Code
list() 列表函数
![]()
![]()
>>> l1 = list([1,2,3,4,5,])>>>type(l1)
>>>l1
[1, 2, 3, 4, 5]
View Code
tuple() 元组
![]()
![]()
>>> t1 = tuple((1,2,3,4,5))>>>type(t1)
>>>t1
(1, 2, 3, 4, 5)>>>t1.
t1.__add__( t1.__ge__( t1.__le__( t1.__repr__(
t1.__class__( t1.__getattribute__( t1.__len__( t1.__rmul__(
t1.__contains__( t1.__getitem__( t1.__lt__( t1.__setattr__(
t1.__delattr__( t1.__getnewargs__( t1.__mul__( t1.__sizeof__(
t1.__dir__( t1.__gt__( t1.__ne__( t1.__str__(
t1.__doc__ t1.__hash__( t1.__new__( t1.__subclasshook__(
t1.__eq__( t1.__init__( t1.__reduce__( t1.count(
t1.__format__( t1.__iter__( t1.__reduce_ex__( t1.index(
View Code
str() 字符串
![]()
![]()
>>> name = str('daniel')>>>type(str)
>>>name'daniel'
>>>name.
name.__add__( name.__mod__( name.expandtabs( name.lstrip(
name.__class__( name.__mul__( name.find( name.maketrans(
name.__contains__( name.__ne__( name.format( name.partition(
name.__delattr__( name.__new__( name.format_map( name.replace(
name.__dir__( name.__reduce__( name.index( name.rfind(
name.__doc__ name.__reduce_ex__( name.isalnum( name.rindex(
name.__eq__( name.__repr__( name.isalpha( name.rjust(
name.__format__( name.__rmod__( name.isdecimal( name.rpartition(
name.__ge__( name.__rmul__( name.isdigit( name.rsplit(
name.__getattribute__( name.__setattr__( name.isidentifier( name.rstrip(
name.__getitem__( name.__sizeof__( name.islower( name.split(
name.__getnewargs__( name.__str__( name.isnumeric( name.splitlines(
name.__gt__( name.__subclasshook__( name.isprintable( name.startswith(
name.__hash__( name.capitalize( name.isspace( name.strip(
name.__init__( name.casefold( name.istitle( name.swapcase(
name.__iter__( name.center( name.isupper( name.title(
name.__le__( name.count( name.join( name.translate(
name.__len__( name.encode( name.ljust( name.upper(
name.__lt__( name.endswith( name.lower( name.zfill(
str
int() 整数
![]()
![]()
>>> i1 = 18
>>>type(i1)
>>> i2 = int(19)>>>type(i2)
#创建完成后就拥有了整数所有的方法
>>>i2.
i2.__abs__( i2.__gt__( i2.__rand__( i2.__sizeof__(
i2.__add__( i2.__hash__( i2.__rdivmod__( i2.__str__(
i2.__and__( i2.__index__( i2.__reduce__( i2.__sub__(
i2.__bool__( i2.__init__( i2.__reduce_ex__( i2.__subclasshook__(
i2.__ceil__( i2.__int__( i2.__repr__( i2.__truediv__(
i2.__class__( i2.__invert__( i2.__rfloordiv__( i2.__trunc__(
i2.__delattr__( i2.__le__( i2.__rlshift__( i2.__xor__(
i2.__dir__( i2.__lshift__( i2.__rmod__( i2.bit_length(
i2.__divmod__( i2.__lt__( i2.__rmul__( i2.conjugate(
i2.__doc__ i2.__mod__( i2.__ror__( i2.denominator
i2.__eq__( i2.__mul__( i2.__round__( i2.from_bytes(
i2.__float__( i2.__ne__( i2.__rpow__( i2.imag
i2.__floor__( i2.__neg__( i2.__rrshift__( i2.numerator
i2.__floordiv__( i2.__new__( i2.__rshift__( i2.real
i2.__format__( i2.__or__( i2.__rsub__( i2.to_bytes(
i2.__ge__( i2.__pos__( i2.__rtruediv__(
i2.__getattribute__( i2.__pow__( i2.__rxor__(
i2.__getnewargs__( i2.__radd__( i2.__setattr__(
View Code
dir() 获取一个类提供的功能
![]()
![]()
>>>dir(d1)
['__class__', '__contains__', '__delattr__', '__delitem__', '__dir__', '__doc__', '__eq__', '__format__', '__ge__', '__getattribute__', '__getitem__', '__gt__', '__hash__', '__init__', '__iter__', '__le__', '__len__', '__lt__', '__ne__', '__new__', '__reduce__', '__reduce_ex__', '__repr__', '__setattr__', '__setitem__', '__sizeof__', '__str__', '__subclasshook__', 'clear', 'copy', 'fromkeys', 'get', 'items', 'keys', 'pop', 'popitem', 'setdefault', 'update', 'values']
View Code
help() 查看详细的帮助
![]()
![]()
Help on dict object:classdict(object)| dict() ->new empty dictionary| dict(mapping) -> new dictionary initialized from a mapping object's
|(key, value) pairs| dict(iterable) -> new dictionary initialized as ifvia:| d ={}| for k, v initerable:| d[k] =v| dict(**kwargs) -> new dictionary initialized with the name=value pairs| in the keyword argument list. For example: dict(one=1, two=2)|
|Methods defined here:|
| __contains__(self, key, /)| True if D has a key k, elseFalse.|
| __delitem__(self, key, /)|Delete self[key].|
| __eq__(self, value, /)| Return self==value.|
| __ge__(self, value, /)| Return self>=value.
。。。。。
View Code
enumerate() 枚举元素,打印出索引和值
![]()
![]()
>>> for index,value inenumerate(d1.keys()):
...print(index,value)
...
0 name1 age
View Code
compile() 把字符串编译成Python代码,而后调用exec执行
exec() 执行,比eval要牛逼,因为exec可以执行任何Python代码,但eval只能执行表达式;但有个缺陷是eval有返回值,而exec没有。
exec可以执行compile编译过的,也可以接受代码执行。
eval() 执行,把接受的字符串当做一个表达式,把代码编译成一行的表达式;
![]()
![]()
#定义一个字符串
>>> str1 = 'print("hello world")'
>>>str1'print("hello world")'
#编译成python代码
>>> result = compile(str1,'','exec')>>> print(result) at 0x1019e4db0, file "", line 1>调用exec执行>>> exec(result)
hello world>>>eval(result)
hello world>>> r1 = exec(result)
hello world>>> print(r1)
None>>> r2 =eval(result)
hello world>>> print(r2)#exec和eval都可以直接调用执行
>>>str1'print("hello world")'
>>>eval(str1)
hello world>>> exec(str1)
hello world
View Code
filter() 筛选,内部循环第二个参数,让每一个元素执行,如果值返回为True,表示元素合法,将元素添加到结果中,否则不做操作;
map() 不对函数返回值进行判断,直接将返回值添加到结果中;
比如现在有个需求,有一个列表l1 = [11,22,33,55,22,223,4452,886,223,258,664,198,] 现在需要找出里面大于100的元素,让我来实现,一下子想到的肯定是for循环整个列表,然后比较,再追加到一个新列表中去,最后不就出来了么?哈哈,这不是学新东西么,用filter可以方便的解决这个需求:
![]()
![]()
l1 = [11,22,33,55,22,223,4452,886,223,258,664,198,]#定一个函数,接受形参,如大大于100,return True
deff1(num):if num > 100:returnTrue#使用filter把l1赋值给f1,如果True的话,会把l1的元素赋值给result,否则不做处理;
result =filter(f1,l1)print(list(result))
for example
但是这么看有点不爽,简单点,lambda表达式:
![]()
![]()
l1 = [11,22,33,55,22,223,4452,886,223,258,664,198,]
result= filter(lambda f1: f1>100,l1)print(list(result))
lambda表达式实现
map的例子简单来一个,比如说想把列表l1中的所有元素值+100,那么来了:
![]()
![]()
l1 = [11,22,33,55,22,223,4452,886,223,258,664,198,]
result= map(lambda f1: f1+100,l1)print(list(result))
lambda
float() 浮点数函数
![]()
![]()
>>> f1 = float(3.1415926)>>>f13.1415926
#下面这些方法在第一天、第二天的内容里已经详细说明并举例了
>>>type(f1)
>>>f1.
f1.__abs__( f1.__getformat__( f1.__pow__( f1.__setformat__(
f1.__add__( f1.__getnewargs__( f1.__radd__( f1.__sizeof__(
f1.__bool__( f1.__gt__( f1.__rdivmod__( f1.__str__(
f1.__class__( f1.__hash__( f1.__reduce__( f1.__sub__(
f1.__delattr__( f1.__init__( f1.__reduce_ex__( f1.__subclasshook__(
f1.__dir__( f1.__int__( f1.__repr__( f1.__truediv__(
f1.__divmod__( f1.__le__( f1.__rfloordiv__( f1.__trunc__(
f1.__doc__ f1.__lt__( f1.__rmod__( f1.as_integer_ratio(
f1.__eq__( f1.__mod__( f1.__rmul__( f1.conjugate(
f1.__float__( f1.__mul__( f1.__round__( f1.fromhex(
f1.__floordiv__( f1.__ne__( f1.__rpow__( f1.hex(
f1.__format__( f1.__neg__( f1.__rsub__( f1.imag
f1.__ge__( f1.__new__( f1.__rtruediv__( f1.is_integer(
f1.__getattribute__( f1.__pos__( f1.__setattr__( f1.real
View Code
format() 格式化输出字符串用,大力推荐使用format来格式化输出字符串,总之好处一大堆啦,真想看明白为啥推荐,那就点我呀点我呀
![]()
![]()
>>> name = 'daniel'
>>> age = 18
>>> '%s %s' %(name,age)'daniel 18'
>>> '{} {}'.format(name,age)'daniel 18'
#调换位置
>>> '{1} {0}'.format(name,age)'18 daniel'
#随意组合:
>>> '{1} {0} {job}'.format(name,age,job='IT')'18 daniel IT'
#靠左靠右:#靠右
print('%10s' %('test'))print('{:>10}'.format('test'))#左
print('%-10s' %('test'))print('{:10}'.format('test'))#居中
print('{:^10}'.format('test'))
View Code
frozenset() 不可变集合
set() 可变集合
python中有两种集合类型,set和frozenset。set是可变的,有add(), remove(), difference()等等方法,但是既然是可变的,那么set就不支持hash。
frozenset是不可变集合,存在hash值,因此可以作为字典的key,也可以作为其他集合的元素,缺点是一旦创建就不能更改,没有add、remove方法。
![]()
![]()
#创建两个集合,一个set,一个frozenset
s1 = frozenset('balabala')
s2= set('bala')#作为字典的key
d1 = {s1:1,'b':2}print(d1)#可变集合set就会报错
d2 = {s2:1,'b':2}print(d2)
TypeError: unhashable type:'set'
View Code
globals() 所有的全局变量
locals() 所有的局部变量
![]()
![]()
NAME = 'daniel'AGE= 18JOB= 'IT'
deff1(num):if num > 2:print('{}你输入的数字 {} 好大啊'.format(NAME,num))else:print('{}你输入的数字 {} 不够大啊!'.format(NAME,num))returnnum
num= input('请输入一个数字试试?').strip()ifnum.isdigit():
num=int(num)
f1(num)print('整个全局变量有 {}'.format(globals()))print('文件中的局部变量有{}'.format(locals()))
输出结果:
请输入一个数字试试?3daniel你输入的数字3好大啊
整个全局变量有 {'JOB': 'IT', '__loader__': <_frozen_importlib_external.sourcefileloader object at>, 'num': 3, '__spec__': None, '__name__': '__main__', '__cached__': None, '__file__': '/Users/daniel/PycharmProjects/S13/day4/写博客.py', '__doc__': None, '__package__': None, 'AGE': 18, '__builtins__': , 'f1': , 'NAME': 'daniel'}
文件中的局部变量有{'JOB': 'IT', '__loader__': <_frozen_importlib_external.sourcefileloader object at>, 'num': 3, '__spec__': None, '__name__': '__main__', '__cached__': None, '__file__': '/Users/daniel/PycharmProjects/S13/day4/写博客.py', '__doc__': None, '__package__': None, 'AGE': 18, '__builtins__': , 'f1': , 'NAME': 'daniel'}
View Code
hash() 将元素生成定长hash值
![]()
![]()
>>> a = 'daniel'
>>> b = '1023u0ksjlfjslkjf0093940102kskdkffl0;;;fjjjfnvnflf'
>>>hash(a)-1628922583924903800
>>>hash(b)-4360187009688213819
View Code
id() 查看对象内存指针
![]()
![]()
>>> a = 'daniel'
>>> b =a>>> a = 'jerry'
>>>id(a)4322605408
>>>id(b)4322604960
>>>a'jerry'
>>>b'daniel'
View Code
input() 接受用户键盘输入,python3中默认用户输入的是字符串类型
![]()
![]()
>>> name = input("What's your name?")
What's your name?daniel
>>> print(type(name))
>>> print(name)
daniel>>> age = input('Age')
Age18>>> print(age)18
>>> print(type(age))
View Code
isinstance() 判断对象是否是某个类的实例
![]()
![]()
>>>isinstance(i1,int)
True>>>isinstance(i1,str)
False>>>isinstance(name,str)
True
View Code
len() 查看长度
![]()
![]()
>>>name'daniel'
>>>len(name)6
>>>l1
[1, 2, 3, 4, 5]>>>len(l1)5
>>>t1
(1, 2, 3, 4, 5)>>>len(t1)5
View Code
memoryview() python3新增,查看内存地址的类
![]()
![]()
>>> name = b'daniel'
>>>name
b'daniel'
>>>id(name)4322277416
>>>memoryview(name)
>>>type(name)
View Code
open() 打开文件操作
![]()
![]()
>>> f = open('a.txt','w+')>>>f.read()''f.__class__( f.__init__( f._checkReadable( f.mode
f.__del__( f.__iter__( f._checkSeekable( f.name
f.__delattr__( f.__le__( f._checkWritable( f.newlines
f.__dict__ f.__lt__( f._CHUNK_SIZE f.read(
f.__dir__( f.__ne__( f._finalizing f.readable(
f.__doc__ f.__new__( f.buffer f.readline(
f.__enter__( f.__next__( f.close( f.readlines(
f.__eq__( f.__reduce__( f.closed f.seek(
f.__exit__( f.__reduce_ex__( f.detach( f.seekable(
f.__format__( f.__repr__( f.encoding f.tell(
f.__ge__( f.__setattr__( f.errors f.truncate(
f.__getattribute__( f.__sizeof__( f.fileno( f.writable(
f.__getstate__( f.__str__( f.flush( f.write(
f.__gt__( f.__subclasshook__( f.isatty( f.writelines(
f.__hash__( f._checkClosed( f.line_buffering
View Code
pow() 求幂
![]()
![]()
>>>i118
>>> pow(i1,2)324
>>> pow(i1,3)5832
View Code
print() 打印各种。。。
![]()
![]()
>>> print('hello world')
hello world>>> print('DBQ 好帅')
DBQ 好帅
View Code
range() 范围,用的太多了...
![]()
![]()
>>> for i in range(5):
...print(i)
...
01
2
3
4
View Code
reversed() 翻转, 和列表、元组等中的翻转一样
![]()
![]()
>>>l1
[1, 2, 3, 4, 5]>>>t1
(1, 2, 3, 4, 5)>>>reversed(l1)
>>> print(reversed(l1))
>>> print(list(reversed(l1)))
[5, 4, 3, 2, 1]>>> print(reversed(t1))
>>> print(tuple(reversed(t1)))
(5, 4, 3, 2, 1)
View Code
round() 四舍五入
![]()
![]()
>>> i = 3.1415926
>>>round(i)3
#可以跟个显示几位
>>> round(i,2)3.14
>>> round(i,3)3.142
View Code
sorted() 排序, 和列表、元组中的排序一样
![]()
![]()
>>> l2 = [5,22,4,2,55,23,]>>>sorted(l2)
[2, 4, 5, 22, 23, 55]
View Code
type() 查看对象类型
![]()
![]()
>>>type(l1)
>>>type(t1)
>>>type(name)
View Code
slice() 切片,和字符串、列表中的切片一样
![]()
![]()
>>>l1
[1, 2, 3, 4, 5]>>> l1[1:5] #这个效果和下面实现的是一样的
[2, 3, 4, 5]>>> l1.__getitem__(slice(1,5,None))
[2, 3, 4, 5]#还可以调整步长
>>> l1.__getitem__(slice(1,5,2))
[2, 4]>>> l1.__getitem__(slice(1,5,1))
[2, 3, 4, 5]>>> l1.__getitem__(slice(0,5,1))
[1, 2, 3, 4, 5]>>> l1.__getitem__(slice(0,5,1))
View Code
zip() 河边元素,如把多个列表中的每个元素合并成一个元组:
![]()
![]()
>>> a = [1,2,3,4,5]>>> b = ['a','b','c','d','e',]>>>zip(a,b)
>>> print(tuple(zip(a,b)) )
((1, 'a'), (2, 'b'), (3, 'c'), (4, 'd'), (5, 'e'))#如果元素长度不一样,会忽略
>>> c = [5,4,3,2]>>> print(tuple(zip(a,c)))
((1, 5), (2, 4), (3, 3), (4, 2))
View Code
其他的一些内置函数都是面向对象、模块、迭代器相关的知识,目前还涉及不到,还不懂,也不啰嗦;
![]()
![]()
classmethod()
complex()
delattr()
getattr()
hasattr()
setattr()
issubclass()
iter()
object()
property()
repr()
staticmethod()
super()
vars()
View Code
二. 装饰器
Python中一切皆对象,所以函数当然也是一个对象,而且函数对象被赋值给变量,所以通过变量也能调用该函数;
>>> deff1():
...print('hello boy')
...>>> a =f1()
hello boy>>> a =f1>>>a()
hello boy
假设,我们现在要对f1函数增加功能,比如在给函数调用前打印日志信息,但又不能修改f1的函数,这种在代码运行期间动态增加功能的方式,就是“装饰器"(Decorator). 当然你肯定会说,我直接在f1函数里写个打印日志功能就好了,可如果有5个函数呢?100个函数呢?而且,我们应遵循一种”开放封闭的原则“,也就是说写好的函数,一般不要直接在里面修改。
现在我们定义一个log日志的装饰器:
deflog(func):def inner(*args,**kwargs):print('这里输出日志信息,是在执行f1之前执行的')
result= func(*args,**kwargs)print('这是输出日之后, 执行完f1之后的信息')returnresultreturninner
@logdeff1():print('hello f1')
a=f1
a()
输出结果如下:
这里输出日志信息,是在执行f1之前执行的
hello f1
这是输出日之后, 执行完f1之后的信息
也就是说装饰器是在外部装饰函数的,在不改变调用者的基础上,可以在执行函数前后添加功能。语法是: 在调用者前面加 @函数名
总结一下,装饰器的功能:
自动执行log函数,并将下面的函数名f1当做参数传递(func)
将log函数的返回值,重新赋值给f1
一旦函数被装饰器装饰,这个函数就会被重新赋值,赋值成装饰器函数的内存函数。
func装饰的是原函数f1。
这里有个例子,有个用户验证程序,比如说登陆某宝,要查看购物车的时候,系统肯定提示你要先登录,你点登陆会提示你输入用户名、密码,你检查购物车,会根据你的历史记录打印出购物车的信息等等;
![]()
![]()
#!/usr/bin/env python3#-*- coding: utf-8 -*-#Author: DBQ(Du Baoqiang)
#先定义一个用户字典,判断用户状态,用户身份等
USER_INFO = {'user_state': False, 'admin_flag':2}#搞一个装饰器,装饰管理后台,检查用户身份等
defouter(func):def inner(*args,**kwargs):if USER_INFO['user_state']:
result= func(*args,**kwargs)returnresultelse:print('你没有登陆系统,请登陆后再操作!')returninner#使用装饰器装饰
@outerdefmanager():print('欢迎登陆到管理员界面')#检查用户身份函数
@outerdefcheckuser(username):if USER_INFO['admin_flag'] ==0:print('{} 您的用户是管理员身份'.format(username))else:print('{} 普通用户啦'.format(username))#登录函数
deflogin(username,userpwd):if username == 'tom' and userpwd == '123':
USER_INFO['user_state'] =True
USER_INFO['current_user'] =username
USER_INFO['admin_flag'] =0
manager()elif username == 'jerry' and userpwd == '123':
USER_INFO['user_state'] =True
USER_INFO['current_user'] =username
USER_INFO['admin_flag'] = 1
else:print('用户名或者密码错误!')#print('欢迎登陆 %s' %username)
#主函数
defmain():whileTrue:print('1: 管理后台 2: 登陆 3. 检查用户身份 4. 退出')
user_input_num= input('选择下吧:').strip()if user_input_num == '1':
result=manager()elif user_input_num == '2':
username= input('请输入您的用户名:').strip()
userpwd= input('密码').strip()
login(username,userpwd)elif user_input_num == '3':
checkuser(USER_INFO.get('current_user',None))elif user_input_num == '4':print('Bye')break
if __name__ == '__main__':
main()
For example