豆瓣Top250:Python爬虫+数据可视化
文章目录
-
- 前言
- 数据爬取
-
- 测试类库
-
- 1.urllib.request( 获取网页HTML源代码)
- 2.re(匹配HTML源代码)
- 3.bs4(HTML/XML的解析器)
-
- 搜索文档树
- CSS选择器
- 4.xlwt(解析出的数据保存到Excel)
- 5.sqlite3(解析出的数据保存到sqlite数据库)
- 执行流程
- 爬取结果
- 数据可视化
-
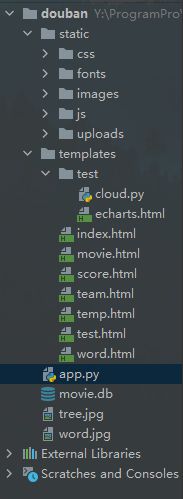
- Flask框架目录结构
- 词云
- Echarts图表
前言
参考B站Python爬虫基础5天速成(2021全新合集)Python入门+数据可视化学习制作,以下是我学习过程中的心得体会,由于整个项目太大,部分代码未做展示。感兴趣的伙伴评论留言,可获取源代码或相关资源。
数据爬取
from bs4 import BeautifulSoup       # 网页解析,获取数据
import re                           # 正则表达式,进行文字匹配
import urllib.request as urlre      # 指定rul,获取网页数据
import xlwt                         # 操作Excel
import sqlite3                      # 操作数据库
测试类库
1.urllib.request( 获取网页HTML源代码)
import urllib.request

url = 'https://movie.douban.com/top250?start='
data = bytes(urllib.parse.urlencode({
     "":""}),encoding='utf-8')
headers = {

'User-Agent': 'Mozilla/5.0 (Windows NT 10.0; Win64; x64) AppleWebKit/537.36 (KHTML, like Gecko) Chrome/88.0.4324.96 Safari/537.36'
}
# 获取网页HTML源代码
urllib.request.urlopen(urllib.request.Request(url=url,data=data,headers=headers,method='POST')).read().decode('utf-8')


# 获取一个get请求
response = urlre.urlopen('http://www.baidu.com')
# 获取网页源代码
print(response.read().decode('utf-8'))

# response = re.urlopen('http://www.baidu.com')
# 网页状态 200
# print(response.status)
# 当我们访问网页时浏览器会向服务器发送请求头,里面包含浏览器版本等信息
# 如果我们的爬虫用get方式直接访问就会被有反爬机制的服务器识破我们的身份
# 因此我们需要用post方式发送请求,使用代理重新设置headers,并且通过urllib.parse模拟用户登录
# print(response.getheaders())
# print(response.getheader('Server'))

# 超时处理
# try:
    # response = re.urlopen('https://httpbin.org/get',timeout=0.5)
    # print(response.read().decode('utf-8'))

# except Exception as e:
#     print(e)
# 获取一个post请求,模拟用户登录时使用
# import urllib.parse
# data = bytes(urllib.parse.urlencode({"":""}),encoding='utf-8')
# response = re.urlopen('https://httpbin.org/post',data=data)
# print(response.read().decode('utf-8'))

url = 'https://movie.douban.com/top250?start='
data = bytes(urllib.parse.urlencode({
     "":""}),encoding='utf-8')
headers = {

'User-Agent': 'Mozilla/5.0 (Windows NT 10.0; Win64; x64) AppleWebKit/537.36 (KHTML, like Gecko) Chrome/88.0.4324.96 Safari/537.36'

}
req = re.Request(url=url,data=data,headers=headers,method='POST')
response = re.urlopen(req)
print(response.read().decode('utf-8'))
2.re(匹配HTML源代码)
# m = re.compile('aa').search('cab')
# m = re.search('aa','dadaa') # 前面是规则,后面是校验对象
# 3.bs4(HTML/XML的解析器)
BeautifulSoup4将复杂HTML文档转换成一个复杂的树形结构,每个节点都是Python对象,所有对象被归纳为4种:
- Tag 标签及其内容(查找第一个符合要求的标签)
对于 Tag,它有两个重要的属性,是 name 和 attrs - NavigableString string 标签内容
- BeautifulSoup 整个文档
- Comment 一个特殊类型的 NavigableString 对象,输出的内容不包括注释符号
搜索文档树
find_all(name, attrs, recursive, text, *kwargs)
在上面的栗子中我们简单介绍了find_all的使用,接下来介绍一下find_all的更多用法-过滤器。这些过滤器贯穿整个搜索API,过滤器可以被用在tag的name中,节点的属性等。
# 两者是相等的# t_list = bs.find_all("a") => t_list = bs("a")
传入参数:
-
字符串过滤:会查找与字符串完全匹配的内容
-
正则表达式过滤:如果传入的是正则表达式,那么BeautifulSoup4会通过search()来匹配内容
-
列表:如果传入一个列表,BeautifulSoup4将会与列表中的任一元素匹配到的节点返回
-
方法:传入一个方法,根据方法来匹配
CSS选择器
BeautifulSoup支持发部分的CSS选择器,在Tag获取BeautifulSoup对象的.select()方法中传入字符串参数,即可使用CSS选择器的语法找到Tag
通过标签名查找
print(bs.select('title'))
属性查找
print(bs.select('a[class="bri"]'))
更多见beautifulsoup菜鸟教程
4.xlwt(解析出的数据保存到Excel)
import xlwt                         		# 操作Excel
workbook = xlwt.Workbook(encoding='utf-8')  # 创建Excel工作表
worksheet = workbook.add_sheet('sheet1')    # 创建工作簿
worksheet.write(0,0,'hello')                # 在工作簿第一行第一列设置数据
workbook.save('student.xlsx')               # 命名并保存工作表
5.sqlite3(解析出的数据保存到sqlite数据库)
conn = sqlite3.connect('db.sqlite3')   # 打开或创建数据库文件

cursor = conn.cursor()					# 创建游标

# sql = '''
#     create table company(
#         id int primary key not null,
#         name text not null,
#         age int not null,
#         address char(20),
#         salary real
#     );
# '''

# sql = '''
#     insert into company values(1,'张三',10,'重庆',8888);
# '''
result = cursor.execute('select * from company')

for i in result:
    print('id=',i[0])
    print('id=',i[1])
    print('id=',i[2])
    print('id=',i[3])

# result = cursor.fetchall()
# print(result)
# conn.commit()
cursor.close()
conn.close()
执行流程
# 通过urllib.request解析一个指定url内容,返回网页HTML源码
def askUrl(url):
    headers = {
          # 模拟浏览器头部信息,发送给豆瓣服务器,一般网站有反爬机制,检测到爬虫禁止访问
        'User-Agent': 'Mozilla/5.0 (Windows NT 10.0; Win64; x64) AppleWebKit/537.36 (KHTML, like Gecko) Chrome/88.0.4324.96 Safari/537.36'
        # 用户代理,避免被发现是爬虫,告诉豆瓣浏览器我们是什么类型的机器(本质上是告诉浏览器我们可以接收什么水平的文件内容)
    }
    req = urlre.Request(url=url, headers=headers)
    try:
        response = urlre.urlopen(req)
        html = response.read().decode('utf-8')
        # print(html)
    except Exception as e:
        print(e)

    return html
# HTML源码中找到需要信息的标签,用正则模糊匹配
findLink = re.compile(r') # 影片详情链接
findImgSrc = re.compile(r',re.S) # 影片图片,re.S去掉换行符
......
# 找到子网页的地址规律,给askUrl解析每个子网页
# 通过bs4中的BeautifulSoup搜索每个子网页的文档树
# 循环遍历每个子网页,将信息保存在列表中,最后将列表保存在存放列表的列表中
def getData(baseurl):
    datalist = []
    for i in range(10):   # 获取页面信息十次
        url = baseurl + str(i*25)
        html = askUrl(url)  # 保存获取到的网页源码
        # 逐一解析数据
        soup = BeautifulSoup(html,'html.parser')
        for item in soup.find_all('div',class_='item'):    # 查找符合要求的字符串,形成列表
            # print(item)
            data = []   # 保存一部电影的所有信息
            item = str(item)

            # 七项信息,其中titles占两个位置,数组中每八位保存一部电影信息
            # 影片详情链接
            link = re.findall(findLink,item)[0]   # 查找指定字符串
            data.append(link)
  			.....
            data.append(bd.strip())     # 去掉前后的空格
            datalist.append(data)       # 将处理好的一部电影信息放入datalist
            # for i in data:
            #     print(i)
    print('数据爬取成功')
    return datalist
# 保存数据到excel
def saveData(dataList,savePath):
    workbook = xlwt.Workbook(encoding='utf-8')
    worksheet = workbook.add_sheet('sheet1')
    colTitle = ('电影详情链接', '图片链接', '影片中文名', '影片英文名', '影片评分', '评价人数', '影片概况', '相关信息')
    for i in range(8):
        worksheet.write(0, i, colTitle[i])
    for i in range(250):
        item = dataList[i]
        for j in range(8):
            data = item[j]
            worksheet.write(i + 1, j, data)

    workbook.save(savePath)
# 保存数据到sqlite数据库
def saveDataBase(dataList,savePath):

    conn = sqlite3.connect(savePath)  # 打开或创建数据库文件
    cur = conn.cursor()

    sqlCr = '''
        create table db_top250 if not exists(
            id int primary key autoincrement,
            link text,
            img text,
            cname varchar,
            ename varchar,
            rated int,
            judge int,
            inq text,
            bd text
        );
    '''
    cur.execute(sqlCr)

    for item in dataList:
        for i in range(len(item)):
            if i == 4 or i == 5:
                continue

            item[i] = '"'+item[i]+'"'
        sqlIn = '''
            insert into db_top250(link,img,cname,ename,rated,judge,inq,bd) values(%s)
        ''' % ','.join(item)  # 将,添加在每个item之间
        cur.execute(sqlIn)
        conn.commit()

    cur.close()
    conn.close()
爬取结果
数据可视化
Flask框架目录结构
词云
import jieba # 分词
from matplotlib import pyplot as plt # 绘图,数据可视化
from wordcloud import WordCloud # 词云
from PIL import Image # 图形处理
import numpy as np # 矩阵运算
import sqlite3 # 数据库
# 准备词云所需的文本
con = sqlite3.connect('../../movie.db')
cur = con.cursor()
sql = 'select inq from db_top250'
data = cur.execute(sql)
text = ''
for item in data:
text = text + item[0]
# print(text)
cur.close()
con.close()
# 分词
cut = jieba.cut(text)
print(cut) # 生成器Echarts图表
Echarts官网
# 需要下载导入Echarts的js文件
<script src="../static/js/echarts.min.js"></script>

<script type="text/javascript">

       var myChart = echarts.init(document.getElementById('main-lb'));

       // 指定图表的配置项和数据
       option = {

      title:{

         text:'豆瓣评分'
      },
      color:['#3398DB'],
      tooltip: {

         trigger: 'axis',
         axisPointer: {
                 // 坐标轴指示器,坐标轴触发有效
            type: 'shadow'        // 默认为直线,可选为:'line' | 'shadow'
         }
      },
      grid: {

         left: '3%',
         right: '4%',
         bottom: '3%',
         containLabel: true
      },
      xAxis: [
         {

            type: 'category',
            data: {
     {
      score|tojson }}
                       // ['Mon', 'Tue', 'Wed', 'Thu', 'Fri', 'Sat', 'Sun'],
            /*axisTick: {

               alignWithLabel: true
            }*/
         }
      ],
      yAxis: [
         {

            type: 'value'
         }
      ],
      series: [
         {

            name: 'score',
            type: 'bar',
            barWidth: '60%',
            data: {
     {
     count}}
                   // [10, 52, 200, 334, 390, 330, 220]
         }
      ]
   };

       // 使用刚指定的配置项和数据显示图表。
       myChart.setOption(option);


   </script>


   {

            type: 'value'
         }
      ],
      series: [
         {

            name: 'score',
            type: 'bar',
            barWidth: '60%',
            data: {
     {
     count}}
                   // [10, 52, 200, 334, 390, 330, 220]
         }
      ]
   };

       // 使用刚指定的配置项和数据显示图表。
       myChart.setOption(option);


   </script>


