【zabbix】Linux下部署使用zabbix
Linux下部署zabbix步骤
1、zabbix简介
1)zabbix是一个企业级开源监控解决方案(cpu、内存、磁盘、网络、服务等)
2)zabbix的基本组成:
zabbix-server:监控程序
zabbix-agent:代理端
database:存储
web gui:网页界面
proxy:分布式监控
2、环境准备
1)本实例环境(zabbix需要依托LAMP或LNMP环境,本实例使用LNMP环境)
server端(192.168.1.130):centos7、mysql5.7、nginx1.16、zabbix4.4(server)
agent端(192.168.1.131):centos7、zabbix4.4(agent)
2)server端和agent端都关闭防火墙和selinux:
service firewalld stop
setenforce 0
3)mysql和nginx可以rpm安装,如需编译安装可参考:
nginx编译安装
mysql编译安装
3、部署步骤
1、获取安装包(以zabbix4.4版本为例):
阿里源地址:https://mirrors.aliyun.com/zabbix/zabbix/4.4/rhel/7/x86_64/
zabbix-agent-4.4.6-1.el7.x86_64.rpm
zabbix-get-4.4.6-1.el7.x86_64.rpm
zabbix-java-gateway-4.4.6-1.el7.x86_64.rpm
zabbix-js-4.4.6-1.el7.x86_64.rpm
zabbix-nginx-conf-4.4.6-1.el7.noarch.rpm
zabbix-proxy-mysql-4.4.6-1.el7.x86_64.rpm
zabbix-release-4.4-1.el7.noarch.rpm
zabbix-sender-4.4.6-1.el7.x86_64.rpm
zabbix-server-mysql-4.4.6-1.el7.x86_64.rpm
zabbix-web-4.4.6-1.el7.noarch.rpm
zabbix-web-japanese-4.4.6-1.el7.noarch.rpm
zabbix-web-mysql-4.4.6-1.el7.noarch.rpm
2、先安装依赖
yum install epel-release -y
rpm -ivh zabbix-release-4.4-1.el7.noarch.rpm
3、安装
yum install zabbix-* -y
4、将zabbix-agent传到agent端,在agent端安装、配置、启动服务
scp zabbix-agent-4.4.6-1.el7.x86_64.rpm [email protected]:~
rpm -ivh zabbix-agent-4.4.6-1.el7.x86_64.rpm
service zabbix-agent start
进入 /etc/zabbix/zabbix_agentd.conf中把Server和ServerActive都改成server端的IP地址(命令行模式使用/Server可以快速查询)
vi /etc/zabbix/zabbix_agentd.conf
Server = 192.168.1.131
ServerActive = 192.168.1.131
重启agent服务
service zabbix-agent restart
5、回到server端,配置mysql和nignx
登录数据库并创建基本zabbix库:
create database zabbix character set utf8 collate utf8_bin;
授权用户‘zabbix’对zabbix库的权限:
grant all privileges on zabbix.* to zabbix@localhost identified by 'zabbix123';
将mysql数据导入到zabbix库中
cd /usr/share/doc/zabbix-server-mysql
gunzip create.sql.gz
mysql -uzabbix -p'zabbix123' zabbix < create.sql
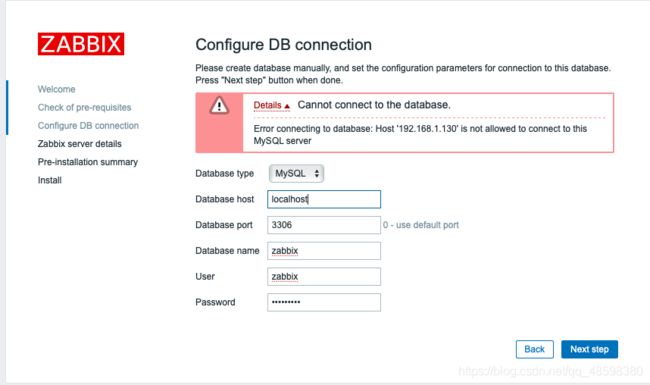
启动zabbix进程并编辑数据库配置
vim /etc/zabbix/zabbix_server.conf
DBHost=localhost
DBName=zabbix
DBUser=zabbix
DBPassword=zabbix123
启动zabbix-server服务
service zabbix-server start
配置并启动php-fpm服务
修改时区:/etc/php-fpm.d/zabbix.conf下 时区改成亚洲上海
vim /etc/php-fpm.d/zabbix.conf
php_value[date.timezone] = Asia/Shanghai
service php-fpm start
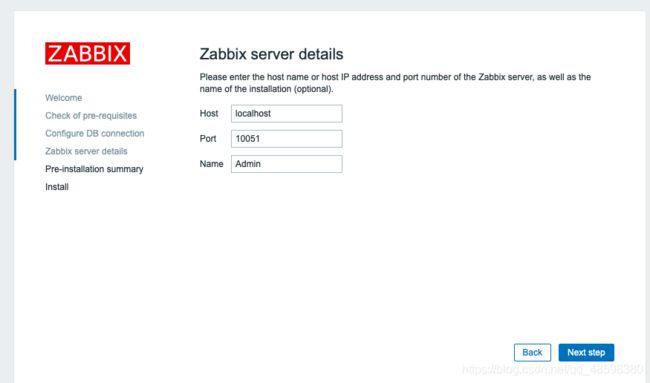
6、测试连通性(注意IP)
[root@localhost zabbix]# zabbix_get -s 192.168.1.131 -p 10050 -k "system.cpu.load[all,avg1]"
zabbix_get [18402]: Check access restrictions in Zabbix agent configuration
7、web界面配置
给机器设置域名解析
1)方法一:如果是windows:
修改Windows里的hosts文件的dns解析纪录:C:\windows\System32\drivers\etc\hosts,添加server端IP地址和虚拟主机名。
2)方法二:如果是macOS:
终端修改/etc/hosts,添加:
192.168.1.130 zabbix
3)方法三:比较智障但好用的方法:把zabbix文件整个复制到nginx默认访问的html页面
cp -r /usr/share/zabbix /usr/share/nginx
8、访问web:
浏览器输入:
http://zabbix
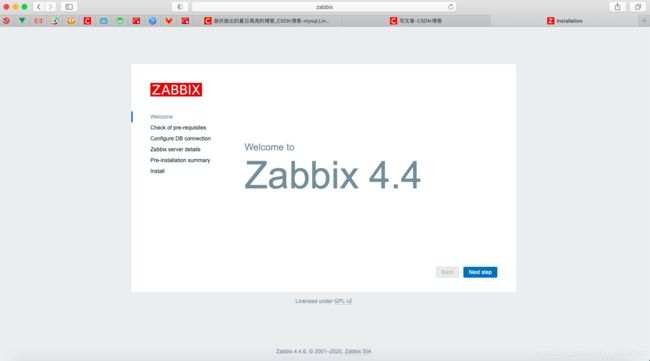
成功访问!
密码为设定的zabbix123
恭喜安装成功

密码为zabbix
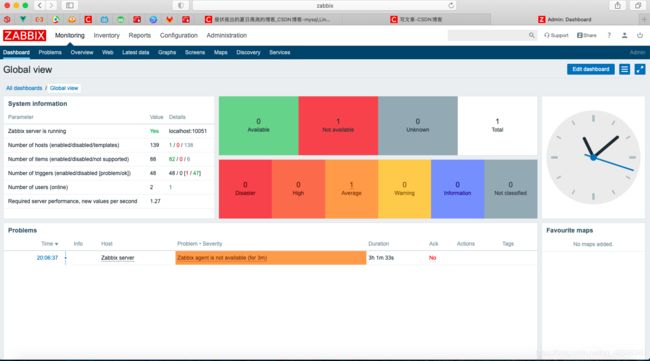
访问到这个页面就成功啦!祝你安装顺利,一遍过。