tensorflow2实现手写体数字识别
我已将整套代码及数据集打包上传,需要自取。
链接: tf2实现手写体数字识别
一、实验内容
实验内容:
利用tensorflow和python进行手写数字识别。
实验目的:
学习tensorflow和python
所用算法:
1.利用opencv进行图片提取
2.利用卷积神经网络进行训练
3.利用opencv生成的图片以及训练好的模型进行预测
算法原理:
典型的 CNN 由3个部分构成:
1.卷积层
2.池化层
3.全连接层
如果简单来描述的话:
卷积层负责提取图像中的局部特征;池化层用来大幅降低参数量级(降维);
全连接层类似传统神经网络的部分,用来输出想要的结果。
二、实验设计
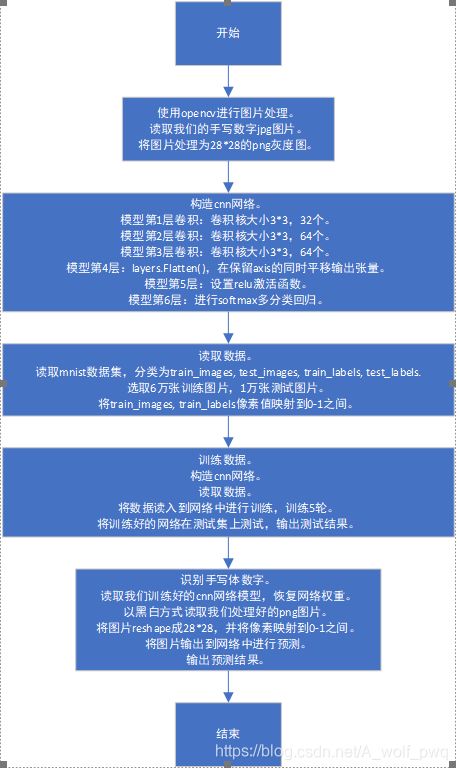
模型分为三大部分:
1.图片处理
将我们的手写体图片处理为可以供网络预测的28*28的png格式的灰度图。
2.网络构建
构建cnn网络,并学习mnist数据集。
3.图片识别
将我们的png图片输入到学习好的网络中进行预测。
三、详细实验过程
四、实验结果
程序运行结果。
1.图片处理
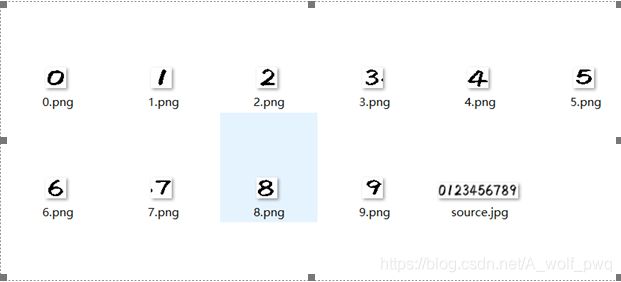
我们手写体数字为source.jpg,经过图片处理后,我们把手写体图片中的数字分别保存为28*28的png灰度图。
2.网络构建
读入训练集6万张图片到网络中,利用梯度下降法进行网络的训练。最终在测试集1万张图片上进行测试,准确率达99.18%,我们的网络可用。
3.图片识别
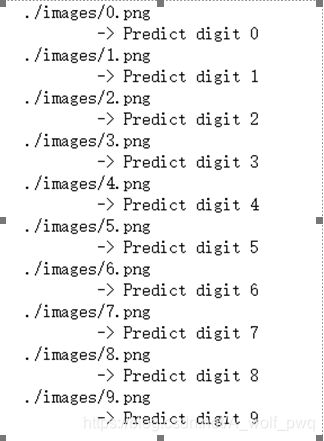
将第一部分处理的手写体图片读入到网络中来,继续预测,得到的准确率为100%。
五、实验心得体会
在实验的一开始,参考了tensorflow1的教程,其中许多语法已经废弃不用不说,最后的模型预测结果也不是特别好。
也就是说,虽然在测试集上已经有较高的准确识别率,但是当真正识别自己的手写体图片时,准确率只能达到70%,数字6、8和9始终不能很好的识别。
所以我果断放弃了已经写好的第一版模型,开始学习tensorflow2,并构建了一个更好的卷积神经网络模型。
这个模型能够在测试集上得到更好的结果,并且最终识别自己的手写体图片时准确率达100%。
代码:
1.opencv.py
import cv2
from PIL import Image
import numpy as np

global img
global point1, point2
global flag
def on_mouse(event, x, y, flags, param):
    global img, point1, point2, flag
    img2 = img.copy()
    if event == cv2.EVENT_LBUTTONDOWN:         #左键点击
        point1 = (x,y)
        cv2.circle(img2, point1, 10, (0,255,0), 5)
        cv2.imshow('image', img2)
    elif event == cv2.EVENT_MOUSEMOVE and (flags & cv2.EVENT_FLAG_LBUTTON):   #按住左键拖曳
        cv2.rectangle(img2, point1, (x,y), (255,0,0), 5) # 图像,矩形顶点,相对顶点,颜色,粗细
        cv2.imshow('image', img2)
    elif event == cv2.EVENT_LBUTTONUP:         #左键释放
        point2 = (x,y)
        cv2.rectangle(img2, point1, point2, (0,0,255), 5)
        cv2.imshow('image', img2)
        min_x = min(point1[0], point2[0])
        min_y = min(point1[1], point2[1])
        width = abs(point1[0] - point2[0])
        height = abs(point1[1] -point2[1])
        cut_img = img[min_y:min_y+height, min_x:min_x+width]
        resize_img = cv2.resize(cut_img, (28,28)) # 调整图像尺寸为28*28
        ret, thresh_img = cv2.threshold(resize_img,127,255,cv2.THRESH_BINARY) # 二值化
        cv2.imshow('result', thresh_img)
#         cv2.imwrite('./images/number.png', thresh_img)  # 预处理后图像保存位置
        cv2.imwrite('./images/' + str(flag) + '.png', thresh_img)  # 预处理后图像保存位置

def func(i):
    global img
    global flag
    flag = i
    img = cv2.imread('./images/source.jpg')  # 手写数字图像所在位置
    img = cv2.cvtColor(img, cv2.COLOR_BGR2GRAY) # 转换图像为单通道(灰度图)
    cv2.namedWindow('image')
    cv2.setMouseCallback('image', on_mouse) # 调用回调函数
    cv2.imshow('image', img)
    cv2.waitKey(0)


if __name__ == '__main__':
    for i in range(10):
        func(i)
2.code.py
import os
import tensorflow as tf
from tensorflow.keras import datasets, layers, models

class CNN(object):
    def __init__(self):
        model = models.Sequential()
        # 第1层卷积,卷积核大小为3*3,32个,28*28为待训练图片的大小
        model.add(layers.Conv2D(32, (3, 3), activation='relu', input_shape=(28, 28, 1)))
        model.add(layers.MaxPooling2D((2, 2)))
        # 第2层卷积,卷积核大小为3*3,64个
        model.add(layers.Conv2D(64, (3, 3), activation='relu'))
        model.add(layers.MaxPooling2D((2, 2)))
        # 第3层卷积,卷积核大小为3*3,64个
        model.add(layers.Conv2D(64, (3, 3), activation='relu'))

        model.add(layers.Flatten())
        model.add(layers.Dense(64, activation='relu'))
        model.add(layers.Dense(10, activation='softmax'))

#         model.summary()

        self.model = model

class DataSource(object):
    def __init__(self):
        # mnist数据集存储的位置,如何不存在将自动下载
#         data_path = os.path.abspath(os.path.dirname(__file__)) + '/../data_set_tf2/mnist.npz'
        (train_images, train_labels), (test_images, test_labels) = datasets.mnist.load_data(path='D:/大三上/人工智能/code_tf2_手写体识别/mnist.npz')
        # 6万张训练图片,1万张测试图片
        train_images = train_images.reshape((60000, 28, 28, 1))
        test_images = test_images.reshape((10000, 28, 28, 1))
        # 像素值映射到 0 - 1 之间
        train_images, test_images = train_images / 255.0, test_images / 255.0

        self.train_images, self.train_labels = train_images, train_labels
        self.test_images, self.test_labels = test_images, test_labels

class Train:
    def __init__(self):
        self.cnn = CNN()
        self.data = DataSource()

    def train(self):
        check_path = './ckpt/cp-{epoch:04d}.ckpt'
        # period 每隔5epoch保存一次
        save_model_cb = tf.keras.callbacks.ModelCheckpoint(check_path, save_weights_only=True, verbose=1, period=5)

        self.cnn.model.compile(optimizer='adam',
                               loss='sparse_categorical_crossentropy',
                               metrics=['accuracy'])
        self.cnn.model.fit(self.data.train_images, self.data.train_labels, epochs=5, callbacks=[save_model_cb])

        test_loss, test_acc = self.cnn.model.evaluate(self.data.test_images, self.data.test_labels)
        print("准确率: %.4f,共测试了%d张图片 " % (test_acc, len(self.data.test_labels)))

if __name__ == "__main__":
    app = Train()
app.train()

import tensorflow as tf
from PIL import Image
import numpy as np

class Predict(object):
    def __init__(self):
        latest = tf.train.latest_checkpoint('./ckpt')
        self.cnn = CNN()
        # 恢复网络权重
        self.cnn.model.load_weights(latest)

    def predict(self, image_path):
        # 以黑白方式读取图片
        img = Image.open(image_path).convert('L')
        img = np.reshape(img, (28, 28, 1)) / 255.
        x = np.array([1 - img])

        # API refer: https://keras.io/models/model/
        y = self.cnn.model.predict(x)

        # 因为x只传入了一张图片,取y[0]即可
        # np.argmax()取得最大值的下标,即代表的数字
        print(image_path)
#         print(y[0])
        print('        -> Predict digit', np.argmax(y[0]))

if __name__ == "__main__":
    app = Predict()
    for i in range(10):
        app.predict('./images/'+ str(i) + '.png')
参考
- 利用TensorFlow手写数字识别(MNIST)
- TensorFlow下利用MNIST训练模型识别手写数字
- TensorFlow下利用MNIST训练模型并识别自己手写的数字
- 利用TensorFlow手写数字识别(MNIST)
- TensorFlow 2.0 (五) - mnist手写数字识别(CNN卷积神经网络)
- 保存和恢复模型


