Intel Realsense D435 Post-processing filters 后处理过滤器(用于消除图像的黑洞)
官方链接:Post-processing filters
文章目录
-
-
- 后处理过滤器
-
- 筛选器说明
-
- 抽取滤波器(抽取过滤器)Decimation Filter
- 空间边缘保留滤镜 Spatial Filter
- 时间过滤器
- 孔填充过滤器
- 设计与实施
- 在应用程序代码中使用过滤器
-
- C:
- C++:
- python
-
- 抽取过滤器 Decimation Filter
- 空间过滤器 Spatial Filter
- 时间过滤器 Temporal Filter
- 孔填充过滤器 Hole Filling filter
- 将所有过滤器一起运用 Putting Everything Together
-
后处理过滤器
筛选器说明
Librealsense实施包括后处理过滤器,以提高深度数据的质量并降低噪声水平。所有过滤器都在库核心中实现为要在客户代码中使用的独立块
抽取滤波器(抽取过滤器)Decimation Filter
有效降低景深场景的复杂度。
滤镜在[2x2]到[8x8]像素大小的内核上运行。对于大小为2和3的面片,选择深度中值。对于较大的内核(4-8像素),出于性能方面的考虑,使用了平均深度。
图像尺寸在两个维度上均按比例缩小,以保持宽高比。
在内部,过滤器对输出帧大小的宽度和高度强加4像素块对齐。例如,对于输入大小(1280X720)和比例因子3,输出大小计算为:
[1280,720] / 3 - > [ 426.6666667,240] - > [ 428,240]
*将被轧染的行/列是零填充。
生成结果帧后,将重新计算帧固有参数以补偿分辨率的变化。
该滤镜还提供了一些填充孔的能力,因为该滤镜仅使用有效(非零)像素。
| 控制项 | 运作方式 | 范围 | 默认 |
|---|---|---|---|
| 过滤幅度 | 抽取线性比例因子 | 离散步长在[2-8]范围内 | 2 |
空间边缘保留滤镜 Spatial Filter
*实现基于纸张由爱德华SL Gastal和Manuel M.奥利维拉。
主要特点:
- 使用高阶域变换的一维保留边缘空间滤波器。
- 线性时间计算,不受参数选择的影响。
滤波器执行一系列一维水平和垂直遍历或迭代,以增强重建数据的平滑度。
| 控制项 | 运作方式 | 范围 | 默认 |
|---|---|---|---|
| 过滤幅度 | 过滤器迭代次数 | [1-5] | 2 |
| 平滑阿尔法 | 具有Alpha = 1-无滤波器的指数移动平均数中的Alpha因子。Alpha = 0-无限过滤器 | [0.25-1] | 0.5 |
| 平滑三角洲 | 步长边界。确定用于保留“边缘”的阈值 | 离散[1-50] | 20 |
| 孔填充 | 在过滤器通过期间水平应用就地启发式对称孔填充模式。旨在纠正对最小伪影的影响最小 | [0-5]范围映射到[none,2,4,8,16,unlimited]像素。 | 0(无) |
时间过滤器
时间滤波器旨在通过基于先前帧操纵每个像素值来改善深度数据的持久性。
过滤器对数据执行一次通过,调整深度值,同时更新跟踪历史记录。如果像素数据丢失或无效,则过滤器使用用户定义的持久性模式来决定是否应使用存储的数据纠正丢失的值。
请注意,由于过滤器依赖于历史数据,因此可能会引入可见的模糊/拖影伪像,因此最适合静态场景。
| 控制项 | 运作方式 | 范围 | 默认 |
|---|---|---|---|
| 平滑阿尔法 | 具有Alpha = 1-无滤波器的指数移动平均数中的Alpha因子。Alpha = 0-无限过滤器 | [0-1] | 0.4 |
| 平滑三角洲 | 步长边界。建立用于保留表面(边缘)的阈值 | 离散[1-100] | 20 |
| 持久指数 | 一组用于控制何时丢失像素的预定义规则(掩码)将被最后一个有效值替换,以使数据随着时间的流逝而保持不变:禁用 -持久性过滤器未激活且未发生孔填充。在8/8中有效 -如果像素在最后8帧中的8个有效,则激活持久性;在2 /最近3时有效-如果像素在最近3帧中的2个有效,则激活。在2 /最后4有效 -激活如果像素在最近4帧中的两个像素中有效,则在2/8中有效 -如果像素在最近8帧中的两个像素中有效,则在1 / last 2中有效-如果像素在其中一个有效,则激活最后两帧在1 /最后5有效-如果像素在最近5帧中的一个有效,则激活- 在1 /最近8帧中有效 -如果像素在最后8帧的其中一个有效,则激活-无限期持久-无论存储的历史记录如何,都将施加持久性(大多数主动过滤) | [0-8]枚举 | 3(在2 /后4有效) |
孔填充过滤器
该过滤器实现了几种方法来纠正结果图像中的缺失数据。
过滤器获取四个立即像素“邻居”(上,下,左,右),并根据用户定义的规则选择其中之一。
| 控制项 | 运作方式 | 范围 | 默认 |
|---|---|---|---|
| 孔填充 | 控制将用于填充无效像素的数据 | [0-2]枚举:fill_from_left-使用左侧相邻像素的值填充孔 farest_from_around-使用距传感器最远的邻近像素的值 near_from_around–使用距像素最近的邻近像素的值传感器 | 1(最远的地方) |
设计与实施
后处理模块被封装到独立的处理模块中,这些模块满足以下关键要求:
1、同步/异步调用
2、内部框架内存/生命周期管理
过滤器能够接收和处理来自不同来源的帧,尽管在一般情况下由于以下原因它不实用:
- 每次识别到帧的新类型/来源时,都会产生性能开销,某些过滤器需要重新初始化。
- 时间过滤器的有效性取决于要保留的帧历史。切换帧源会使保留的历史记录无效并使过滤器无法工作。
因此,强烈建议为每个摄像机源建立和维护过滤管。
过滤器保留原始数据,并始终生成新的(过滤的)帧以继续传递。新帧的重新生成允许在不同使用者(线程)之间共享帧,而不会存在数据被另一个用户覆盖的风险。
所有过滤器都支持谨慎的以及浮点输入数据格式。
浮点输入由支持Disparity数据表示的基于D400立体声的Depth摄像机使用。
谨慎版本的滤镜主要用于SR300相机,但也
可以应用于D400设备(尽管不推荐)
在应用程序代码中使用过滤器
设计并构建了后处理块,以将其串联到处理管道中。
没有施加软件的约束来强制应用过滤器的顺序。
同时,下面详细介绍了在librealsense工具和演示中使用的推荐方案:
深度帧 >> 抽取滤波器 >> Depth2Disparity变换** -> 空间滤波器 >> 时间滤波器 >> Disparity2Depth 变换** >> 孔填充滤波器 >> 过滤深度。
**适用于基于立体声的深度相机(D4XX)。
请注意,即使演示中的过滤器顺序是预定义的,每个过滤器也可以单独控制,并且可以在运行时打开/关闭。
嵌入了后处理代码块的演示和工具:
1、实感查看器
2、深度质量工具
3、后处理演示
过滤初始化和激活流程:
使用CAPI调用:
C:
// Establishing a frame_queue object for each processing block that will receive the processed frames
rs2_frame_queue* decimated_queue = rs2_create_frame_queue(1, NULL);
rs2_frame_queue* spatial_queue = rs2_create_frame_queue(1, NULL);
...
// Creating processing blocks/ filters
rs2_processing_block* decimation_filter = rs2_create_decimation_filter_block(NULL);
rs2_processing_block* spatial_filter = rs2_create_spatial_filter_block(NULL);
...

// Direct the output of the filters to a dedicated queue
rs2_start_processing_queue(decimation_filter, decimated_queue, NULL);
rs2_start_processing_queue(spatial_filter, spatial_queue, NULL);
...
// Get depth frame from the device
rs2_frame* depth_frame = ...

// Apply decimation filter
rs2_process_frame(decimation_filter, depth_frame, NULL);
rs2_frame* decimated_frame = rs2_wait_for_frame(decimated_queue, 5000, NULL);
// Inject the decimated frame to spatial filter
rs2_process_frame(spatial_filter, decimated_frame, NULL);
// Get the filtered frame
rs2_frame* spatial_filter_frame = rs2_wait_for_frame(spatial_queue, 5000, NULL);
// Use the filtered data
...

// Control filter options
rs2_set_option((rs2_options*)decimation_filter, RS2_OPTION_FILTER_MAGNITUDE, 3, NULL);
rs2_set_option((rs2_options*)spatial_filter, RS2_OPTION_FILTER_SMOOTH_ALPHA, 0.5f, NULL);
C++:
    // Streaming initialization
    rs2::pipeline pipe;
    ...
    // Declare filters
    rs2::decimation_filter dec_filter;
    rs2::spatial_filter spat_filter;

    // Configure filter parameters
    decimation_filter.set_option(RS2_OPTION_FILTER_MAGNITUDE, 3);
    ...
    spatial_filter.set_option(RS2_OPTION_FILTER_SMOOTH_ALPHA, 0.55f);
    ...


    // Main Loop
    while (true) {

       rs2::frameset data = pipe.wait_for_frames();
       rs2::frame depth_frame = data.get_depth_frame();
       ...
       rs2::frame filtered = depth_frame;
       // Note the concatenation of output/input frame to build up a chain
       filtered = dec_filter.process(filtered);
       filtered = spatial_filter.process(filtered);

    }
python
参考连接:librealsense/notebooks/depth_filters.ipynb
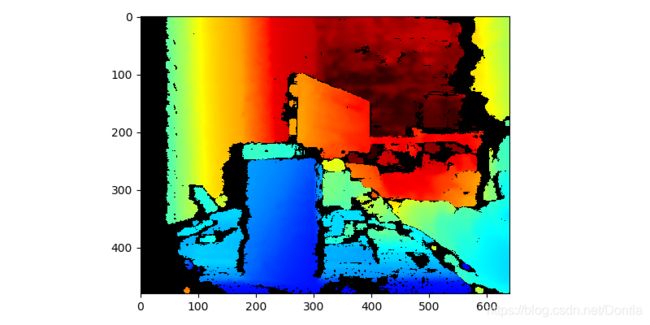
原图:

抽取过滤器 Decimation Filter
# -*- coding: utf-8 -*-
"""
@File : test_测试深度过滤器_depth_filters.py
@Time : 2019/12/17 11:29
@Author : Dontla
@Email : [email protected]
@Software: PyCharm
"""
import numpy as np # fundamental package for scientific computing 科学计算的基本软件包
import matplotlib.pyplot as plt # 2D plotting library producing publication quality figures 2D绘图库产生出版物质量数据
import pyrealsense2 as rs # Intel RealSense cross-platform open-source API 英特尔实感跨平台开源API
print("Environment Ready")
# 【Setup: 配置】
pipe = rs.pipeline()
cfg = rs.config()
# cfg.enable_device_from_file("stairs.bag")
cfg.enable_device('838212073161')
cfg.enable_stream(rs.stream.depth, 640, 480, rs.format.z16, 30)
cfg.enable_stream(rs.stream.color, 640, 480, rs.format.bgr8, 30)
profile = pipe.start(cfg)
# 【Skip 5 first frames to give the Auto-Exposure time to adjust 跳过前5帧以设置自动曝光时间】
for x in range(5):
pipe.wait_for_frames()
# 【Store next frameset for later processing: 存储下一个框架集以供以后处理:】
frameset = pipe.wait_for_frames()
depth_frame = frameset.get_depth_frame()
# 【Cleanup: 清理:】
pipe.stop()
print("Frames Captured")
# 【计算深度图数据中的0值】
num = 0
all = 0
for i in np.asanyarray(depth_frame.get_data()).ravel():
all += 1
if i == 0:
num += 1
print('depth_frame分辨率:{}'.format(np.asanyarray(depth_frame.get_data()).shape))
print('depth_frame:{}'.format(num))
print('depth_frame:{}'.format(num / all))
# depth_frame分辨率:(480, 640)
# depth_frame:49892
# depth_frame:0.16240885416666667
# 【Visualising the Data 可视化数据】
# 创建着色器(其实这个可以替代opencv的convertScaleAbs()和applyColorMap()函数了,但是是在多少米范围内map呢?)
colorizer = rs.colorizer()
# 绘图不显示网格
plt.rcParams["axes.grid"] = False
# 图形尺寸,单位英尺
plt.rcParams['figure.figsize'] = [8, 4]
# 【Applying Filters 应用过滤器】
# [1、抽取过滤器]
# 抽取
# 使用立体深度解决方案时,z精度与原始空间分辨率有关。
# 如果您对较低的空间分辨率感到满意,则“抽取滤波器”将降低空间分辨率,以保持z精度并执行一些基本的孔填充。
# 创建抽取过滤器
decimation = rs.decimation_filter()
# decimated_depth = decimation.process(depth_frame)
# print(type(decimation)) # 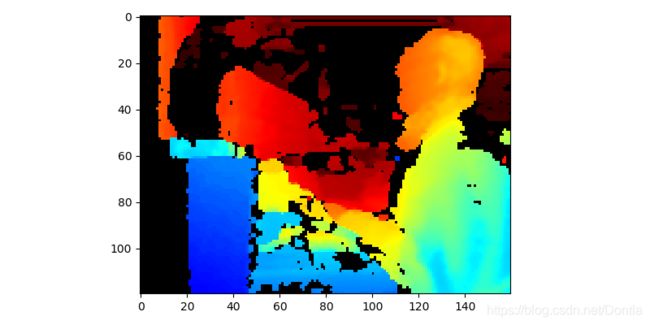
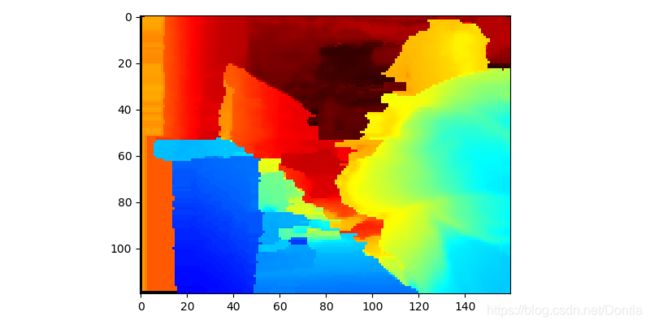
空间过滤器 Spatial Filter
# -*- coding: utf-8 -*-
"""
@File    : test_测试深度过滤器_depth_filters.py
@Time    : 2019/12/17 11:29
@Author  : Dontla
@Email   : [email protected]
@Software: PyCharm
"""

import numpy as np  # fundamental package for scientific computing 科学计算的基本软件包
import matplotlib.pyplot as plt  # 2D plotting library producing publication quality figures 2D绘图库产生出版物质量数据
import pyrealsense2 as rs  # Intel RealSense cross-platform open-source API 英特尔实感跨平台开源API

print("Environment Ready")

# 【Setup: 配置】
pipe = rs.pipeline()
cfg = rs.config()
# cfg.enable_device_from_file("stairs.bag")
cfg.enable_device('838212073161')
cfg.enable_stream(rs.stream.depth, 640, 480, rs.format.z16, 30)
cfg.enable_stream(rs.stream.color, 640, 480, rs.format.bgr8, 30)
profile = pipe.start(cfg)

# 【Skip 5 first frames to give the Auto-Exposure time to adjust 跳过前5帧以设置自动曝光时间】
for x in range(5):
    pipe.wait_for_frames()

# 【Store next frameset for later processing: 存储下一个框架集以供以后处理:】
frameset = pipe.wait_for_frames()
depth_frame = frameset.get_depth_frame()

# 【Cleanup: 清理:】
pipe.stop()
print("Frames Captured")

# 【计算深度图数据中的0值】
num = 0
all = 0
for i in np.asanyarray(depth_frame.get_data()).ravel():
    all += 1
    if i == 0:
        num += 1
print('depth_frame分辨率:{}'.format(np.asanyarray(depth_frame.get_data()).shape))
print('depth_frame:{}'.format(num))
print('depth_frame:{}'.format(num / all))
# depth_frame分辨率:(480, 640)
# depth_frame:127369
# depth_frame:0.41461263020833333

# 【Visualising the Data 可视化数据】
# 创建着色器(其实这个可以替代opencv的convertScaleAbs()和applyColorMap()函数了,但是是在多少米范围内map呢?)
colorizer = rs.colorizer()
# colorized_depth = np.asanyarray(colorizer.colorize(depth_frame).get_data())
# print(colorized_depth.shape)  # (480, 640, 3)
# cv2.imshow('win', colorized_depth)
# cv2.waitKey(0)

# 绘图不显示网格
plt.rcParams["axes.grid"] = False
# 图形尺寸,单位英尺
plt.rcParams['figure.figsize'] = [8, 4]
# plt.imshow(colorized_depth)

# 【Applying Filters 应用过滤器】
# [2、空间过滤器]
# Spatial Filter
# Spatial Filter is a fast implementation of Domain-Transform Edge Preserving Smoothing
# 空间滤波器是域转换边缘保留平滑的快速实现
spatial = rs.spatial_filter()
# filtered_depth = spatial.process(depth_frame)

# We can emphesize the effect of the filter by cranking-up smooth_alpha and smooth_delta options:
# 我们可以通过增加smooth_alpha和smooth_delta选项来强调滤镜的效果:
spatial.set_option(rs.option.filter_magnitude, 5)
spatial.set_option(rs.option.filter_smooth_alpha, 1)
spatial.set_option(rs.option.filter_smooth_delta, 50)

# The filter also offers some basic spatial hole filling capabilities:
# 该过滤器还提供一些基本的空间孔填充功能:
spatial.set_option(rs.option.holes_fill, 3)

filtered_depth = spatial.process(depth_frame)
colorized_depth = np.asanyarray(colorizer.colorize(filtered_depth).get_data())
plt.imshow(colorized_depth)
plt.show()

# 【计算深度图数据中的0值】
num = 0
all = 0
for i in np.asanyarray(filtered_depth.get_data()).ravel():
    all += 1
    if i == 0:
        num += 1
print('filtered_depth分辨率:{}'.format(np.asanyarray(filtered_depth.get_data()).shape))
print('filtered_depth:{}'.format(num))
print('filtered_depth:{}'.format(num / all))
# filtered_depth分辨率:(480, 640)
# filtered_depth:29913
# filtered_depth:0.097373046875
时间过滤器 Temporal Filter
# -*- coding: utf-8 -*-
"""
@File    : test_191218_测试时间过滤器_Temporal_Filter.py
@Time    : 2019/12/18 10:59
@Author  : Dontla
@Email   : [email protected]
@Software: PyCharm
"""
import numpy as np  # fundamental package for scientific computing 科学计算的基本软件包
import matplotlib.pyplot as plt  # 2D plotting library producing publication quality figures 2D绘图库产生出版物质量数据
import pyrealsense2 as rs  # Intel RealSense cross-platform open-source API 英特尔实感跨平台开源API

print("Environment Ready")

# 【Setup: 配置】
pipe = rs.pipeline()
cfg = rs.config()
# cfg.enable_device_from_file("stairs.bag")
cfg.enable_device('838212073161')
cfg.enable_stream(rs.stream.depth, 640, 480, rs.format.z16, 30)
cfg.enable_stream(rs.stream.color, 640, 480, rs.format.bgr8, 30)
profile = pipe.start(cfg)

# 【Skip 5 first frames to give the Auto-Exposure time to adjust 跳过前5帧以设置自动曝光时间】
for x in range(5):
    pipe.wait_for_frames()

# Our implementation of Temporal Filter does basic temporal smoothing and hole-filling.
# It is meaningless when applied to a single frame, so let's capture several consecutive frames:
# 我们的“时间过滤器”实现执行基本的时间平滑和孔填充。 当应用于单个帧时它是没有意义的,因此让我们捕获几个连续的帧:
frames = []
for x in range(10):
    frameset = pipe.wait_for_frames()
    frames.append(frameset.get_depth_frame())

pipe.stop()
print("Frames Captured")

# 【Visualising the Data 可视化数据】
# 创建着色器(其实这个可以替代opencv的convertScaleAbs()和applyColorMap()函数了,但是是在多少米范围内map呢?)
colorizer = rs.colorizer()
# colorized_depth = np.asanyarray(colorizer.colorize(depth_frame).get_data())
# print(colorized_depth.shape)  # (480, 640, 3)
# cv2.imshow('win', colorized_depth)
# cv2.waitKey(0)

# 绘图不显示网格
plt.rcParams["axes.grid"] = False
# 图形尺寸,单位英尺
plt.rcParams['figure.figsize'] = [8, 4]
# plt.imshow(colorized_depth)

# Next, we need to "feed" the frames to the filter one by one:
# 接下来,我们需要将帧逐一“馈入”到过滤器:
temporal = rs.temporal_filter()
for x in range(10):
    temp_filtered = temporal.process(frames[x])
    colorized_depth = np.asanyarray(colorizer.colorize(temp_filtered).get_data())
    plt.imshow(colorized_depth)
    plt.show()
# 您可以修改过滤器选项以微调结果(任何时间过滤都需要在平滑和运动之间进行权衡)
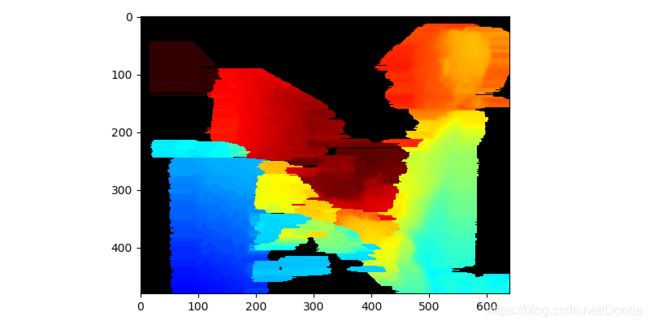
孔填充过滤器 Hole Filling filter
# -*- coding: utf-8 -*-
"""
@File    : test_191218_测试孔填充过滤器.py
@Time    : 2019/12/18 13:32
@Author  : Dontla
@Email   : [email protected]
@Software: PyCharm
"""
import numpy as np  # fundamental package for scientific computing 科学计算的基本软件包
import matplotlib.pyplot as plt  # 2D plotting library producing publication quality figures 2D绘图库产生出版物质量数据
import pyrealsense2 as rs  # Intel RealSense cross-platform open-source API 英特尔实感跨平台开源API

print("Environment Ready")

# 【Setup: 配置】
pipe = rs.pipeline()
cfg = rs.config()
# cfg.enable_device_from_file("stairs.bag")
cfg.enable_device('838212073161')
cfg.enable_stream(rs.stream.depth, 640, 480, rs.format.z16, 30)
cfg.enable_stream(rs.stream.color, 640, 480, rs.format.bgr8, 30)
profile = pipe.start(cfg)

# 【Skip 5 first frames to give the Auto-Exposure time to adjust 跳过前5帧以设置自动曝光时间】
for x in range(5):
    pipe.wait_for_frames()

# 【Store next frameset for later processing: 存储下一个框架集以供以后处理:】
frameset = pipe.wait_for_frames()
depth_frame = frameset.get_depth_frame()

# 【Cleanup: 清理:】
pipe.stop()
print("Frames Captured")

# 【Visualising the Data 可视化数据】
# 创建着色器(其实这个可以替代opencv的convertScaleAbs()和applyColorMap()函数了,但是是在多少米范围内map呢?)
colorizer = rs.colorizer()
# colorized_depth = np.asanyarray(colorizer.colorize(depth_frame).get_data())
# print(colorized_depth.shape)  # (480, 640, 3)
# cv2.imshow('win', colorized_depth)
# cv2.waitKey(0)
# 绘图不显示网格
plt.rcParams["axes.grid"] = False
# 图形尺寸,单位英尺
plt.rcParams['figure.figsize'] = [8, 4]
# plt.imshow(colorized_depth)

# 孔填充过滤器提供了附加的深度外推层:
hole_filling = rs.hole_filling_filter()
filled_depth = hole_filling.process(depth_frame)
colorized_depth = np.asanyarray(colorizer.colorize(filled_depth).get_data())
plt.imshow(colorized_depth)
plt.show()


将所有过滤器一起运用 Putting Everything Together
# -*- coding: utf-8 -*-
"""
@File : test_191219_测试合并所有过滤器_PuttingEverythingTogether.py
@Time : 2019/12/19 11:34
@Author : Dontla
@Email : [email protected]
@Software: PyCharm
"""
# 依次顺序应用这些过滤器时效果最佳。
# 在更长的范围内,它还有助于使用disparity_transform从深度表示转换为视差形式:
import numpy as np # fundamental package for scientific computing 科学计算的基本软件包
import matplotlib.pyplot as plt # 2D plotting library producing publication quality figures 2D绘图库产生出版物质量数据
import pyrealsense2 as rs # Intel RealSense cross-platform open-source API 英特尔实感跨平台开源API
print("Environment Ready")
# 【Setup: 配置】
pipe = rs.pipeline()
cfg = rs.config()
# cfg.enable_device_from_file("stairs.bag")
cfg.enable_device('838212073161')
cfg.enable_stream(rs.stream.depth, 640, 480, rs.format.z16, 30)
cfg.enable_stream(rs.stream.color, 640, 480, rs.format.bgr8, 30)
profile = pipe.start(cfg)
# 【Skip 5 first frames to give the Auto-Exposure time to adjust 跳过前5帧以设置自动曝光时间】
for x in range(5):
pipe.wait_for_frames()
frames = []
for x in range(10):
frameset = pipe.wait_for_frames()
frames.append(frameset.get_depth_frame())
# 【Cleanup: 清理:】
pipe.stop()
print("Frames Captured")
# 【Visualising the Data 可视化数据】
# 创建着色器(其实这个可以替代opencv的convertScaleAbs()和applyColorMap()函数了,但是是在多少米范围内map呢?)
colorizer = rs.colorizer()
# colorized_depth = np.asanyarray(colorizer.colorize(depth_frame).get_data())
# print(colorized_depth.shape) # (480, 640, 3)
# cv2.imshow('win', colorized_depth)
# cv2.waitKey(0)
# 绘图不显示网格
plt.rcParams["axes.grid"] = False
# 图形尺寸,单位英尺
plt.rcParams['figure.figsize'] = [8, 4]
# plt.imshow(colorized_depth)
depth_to_disparity = rs.disparity_transform(True)
disparity_to_depth = rs.disparity_transform(False)
# 创建抽取过滤器
decimation = rs.decimation_filter()
# decimated_depth = decimation.process(depth_frame)
# print(type(decimation)) # 结果: