综合练习day1
图片
创建一个目录,写一个docker-compose
1 | mkdir host
2 | cat docker-compose.yml
内容如下
version: '3.8'
services:
  h1:
    build: .
    image: centos7-sshd
    container_name: h1
    privileged: true
    command: /usr/sbin/init
    hostname: h1
    networks:
      xiuyun_net:

  tomcat1:
    build: .
    image: centos7-sshd
    container_name: tomcat1
    privileged: true
    hostname: tomcat1
    command: /usr/sbin/init
    networks:
      xiuyun_net:

  tomcat2:
    build: .
    image: centos7-sshd
    container_name: tomcat2
    hostname: tomcat2
    privileged: true
    command: /usr/sbin/init
    networks:
      xiuyun_net:

  mysql-master:
    build: .
    image: centos7-sshd
    container_name: mysql-master
    hostname: mysql-master
    privileged: true
    command: /usr/sbin/init
    networks:
      xiuyun_net:
  mysql-slave:
    build: .
    image: centos7-sshd
    container_name: mysql-slave
    hostname: mysql-slave
    privileged: true
    command: /usr/sbin/init
    networks:
      xiuyun_net:
  ansible:
    build: .
    image: centos7-sshd
    container_name: ansible
    hostname: ansible
    privileged: true
    command: /usr/sbin/init
    networks:
      xiuyun_net:

networks:
  xiuyun_net:
Dockerfile
1 | cat Dockerfile
FROM centos:7
RUN yum install -y \
    vim bash-com* openssh-clients openssh-server iproute cronie;\
    yum group install -y "Development Tools";yum clean all;\
    localedef -c -f UTF-8 -i zh_CN zh_CN.UTF-8 && \
    ln -sf /usr/share/zoneinfo/Asia/Shanghai /etc/localtime
ENV LANG=zh_CN.UTF-8
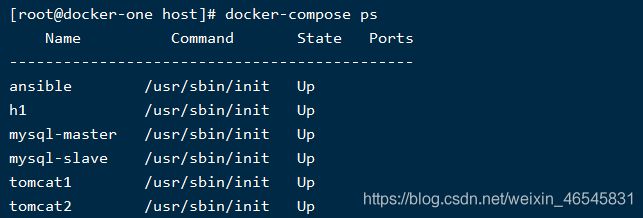
执行完上面的步骤,执行如下命令
1 | docker-compose up -d  #  启动进程
2 | docker-compose ps
实施步骤
1.安装ansible
1 | docker-compose exec ansible bash      #   进入ansible机器
2 | curl -o /etc/yum.repos.d/epel.repo http://mirrors.aliyun.com/repo/epel-7.repo # 下载epel源
3 | yum -y install ansible     #  安装ansible
与其他管理节点建立信任关系
不检查其他主机的公钥
在ansible主机上修改文件 vi /etc/ansible/ansible.cfg中设置如下选项

继续在ansible主机上执行如下命令,创建自己的密钥对
1 | ssh-keygen -N '' -f ~/.ssh/id_rsa
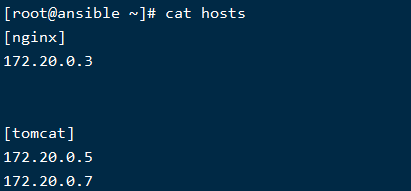
建立hosts资产清单文件
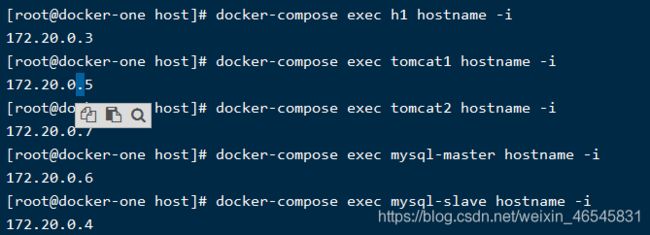
IP 信息可以通过在 宿主机 上执行如下命令获取

创建一个文件hosts
1 | vim hosts
给管理的机器设置 root 密码
由于这里是使用容器作为虚拟机的,所以默认情况下,root 用户没有密码,需要我们手动设置。
在宿主机上执行如下命令设置密码
1 | docker-compose exec 服务名称 bash -c 'echo 密码 | passwd root --stdin'
1 | docker-compose exec h1  bash -c 'echo 1 | passwd root --stdin'
2 | docker-compose exec tomcat1 bash -c 'echo 1 | passwd root --stdin'
3 | docker-compose exec tomcat2  bash -c 'echo 1 | passwd root --stdin'
4 | docker-compose exec mysql-master  bash -c 'echo 1 | passwd root --stdin'
5 | docker-compose exec mysql-slave bash -c 'echo 1| passwd root --stdin'
传输公钥
1 | mkdir playbook     #  创建目录
2 | cd playbook
3 | cat send-pubkey.yml
内容如下
---
- hosts: all
 gather_facts: no
  remote_user: root
  vars_files:
    - foo.yml
  tasks:
  - name: Set authorized key taken from file
    authorized_key:
      user: root
      state: present
      key: "{
     { lookup('file', '/root/.ssh/id_rsa.pub') }}"
...
1 | vim foo.yml
ansible_ssh_pass: 1
执行playbook
ansible-playbook -i hosts send-pubkey.yml
结果图


给另外一台机器安装nginx(在ansible机器上执行操作)
1 | mkdir nginx     #  创建目录
2 | vim nginx.repo
内容如下
[nginx-stable]
name=nginx stable repo
baseurl=http://nginx.org/packages/centos/$releasever/$basearch/
gpgcheck=1
enabled=1
gpgkey=https://nginx.org/keys/nginx_signing.key
module_hotfixes=true
3 | cat nginx/install-nginx.yml
内容如下
---
- hosts: nginx
  gather_facts: no
  tasks:
    - name: copy nginx 仓库文件
      copy:
       src: ./nginx.repo
       dest: /etc/yum.repos.d/nginx.repo

    - name: instll nginx
      yum:
        name: nginx
        state: present

    - name:  start nginx
      systemd:
         name: nginx
         state: started
执行playbook
1 | ansible-playbook -i hosts nginx/install-nginx.yml


