Android:Android开发首先要做的工作
Android学习之路:Android开发首先要做的工作
-
-
- 1. 构建脚本(提升android加载外网资源速度)
- 2. 编辑 1.8 java版本(提供更多使用方法)
- 3. 添加 butterknife 依赖(快速绑定组件)
- 4. 使用 butterknife
-
1. 构建脚本(提升android加载外网资源速度)
打开 android studio -->project build.gradle–>添加代码(两处都要)
maven{ url ‘http://maven.aliyun.com/nexus/content/groups/public/’}
repositories {

    maven{
      url 'http://maven.aliyun.com/nexus/content/groups/public/'}
    google()
    jcenter()

}
allprojects {
repositories {
maven{
url 'http://maven.aliyun.com/nexus/content/groups/public/'}
google()
jcenter()
}
}说明:添加此行代码,Android studio 在加载组件的时候会优先选择aliyun的镜像文件。没有添加的话,会访问默认的google、jcenter,速度会比较慢。
2. 编辑 1.8 java版本(提供更多使用方法)
打开 android studio -->module build.gradle–>添加代码
compileOptions {


    sourceCompatibility JavaVersion.VERSION_1_8
    targetCompatibility JavaVersion.VERSION_1_8

}
完整页面如下:
android {

    compileSdkVersion 30
    buildToolsVersion "30.0.0"
    defaultConfig {

        applicationId "com.example.luckydraw"
        minSdkVersion 15
        targetSdkVersion 30
        versionCode 1
        versionName "1.0"
        testInstrumentationRunner "androidx.test.runner.AndroidJUnitRunner"
    }
    buildTypes {

        release {

            minifyEnabled false
            proguardFiles getDefaultProguardFile('proguard-android-optimize.txt'), 'proguard-rules.pro'
        }
    }

    compileOptions {


        sourceCompatibility JavaVersion.VERSION_1_8
        targetCompatibility JavaVersion.VERSION_1_8

    }
}
3. 添加 butterknife 依赖(快速绑定组件)
第一步 ,在 module build.gradle 下添加butterknife 依赖,如下图
//注解
implementation 'com.jakewharton:butterknife:10.2.3'
annotationProcessor 'com.jakewharton:butterknife-compiler:10.2.1'
第二步 ,在 project build.gradle 下添加butterknife 依赖,如下图
//botterKnife
classpath ‘com.neenbedankt.gradle.plugins:android-apt:1.8’
buildscript {
repositories {
maven{
url 'http://maven.aliyun.com/nexus/content/groups/public/'}
google()
jcenter()
}
dependencies {
classpath 'com.android.tools.build:gradle:3.5.2'
//botterKnife
classpath 'com.neenbedankt.gradle.plugins:android-apt:1.8'
// NOTE: Do not place your application dependencies here; they belong
// in the individual module build.gradle files
}
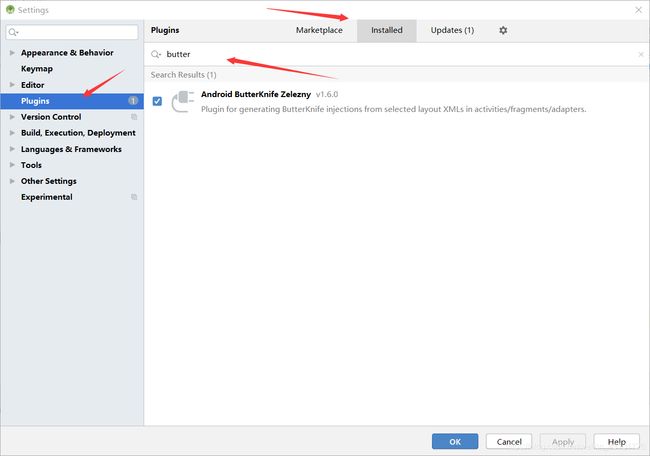
} 第三步 , 加载 butterknife 插件步骤:打开Android studio --> settings --> piugins --> 在 marketplace 搜索栏中搜索 butterknife --> install(我已经下好,所以在installed看 ♪ ( ^ ∇ ^ * ) )
第四步 , 重启 Android 。
注意:配置 butterknife 需要配合 目录2 一起才能正常使用,否则会出错。
4. 使用 butterknife
注意:请提前配置好插件,未配置可以看目录3配置
butterknife的使用非常简单
1).在 activity 中 添加
ButterKnife.bind(this);2).在 activity 文件中右击绑定的 xml 文件名 --> 点击generate --> 点击generate butterknife … --> 勾选控件绑定(也可以设置点击事件)
效果图:

@BindView(R.id.list_item)
ListView listItem;
@BindView(R.id.ed_num)
EditText edNum;
@BindView(R.id.bt_draw)
Button btDraw;
@BindView(R.id.bt_clear)
Button btClear;
@BindView(R.id.checkbox)
CheckBox checkbox;
@BindView(R.id.et_num2)
笔记,欢迎白嫖♪ ( ^ ∇ ^ * )