ambari在线安装偶数HAWQ
环境清单:
主机1: 内网: 192.168.6.165
主机2: 内网: 192.168.6.166
主机3: 内网: 192.168.6.167
系统配置清单:
| IP |
HOSTNAME |
CPU |
MEM |
DISK |
RELEASE |
| 192.168.6.165 |
ambari01 |
2核 |
4G |
50G |
CentOS Linux release 7.3.1611 (Core) |
| 192.168.6.166 |
ambari02 |
2核 |
4G |
50G |
CentOS Linux release 7.3.1611 (Core) |
| 192.168.6.167 |
ambari03 |
2核 |
4G |
50G |
CentOS Linux release 7.3.1611 (Core) |
★centos 7 获取【ambari.repo】
#> wget -nv http://public-repo-1.hortonworks.com/ambari/centos7/2.x/updates/2.4.2.0/ambari.repo -O /etc/yum.repos.d/ambari.repo

#> cat /etc/yum.repos.d/ambari.repo

#> yum repolist
★centos 7 安装【 ambari-server】
#> yum install ambari-server★centos 7 配置【 ambari-server】
0.配置所有机器/etc/hosts
192.168.6.165 ambari01
192.168.6.166 ambari02
192.168.6.167 ambari03
1.打通所有机器信任
#> ssh-keygen
#> ssh-copy-id ambari01
#> ssh-copy-id ambari02
#> ssh-copy-id ambari03
2.关闭所以机器selinux
#> sed -i 's/SELINUX=.*/SELINUX=disabled/' /etc/selinux/config
#> setenforce 0
#> getenforce
3.关闭所有机器的防火墙
#> systemctl stop firewalld.service
#> systemctl disable firewalld.service
4.配置所有机器的sysctl.conf
| kernel.shmmax = 1000000000 |
5.安装并配置ntp
--安装ntp
#> yum install -y ntp
#> service ntpd start
--配置ntp请参考百度
6.配置ambari-server
#> ambari-server setup--下列是setup打印的信息
| [root@ambari01 ~]# ambari-server setup Using python /usr/bin/python Setup ambari-server Checking SELinux... SELinux status is 'disabled' Customize user account for ambari-server daemon [y/n] (n)? y Enter user account for ambari-server daemon (root): Adjusting ambari-server permissions and ownership... Checking firewall status... Checking JDK... [1] Oracle JDK 1.8 + Java Cryptography Extension (JCE) Policy Files 8 [2] Oracle JDK 1.7 + Java Cryptography Extension (JCE) Policy Files 7 [3] Custom JDK ============================================================================== Enter choice (1): To download the Oracle JDK and the Java Cryptography Extension (JCE) Policy Files you must accept the license terms found at http://www.oracle.com/technetwork/java/javase/terms/license/index.html and not accepting will cancel the Ambari Server setup and you must install the JDK and JCE files manually. Do you accept the Oracle Binary Code License Agreement [y/n] (y)? y Downloading JDK from http://public-repo-1.hortonworks.com/ARTIFACTS/jdk-8u77-linux-x64.tar.gz to /var/lib/ambari-server/resources/jdk-8u77-linux-x64.tar.gz jdk-8u77-linux-x64.tar.gz... 100% (173.0 MB of 173.0 MB) Successfully downloaded JDK distribution to /var/lib/ambari-server/resources/jdk-8u77-linux-x64.tar.gz Installing JDK to /usr/jdk64/ Successfully installed JDK to /usr/jdk64/ Downloading JCE Policy archive from http://public-repo-1.hortonworks.com/ARTIFACTS/jce_policy-8.zip to /var/lib/ambari-server/resources/jce_policy-8.zip
Successfully downloaded JCE Policy archive to /var/lib/ambari-server/resources/jce_policy-8.zip Installing JCE policy... Completing setup... Configuring database... Enter advanced database configuration [y/n] (n)? Configuring database... Default properties detected. Using built-in database. Configuring ambari database... Checking PostgreSQL... Running initdb: This may take up to a minute. Initializing database ... OK
About to start PostgreSQL Configuring local database... Connecting to local database...done. Configuring PostgreSQL... Restarting PostgreSQL Extracting system views... ambari-admin-2.4.2.0.136.jar ............ Adjusting ambari-server permissions and ownership... Ambari Server 'setup' completed successfully. [root@ambari01 ~]# |
7.启动ambari-server
#> ambari-server start
--下列是打印的信息
| Using python /usr/bin/python Starting ambari-server Ambari Server running with administrator privileges. Organizing resource files at /var/lib/ambari-server/resources... Ambari database consistency check started... No errors were found. Ambari database consistency check finished Server PID at: /var/run/ambari-server/ambari-server.pid Server out at: /var/log/ambari-server/ambari-server.out Server log at: /var/log/ambari-server/ambari-server.log Waiting for server start.................... Ambari Server 'start' completed successfully. |
★安装hawq ambari插件
#> wget -P /etc/yum.repos.d/ http://yum.oushu-tech.com/oushurepo/oushudatabaserepo/centos7/3.1.2.0/oushu-database-cent73.repo

#> yum install -y oushu-database-ambari-plugin
#> cd /var/lib/hawq/
#> ./add-hawq.py --stack HDP-2.5 --hawqrepo http://yum.oushu-tech.com/oushurepo/yumrepo/release/oushu-database/centos7/3.1.2.0/release/★重新启动ambari-server
#> ambari-server restart★ambari-serverweb验证登陆
http://xxx.xxx.xxx.xxx:8080
★ambari-serverweb点击create a cluster
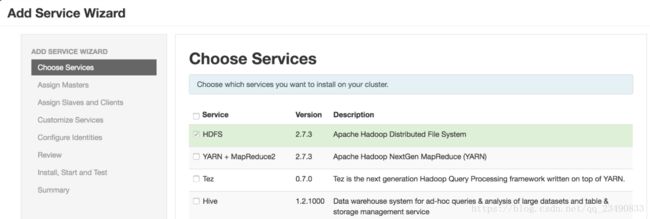
★ambari-serverweb安装HDFS和zookeeper组件
★ambari-serverweb安装hawq组件
1.add service wizard 中选择hawq
2.customize service,设置hawq用户密码
★测试hawq是否成功部署
--master操作
#> su - gpadmin
$> source /usr/local/hawq/greenplum_path.sh
$> psql -d postgres
postgres=# select * from gp_segment_configuration;  #确定所有节点是up状态
postgres=# create table t(i int);
postgres=# insert into t select generate_series(1,1000);
postgres=# select count(*) from t;
参考:
http://www.oushu.io/docs/ch/deployment.html


