前言
我们已经学习了如何通过IDEA创建一个简单的springboot helloworld了,那么springboot如何连接mysql呢?
几种方式
Spring为各种支持的持久化技术,都提供了简单操作的模板和回调,目前大概有如下几种
| ORM持久化技术 | 模板类 |
|---|---|
| JDBC | org.springframework.jdbc.core.JdbcTemplate |
| Hibernate | org.springframework.orm.hibernate.HibernateTemplate |
| IBatis | org.springframework.orm.ibatis.SqlMapClientTemplate |
| JPA | org.springfrmaework.orm.jpa.JpaTemplate |
目前比较通用流行的做法是使用mybatis,这里我们简单的介绍下JPA的方式,因为它使用的也不少,后续的教程很多都是基于mybatis或mybatis-plus的,所以这边不多介绍。至于其它的方式,有时间我再补上。
创建空项目
首先我们使用IDEA创建一个基础的springboot2.0的项目(创建的过程略,可以参考前几章),无需加载任何依赖(依赖还是手动加载感悟更深)。
添加依赖
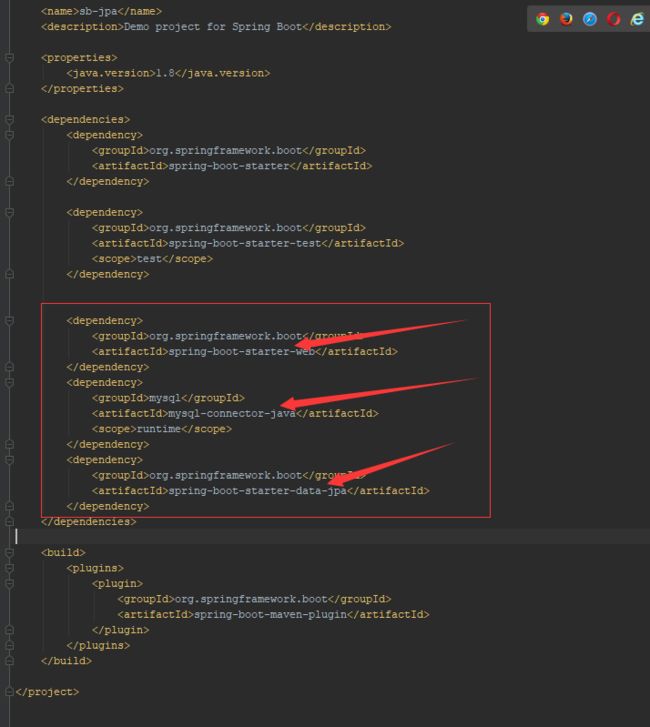
编辑pom.xml:
            org.springframework.boot
            spring-boot-starter-web


            mysql
            mysql-connector-java
            runtime


            org.springframework.boot
            spring-boot-starter-data-jpa
如图
添加配置
更改application.properties为application.yml,添加内容:
spring:
  datasource:
    url: jdbc:mysql://192.168.145.131:3306/test?useUnicode=true&characterEncoding=UTF-8&useSSL=false&autoReconnect=true&failOverReadOnly=false&serverTimezone=GMT%2B8
    username: root
    password: 123456
    driver-class-name: com.mysql.cj.jdbc.Driver
建库
创建名为test的数据库,建表执行
CREATE TABLE `person` (
  `id` int(11) NOT NULL,
  `name` varchar(255) DEFAULT NULL,
  `age` int(11) DEFAULT NULL,
  PRIMARY KEY (`id`)
) ENGINE=MyISAM DEFAULT CHARSET=utf8;

INSERT INTO `person` VALUES ('1', '1', '1');
INSERT INTO `person` VALUES ('2', '2', '2');
INSERT INTO `person` VALUES ('3', '3', '3');
INSERT INTO `person` VALUES ('4', '4', '4');
INSERT INTO `person` VALUES ('5', '5', '5');
INSERT INTO `person` VALUES ('6', '6', '6');
INSERT INTO `person` VALUES ('7', '7', '7');
INSERT INTO `person` VALUES ('8', '8', '8');
INSERT INTO `person` VALUES ('9', '9', '9');
INSERT INTO `person` VALUES ('10', '10', '10');
INSERT INTO `person` VALUES ('11', '11', '11');
完善
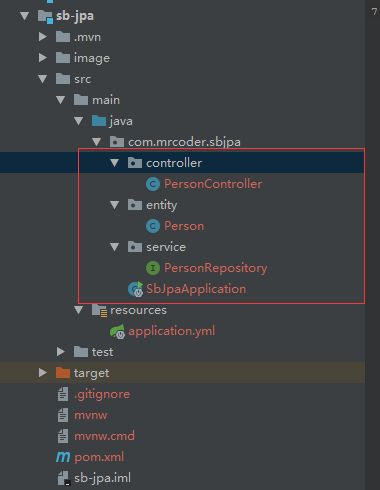
创建controller、entity和service的package,并创建对应的类文件,目录如下
controller/PersonController:
package com.mrcoder.sbjpa.controller;

import com.mrcoder.sbjpa.entity.Person;
import com.mrcoder.sbjpa.service.PersonRepository;
import org.springframework.beans.factory.annotation.Autowired;
import org.springframework.web.bind.annotation.RequestMapping;
import org.springframework.web.bind.annotation.RequestMethod;
import org.springframework.web.bind.annotation.RestController;

import java.util.List;

@RestController
public class PersonController {
    @Autowired
    private PersonRepository personRepository;

    @RequestMapping(value = "/list", method = RequestMethod.GET)
    public List getPersonList(){
        return personRepository.findAll();
    }
}
entity/Person:
package com.mrcoder.sbjpa.entity;

import javax.persistence.Column;
import javax.persistence.Entity;
import javax.persistence.GeneratedValue;
import javax.persistence.Id;

@Entity
public class Person {
    @Id
    @GeneratedValue
    @Column(nullable = true)
    private String name;
    @Column(nullable = true)
    private int age;

    public void setName(String name) {
        this.name = name;
    }

    public int getAge() {
        return age;
    }

    public void setAge(int age) {
        this.age = age;
    }

    @Override
    public String toString() {
        return "Student{" +
                "name='" + name + '\'' +
                ", age=" + age + '}';
    }

}
service/PersonRepository:
package com.mrcoder.sbjpa.service;
import com.mrcoder.sbjpa.entity.Person;
import org.springframework.data.jpa.repository.JpaRepository;

public interface PersonRepository extends JpaRepository {

}
运行
项目地址
https://github.com/MrCoderStack/SpringBootDemo/tree/master/sb-jpa
https://gitee.com/MrCoderStack/SpringBootDemo/tree/master/sb-jpa


