一、添加依赖
     org.springframework.security
      spring-security-data


    org.springframework.cloud
    spring-cloud-starter-oauth2
    true


    org.springframework.security.oauth.boot
    spring-security-oauth2-autoconfigure
    2.1.3.RELEASE


      org.springframework.security.oauth
      spring-security-oauth2
      2.3.5.RELEASE
任何需要身份验证的请求都将被重定向到授权服务器,模块中添加统一认证配置,比如expense服务:
security.oauth2.client.access-token-uri = http://fec-api-gateway.internal.aegonthtf.com/fec-auth/oauth/token
security.oauth2.client.client-authentication-scheme = form
security.oauth2.client.client-id = implement-integration
security.oauth2.client.client-secret = K2QzPPz3fqQNEnsbwupD1b1IDPPg0RfkdWalXysL7wd
security.oauth2.client.grant-type = client_credentials
security.oauth2.resource.user-info-uri = http://fec-api-gateway.internal.aegonthtf.com/fec-auth/api/check_token
访问的时候会根据form表单来获取新的form:
username:06017
password:123654
grant_type:password
scope:read write
二、实现流程
获取token的dto:
//
// Source code recreated from a .class file by IntelliJ IDEA
// (powered by Fernflower decompiler)
//

package org.springframework.security.oauth2.common;

import java.util.Date;
import java.util.Map;
import java.util.Set;
import org.codehaus.jackson.map.annotate.JsonDeserialize;
import org.codehaus.jackson.map.annotate.JsonSerialize;

@JsonSerialize(
    using = OAuth2AccessTokenJackson1Serializer.class
)
@JsonDeserialize(
    using = OAuth2AccessTokenJackson1Deserializer.class
)
@com.fasterxml.jackson.databind.annotation.JsonSerialize(
    using = OAuth2AccessTokenJackson2Serializer.class
)
@com.fasterxml.jackson.databind.annotation.JsonDeserialize(
    using = OAuth2AccessTokenJackson2Deserializer.class
)
public interface OAuth2AccessToken {
    String BEARER_TYPE = "Bearer";
    String OAUTH2_TYPE = "OAuth2";
    String ACCESS_TOKEN = "access_token";
    String TOKEN_TYPE = "token_type";
    String EXPIRES_IN = "expires_in";
    String REFRESH_TOKEN = "refresh_token";
    String SCOPE = "scope";

    Map getAdditionalInformation();

    Set getScope();

    OAuth2RefreshToken getRefreshToken();

    String getTokenType();

    boolean isExpired();

    Date getExpiration();

    int getExpiresIn();

    String getValue();
}
返回token的方法:
public  OAuth2AccessToken getToken(String userName)
    {

        List authorities= AuthorityUtils.createAuthorityList("ROLE_ADMIN");
        Map paramters=new HashMap<>();
        paramters.put("username",userName);
        paramters.put("grant_type","password");
        paramters.put("scope","read write");
        Set scope=new HashSet<>();
        scope.add("read");
        scope.add("write");
        UsernamePasswordAuthenticationToken authentication=
                new UsernamePasswordAuthenticationToken(userService.loadUserByUsername(userName),null,authorities);
        authentication.setDetails(paramters);
        OAuth2Request request =new OAuth2Request(paramters,"ArtemisWeb",
                authorities,true,scope,new HashSet<>(),null,
                new HashSet<>(),new HashMap<>());
        OAuth2Authentication auth2Authentication=new OAuth2Authentication(request,authentication);
        OAuth2AccessToken oAuth2AccessToken = baseTokenService.createAccessToken(auth2Authentication);
//        try {
//            oAuth2AccessToken= tokenEndpoint.postAccessToken(authenticationToken,paramters).getBody();
//        } catch (HttpRequestMethodNotSupportedException e) {
//            e.printStackTrace();
//        }
        return oAuth2AccessToken;
    }
创建token的方法:
@Override
public OAuth2AccessToken createAccessToken(OAuth2Authentication authentication)  {
    return super.createAccessToken(authentication);
}
数据库表结构:
访问的token表 oauth_access_token:
SET NAMES utf8mb4;
SET FOREIGN_KEY_CHECKS = 0;

-- ----------------------------
-- Table structure for oauth_access_token
-- ----------------------------
DROP TABLE IF EXISTS `oauth_access_token`;
CREATE TABLE `oauth_access_token`  (
  `token_id` varchar(255) CHARACTER SET utf8mb4 COLLATE utf8mb4_bin NULL DEFAULT NULL,
  `token` blob NULL,
  `authentication_id` varchar(255) CHARACTER SET utf8mb4 COLLATE utf8mb4_bin NOT NULL,
  `user_name` varchar(255) CHARACTER SET utf8mb4 COLLATE utf8mb4_bin NULL DEFAULT NULL,
  `client_id` varchar(255) CHARACTER SET utf8mb4 COLLATE utf8mb4_bin NULL DEFAULT NULL,
  `authentication` blob NULL,
  `refresh_token` varchar(255) CHARACTER SET utf8mb4 COLLATE utf8mb4_bin NULL DEFAULT NULL,
  `is_validated_device` bit(1) NULL DEFAULT b'1' COMMENT '是否通过设备验证 1:是 0:否',
  PRIMARY KEY (`authentication_id`) USING BTREE,
  INDEX `oauth_access_token_n1`(`token_id`) USING BTREE
) ENGINE = InnoDB CHARACTER SET = utf8mb4 COLLATE = utf8mb4_bin ROW_FORMAT = Dynamic;

SET FOREIGN_KEY_CHECKS = 1;
客户端详情表(oauth_client_details):
包含移动端,web端和三方接口的认证:
CREATE TABLE `oauth_client_details`  (
  `client_id` varchar(255) CHARACTER SET utf8mb4 COLLATE utf8mb4_bin NOT NULL,
  `resource_ids` varchar(255) CHARACTER SET utf8mb4 COLLATE utf8mb4_bin NULL DEFAULT NULL,
  `client_secret` varchar(255) CHARACTER SET utf8mb4 COLLATE utf8mb4_bin NULL DEFAULT NULL,
  `scope` varchar(255) CHARACTER SET utf8mb4 COLLATE utf8mb4_bin NULL DEFAULT NULL,
  `authorized_grant_types` varchar(255) CHARACTER SET utf8mb4 COLLATE utf8mb4_bin NULL DEFAULT NULL,
  `web_server_redirect_uri` varchar(255) CHARACTER SET utf8mb4 COLLATE utf8mb4_bin NULL DEFAULT NULL,
  `authorities` varchar(255) CHARACTER SET utf8mb4 COLLATE utf8mb4_bin NULL DEFAULT NULL,
  `access_token_validity` int(11) NULL DEFAULT NULL,
  `refresh_token_validity` int(11) NULL DEFAULT NULL,
  `additional_information` varchar(4000) CHARACTER SET utf8mb4 COLLATE utf8mb4_bin NULL DEFAULT NULL,
  `autoapprove` varchar(4000) CHARACTER SET utf8mb4 COLLATE utf8mb4_bin NULL DEFAULT NULL,
  PRIMARY KEY (`client_id`) USING BTREE
) ENGINE = InnoDB CHARACTER SET = utf8mb4 COLLATE = utf8mb4_bin ROW_FORMAT = Dynamic;

-- ----------------------------
-- Records of oauth_client_details
-- ----------------------------
INSERT INTO `oauth_client_details` VALUES ('ArtemisApp', NULL, '{noop}nLCnwdIhizWbykHyuZM6TpQDd7KwK9IXDK8LGsa7SOW', 'read,write', 'password,refresh_token', NULL, 'ROLE_ADMIN,ROLE_USER', 172800, NULL, NULL, NULL);
INSERT INTO `oauth_client_details` VALUES ('ArtemisWeb', NULL, '{noop}nLCnwdIhizWbykHyuZM6TpQDd7KwK9IXDK8LGsa7SOW', 'read,write', 'password,refresh_token', NULL, 'ROLE_ADMIN,ROLE_USER', 172800, NULL, NULL, NULL);
INSERT INTO `oauth_client_details` VALUES ('implement-integration', NULL, '{noop}K2QzPPz3fqQNEnsbwupD1b1IDPPg0RfkdWalXysL7wd', 'read,write', 'client_credentials', NULL, 'ROLE_INTEGRATION_CLIENTS', 172800, NULL, NULL, NULL);

SET FOREIGN_KEY_CHECKS = 1;
令牌刷新表: oauth_refresh_token
SET NAMES utf8mb4;
SET FOREIGN_KEY_CHECKS = 0;

-- ----------------------------
-- Table structure for oauth_refresh_token
-- ----------------------------
DROP TABLE IF EXISTS `oauth_refresh_token`;
CREATE TABLE `oauth_refresh_token`  (
  `id` int(11) NOT NULL AUTO_INCREMENT,
  `token_id` varchar(255) CHARACTER SET utf8mb4 COLLATE utf8mb4_bin NULL DEFAULT NULL,
  `token` blob NULL,
  `authentication` blob NULL,
  PRIMARY KEY (`id`) USING BTREE
) ENGINE = InnoDB AUTO_INCREMENT = 11353 CHARACTER SET = utf8mb4 COLLATE = utf8mb4_bin ROW_FORMAT = Dynamic;
使用postman访问时添加form表单的内容如下:
username:***
password:***
grant_type:password
scope:read write
headers添加一下自定义的秘钥:
即可获取到对应用户的token:
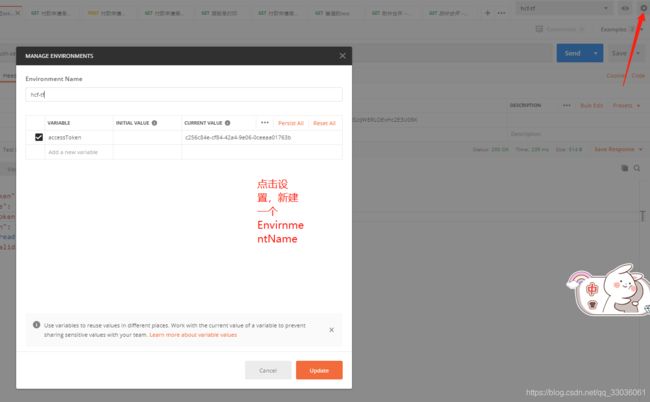
另外在postman里面配置一下环境变量:
然后把变量设置为accessToken,把刚获取到的token值复制进去,然后点击保存,接下来在每个请求里配置Headers:
Authorization:Bearer{{accessToken}}
相当于请求携带token来访问系统,经过认证,通过后才放行!


