引言
幂等性:就是对于用户发起的同一操作的一次请求或者多次请求的结果是一致的,不会因为多次点击而产生副作用。
你比如支付,在用户购买商品后的支付,支付扣款成功,但是返回结果的时候网络异常,此时钱已经扣了,用户再次点击按钮,此时会进行二次付款。那么不论是扣款还是流水记录都生成了两条记录。或者提交特殊订单时网络问题生成两笔订单。在原来我们是把数据操作放入事务中即可,发生错误立即回滚,但是再相应客户端的时候是有可能网络再次中断或者异常等。
常见的解决方案
- 1、
唯一索引:防止新增脏数据 - 2、
token机制:防止页面重复提交 - 3、
悲观锁: 获取数据的时候加锁(锁表或锁行) - 4、
乐观锁:基于版本号version实现,在更新数据的那一刻校验数据 - 5、
分布式锁:redis(jedis、redisson)或zookeeper实现
Jedis是Redis官方推荐的Java连接开发工具
Redisson是架设在Redis基础上的一个Java驻内存数据网格(In-Memory Data Grid)。【Redis官方推荐】
ZooKeeper是一个分布式的,开放源码的分布式应用程序协调服务,是Google的Chubby一个开源的实现,是Hadoop和Hbase的重要组件。它是一个为分布式应用提供一致性服务的软件,提供的功能包括:配置维护、域名服务、分布式同步、组服务等。
- 6、
状态机:状态变更,更新数据时判断状态
实现
本文采用第2中实现方式,即通过redis + token机制实现接口幂等性校验
思路
为需要保证幂等性的每一次请求创建一个唯一标识token,先获取token,并将此token存入redis,请求接口时,将此token放到header或者作为请求参数请求接口,后端接口判断redis中是否存在此token:
- 如果存在,正常处理业务逻辑,并从redis中删除此token,如果是重复请求,由于token已被删除,则不能通过校验,返回请勿重复操作提示
- 如果不存在,说明参数不合法或者是重复请求,返回提示
应用
用到的开发工具
- IntelliJ IDEA 2019.3.2 x64
- redis
- Another.Redis.Desktop.Manager(redis可视化工具)
- postman(专用的接口调用工具)
- jmeter(可用于并发测试的压力接口调试工具)
开发
直接贴pom.xml文件
    4.0.0

        org.springframework.boot
        spring-boot-starter-parent
        2.2.4.RELEASE


    com.jinzheyi
    idempotency
    0.0.1-SNAPSHOT
    war
    idempotency
    接口幂等性校验


        1.8


            redis.clients
            jedis
            2.9.0


            org.apache.commons
            commons-lang3
            3.4


            org.springframework.boot
            spring-boot-starter-web


            org.springframework.boot
            spring-boot-starter-tomcat
            provided


            org.springframework.boot
            spring-boot-starter-test
            test


                    org.junit.vintage
                    junit-vintage-engine


                org.springframework.boot
                spring-boot-maven-plugin
然后我们可以配置我们的redis。配置redis之前需要安装一下redis。具体安装过程就不描述了。
application.yml配置如下
#设置端口号
server:
  port: 1111

#redis config
spring:
  redis:
    host: 127.0.0.1
    port: 6379
    password: password
    jedis:
      pool:
        max-idle: 8
        max-wait: -1
        min-idle: 0
    timeout: 0
配置redis
package com.jinzheyi.idempotency.config;

import org.springframework.beans.factory.annotation.Value;
import org.springframework.context.annotation.Bean;
import org.springframework.context.annotation.Configuration;
import redis.clients.jedis.JedisPool;
import redis.clients.jedis.JedisPoolConfig;

/**
 * @version 0.1
 * @Description jedis配置类
 * @Author jinzheyi
 * @Date 2020/2/29 12:43
 */
@Configuration
public class JedisConfig {

    @Value("${spring.redis.host}")
    private String host;

    @Value("${spring.redis.port}")
    private int port;

    @Value("${spring.redis.password}")
    private String password;

    @Value("${spring.redis.jedis.pool.max-idle}")
    private int maxIdle;

    @Value("${spring.redis.jedis.pool.min-idle}")
    private int minIdle;

    @Value("${spring.redis.jedis.pool.max-wait}")
    private long maxWait;

    @Value("${spring.redis.timeout}")
    private int timeout;

    @Bean
    public JedisPool redisPoolFactory(){
        JedisPoolConfig jedisPoolConfig = new JedisPoolConfig();
        jedisPoolConfig.setMaxIdle(maxIdle);
        jedisPoolConfig.setMaxWaitMillis(maxWait);
        jedisPoolConfig.setMinIdle(minIdle);
        JedisPool jedisPool = new JedisPool(jedisPoolConfig, host, port, timeout, password);
        return jedisPool;
    }


}
然后创建jedisUtil用于操作redis的工具类
package com.jinzheyi.idempotency.utils;

import org.slf4j.Logger;
import org.slf4j.LoggerFactory;
import org.springframework.beans.factory.annotation.Autowired;
import org.springframework.stereotype.Component;
import redis.clients.jedis.Jedis;
import redis.clients.jedis.JedisPool;

/**
 *@Description redis连接Java的开发工具类
 *@Author jinzheyi
 *@Date 2020/2/25 20:54
 *@version 0.1
 */
@Component
public class JedisUtil {

    private static final Logger logger = LoggerFactory.getLogger(JedisUtil.class);

    @Autowired
    private JedisPool jedisPool;

    private Jedis getJedis(){
        return jedisPool.getResource();
    }

    /**
     * 设值
     * @param key 键
     * @param value 值
     * @return
     */
    public String set(String key, String value){
        Jedis jedis = null;
        try {
            jedis = getJedis();
            return jedis.set(key,value);
        }catch (Exception e) {
            logger.error("设置key:{} value:{} 错误",key, value, e);
            return null;
        }finally {
            close(jedis);
        }
    }

    /**
     * 设置带过期时间的值
     * @param key 键
     * @param value 值
     * @param expireTime 过期时间,单位 s
     * @return
     */
    public String setex(String key, String value, int expireTime){
        Jedis jedis = null;
        try {
            jedis = getJedis();
            return jedis.setex(key, expireTime, value);
        }catch (Exception e){
            logger.error("设置 key:{} value: {} expireTime: {} 错误", key, value, expireTime);
            return null;
        }finally {
            close(jedis);
        }
    }

    /**
     * 取值
     * @param key
     * @return
     */
    public String get(String key){
        Jedis jedis = null;
        try {
            jedis = getJedis();
            return jedis.get(key);
        } catch (Exception e){
            logger.error("取值 key:{} 错误",key,e);
            return null;
        } finally {
            close(jedis);
        }
    }

    /**
     * 删除 key
     * @param key
     * @return
     */
    public Long del(String key){
        Jedis jedis = null;
        try {
            jedis = getJedis();
            return jedis.del(key.getBytes());
        } catch (Exception e) {
            logger.error("删除 key:{} 错误",key, e);
            return null;
        } finally {
            close(jedis);
        }
    }

    /**
     * 判断key是否存在
     * @return
     */
    public Boolean exist(String key){
        Jedis jedis = null;
        try {
            jedis = getJedis();
            return jedis.exists(key.getBytes());
        } catch (Exception e) {
            logger.error("判断key:{} 是否存在错误",key, e);
            return null;
        } finally {
            close(jedis);
        }
    }

    /**
     * 设置指定key的过期时间
     * @param key
     * @param expireTime
     * @return
     */
    public Long expire(String key, int expireTime){
        Jedis jedis = null;
        try {
            jedis = getJedis();
            return jedis.expire(key.getBytes(),expireTime);
        } catch (Exception e) {
            logger.error("设置 key:{}的过期时间 expireTime:{} 错误",key,expireTime, e);
            return null;
        } finally {
            close(jedis);
        }
    }

    /**
     * 获取key的剩余时间
     * @param key
     * @return
     */
    public Long ttl(String key){
        Jedis jedis = null;
        try {
            jedis = getJedis();
            return jedis.ttl(key.getBytes());
        } catch (Exception e) {
            logger.error("获取 key:{}的剩余时间错误",key, e);
            return null;
        } finally {
            close(jedis);
        }
    }

    /**
     * 对jedis进行关闭
     * @param jedis
     */
    private void close(Jedis jedis){
        if(null != jedis){
            jedis.close();
        }
    }

}
我们用到了token机制来检验,那必然需要创建先进行创建token,后期也需要校验token是否一致以及是否存在,创建业务处理接口类和对其实现
接口
package com.jinzheyi.idempotency.service;

import com.jinzheyi.idempotency.common.ResponseData;
import javax.servlet.http.HttpServletRequest;

/**
 * @version 0.1
 * @Description TODO
 * @Author jinzheyi
 * @Date 2020/2/25 21:38
 */
public interface TokenService {

    ResponseData createToken();

    void checkToken(HttpServletRequest request);
}
接口实现
package com.jinzheyi.idempotency.service.impl;

import com.jinzheyi.idempotency.common.Constant;
import com.jinzheyi.idempotency.common.ResponseCode;
import com.jinzheyi.idempotency.common.ResponseData;
import com.jinzheyi.idempotency.exception.ServiceException;
import com.jinzheyi.idempotency.service.TokenService;
import com.jinzheyi.idempotency.utils.JedisUtil;
import com.jinzheyi.idempotency.utils.RandomUtil;
import org.apache.commons.lang3.StringUtils;
import org.apache.commons.lang3.text.StrBuilder;
import org.springframework.beans.factory.annotation.Autowired;
import org.springframework.stereotype.Service;
import javax.servlet.http.HttpServletRequest;

/**
 * @version 0.1
 * @Description TODO
 * @Author jinzheyi
 * @Date 2020/2/25 21:41
 */
@Service
public class TokenServiceImpl implements TokenService {

    private static final String TOKEN_NAME = "token";

    @Autowired
    private JedisUtil jedisUtil;

    @Override
    public ResponseData createToken() {
        String str = RandomUtil.UUID32();
        StrBuilder token = new StrBuilder();
        token.append(Constant.TOKEN_PREFIX).append(str);
        jedisUtil.setex(token.toString(), token.toString(), Constant.EXPIRE_TIME_HOUR);
        return ResponseData.success(token.toString());
    }

    @Override
    public void checkToken(HttpServletRequest request) {
        String token = request.getHeader(TOKEN_NAME);
        if (StringUtils.isBlank(token)) {// header中不存在token
            token = request.getParameter(TOKEN_NAME);
            if (StringUtils.isBlank(token)) {// parameter中也不存在token
                throw new ServiceException(ResponseCode.ILLEGAL_ARGUMENT.getMessage());
            }
        }
        if (!jedisUtil.exist(token)) {
            throw new ServiceException(ResponseCode.REPETITIVE_OPERATION.getMessage());
        }
        Long del = jedisUtil.del(token);
        if (del <= 0) {
            throw new ServiceException(ResponseCode.REPETITIVE_OPERATION.getMessage());
        }
    }

}
我们可以自定义接口幂等性的注解@ApiIdempotent,在需要接口幂等性的方法上加上此注解,对有此注解的方法才进行判断
package com.jinzheyi.idempotency.annotation;

import java.lang.annotation.ElementType;
import java.lang.annotation.Retention;
import java.lang.annotation.RetentionPolicy;
import java.lang.annotation.Target;

/**
 * @version 0.1
 * @Description 自定义接口幂等性的注解
 * @Author jinzheyi
 * @Date 2020/2/25 20:56
 */
@Target({ElementType.METHOD})
@Retention(RetentionPolicy.RUNTIME)
public @interface ApiIdempotent {
}
创建自定义拦截器来做公共的判断。实现统一入口来校验
package com.jinzheyi.idempotency.interceptor;

import com.jinzheyi.idempotency.annotation.ApiIdempotent;
import com.jinzheyi.idempotency.service.TokenService;
import org.springframework.beans.factory.annotation.Autowired;
import org.springframework.web.method.HandlerMethod;
import org.springframework.web.servlet.handler.HandlerInterceptorAdapter;

import javax.servlet.http.HttpServletRequest;
import javax.servlet.http.HttpServletResponse;
import java.lang.reflect.Method;

/**
 * @version 0.1
 * @Description 接口幂等性拦截器
 * @Author jinzheyi
 * @Date 2020/2/25 21:02
 */
public class ApiIdempotentInterceptor extends HandlerInterceptorAdapter {

    @Autowired
    private TokenService tokenService;

    @Override
    public boolean preHandle(HttpServletRequest request, HttpServletResponse response, Object handler) throws Exception {
        if(!(handler instanceof HandlerMethod)){
            return true;
        }
        HandlerMethod handlerMethod = (HandlerMethod) handler;
        Method method = handlerMethod.getMethod();
        ApiIdempotent apiIdempotent = method.getAnnotation(ApiIdempotent.class);
        if(apiIdempotent!=null){
            check(request); //当方法上加了需要校验接口幂等性的注解时进行校验,并统一友好的返回界面
        }
        return true;
    }

    private void check(HttpServletRequest request){
        tokenService.checkToken(request);
    }
}
package com.jinzheyi.idempotency.interceptor;

import org.springframework.context.annotation.Bean;
import org.springframework.context.annotation.Configuration;
import org.springframework.web.servlet.config.annotation.CorsRegistry;
import org.springframework.web.servlet.config.annotation.InterceptorRegistry;
import org.springframework.web.servlet.config.annotation.WebMvcConfigurer;

/**
 * @version 0.1
 * @Description 相关配置类
 * @Author jinzheyi
 * @Date 2020/2/27 22:20
 */
@Configuration
public class WebConfig implements WebMvcConfigurer {

    @Override
    public void addInterceptors(InterceptorRegistry registry) {
        registry.addInterceptor(apiIdempotentInterceptor());
    }

    /**
     * 解决跨域
     * @param registry
     */
    @Override
    public void addCorsMappings(CorsRegistry registry) {
        registry.addMapping("/**")
                .allowedOrigins("*")    //允许的来源
                .allowCredentials(true)   //允许的凭证
                .allowedMethods("GET","POST","DELETE","PUT","PATCH","OPTIONS","HEAD")
                .maxAge(3600 * 24);
    }

    /**
     * 自定义拦截器注入bean中
     * @return
     */
    @Bean
    public ApiIdempotentInterceptor apiIdempotentInterceptor(){
        return new ApiIdempotentInterceptor();
    }
}
最后我们建立一个用于测试的业务处理类
package com.jinzheyi.idempotency.controller;

import com.jinzheyi.idempotency.annotation.ApiIdempotent;
import com.jinzheyi.idempotency.common.ResponseData;
import com.jinzheyi.idempotency.service.TokenService;
import org.springframework.beans.factory.annotation.Autowired;
import org.springframework.web.bind.annotation.GetMapping;
import org.springframework.web.bind.annotation.PostMapping;
import org.springframework.web.bind.annotation.RequestMapping;
import org.springframework.web.bind.annotation.RestController;

/**
 * @version 0.1
 * @Description 用于测试
 * @Author jinzheyi
 * @Date 2020/2/27 22:30
 */
@RestController
@RequestMapping("/test")
public class TestController {

    @Autowired
    private TokenService tokenService;

    @GetMapping("/getToken")
    public ResponseData getToken(){
        return tokenService.createToken();
    }

    @ApiIdempotent
    @PostMapping("/idempotent")
    public ResponseData idempotent(){
        return ResponseData.success("调用成功");
    }
}
代码里面的封装捕获的自定义异常处理以及自定义返回统一格式封装可以到我的gitee
里面具体查看怎么处理
测试
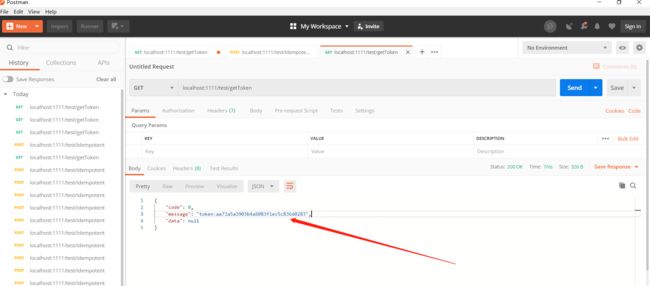
程序启动之后,我们先用postman工具请求token
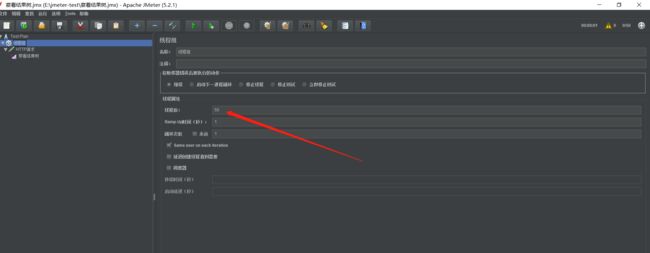
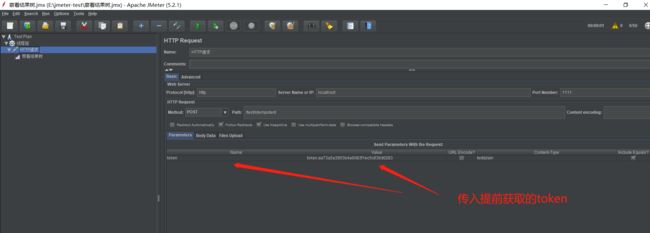
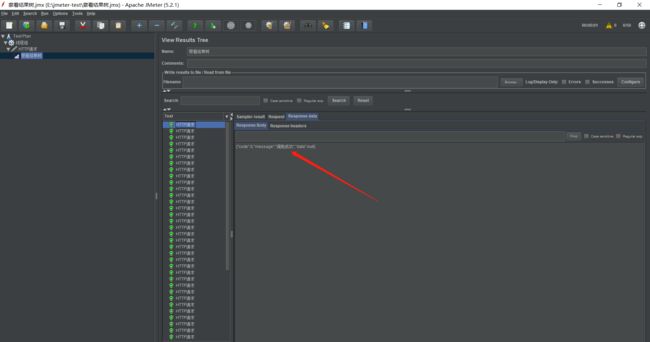
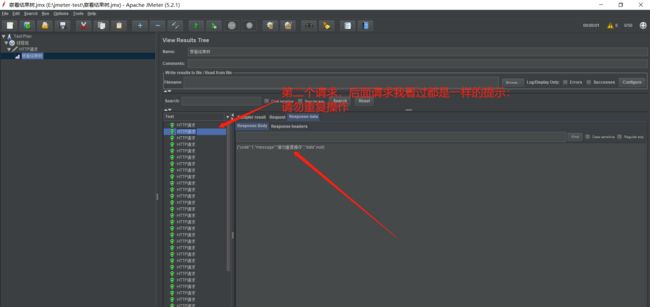
然后打开压力测试工具,我们前期模拟50个用户来并发请求 http://localhost:1111/test/idempotent
线程组参数详解:
- 线程数:虚拟用户数。一个虚拟用户占用一个进程或线程。设置多少虚拟用户数在这里也就是设置多少个线程数。
- Ramp-Up Period(in seconds)准备时长:设置的虚拟用户数需要多长时间全部启动。如果线程数为10,准备时长为2,那么需要2秒钟启动10个线程,也就是每秒钟启动5个线程。
- 循环次数:每个线程发送请求的次数。如果线程数为10,循环次数为100,那么每个线程发送100次请求。总请求数为10*100=1000 。如果勾选了“永远”,那么所有线程会一直发送请求,一到选择停止运行脚本。
- Delay Thread creation until needed:直到需要时延迟线程的创建。
- 调度器:设置线程组启动的开始时间和结束时间(配置调度器时,需要勾选循环次数为永远)
持续时间(秒):测试持续时间,会覆盖结束时间
启动延迟(秒):测试延迟启动时间,会覆盖启动时间
启动时间:测试启动时间,启动延迟会覆盖它。当启动时间已过,手动只需测试时当前时间也会覆盖它。
结束时间:测试结束时间,持续时间会覆盖它。
重要注意点(敲黑板)
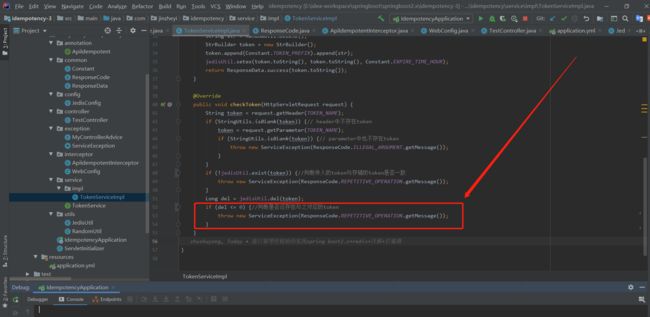
上图中, 不能单纯的直接删除token而不校验是否删除成功, 会出现并发安全性问题, 因为, 有可能多个线程同时走到第46行, 此时token还未被删除, 所以继续往下执行, 如果不校验jedisUtil.del(token)的删除结果而直接放行, 那么还是会出现重复提交问题, 即使实际上只有一次真正的删除操作。
作者:金哲一(jinzheyi)【笔名】
本文代码地址:https://gitee.com/jinzheyi/springboot/tree/master/springboot2.x/idempotency-3
本文链接:https://www.jianshu.com/p/3461441f9779
