TensorFlow学习笔记01:使用tf.keras训练模型
TensorFlow学习笔记01:使用tf.keras训练模型
- Keras入门案例
-
- 使用单神经元完成线性回归
- 使用Keras搭建卷积神经网络
-
- 例子1: 使用神经网络进行图片分类
-
- 获取数据集
- 定义并训练神经网络
- 定义回调函数
- 历史训练指标的可视化
- 各层的输出的可视化
- 例子2: 使用实际图片进行训练
-
- 获取数据集
- 构造ImageDataGenerator
- 定义并训练神经网络
- 对原图像进行数据扩充
- 例子3: 使用迁移学习(Transfer Learning)复用原有模型
Keras入门案例
使用单神经元完成线性回归
使用Keras创建模型的过程为:定义模型→编译模型→训练模型.以一个单神经元线性回归的例子演示如下:
xs = np.array([1, 2, 3, 4, 5, 6])
ys = np.array([1, 1.5, 2, 2.5, 3, 3.5])

model = tf.keras.Sequential([keras.layers.Dense(units=1, input_shape=[1])])	# 定义模型
model.compile(optimizer='sgd', loss='mean_squared_error')					# 编译模型
model.fit(xs, ys, epochs=500)												# 训练模型
model.predict([10.0])	# 得到 [5.5]
tf.keras.Sequential类表示序列模型,多层神经元之间顺序堆叠.
keras.layers.Dense类表示全连接层,其主要属性有:
units: 该层的神经元个数.activation: 激活函数,默认为线性函数(也就是说没有激活函数).input_shape: 用在序列模型的第一层,表示输入数据的形状.
model.compile()函数用于编译模型,在编译模型时指定了优化器和损失函数.
使用Keras搭建卷积神经网络
例子1: 使用神经网络进行图片分类
获取数据集
对fashion_mnist数据集进行图片分类,该数据集被包含在Keras的datasets模块中,获取数据集的代码如下:
# 获取数据
mnist = tf.keras.datasets.fashion_mnist
(training_images, training_labels), (test_images, test_labels) = mnist.load_data()
# 展示数据
import matplotlib.pyplot as plt
plt.imshow(training_images[0])
print(training_labels[0])
print(training_images[0])
对于图片数据的一个常规操作是将其归一化,将每个点的像素值归一化到[0, 1]之间:
training_images = training_images.reshape(60000, 28, 28, 1)
test_images = test_images.reshape(10000, 28, 28, 1)
training_images = training_images / 255.0
test_images = test_images / 255.0
定义并训练神经网络
下面定义并训练神经网络模型进行图片分类:
# 定义模型
model = tf.keras.models.Sequential([
    tf.keras.layers.Conv2D(32, (3,3), activation='relu', input_shape=(28, 28, 1)),
    tf.keras.layers.MaxPooling2D(2, 2),
    tf.keras.layers.Conv2D(64, (3,3), activation='relu'),
    tf.keras.layers.MaxPooling2D(2,2),
    tf.keras.layers.Flatten(),
    tf.keras.layers.Dense(128, activation='relu'),
    tf.keras.layers.Dense(10, activation='softmax')
])

# 编译模型
model.compile(optimizer='adam', loss='sparse_categorical_crossentropy', metrics=['accuracy'])

# 训练模型,并将每轮训练的历史信息保存在变量 history 中
history = model.fit(x=training_images, y=training_labels, epochs=10, validation_data=(test_images, test_labels))

# 计算损失
test_loss = model.evaluate(test_images, test_labels)
上述神经网络的结构如下:
调用model.summary()查看模型的结构如下:
Model: "sequential"
_________________________________________________________________
Layer (type)                 Output Shape              Param #
=================================================================
conv2d (Conv2D)              (None, 26, 26, 32)        320
_________________________________________________________________
max_pooling2d (MaxPooling2D) (None, 13, 13, 32)        0
_________________________________________________________________
conv2d_1 (Conv2D)            (None, 11, 11, 64)        18496
_________________________________________________________________
max_pooling2d_1 (MaxPooling2 (None, 5, 5, 64)          0
_________________________________________________________________
flatten (Flatten)            (None, 1600)              0
_________________________________________________________________
dense (Dense)                (None, 128)               204928
_________________________________________________________________
dense_1 (Dense)              (None, 10)                1290
=================================================================
Total params: 225,034
Trainable params: 225,034
Non-trainable params: 0
_________________________________________________________________
定义回调函数
通过定义回调函数,可以增强训练过程(比如在达到一定准确度后提前停止).
回调函数本质上是一个继承自tf.keras.callbacks.Callback的Python类,在这里,们定义一个回调函数,在每轮训练结束后检查模型的准确率,若准确率大于99.8%则提前停止训练.回调函数的epoch参数代表当前训练的轮数,logs参数保存模型当前的一些指标信息.
class myCallback(tf.keras.callbacks.Callback):
	def on_epoch_end(self, epoch, logs={
     }):
		if (logs.get('acc')>0.998):
			print('\nReached 99.8% accuracy so cancelling training!')
			self.model.stop_training = True

callback = myCallback()
在调用fit()方法向callbacks参数传入一个包含回调函数实例类的列表即可在训练模型时调用回调函数.
callback = myCallback()
history = model.fit(x=training_images, y=training_labels, epochs=10,
	callbacks=[callback], validation_data=(test_images, test_labels))
执行训练过程,可以发现在第7轮训练结束后达到了99.8%的准确度,训练过程提前终止.
历史训练指标的可视化
我们将每轮训练中的历史指标的值保存在变量history中,其history属性保存了每轮训练的损失函数值以及其它的指标.
下面代码获取这些指标并绘制相应的曲线:
import matplotlib.pyplot as plt

# 获取历史信息
acc = history.history['acc']
val_acc = history.history['val_acc']
loss = history.history['loss']
val_loss = history.history['val_loss']
epochs = range(len(acc)) # 训练轮数

# 绘制准确率曲线
plt.plot(epochs, acc, label=['acc'])
plt.plot(epochs, val_acc, label=['val_acc'])
plt.title('Training and validation accuracy')
plt.legend()
plt.figure()

# 绘制损失函数曲线
plt.plot(epochs, loss, label='loss')
plt.plot(epochs, val_loss, label='val_loss')
plt.legend()
plt.title('Training and validation loss')
各层的输出的可视化
使用下面代码对上述神经网络各卷积层进行可视化
import matplotlib.pyplot as plt
f, axarr = plt.subplots(3,4)
FIRST_IMAGE=0
SECOND_IMAGE=7
THIRD_IMAGE=26
CONVOLUTION_NUMBER = 1
from tensorflow.keras import models
layer_outputs = [layer.output for layer in model.layers]
activation_model = tf.keras.models.Model(inputs = model.input, outputs = layer_outputs)
for x in range(0,4):
    f1 = activation_model.predict(test_images[FIRST_IMAGE].reshape(1, 28, 28, 1))[x]
    axarr[0,x].imshow(f1[0, : , :, CONVOLUTION_NUMBER], cmap='inferno')
    axarr[0,x].grid(False)
    f2 = activation_model.predict(test_images[SECOND_IMAGE].reshape(1, 28, 28, 1))[x]
    axarr[1,x].imshow(f2[0, : , :, CONVOLUTION_NUMBER], cmap='inferno')
    axarr[1,x].grid(False)
    f3 = activation_model.predict(test_images[THIRD_IMAGE].reshape(1, 28, 28, 1))[x]
    axarr[2,x].imshow(f3[0, : , :, CONVOLUTION_NUMBER], cmap='inferno')
    axarr[2,x].grid(False)
例子2: 使用实际图片进行训练
在前面的例子中,我们一直是对现成的图片数据集进行训练,这些图片已经被裁剪和标注好.在这个例子中,我们使用tensorflow.keras.preprocessing.image.ImageDataGenerator类对实际图片进行标注和数据扩充(data augmentation).
获取数据集
在这里,我们使用kaggle的猫狗大战数据集模拟实际图片数据,获取数据的步骤如下:
-
使用
wget命令下载数据集!wget --no-check-certificate \ https://storage.googleapis.com/mledu-datasets/cats_and_dogs_filtered.zip \ -O /tmp/cats_and_dogs_filtered.zip -
解压压缩包
import os
import zipfile

local_zip = '/tmp/cats_and_dogs_filtered.zip'

zip_ref = zipfile.ZipFile(local_zip, 'r')
zip_ref.extractall('/tmp')
zip_ref.close()
经过上述操作,我们将数据存入/tmp/cats_and_dogs_filtered/目录下,该目录下的文件结构树如下:
/tmp/cats_and_dogs_filtered
├── train
│   ├── cats
│   │   ├── cat.0.jpg
│   │   ├── cat.1.jpg
│   │   ├── cat.2.jpg
│   │   ├── ...
│   │   └── cat.999.jpg
│   └── dogs
│       ├── dog.0.jpg
│       ├── dog.1.jpg
│       ├── dog.2.jpg
│       ├── ...
│       └── dog.999.jpg
├── validation
│   ├── cats
│   │   ├── cat.2000.jpg
│   │   ├── cat.2001.jpg
│   │   ├── ...
│   │   └── cat.2499.jpg
│   └── dogs
│       ├── dog.2000.jpg
│       ├── dog.2001.jpg
│       ├── ...
│       └── dog.2499.jpg
└── vectorize.py
其中部分数据如下:
构造ImageDataGenerator
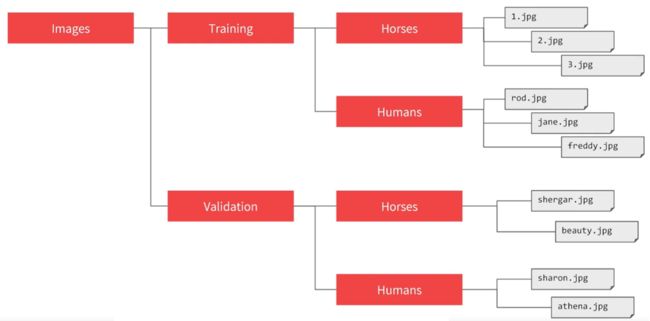
ImageDataGenerator通过将图片文件打标签为图片文件的上一层目录名.在这里要注意,对于下面的目录结构,生成数据流的directory参数应为Training和Validation目录而非Images目录.ImageDataGenerator会自动为我们给图片标上Horses或Humans标签.
通过向ImageDataGenerator构造函数传入一系列参数,可以实现数据扩充,在这一步中,我们暂时先只定义rescale参数对数值进行缩放,而不做数据扩充.
我们使用flow_from_directory()方法从目录中生成数据流,代码如下:
值得注意的是,flow_from_directory()方法的class_mode表示当前的分类任务的类别数量.可选值有'binary'(表示二分类,使用0-1编码)和'categorical'(表示多分类,使用one-hot编码).
# 定义目录路径
base_dir = '/tmp/cats_and_dogs_filtered'
train_dir = os.path.join(base_dir, 'train')
validation_dir = os.path.join(base_dir, 'validation')
train_cats_dir = os.path.join(train_dir, 'cats')
train_dogs_dir = os.path.join(train_dir, 'dogs')
validation_cats_dir = os.path.join(validation_dir, 'cats')
validation_dogs_dir = os.path.join(validation_dir, 'dogs')

# 创建 ImageDataGenerator
train_datagen = ImageDataGenerator(rescale=1./255)
test_datagen = ImageDataGenerator(rescale=1./255)

# 从目录生成数据流
train_generator = train_datagen.flow_from_directory(
    directory=train_dir,		# 指定数据源的目录
    target_size=(150, 150),  	# 将图片缩放到 target_size 的尺寸
    batch_size=20,				# 设置每批数据的个数
    class_mode='binary'			# 二分类,生成的标签使用0-1编码而非one-hot编码
)
validation_generator = test_datagen.flow_from_directory(
    directory=validation_dir,
    target_size=(150, 150),
    batch_size=20,
    class_mode='binary'
)
定义并训练神经网络
在这里,我们从Generator而非矩阵中获取数据,因此应使用fit_generator()方法而非fit()方法训练模型.
model = tf.keras.models.Sequential([
    tf.keras.layers.Conv2D(32, (3,3), activation='relu', input_shape=(150, 150, 3)),
    tf.keras.layers.MaxPooling2D(2, 2),
    tf.keras.layers.Conv2D(64, (3,3), activation='relu'),
    tf.keras.layers.MaxPooling2D(2,2),
    tf.keras.layers.Conv2D(128, (3,3), activation='relu'),
    tf.keras.layers.MaxPooling2D(2,2),
    tf.keras.layers.Conv2D(128, (3,3), activation='relu'),
    tf.keras.layers.MaxPooling2D(2,2),
    tf.keras.layers.Dropout(0.5),
    tf.keras.layers.Flatten(),
    tf.keras.layers.Dense(512, activation='relu'),
    tf.keras.layers.Dense(1, activation='sigmoid')
])
model.compile(loss='binary_crossentropy',optimizer='adam',metrics=['acc'])

# 使用 fit_generator方法 训练模型
history = model.fit_generator(
    train_generator,
    steps_per_epoch=100,  # 2000 images = batch_size * steps
    epochs=100,
    validation_data=validation_generator,
    validation_steps=50,  # 1000 images = batch_size * steps
)
fit_generator()方法的steps_per_epoch和validation_steps参数分别指定每轮训练和验证时生成的数据批数.应尽量满足 s t e p s _ p e r _ e p o c h × b a t c h _ s i z e = 训 练 样 本 数 steps\_per\_epoch \times batch\_size = 训练样本数 steps_per_epoch×batch_size=训练样本数( v a l i d a t i o n _ s t e p s t i m e s b a t c h _ s i z e = 验 证 样 本 数 validation\_steps\ times batch\_size = 验证样本数 validation_steps timesbatch_size=验证样本数),这样保证了每轮训练(验证)中几乎所有样本都被训练(验证)了一次.
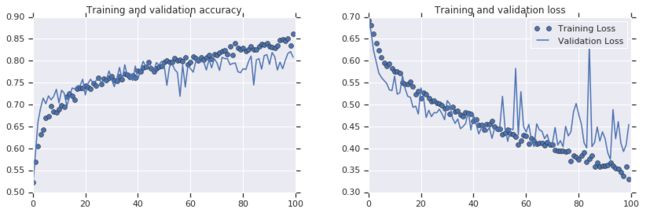
画出训练过程中各指标的曲线如下,可以看到,发生了过拟合.这是因为训练集过小,需要我们进行数据扩充:
对原图像进行数据扩充
通过向ImageDataGenerator构造函数传入一系列参数,可以实现数据扩充,具体的参数信息可以查看Keras官方文档.
下面代码演示构造ImageDataGenerator对训练集进行数据扩充:
# 创建ImageDataGenerator是传入参数进行数据扩充
train_datagen = ImageDataGenerator(
    rescale=1./255,
    rotation_range=40,
    width_shift_range=0.2,
    height_shift_range=0.2,
    shear_range=0.2,
    zoom_range=0.2,
    horizontal_flip=True,
    fill_mode='nearest'
)

test_datagen = ImageDataGenerator(rescale=1./255)
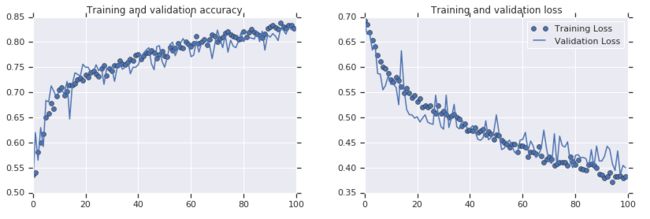
使用进行了数据扩充的ImageDataGenerator进行训练后,得到的历史指标曲线如下.可以看到,进行数据扩充有效地克服了过拟合现象.
例子3: 使用迁移学习(Transfer Learning)复用原有模型
在这个例子中,我们基于现有的InceptionV3网络构建我们自己的猫狗识别网络.模型的搭建过程分为以下几步:
-
导入训练好的的
InceptionV3网络:在Keras中内置了
InceptionV3网络模型,我们可以轻松导入它:from tensorflow.keras.applications.inception_v3 import InceptionV3 pre_trained_model = InceptionV3( input_shape = (150, 150, 3), include_top = False, # 不包含网络顶端的全连接层 weights = None # 我们会从网络上下载训练好的网络参数 )从网上下载训练好的网络参数:
wget --no-check-certificate \
https://storage.googleapis.com/mledu-datasets/inception_v3_weights_tf_dim_ordering_tf_kernels_notop.h5 \
	-O /tmp/inception_v3_weights_tf_dim_ordering_tf_kernels_notop.h5
将该参数赋给网络:
local_weights_file = '/tmp/inception_v3_weights_tf_dim_ordering_tf_kernels_notop.h5'
pre_trained_model.load_weights(local_weights_file)
这样,我们就构建好了一个训练好的
InceptionV3网络. -
锁定网络的参数,这样我们在训练时不会更新对应层上的网络权重:
for layer in pre_trained_model.layers: layer.trainable = False -
基于
pre_trained_model网络构建自己的新网络:# 定位原有网络的某一层 last_layer = pre_trained_model.get_layer('mixed7') last_output = last_layer.output # 在该层基础上添加新层构建网络 x = layers.Flatten()(last_output) x = layers.Dense(1024, activation='relu')(x) x = layers.Dropout(0.2)(x) x = layers.Dense (1, activation='sigmoid')(x) # 将对应的层次封装为新的网络模型 model = Model(input=pre_trained_model.input, output=x)
经过上面三步,我们基于InceptionV3网络构建了我们的新网络model,且原本来源于InceptionV3层的网络参数都被锁定,在训练过程中不会被更新,这样大大降低了模型训练的运算量.
剩下的对于model的操作过程与之前的例子中几乎一样.


