摘要
mall项目中的商品搜索功能,一直都没有做实时数据同步。最近发现阿里巴巴开源的canal可以把MySQL中的数据实时同步到Elasticsearch中,能很好地解决数据同步问题。今天我们来讲讲canal的使用,希望对大家有所帮助!
canal简介
canal主要用途是对MySQL数据库增量日志进行解析,提供增量数据的订阅和消费,简单说就是可以对MySQL的增量数据进行实时同步,支持同步到MySQL、Elasticsearch、HBase等数据存储中去。
canal工作原理
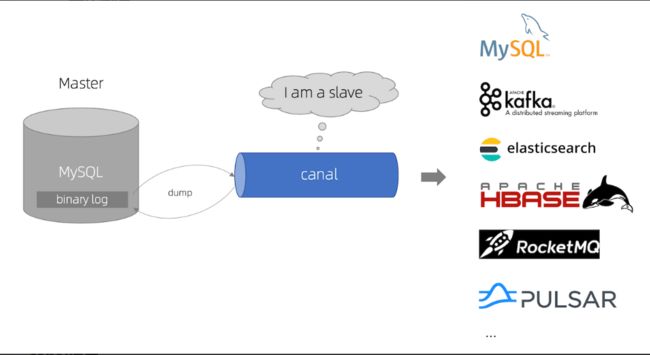
canal会模拟MySQL主库和从库的交互协议,从而伪装成MySQL的从库,然后向MySQL主库发送dump协议,MySQL主库收到dump请求会向canal推送binlog,canal通过解析binlog将数据同步到其他存储中去。
canal使用
接下来我们来学习下canal的使用,以MySQL实时同步数据到Elasticsearch为例。
组件下载
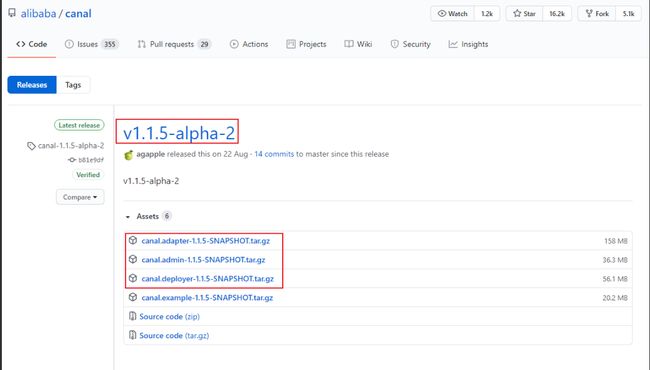
首先我们需要下载canal的各个组件canal-server、canal-adapter、canal-admin,下载地址:https://github.com/alibaba/canal/releases
canal的各个组件的用途各不相同,下面分别介绍下: canal-server(canal-deploy):可以直接监听MySQL的binlog,把自己伪装成MySQL的从库,只负责接收数据,并不做处理。 canal-adapter:相当于canal的客户端,会从canal-server中获取数据,然后对数据进行同步,可以同步到MySQL、Elasticsearch和HBase等存储中去。 canal-admin:为canal提供整体配置管理、节点运维等面向运维的功能,提供相对友好的WebUI操作界面,方便更多用户快速和安全的操作。
由于不同版本的MySQL、Elasticsearch和canal会有兼容性问题,所以我们先对其使用版本做个约定。
MySQL配置
由于canal是通过订阅MySQL的binlog来实现数据同步的,所以我们需要开启MySQL的binlog写入功能,并设置binlog-format为ROW模式,我的配置文件为/mydata/mysql/conf/my.cnf,改为如下内容即可;
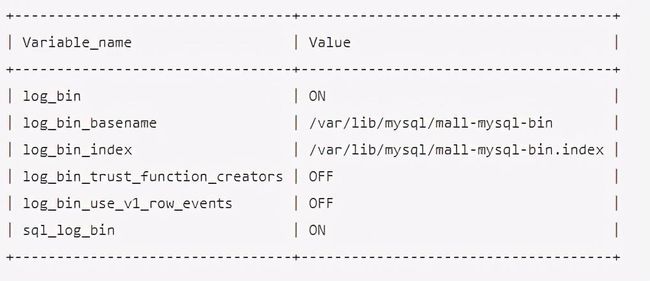
配置完成后需要重新启动MySQL,重启成功后通过如下命令查看binlog是否启用;
showvariableslike'%log_bin%'
再查看下MySQL的binlog模式;
show variables like 'binlog_format%';
接下来需要创建一个拥有从库权限的账号,用于订阅binlog,这里创建的账号为canal:canal;
CREATEUSERcanalIDENTIFIEDBY'canal';GRANTSELECT,REPLICATIONSLAVE,REPLICATIONCLIENTON*.*TO'canal'@'%';FLUSHPRIVILEGES;
创建好测试用的数据库canal-test,之后创建一张商品表product,建表语句如下。
CREATETABLE`product`(`id`bigint(20)NOTNULLAUTO_INCREMENT,`title`varchar(255)CHARACTERSETutf8COLLATEutf8_general_ciNULLDEFAULTNULL,`sub_title`varchar(255)CHARACTERSETutf8COLLATEutf8_general_ciNULLDEFAULTNULL,`price`decimal(10,2)NULLDEFAULTNULL,`pic`varchar(255)CHARACTERSETutf8COLLATEutf8_general_ciNULLDEFAULTNULL, PRIMARYKEY(`id`)USINGBTREE)ENGINE=InnoDBAUTO_INCREMENT =2CHARACTERSET= utf8COLLATE= utf8_general_ci ROW_FORMAT = Dynamic;
canal-server使用
将我们下载好的压缩包canal.deployer-1.1.5-SNAPSHOT.tar.gz上传到Linux服务器,然后解压到指定目录/mydata/canal-server,可使用如下命令解压;
tar-zxvfcanal.deployer-1.1.5-SNAPSHOT.tar.gz复制代码
解压完成后目录结构如下;
修改配置文件conf/example/instance.properties,按如下配置即可,主要是修改数据库相关配置;
使用startup.sh脚本启动canal-server服务;
shbin/startup.sh
启动成功后可使用如下命令查看服务日志信息;
tail -f logs/canal/canal.log
2020-10-2616:18:13.354[main]INFOcom.alibaba.otter.canal.deployer.CanalController-##startthecanalserver[172.17.0.1(172.17.0.1):11111]2020-10-2616:18:19.978[main]INFOcom.alibaba.otter.canal.deployer.CanalStarter-##thecanalserverisrunningnow......
启动成功后可使用如下命令查看instance日志信息;
tail -f logs/example/example.log复制代码
2020-10-2616:18:16.056[main]INFOc.a.o.c.i.spring.support.PropertyPlaceholderConfigurer-Loadingpropertiesfilefromclasspathresource[canal.properties]2020-10-2616:18:16.061[main]INFOc.a.o.c.i.spring.support.PropertyPlaceholderConfigurer-Loadingpropertiesfilefromclasspathresource[example/instance.properties]2020-10-2616:18:18.259[main]INFOc.a.otter.canal.instance.spring.CanalInstanceWithSpring-startCannalInstancefor1-example2020-10-2616:18:18.282[main]WARNc.a.o.canal.parse.inbound.mysql.dbsync.LogEventConvert--->init table filter :^.*\..*$2020-10-2616:18:18.282[main]WARNc.a.o.canal.parse.inbound.mysql.dbsync.LogEventConvert--->init table black filter :^mysql\.slave_.*$2020-10-2616:18:19.543[destination=example,address=/127.0.0.1:3306,EventParser]WARNc.a.o.c.p.inbound.mysql.rds.RdsBinlogEventParserProxy---->begintofindstartposition,itwillbelongtimeforresetorfirstposition2020-10-2616:18:19.578[main]INFOc.a.otter.canal.instance.core.AbstractCanalInstance-startsuccessful....2020-10-2616:18:19.912[destination=example,address=/127.0.0.1:3306,EventParser]WARNc.a.o.c.p.inbound.mysql.rds.RdsBinlogEventParserProxy-preparetofindstartpositionjustlastposition{"identity":{"slaveId":-1,"sourceAddress":{"address":"localhost","port":3306}},"postion":{"gtid":"","included":false,"journalName":"mall-mysql-bin.000006","position":2271,"serverId":101,"timestamp":1603682664000}}2020-10-2616:18:22.435[destination=example,address=/127.0.0.1:3306,EventParser]WARNc.a.o.c.p.inbound.mysql.rds.RdsBinlogEventParserProxy---->findstartpositionsuccessfully,EntryPosition[included=false,journalName=mall-mysql-bin.000006,position=2271,serverId=101,gtid=,timestamp=1603682664000]cost :2768ms,thenextstepisbinlogdump
如果想要停止canal-server服务可以使用如下命令。
shbin/stop.sh
canal-adapter使用
将我们下载好的压缩包canal.adapter-1.1.5-SNAPSHOT.tar.gz上传到Linux服务器,然后解压到指定目录/mydata/canal-adpter,解压完成后目录结构如下;
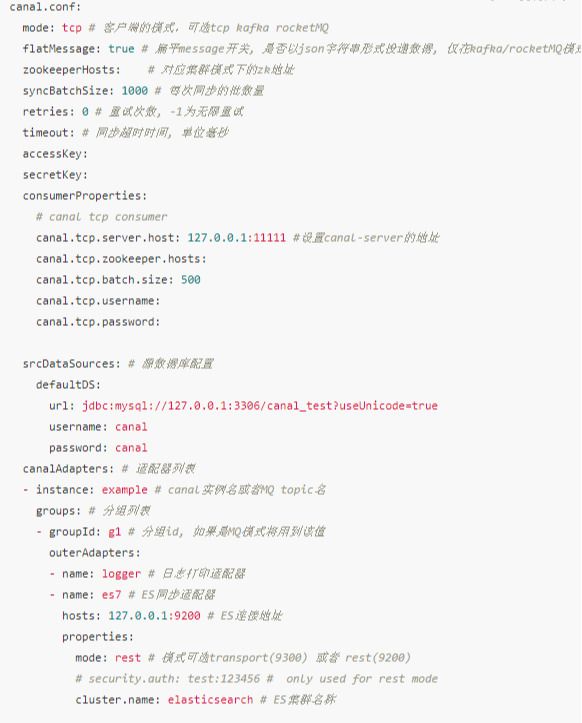
修改配置文件conf/application.yml,按如下配置即可,主要是修改canal-server配置、数据源配置和客户端适配器配置;
添加配置文件canal-adapter/conf/es7/product.yml,用于配置MySQL中的表与Elasticsearch中索引的映射关系;
使用startup.sh脚本启动canal-adapter服务;
shbin/startup.sh
启动成功后可使用如下命令查看服务日志信息;
tail -f logs/adapter/adapter.log
20-10-2616:52:55.148[main]INFO c.a.o.canal.adapter.launcher.loader.CanalAdapterLoader - Load canal adapter:loggersucceed2020-10-2616:52:57.005[main]INFOc.a.o.c.client.adapter.es.core.config.ESSyncConfigLoader-## Start loading es mapping config ... 2020-10-2616:52:57.376[main]INFOc.a.o.c.client.adapter.es.core.config.ESSyncConfigLoader-## ES mapping config loaded2020-10-2616:52:58.615[main]INFO c.a.o.canal.adapter.launcher.loader.CanalAdapterLoader - Load canal adapter:es7succeed2020-10-2616:52:58.651[main]INFO c.alibaba.otter.canal.connector.core.spi.ExtensionLoader - extension classpath dir:/mydata/canal-adapter/plugin2020-10-2616:52:59.043[main]INFO c.a.o.canal.adapter.launcher.loader.CanalAdapterLoader - Start adapter for canal-client mq topic:example-g1succeed2020-10-2616:52:59.044[main]INFOc.a.o.canal.adapter.launcher.loader.CanalAdapterService-## the canal client adapters are running now ......2020-10-2616:52:59.057[Thread-4]INFOc.a.otter.canal.adapter.launcher.loader.AdapterProcessor-=============>Start to connect destination:example<=============2020-10-2616:52:59.100[main]INFOorg.apache.coyote.http11.Http11NioProtocol-StartingProtocolHandler["http-nio-8081"]2020-10-2616:52:59.153[main]INFOorg.apache.tomcat.util.net.NioSelectorPool-Usingasharedselectorforservletwrite/read2020-10-2616:52:59.590[main]INFOo.s.boot.web.embedded.tomcat.TomcatWebServer-Tomcatstartedonport(s):8081(http)withcontextpath''2020-10-2616:52:59.626[main]INFOc.a.otter.canal.adapter.launcher.CanalAdapterApplication-StartedCanalAdapterApplicationin31.278seconds(JVMrunningfor33.99)2020-10-2616:52:59.930[Thread-4]INFOc.a.otter.canal.adapter.launcher.loader.AdapterProcessor-=============>Subscribe destination:examplesucceed<=============
如果需要停止canal-adapter服务可以使用如下命令。
shbin/stop.sh
数据同步演示
经过上面的一系列步骤,canal的数据同步功能已经基本可以使用了,下面我们来演示下数据同步功能。
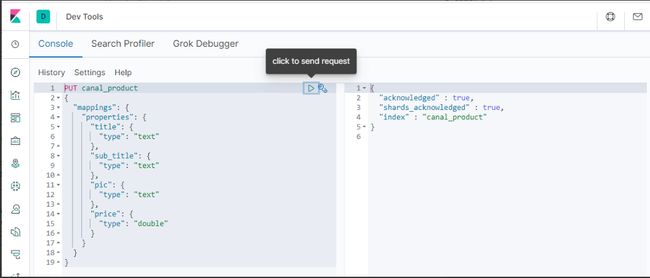
首先我们需要在Elasticsearch中创建索引,和MySQL中的product表相对应,直接在Kibana的Dev Tools中使用如下命令创建即可;
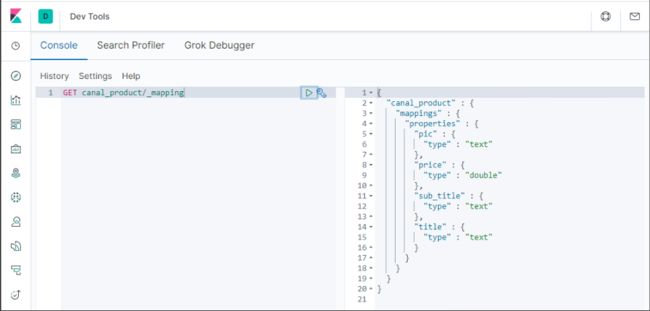
创建完成后可以查看下索引的结构;
GETcanal_product/_mapping
之后使用如下SQL语句在数据库中创建一条记录;
INSERTINTOproduct (id, title, sub_title, price, pic )VALUES(5,'小米8',' 全面屏游戏智能手机 6GB+64GB',1999.00,NULL);
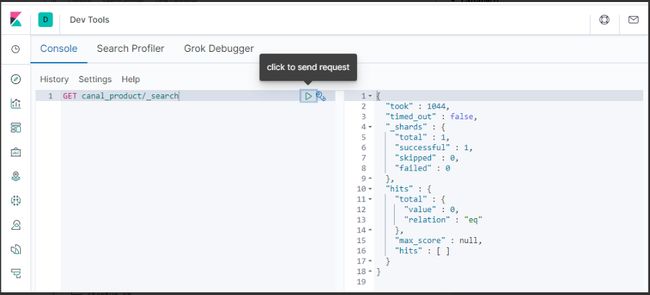
创建成功后,在Elasticsearch中搜索下,发现数据已经同步了;
GETcanal_product/_search
再使用如下SQL对数据进行修改;
UPDATEproductSETtitle='小米10'WHEREid=5
修改成功后,在Elasticsearch中搜索下,发现数据已经修改了;
再使用如下SQL对数据进行删除操作;
DELETEFROMproductWHEREid=5
删除成功后,在Elasticsearch中搜索下,发现数据已经删除了,至此MySQL同步到Elasticsearch的功能完成了!
canal-admin使用
将我们下载好的压缩包canal.admin-1.1.5-SNAPSHOT.tar.gz上传到Linux服务器,然后解压到指定目录/mydata/canal-admin,解压完成后目录结构如下;
创建canal-admin需要使用的数据库canal_manager,创建SQL脚本为/mydata/canal-admin/conf/canal_manager.sql,会创建如下表;
修改配置文件conf/application.yml,按如下配置即可,主要是修改数据源配置和canal-admin的管理账号配置,注意需要用一个有读写权限的数据库账号,比如管理账号root:root;
接下来对之前搭建的canal-server的conf/canal_local.properties文件进行配置,主要是修改canal-admin的配置,修改完成后使用sh bin/startup.sh local重启canal-server:
使用startup.sh脚本启动canal-admin服务;
shbin/startup.sh
启动成功后可使用如下命令查看服务日志信息;
tail -f logs/admin.log
020-10-2710:15:04.210[main]INFOorg.apache.coyote.http11.Http11NioProtocol-StartingProtocolHandler["http-nio-8089"]2020-10-2710:15:04.308[main]INFOorg.apache.tomcat.util.net.NioSelectorPool-Usingasharedselectorforservletwrite/read2020-10-2710:15:04.534[main]INFOo.s.boot.web.embedded.tomcat.TomcatWebServer-Tomcatstartedonport(s):8089(http)withcontextpath''2020-10-2710:15:04.573[main]INFOcom.alibaba.otter.canal.admin.CanalAdminApplication-StartedCanalAdminApplicationin31.203seconds(JVMrunningfor34.865)
访问canal-admin的Web界面,输入账号密码admin:123456即可登录,访问地址:http://192.168.3.101:8089
登录成功后即可使用Web界面操作canal-server。
