目录
一、前言
二、SpringBoot启动流程梳理
三、第一步:获取并启动监听器
四、第二步:构造应用上下文环境
4.1、 ConfigurableEnvironment environment = getOrCreateEnvironment();
4.2、 configureEnvironment(environment, applicationArguments.getSourceArgs());
4.3、 listeners.environmentPrepared(environment);
五、第三步:初始化应用上下文
一、前言
前一篇介绍了 SpringApplication 类的实例化过程,本章总结SpringBoot启动流程最重要的部分run方法。
通过run方法梳理出SpringBoot启动的流程,然后后面的博客再一步步的分析启动流程中各个步骤所做的具体的工作。深入分析后会发现SpringBoot也就是给Spring包了一层皮,事先替我们准备好Spring所需要的环境及一些基础,具体通过源码一步步深入分析后会发现Spring是真的很伟大。当然跟代码的时候越深入越容易陷进去进而发现有些东西没法通过博客详细的梳理出来。当然在这个过程中还是立足于我们对SpringBoot的使用来说明源码所做的工作。知其然才能知其所以然。加油
二、SpringBoot启动流程梳理
首先摆上run方法的源码
    public ConfigurableApplicationContext run(String... args) {
        //记录程序运行时间
        StopWatch stopWatch = new StopWatch();
        stopWatch.start();
        // ConfigurableApplicationContext Spring 的上下文
        ConfigurableApplicationContext context = null;
        Collection exceptionReporters = new ArrayList();
        this.configureHeadlessProperty();
        //从META-INF/spring.factories中获取监听器
        //1、获取并启动监听器
        SpringApplicationRunListeners listeners = this.getRunListeners(args);
        listeners.starting();

        Collection exceptionReporters;
        try {
            ApplicationArguments applicationArguments = new DefaultApplicationArguments(args);
            //2、构造应用上下文环境
            ConfigurableEnvironment environment = this.prepareEnvironment(listeners, applicationArguments);
            //处理需要忽略的Bean
            this.configureIgnoreBeanInfo(environment);
            //打印banner
            Banner printedBanner = this.printBanner(environment);
            //3、初始化应用上下文
            context = this.createApplicationContext();
            //实例化SpringBootExceptionReporter.class,用来支持报告关于启动的错误
            exceptionReporters = this.getSpringFactoriesInstances(SpringBootExceptionReporter.class, new Class[]{ConfigurableApplicationContext.class}, context);
            //4、刷新应用上下文前的准备阶段
            this.prepareContext(context, environment, listeners, applicationArguments, printedBanner);
            //5、刷新应用上下文
            this.refreshContext(context);
            //刷新应用上下文后的扩展接口
            this.afterRefresh(context, applicationArguments);
            //时间记录停止
            stopWatch.stop();
            if (this.logStartupInfo) {
                (new StartupInfoLogger(this.mainApplicationClass)).logStarted(this.getApplicationLog(), stopWatch);
            }

            //发布容器启动完成事件
            listeners.started(context);
            this.callRunners(context, applicationArguments);
        } catch (Throwable var10) {
            this.handleRunFailure(context, var10, exceptionReporters, listeners);
            throw new IllegalStateException(var10);
        }

        try {
            listeners.running(context);
            return context;
        } catch (Throwable var9) {
            this.handleRunFailure(context, var9, exceptionReporters, (SpringApplicationRunListeners)null);
            throw new IllegalStateException(var9);
        }
    }
具体的每一行代码的含义请看注释,我们在这先总结一下启动过程中的重要步骤:(笔者倾向于将应用上下文同容器区分开来)
第一步:获取并启动监听器
第二步:构造应用上下文环境
第三步:初始化应用上下文
第四步:刷新应用上下文前的准备阶段
第五步:刷新应用上下文
第六步:刷新应用上下文后的扩展接口
OK,下面SpringBoot的启动流程分析,我们就根据这6大步骤进行详细解读。最总要的是第四,五步。我们会着重的分析。
三、第一步:获取并启动监听器
事件机制在Spring是很重要的一部分内容,通过事件机制我们可以监听Spring容器中正在发生的一些事件,同样也可以自定义监听事件。Spring的事件为Bean和Bean之间的消息传递提供支持。当一个对象处理完某种任务后,通知另外的对象进行某些处理,常用的场景有进行某些操作后发送通知,消息、邮件等情况。
    private SpringApplicationRunListeners getRunListeners(String[] args) {
        Class[] types = new Class[]{SpringApplication.class, String[].class};
        return new SpringApplicationRunListeners(logger, this.getSpringFactoriesInstances(SpringApplicationRunListener.class, types, this, args));
    }
在这里面是不是看到一个熟悉的方法:getSpringFactoriesInstances(),可以看下下面的注释,前面的博文我们已经详细介绍过该方法是怎么一步步的获取到META-INF/spring.factories中的指定的key的value,获取到以后怎么实例化类的。
/**
 * 通过指定的classloader 从META-INF/spring.factories获取指定的Spring的工厂实例
 * @param type
 * @param parameterTypes
 * @param args
 * @param
 * @return
 */
    private  Collection getSpringFactoriesInstances(Class type, Class[] parameterTypes, Object... args) {
        ClassLoader classLoader = this.getClassLoader();
        // Use names and ensure unique to protect against duplicates
        //通过指定的classLoader从 META-INF/spring.factories 的资源文件中,
        //读取 key 为 type.getName() 的 value
        Set names = new LinkedHashSet(SpringFactoriesLoader.loadFactoryNames(type, classLoader));
        //创建Spring工厂实例
        List instances = this.createSpringFactoriesInstances(type, parameterTypes, classLoader, args, names);
        //对Spring工厂实例排序(org.springframework.core.annotation.Order注解指定的顺序)
        AnnotationAwareOrderComparator.sort(instances);
        return instances;
    }
回到run方法,debug这个代码 SpringApplicationRunListeners listeners = getRunListeners(args); 看一下获取的是哪个监听器:

EventPublishingRunListener监听器是Spring容器的启动监听器。
listeners.starting(); 开启了监听事件。
四、第二步:构造应用上下文环境
应用上下文环境包括什么呢?包括计算机的环境,Java环境,Spring的运行环境,Spring项目的配置(在SpringBoot中就是那个熟悉的application.properties/yml)等等。
首先看一下prepareEnvironment()方法。
    private ConfigurableEnvironment prepareEnvironment(SpringApplicationRunListeners listeners, ApplicationArguments applicationArguments) {
        // Create and configure the environment
        //创建并配置相应的环境
        ConfigurableEnvironment environment = this.getOrCreateEnvironment();

        //根据用户配置,配置 environment系统环境
        this.configureEnvironment((ConfigurableEnvironment)environment, applicationArguments.getSourceArgs());
        ConfigurationPropertySources.attach((Environment)environment);
        // 启动相应的监听器,其中一个重要的监听器 ConfigFileApplicationListener 就是加载项目配置文件的监听器。listeners.environmentPrepared((ConfigurableEnvironment)environment);
        this.bindToSpringApplication((ConfigurableEnvironment)environment);
        if (!this.isCustomEnvironment) {
            environment = (new EnvironmentConverter(this.getClassLoader())).convertEnvironmentIfNecessary((ConfigurableEnvironment)environment, this.deduceEnvironmentClass());
        }

        ConfigurationPropertySources.attach((Environment)environment);
        return (ConfigurableEnvironment)environment;
    }
看上面的注释,方法中主要完成的工作,首先是创建并按照相应的应用类型配置相应的环境,然后根据用户的配置,配置系统环境,然后启动监听器,并加载系统配置文件。
4.1、 ConfigurableEnvironment environment = getOrCreateEnvironment();
看看getOrCreateEnvironment()干了些什么。
private ConfigurableEnvironment getOrCreateEnvironment() {
      if (this.environment != null) {
          return this.environment;
      }
      //如果应用类型是 SERVLET 则实例化 StandardServletEnvironment
      if (this.webApplicationType == WebApplicationType.SERVLET) {
         return new StandardServletEnvironment();
     }
      return new StandardEnvironment();
 }
通过代码可以看到根据不同的应用类型初始化不同的系统环境实例。前面咱们已经说过应用类型是怎么判断的了,这里就不在赘述了。

从上面的继承关系可以看出,StandardServletEnvironment是StandardEnvironment的子类。这两个对象也没什么好讲的,当是web项目的时候,环境上会多一些关于web环境的配置。
4.2、 configureEnvironment(environment, applicationArguments.getSourceArgs());
protected void configureEnvironment(ConfigurableEnvironment environment, String[] args) {
     // 将main 函数的args封装成 SimpleCommandLinePropertySource 加入环境中。
     configurePropertySources(environment, args);
     // 激活相应的配置文件
     configureProfiles(environment, args); 7
}
在执行完方法中的两行代码后,debug的截图如下
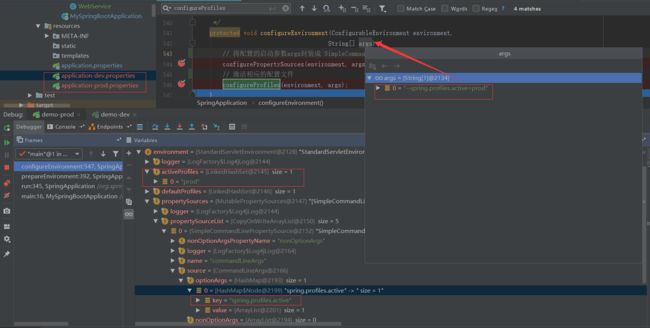
如下图所示,我在spring的启动参数中指定了参数:--spring.profiles.active=prod(关于这个参数的用法,点我,其实就是启动多个实例用的)

在configurePropertySources(environment, args);中将args封装成了SimpleCommandLinePropertySource并加入到了environment中。
configureProfiles(environment, args);根据启动参数激活了相应的配置文件。
话不多说,debug一遍就明白了。
4.3、 listeners.environmentPrepared(environment);
进入到方法一路跟下去就到了SimpleApplicationEventMulticaster类的multicastEvent()方法。


查看getApplicationListeners(event, type)执行结果,发现一个重要的监听器ConfigFileApplicationListener。
先看看这个类的注释
/**
* {@link EnvironmentPostProcessor} that configures the context environment by loading
* properties from well known file locations. By default properties will be loaded from
* 'application.properties' and/or 'application.yml' files in the following locations:
*
* - classpath:
* - file:./
* - classpath:config/
* - file:./config/:
*
*
* Alternative search locations and names can be specified using
* {@link #setSearchLocations(String)} and {@link #setSearchNames(String)}.
*
* Additional files will also be loaded based on active profiles. For example if a 'web'
* profile is active 'application-web.properties' and 'application-web.yml' will be
* considered.
*
* The 'spring.config.name' property can be used to specify an alternative name to load
* and the 'spring.config.location' property can be used to specify alternative search
* locations or specific files.
*
* 从默认的位置加载配置文件,并将其加入 上下文的 environment变量中
*/
这个监听器默认的从注释中
- 标签所示的几个位置加载配置文件,并将其加入 上下文的 environment变量中。当然也可以通过配置指定。
debug跳过 listeners.environmentPrepared(environment); 这一行,查看environment属性,果真如上面所说的,配置文件的配置信息已经添加上来了。

五、第三步:初始化应用上下文
在SpringBoot工程中,应用类型分为三种,如下代码所示。
public enum WebApplicationType {
    /**
     * 应用程序不是web应用,也不应该用web服务器去启动
     */
    NONE,
    /**
     * 应用程序应作为基于servlet的web应用程序运行,并应启动嵌入式servlet web(tomcat)服务器。
     */
    SERVLET,
    /**
     * 应用程序应作为 reactive web应用程序运行,并应启动嵌入式 reactive web服务器。
     */
    REACTIVE
}
对应三种应用类型,SpringBoot项目有三种对应的应用上下文,我们以web工程为例,即其上下文为AnnotationConfigServletWebServerApplicationContext。
public static final String DEFAULT_WEB_CONTEXT_CLASS = "org.springframework.boot."
        + "web.servlet.context.AnnotationConfigServletWebServerApplicationContext";
public static final String DEFAULT_REACTIVE_WEB_CONTEXT_CLASS = "org.springframework."
        + "boot.web.reactive.context.AnnotationConfigReactiveWebServerApplicationContext";
public static final String DEFAULT_CONTEXT_CLASS = "org.springframework.context."
        + "annotation.AnnotationConfigApplicationContext";

protected ConfigurableApplicationContext createApplicationContext() {
    Class contextClass = this.applicationContextClass;
    if (contextClass == null) {
        try {
            switch (this.webApplicationType) {
                case SERVLET:
                    contextClass = Class.forName(DEFAULT_WEB_CONTEXT_CLASS);
                    break;
                case REACTIVE:
                    contextClass = Class.forName(DEFAULT_REACTIVE_WEB_CONTEXT_CLASS);
                    break;
                default:
                    contextClass = Class.forName(DEFAULT_CONTEXT_CLASS);
            }
        } catch (ClassNotFoundException ex) {
            throw new IllegalStateException(
                    "Unable create a default ApplicationContext, "
                            + "please specify an ApplicationContextClass",
                    ex);
        }
    }
    return (ConfigurableApplicationContext) BeanUtils.instantiateClass(contextClass);
}
我们先看一下AnnotationConfigServletWebServerApplicationContext的设计。

关于他的继承体系,我们在前面的博客中
应用上下文可以理解成IoC容器的高级表现形式,应用上下文确实是在IoC容器的基础上丰富了一些高级功能。
应用上下文对IoC容器是持有的关系。他的一个属性beanFactory就是IoC容器(DefaultListableBeanFactory)。所以他们之间是持有,和扩展的关系。
接下来看GenericApplicationContext类
public class GenericApplicationContext extends AbstractApplicationContext implements BeanDefinitionRegistry {
    private final DefaultListableBeanFactory beanFactory;
    ...
    public GenericApplicationContext() {
        this.beanFactory = new DefaultListableBeanFactory();
    }
    ...
}
beanFactory正是在AnnotationConfigServletWebServerApplicationContext实现的接口GenericApplicationContext中定义的。在上面createApplicationContext()方法中的, BeanUtils.instantiateClass(contextClass) 这个方法中,不但初始化了AnnotationConfigServletWebServerApplicationContext类,也就是我们的上下文context,同样也触发了GenericApplicationContext类的构造函数,从而IoC容器也创建了。仔细看他的构造函数,有没有发现一个很熟悉的类DefaultListableBeanFactory,没错,DefaultListableBeanFactory就是IoC容器真实面目了。在后面的refresh()方法分析中,DefaultListableBeanFactory是无处不在的存在感。
debug跳过createApplicationContext()方法。

如上图所示,context就是我们熟悉的上下文(也有人称之为容器,都可以,看个人爱好和理解),beanFactory就是我们所说的IoC容器的真实面孔了。细细感受下上下文和容器的联系和区别,对于我们理解源码有很大的帮助。在系列文章中,我们也是将上下文和容器严格区分开来的。