你要知道的KVC、KVO、Delegate、Notification都在这里
转载请注明出处 http://www.jianshu.com/p/eafa34abdad5
本系列文章主要通过讲解KVC、KVO、Delegate、Notification的使用方法,来探讨KVO、Delegate、Notification的区别以及相关使用场景,本系列文章将分一下几篇文章进行讲解,读者可按需查阅。
- KVC 使用方法详解及底层实现
- KVO 正确使用姿势进阶及底层实现
- Protocol与Delegate 使用方法详解
- NSNotificationCenter 通知使用方法详解
- KVO、Delegate、Notification 区别及相关使用场景
Protocol与Delegate 使用方法详解
protocol协议类似于Java的接口,规定一系列实现类应该遵守的方法,OC中protocol协议远没有Java中的interface使用频率高,毕竟在Java中面向接口编程更加盛行,但OC使用较频繁的代理模式delegate就是以protocol作为基础实现的。代理模式是OC中一个非常重要的概念,接下来将从protocol协议开始逐一进行讲解。
实现协议还有一种方法,就是通过类别category实现,前面两篇文章讲解的KVC和KVO的实现都是依赖于类别而不是接口,类别提供了一种限定性更弱,并且不需要修改源代码的方式来为已有类添加新的方法,非常适用于扩展第三方或是系统提供的已有类。
接下来举一个通过类别category扩展实现协议的栗子:
#import

@interface NSObject (Flyable)

- (void)fly;

@end

@interface Bird : NSObject

@end

@implementation Bird

- (void)fly
{
    NSLog(@"I can fly!!!");
}

@end

int main(int argc, const char * argv[]) {
    @autoreleasepool {

        NSObject *obj = [[Bird alloc] init];
        [obj fly];
    }
    return 0;
}
上面的栗子首先定义了一个Flyable的类别,扩展的是NSObject类,接着定义了Bird类,该类继承自NSObject类,因此也继承了fly方法,在Bird类的实现中实现了fly方法,因此在main函数中可以通过NSObject来调用fly方法。category类别并不要求扩展类的子类实现类别中声明的所有方法,因此,如果Bird类没有实现fly方法再调用fly方法时会抛出异常,因此,正确的使用方法应该先判断其是否能够响应相关方法:
int main(int argc, const char * argv[]) {
    @autoreleasepool {

        NSObject *obj = [[Bird alloc] init];
        //判断是否能够响应fly方法
        if ([obj respondsToSelector:@selector(fly)])
        {
            [obj fly];
        }
    }
    return 0;
}
类别category不能强制要求子类实现其声明的方法,所以如果有必须要子类实现的方法应当使用protocol协议来定义,举个协议的例子:
#import

@protocol Flyable

@required
- (void)fly;

@optional
- (void)run;

@end

@interface Bird : NSObject

@end

@implementation Bird

- (void)fly
{
    NSLog(@"I can fly!!!");
}

- (void)run
{
    NSLog(@"I can run too !!!");
}

@end


int main(int argc, const char * argv[]) {
    @autoreleasepool {

        NSObject *flyAnimal = [[Bird alloc] init];
        [flyAnimal fly];

        id flyAnimal2 = [[Bird alloc] init];
        [flyAnimal2 fly];

        if ([flyAnimal2 respondsToSelector:@selector(run)])
        {
            [flyAnimal2 run];
        }

    }
    return 0;
}
OC的类与Java的类一样,不支持多重继承,只支持单继承,OC的协议protocol与Java的interface接口一样,支持多重继承,在定义protocol协议时最好让其继承NSObject协议,否则无法使用respondsToSelector方法。
通过协议类型来定义变量时与Java接口不同,Java的接口本身就可以作为一种类型来定义变量,但协议不可以,协议需要依托于NSobject或id,使用required关键字标识遵守协议的类必须要实现的方法,而optional关键字标识遵守协议的类可选实现的方法。对于可选方法在调用前最好先进行一次判断,由于id本身就是指针类型,因此不需要加*语法来标识其为指针。
接下来就叫介绍代理模式也称为委托模式delegate,代理模式顾名思义就是让其他类代理当前类来执行一些任务,实现方式就是要依托协议protocol,定义一系列的方法,如果某个对象想成为其的代理则需要去实现该协议的方法,当需要给委托的对象传递信息或是想要从委托对象获取信息时就可以调用相关的方法,通过从委托获取数据这样的方式可以将数据与业务逻辑解耦,就像我们常使用的UITableView或UICollectionView,这些视图是用来展示一系列数据的,这些视图应该只负责展示数据,而不应该去负责获取或是决定哪些数据用于展示,这时委托的对象称为数据源dataSource,当然,视图中还可以包含事件的处理,此时则是委托delegate。
接下来考虑一个场景,现在有两个视图控制器A和B,我们在A视图中有一个标签和一个按钮,点击按钮可以跳转到B视图,B视图有一个输入框和一个按钮,点击按钮后跳转回A视图,此时要求将B视图用户填写的数据展示在A视图的标签上。
这是一个在实际开发中比较常见的场景,能够实现这个功能的方法也有很多,比如:在创建B视图让其持有A视图的弱引用,并提供一个函数用于修改标签数据,B视图在用户点击按钮后调用该方法然后再退出视图。这个方法肯定是可行的,但是太过凌乱,B视图不一定知道该调用A视图的何种方法,B视图也不一定会去调用该方法,为了规范代码,这个场景使用委托模式delegate更加合适。具体代码如下:
//上述视图A为ViewController,视图B为NextViewController
//NextViewController.h文件代码如下:

#ifndef NextViewController_h
#define NextViewController_h

#import

@protocol PassStringValueDelegate

@required
- (void) passValueWithString:(NSString*)stringValue;

@end

@interface NextViewController: UIViewController

@property (nonatomic, weak) id delegate;

@end

#endif /* NextViewController_h */
NextViewController.h文件中定义了一个协议,PassStringValueDelegate,该协议只有一个方法passValueWithString方法,该方法作用如其名,就是为了传递stringValue,并且定义了一个weak修饰的遵守PassStringValueDelegate协议的变量delegate,这里使用weak是为了防止互相持有强引用构成引用环。
接下来看一下NextViewController.m文件代码:
#define ScreenWidth [[UIScreen mainScreen] bounds].size.width
#define ScreenHeight [[UIScreen mainScreen] bounds].size.height

@interface NextViewController()

@property (nonatomic, strong) UITextField *textField;
@property (nonatomic, strong) UIButton *completeButton;

@end

@implementation NextViewController

@synthesize textField = _textField;
@synthesize completeButton = _completeButton;
@synthesize delegate = _delegate;

- (instancetype)init
{
    if (self = [super init])
    {
        self.view.backgroundColor = [UIColor whiteColor];

        self.textField = [[UITextField alloc] initWithFrame:CGRectMake((ScreenWidth - 150) / 2.0, 200, 150, 50)];
        self.textField.placeholder = @"please input sth...";
        [self.view addSubview:self.textField];

        self.completeButton = [UIButton buttonWithType:UIButtonTypeCustom];
        self.completeButton.frame = CGRectMake((ScreenWidth - 80) / 2.0, self.textField.frame.origin.y + self.textField.frame.size.height, 80, 40);
        [self.completeButton setBackgroundColor:[UIColor greenColor]];
        [self.completeButton setTitle:@"Complete" forState:UIControlStateNormal];
        [self.completeButton addTarget:self action:@selector(completeButtonClickedHandler) forControlEvents:UIControlEventTouchUpInside];
        [self.view addSubview:self.completeButton];
    }
    return self;
}

//用户完成输入点击按钮的事件处理器
- (void)completeButtonClickedHandler
{
    /*
    首先需要判断delegate是否能响应passValueWithString:方法
    如果delegate为nil或不能响应该方法这里的返回值都为false
    定义协议需要继承NSObject协议才可使用该方法
    */
    if ([self.delegate respondsToSelector:@selector(passValueWithString:)])
    {
        //委托可以响应相关方法则调用该方法
        [self.delegate passValueWithString:self.textField.text];
    }
    //退出视图
    [self dismissViewControllerAnimated:YES completion:nil];
}

@end
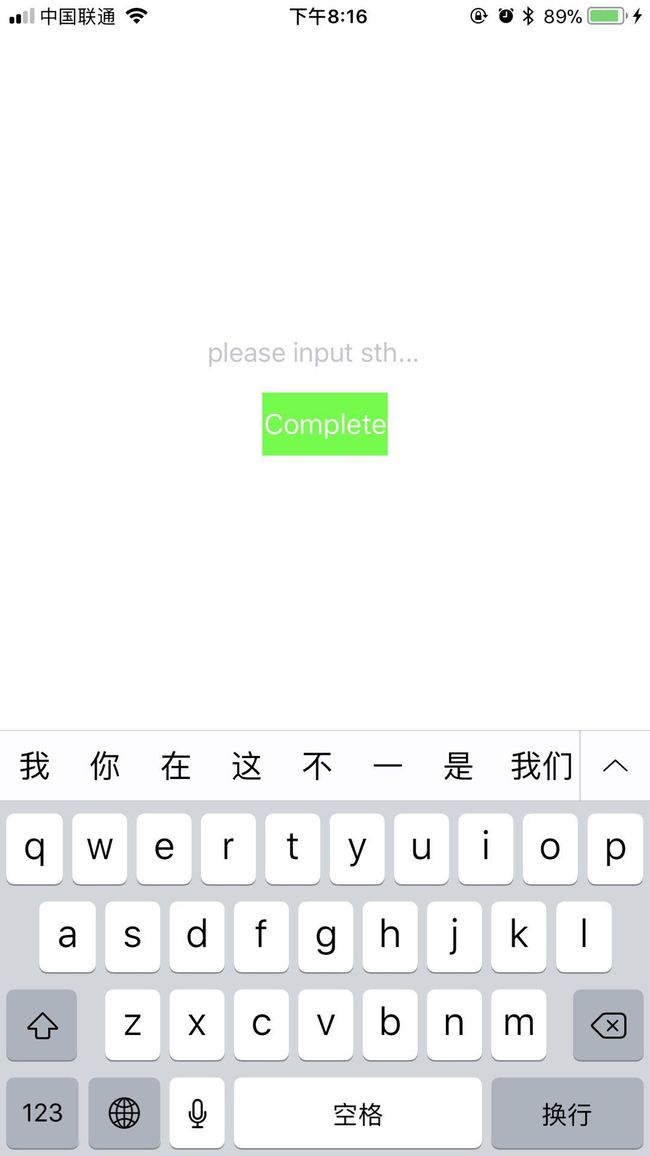
整个NextViewController的逻辑比较简单,在UI方面只有一个UITextField的输入框和一个完成按钮UIButton,当用户输入完成后点击完成按钮,NextViewController会通过协议声明的方法来通知委托对象接收相关参数。实现的界面效果如下:
接下来看一下ViewController.m文件代码:
#define ScreenWidth [[UIScreen mainScreen] bounds].size.width
#define ScreenHeight [[UIScreen mainScreen] bounds].size.height

//ViewController遵守PassStringValueDelegate协议
@interface ViewController ()

@property (nonatomic, strong) UIButton *button;
@property (nonatomic, strong) UILabel *label;

@end

@implementation ViewController

@synthesize button = _button;
@synthesize label = _label;

- (instancetype)init
{
    if (self = [super init])
    {
        self.view.backgroundColor = [UIColor whiteColor];

        self.button = [UIButton buttonWithType:UIButtonTypeCustom];
        [self.button setTitle:@"Click Me" forState:UIControlStateNormal];
        [self.button setBackgroundColor:[UIColor redColor]];
        self.button.frame = CGRectMake((ScreenWidth - 80) / 2.0, 200, 80, 40);
        [self.button addTarget:self action:@selector(buttonClicked) forControlEvents:UIControlEventTouchUpInside];
        [self.view addSubview:self.button];

        self.label = [[UILabel alloc] initWithFrame:CGRectMake(0, self.button.frame.origin.y + self.button.frame.size.height + 10, ScreenWidth, 40)];
        self.label.font = [UIFont systemFontOfSize:18];
        self.label.textAlignment = NSTextAlignmentCenter;
        self.label.text = @"";
        [self.view addSubview:self.label];

    }
    return self;
}

//按钮点击事件处理器
- (void)buttonClicked
{
    //创建NextViewController对象
    NextViewController *vc = [[NextViewController alloc] init];
    //设置其代理为self
    vc.delegate = self;
    //展示视图
    [self presentViewController:vc animated:YES completion:nil];
}

//实现PassStringValueDelegate协议的方法用于接收NextViewController回调的参数
- (void)passValueWithString:(NSString *)stringValue
{
    //将NextViewController传回的参数展示在UI上
    self.label.text = stringValue;
}

@end
ViewController页面也很简单只有一个按钮一个标签,ViewController遵守了PassStringValueDelegate因此需要实现该协议的方法passValueWithString:,当NextViewController返回参数后就可通过该方法接收参数并展示在UI上。
当点击按钮跳转到NextViewController,在输入框输入Hello,World!,并点击按钮退出NextViewController后的ViewController具体效果如下:
通过上面的代码可以看出委托模式提供了一种规范化的方式来实现回调,并且实现起来也很简洁。
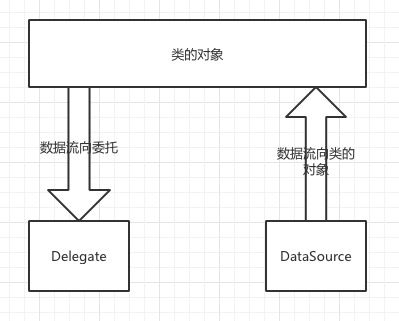
委托有两种方式,一种是代理delegate,当对象有某些事件发生后需要交由委托对象处理,类似于上面的栗子,这种方式一般代理协议定义的方法会包含一一些必要的参数用于对象通知委托对象,返回值往往为void。还有一种是数据源dataSource,对象需要从委托对象中获取数据,此时在代理协议中声明的方法就会有返回值,有时也会传递一定的形参通知委托对象返回什么样的数据。数据流向如下图所示:
备注
由于作者水平有限,难免出现纰漏,如有问题还请不吝赐教。


