目标检测Anchor-free FCOS网络训练自己数据集(VOC格式)
FCOS训练自己数据集
-
-
- FCOS测试:
- YOLO V3测试:
- 一、环境配置:
-
- 2种方案,源码更清晰一点,mm框架的训练方便。
- 2.搭建mmdetection:
- 要求
- 安装虚拟环境
- 二、制作VOC格式数据集:
- 三、实验细节:
-
- 训练命令
- 测试命令
- 四、训练结果
- 五、FCOS在该数据集的MAP测量
-
FCOS测试:
论文参考博主另一篇博客:论文阅读【FCOS】
YOLO V3测试:
一、环境配置:
2种方案,源码更清晰一点,mm框架的训练方便。
- 直接项目源码:https://github.com/tianzhi0549/FCOS ,截止目前 pytorch每天都在更新nightly(测试)版本,建议安装最新稳定(stable)版pytorch=1.3.1, torchvision=0.4.2, cudatoolkit=10.0匹配cuda10.0,使用命令nvcc -V 查下你当前的cuda版本,最后执行命令:
# first, make sure that your conda is setup properly with the right environment
# for that, check that `which conda`, `which pip` and `which python` points to the
# right path. From a clean conda env, this is what you need to do

conda create --name FCOS
conda activate FCOS

# this installs the right pip and dependencies for the fresh python
conda install ipython

# FCOS and coco api dependencies
pip install ninja yacs cython matplotlib tqdm

# follow PyTorch installation in https://pytorch.org/get-started/locally/
# we give the instructions for CUDA 9.0
conda install -c pytorch==1.3.1 torchvision=0.4.2 cudatoolkit=10.0


# install pycocotools. Please make sure you have installed cython.
cd到home/xxx下
git clone https://github.com/cocodataset/cocoapi.git
cd cocoapi/PythonAPI
python setup.py build_ext install

# install PyTorch Detection
cd到home/xxx下
git clone https://github.com/tianzhi0549/FCOS.git
cd FCOS

# the following will install the lib with
# symbolic links, so that you can modify
# the files if you want and won't need to
# re-build it
激活fcos环境再编译 source activate FCOS
python setup.py build develop --no-deps
2.搭建mmdetection:
参考:https://github.com/open-mmlab/mmdetection
mmdetection安装文档详见:https://github.com/open-mmlab/mmdetection/blob/master/docs/INSTALL.md
mmcv安装文档详见: https://github.com/open-mmlab/mmcv
要求
- Linux (Windows is not officially supported)
- Python 3.5+ (Python 2 is not supported)
- PyTorch 1.1 or higher
- CUDA 9.0 or higher
- NCCL 2
- GCC(G++) 4.9 or higher
- mmcv
注:这里安装前一般把 NCCL 和 MMCV提前安装好
安装虚拟环境
conda还是好一点,装局部的话,安装过成中 将 set conda python那个选 no,就不会改变系统python 装局部启动环境时
执行:
cd anacond3/bin
source activate
source activate open-mmlab
不要忙着启动了,还没搭环境呢,anaconda安装好之后执行:
a. Create a conda virtual environment and activate it.
conda create -n open-mmlab python=3.7 -y
conda activate open-mmlab
b. Install PyTorch stable or nightly and torchvision following the official instructions, e.g.,
conda install pytorch torchvision -c pytorch
c. Clone the mmdetection repository.
git clone https://github.com/open-mmlab/mmdetection.git
cd mmdetection
d. Install mmdetection (other dependencies will be installed automatically).
python setup.py develop
# or "pip install -v -e ."
二、制作VOC格式数据集:
这里没有用coco格式,原作者代码解析coco官方数据集没问题,博主自己转换的就有问题,这里我看了coco API借口也没发现自己制作的问题,算了赶时间我就换VOC格式,VOC相比COCO能简单,COCO数据集无用的信息太多了。
参考:https://blog.csdn.net/u011574296/article/details/78953681
这个网上很多,如果不想制作看博主一篇文章:我们直接提取VOC,或者COCO的某几类作为自己的数据集,博主提取COCO的person一类哈 :
提取VOC或COCO某几类数据集:https://blog.csdn.net/weixin_38632246/article/details/97141364:
三、实验细节:
修改配置文件~ /mmdetection/config/fcos/fcos_r50_caffe_fpn_gn_1x_4gpu.py
# model settings
model = dict(
    type='FCOS',
    pretrained='/home/rock/mmdetection/configs/fcos/resnet50_caffe-788b5fa3.pth',  #这个可以不改,默认直接下载
    backbone=dict(
        type='ResNet',
        depth=50,
        num_stages=4,
        out_indices=(0, 1, 2, 3),
        frozen_stages=1,
        norm_cfg=dict(type='BN', requires_grad=False),
        style='caffe'),
    neck=dict(
        type='FPN',
        in_channels=[256, 512, 1024, 2048],
        out_channels=256,
        start_level=1,
        add_extra_convs=True,
        extra_convs_on_inputs=False,  # use P5
        num_outs=5,
        relu_before_extra_convs=True),
    bbox_head=dict(
        type='FCOSHead',
        num_classes=2,  #改下类别为 class+1
        in_channels=256,
        stacked_convs=4,
        feat_channels=256,
        strides=[8, 16, 32, 64, 128],
        loss_cls=dict(
            type='FocalLoss',
            use_sigmoid=True,
            gamma=2.0,
            alpha=0.25,
            loss_weight=1.0),
        loss_bbox=dict(type='IoULoss', loss_weight=1.0),
        loss_centerness=dict(
            type='CrossEntropyLoss', use_sigmoid=True, loss_weight=1.0)))
# training and testing settings
train_cfg = dict(
    assigner=dict(
        type='MaxIoUAssigner',
        pos_iou_thr=0.5,
        neg_iou_thr=0.4,
        min_pos_iou=0,
        ignore_iof_thr=-1),
    allowed_border=-1,
    pos_weight=-1,
    debug=False)
test_cfg = dict(
    nms_pre=1000,
    min_bbox_size=0,
    score_thr=0.05,
    nms=dict(type='nms', iou_thr=0.5),
    max_per_img=100)
# dataset settings
dataset_type = 'VOCDataset' #改成 VOCDataset
data_root = '/home/rock/dataset/pd/'# 博主在~/pd/下存放的是转换后的VOC2012数据集,建议名字VOC2012,不要乱改,不然程序要多改/home/rock/mmdetection/mmdet/datasets/voc.py 文件,后面再说喽
img_norm_cfg = dict(
    mean=[102.9801, 115.9465, 122.7717], std=[1.0, 1.0, 1.0], to_rgb=False)
train_pipeline = [
    dict(type='LoadImageFromFile'),
    dict(type='LoadAnnotations', with_bbox=True),
    dict(type='Resize', img_scale=(1333, 800), keep_ratio=True),
    dict(type='RandomFlip', flip_ratio=0.5),
    dict(type='Normalize', **img_norm_cfg),
    dict(type='Pad', size_divisor=32),
    dict(type='DefaultFormatBundle'),
    dict(type='Collect', keys=['img', 'gt_bboxes', 'gt_labels']),
]
test_pipeline = [
    dict(type='LoadImageFromFile'),
    dict(
        type='MultiScaleFlipAug',
        img_scale=(1333, 800),
        flip=False,
        transforms=[
            dict(type='Resize', keep_ratio=True),
            dict(type='RandomFlip'),
            dict(type='Normalize', **img_norm_cfg),
            dict(type='Pad', size_divisor=32),
            dict(type='ImageToTensor', keys=['img']),
            dict(type='Collect', keys=['img']),
        ])
]
data = dict(
    imgs_per_gpu=4,
    workers_per_gpu=4,
    train=dict(
        type=dataset_type,
        ann_file=data_root + 'VOC2012/ImageSets/Main/trainval.txt',  #以下数据集路径都要改
        img_prefix=data_root+'VOC2012/',
        pipeline=train_pipeline),
    val=dict(
        type=dataset_type,
        ann_file=data_root + 'VOC2012/ImageSets/Main/test.txt',
        img_prefix=data_root+'VOC2012/',
        pipeline=test_pipeline),
    test=dict(
        type=dataset_type,
        ann_file=data_root + 'VOC2012/ImageSets/Main/test.txt',
        img_prefix=data_root+'VOC2012/',
        pipeline=test_pipeline))
# optimizer
optimizer = dict(
    type='SGD',
    lr=0.002,
    momentum=0.9,
    weight_decay=0.0001,
    paramwise_options=dict(bias_lr_mult=2., bias_decay_mult=0.))
optimizer_config = dict(grad_clip=None)
# learning policy
lr_config = dict(
    policy='step',
    warmup='constant',
    warmup_iters=500,
    warmup_ratio=1.0 / 3,
    step=[8, 11])
checkpoint_config = dict(interval=1)
# yapf:disable
log_config = dict(
    interval=50,
    hooks=[
        dict(type='TextLoggerHook'),
        dict(type='TensorboardLoggerHook')  #把这项打开,tensorboard 可以查看日志
    ])
# yapf:enable
# runtime settings
total_epochs = 12
device_ids = range(4)
dist_params = dict(backend='nccl')
log_level = 'INFO'
work_dir = './work_dirs/fcos_r50_caffe_fpn_gn_1x_4gpu_pd'
load_from = None
resume_from = None
workflow = [('train', 1)]
修改配置文件 /mmdetection/mmdet/datasets/voc.py
from .registry import DATASETS
from .xml_style import XMLDataset


@DATASETS.register_module
class VOCDataset(XMLDataset):

    # CLASSES = ('aeroplane', 'bicycle', 'bird', 'boat', 'bottle', 'bus', 'car',
    #            'cat', 'chair', 'cow', 'diningtable', 'dog', 'horse',
    #            'motorbike', 'person', 'pottedplant', 'sheep', 'sofa', 'train',
    #            'tvmonitor')
    CLASSES = ('person',)  #几类你写几类,一类把最后的逗号加上


    def __init__(self, **kwargs):
        super(VOCDataset, self).__init__(**kwargs)
        if 'VOC2007' in self.img_prefix:
            self.year = 2007
        elif 'VOC2012' in self.img_prefix:
            self.year = 2012    # 如果你是VOC2017把数字改过来就行
        else:
            raise ValueError('Cannot infer dataset year from img_prefix')
训练命令
python tools/test.py configs/fcos/fcos_r50_caffe_fpn_gn_1x_4gpu.py
测试命令
python tools/test.py configs/fcos/fcos_r50_caffe_fpn_gn_1x_4gpu.py /home/rock/mmdetection/work_dirs/fcos_r50_caffe_fpn_gn_1x_4gpu_pd/epoch_5.pth --show
注:按任意健切换测试图像,ctrl+Z 退出
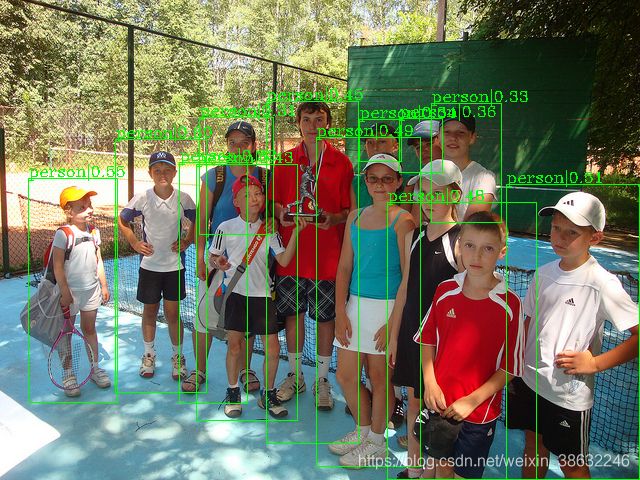
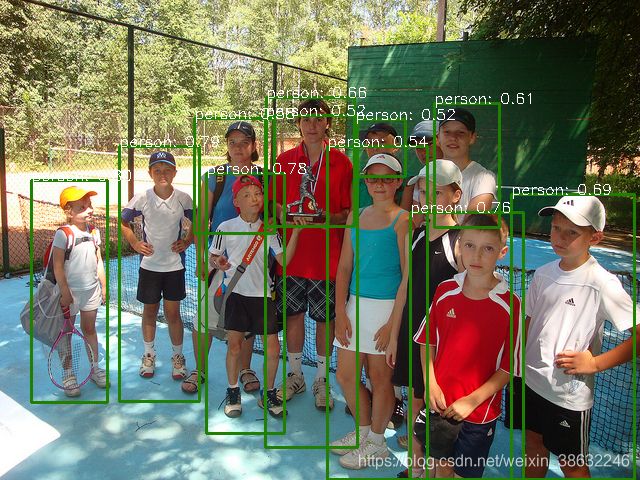
四、训练结果
网络输入大小 img_height<800, img_width<1333, 实验用了2万7千多张训练,1万5千张测试:
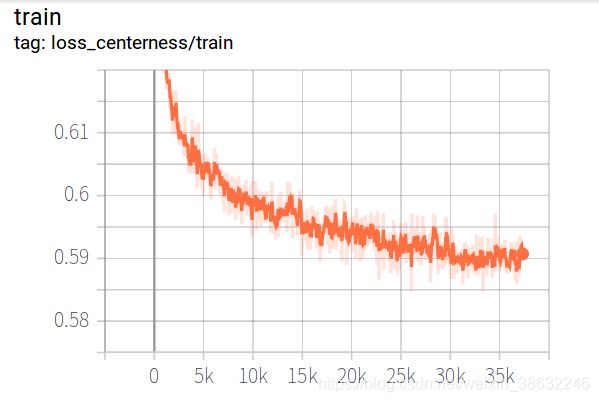
主要观察参数 loss_cls下降到0.3以下,loss_bbox 大概在0.4-0.3以下, 总体loss在1.0 左右说明训练正常

类别置信度损失:

总体损失函数

中心点损失:
边框回归损失:

五、FCOS在该数据集的MAP测量
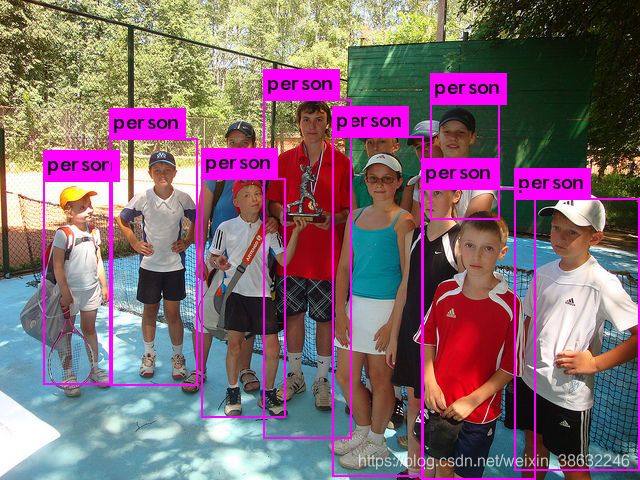
博主测了下迭代5个epoch的model在测试集上的表现,最终map为66.38,这个和yolov3 608尺寸迭代40000次的结果为66.50,况且博主测试的是最差的FCOS主干网络(resnet-50),博主估计其骨架网络最好的可以比 YOLO v3 map肯定高出不少,YOLO v3-608的速度与FCOS(resnet-50)两者速度持平

配置(单GPU,2080Ti), 博主测试一段1分钟视频,YOLO v3-608 总耗时2分08秒,FCOS-resnet50 耗时2分48秒,两者fps比较如下图,YOLO v3为16fps左右,FCOS为14fps左右。

FCOS论文阅读 见博主这篇文章https://blog.csdn.net/weixin_38632246/article/details/100542184
分享下几点总结:
1、FCOS网络主要去除Anchor ,解决了遮挡问题,是一种点对点的检测
2、其缺点是cls_score 的打分有点低,yolo一般在1.0-0.5, fcos在0.7-0.3
3、FCOS CenterNet将目标检测推向新的方法领域,Anchor-Free is better !
================== 更新11.28 -2019==========================
刚训练下fcos-mobilenetv2:模型大小30MB,一台2080ti训练完大概9个小时,比fcos要快很多,原fcos的BFLOPS为33左右,fcos-mobilenetv2的BFLOPS为22,减小了大约三分之一的计算量,博主测试了下在26000张picture的map为75.6,fps 为50左右,accuracy几乎没有降低,厉害了。
博主最近刚撸完cornernet-lite系列的code,后面会写系列的源码解读哈,目标检测的paper更新的实在太快了,读paper要勤奋呀!
fcos有很多改进的地方,比如以下几点:
1.基于主干网络(backbone)的更新,我列举几个:mobilenetv1-v3,shufflenet v1-v2, vovnet, hrnet, efficientDet
2.优化loss模块 nms,heatmap-gaussian 等
3.分布式训练,GroupNorm层,Leak_relu, attention机制。
-------------------------12.31.2019-----------------------------------
更新一下一张富有哲理的图,这个是fcos的 center 预生成的location 位置,暂且不说,看完源码详细补充。。。。

-------------------------13.3.2020-----------------------------------
更新一下map更高的paper Bridging the Gap Between Anchor-based and Anchor-free Detection via Adaptive Training Sample Selection
同FCOS,将anchor的方式加入FCOS,取消原来的Center预测,同基准测试行人检测,ATSS-mobilenet比FCOS-mobilenet 高25%的map,下图右三的黑衣服女孩检测出来了,后面的2个人头其实也检测出来了,不过我提高了检测阈值。
同时记录一下新的trick:
1).apex的FP16技术可以加速网络训练,提升anchor-free模型单GPU大概8-10倍
2). mixup 的训练方式可以提高map,大约1%-5%,详细请参看论文,附代码
3) label smooth 技术,参看论文
