# 前言 例如:生成分享海报,比如注册扫二维码登录.分享商品海报等!本博文是基于springboot工程得!
一、使用步骤
1.导入pom依赖和上传图片到工程
代码如下(示例):在自己得通用工具类模块中导入坐标!(这需要根据自己得工程来)
            net.coobird
            thumbnailator


            com.google.guava
            guava


            cn.hutool
            hutool-extra
            5.4.3


            com.google.zxing
            core
            3.3.3
代码如下(示例):
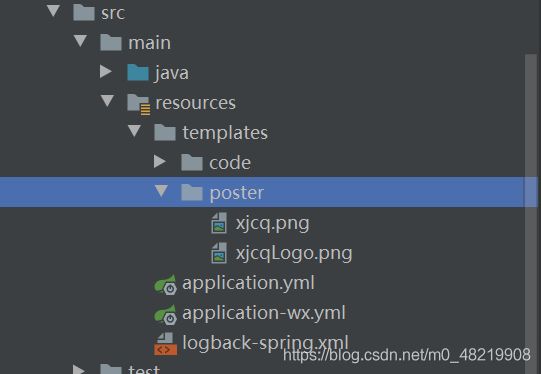
这里是要生成海报的模板和二维码的logo
2.创建生成接口
代码如下(示例):
@LoginUser:是自定义注解获取jwt的用户id(根据自己的需求和工程来)
@NoLogin:是项目种的白名单,不需要携带token的注解
  /**
     * 生成用户的邀请二维码
     *
     * @param userId 用户id
     */
    @GetMapping("qRCode")
    @NoLogin
    public Object qRCode(@LoginUser Integer userId) {
        //判断用户id是否为空
        if (userId == null) {
            return ResponseUtil.fail("请选择用户");
        }
        //获取生成海报的图片路径
        String filePath = wxUserService.qRCode(userId);
        return ResponseUtil.ok(filePath);
    }
3.创建service层
代码如下(示例):
这是一个接口!需要自己实现该接口!实现接口代码在下面!
   /**
     * 根据用户的邀请码生成分享海报
     *
     * @param userId
     * @return
     */
    String qRCode(Integer userId);
代码如下(示例):
上面接口的实现类
  /**
     * 根据用户的邀请码生成分享海报
     *
     * @param userId
     * @return
     */
    @Override
    public String qRCode(Integer userId) {
        try {
            // 根据用户id查询验证码
            UserInfo userInfo = userService.selectById(userId);
            //判断是否库是否存在海报地址
            if (!StringUtils.isEmpty(userInfo.getPoster())) {
                return userInfo.getPoster();
            }
            //要生成海报的模板(一般在springboot工程的 resources下 我的工程路径:templates/poster/xjcq.png  可以改成自己工程需要的路径)
            File hbPath = ResourceUtils.getFile("classpath:templates/poster/xjcq.png");
            //要生成二维码的logo(一般在springboot工程的 resources下 我的工程路径:templates/poster/xjcqLogo.png 可以改成自己工程需要的路径)
            File logoPath = ResourceUtils.getFile("classpath:templates/poster/xjcqLogo.png");
            // 获取上传后的路径
            String filePath = imageUtil.drawString(qRCodeInviteScheme + userInfo.getInviteCode(), userInfo.getInviteCode(), userInfo.getInviteCode(), hbPath, logoPath);
            //File转MultipartFile(因为我们的oss是转MultipartFile)
            File file = new File(filePath);
            InputStream inputStream = new FileInputStream(file);
            MultipartFile multipartFile = new MockMultipartFile(file.getName(), file.getName(),
                    ContentType.APPLICATION_OCTET_STREAM.toString(), inputStream);
            //上转至阿里云
            String s = storageUtil.uploadOssFile(multipartFile);
            //更改数据库
            UserInfo updateUserInfo = new UserInfo();
            updateUserInfo.setId(userInfo.getId());
            updateUserInfo.setPoster(s);
            userService.updateById(updateUserInfo);
            return updateUserInfo.getPoster();
        } catch (FileNotFoundException e) {
            log.error("文件找不到:{}", e);
        } catch (IOException e) {
            log.error("io异常:{}", e);
        }
        return null;
    }
4.生成海报的工具类
代码如下(示例):
wordPath类的代码,可以参考一下java获取yml配置文件内容
package com.legend.core.config;


import lombok.Data;
import org.springframework.beans.factory.annotation.Value;
import org.springframework.stereotype.Component;

/**
 * 获取全局配置path
 * @author admin
 */
@Component
@Data
public class WordPath {
     //生成电子合同的路径
     @Value("${word.path}")
     private String wordPath;
     //生成海报的路径
     @Value("${poster.path}")
     private String posterPath;
}
代码如下(示例):
wordPath: 这个是我把要生成画报地址的路径配置到了yml中了,因为测试的使用用的是winodows,上了生产就用linux服务器了。所以配置到了yml中了
package com.legend.core.util;

import cn.hutool.extra.qrcode.QrCodeUtil;
import cn.hutool.extra.qrcode.QrConfig;
import com.google.zxing.qrcode.decoder.ErrorCorrectionLevel;
import com.legend.core.config.WordPath;
import lombok.extern.slf4j.Slf4j;
import org.apache.commons.io.IOUtils;
import org.springframework.core.io.DefaultResourceLoader;
import org.springframework.core.io.ResourceLoader;
import org.springframework.stereotype.Service;

import javax.annotation.Resource;
import javax.imageio.ImageIO;
import javax.imageio.stream.ImageOutputStream;
import java.awt.*;
import java.awt.image.BufferedImage;
import java.io.*;

/**
 * 生成分享好友
 *
 * @author 生成分享好友
 */
@Service
@Slf4j
public class ImageUtil {
    //我把生成海报地址的路径配置到了springboot的yml配置文件中了
    @Resource
    private WordPath wordPath;

    /**
     * 生成海报
     *
     * @param content  二维码内容
     * @param written  文字内容
     * @param filePath 保存文件 例:1.png    (d:/1.png)
     * @param hbPath   海报图片地址 例:1.png   (d:/1.png)
     * @param logoPath 二维码logo
     * @return
     * @author Uncle
     * @Description 在一张背景图上添加二维码
     * @Date 2020-09-28 23:59
     */
    public String drawString(String content, String written, String filePath, File hbPath, File logoPath) {
        try {
            BufferedImage image = addWater(content, hbPath, logoPath);
            Graphics2D gd = image.createGraphics();
            // 3、设置对线段的锯齿状边缘处理
            gd.setRenderingHint(RenderingHints.KEY_INTERPOLATION, RenderingHints.VALUE_INTERPOLATION_BILINEAR);
            // 5、设置水印文字颜色
            gd.setColor(Color.darkGray);
            // 6、设置水印文字Font
            gd.setFont(new Font("苹方", Font.PLAIN, 32));
            // 8、第一参数->设置的内容,后面两个参数->文字在图片上的坐标位置(x,y)
            gd.drawString(written, 440, 1122);
            gd.dispose();

            ByteArrayOutputStream bs = new ByteArrayOutputStream();
            ImageOutputStream imOut = ImageIO.createImageOutputStream(bs);
            ImageIO.write(image, "png", imOut);
            InputStream inputStream = new ByteArrayInputStream(bs.toByteArray());

            // 获取yml海报的配置
            String file = wordPath.getPosterPath() + filePath + ".png";
            if (!new File(wordPath.getPosterPath()).exists()) {
                new File(wordPath.getPosterPath()).mkdirs();
            }
            OutputStream outStream = new FileOutputStream(file);
            IOUtils.copy(inputStream, outStream);
            inputStream.close();
            outStream.close();
            // 返回文件地址
            return file;
        } catch (Exception e) {
            log.error("海报生成失败:", e);
        }
        return null;
    }


    /***
     * 在一张背景图上添加二维码
     */
    public BufferedImage addWater(String content, File hbPath, File logoPath) throws Exception {
        // 读取原图片信息
        //得到文件
        //File file = new File(hbPath);
        //文件转化为图片
        Image srcImg = ImageIO.read(hbPath);
        //获取图片的宽
        int srcImgWidth = srcImg.getWidth(null);
        //获取图片的高
        int srcImgHeight = srcImg.getHeight(null);
        // 加水印
        BufferedImage bufImg = new BufferedImage(srcImgWidth, srcImgHeight, BufferedImage.TYPE_INT_RGB);
        Graphics2D g = bufImg.createGraphics();
        g.drawImage(srcImg, 0, 0, srcImgWidth, srcImgHeight, null);
        //使用工具类生成二维码
        Image image = createQrCode(content, 230, 230, logoPath);
        //将小图片绘到大图片上,500,300 .表示你的小图片在大图片上的位置。
        g.drawImage(image, 25, 1070, null);
        //设置颜色。
        g.setColor(Color.WHITE);
        g.dispose();
        return bufImg;
    }

    private BufferedImage createQrCode(String content, int width, int height, File logoPath) throws IOException {
        QrConfig config = new QrConfig(width, height);
        if (logoPath != null) {
            Image image = ImageIO.read(new FileInputStream(logoPath));
            config.setImg(image);
        }
        config.setErrorCorrection(ErrorCorrectionLevel.H);
        return QrCodeUtil.generate(
                content,
                config);
    }

    public InputStream resourceLoader(String fileFullPath) throws IOException {
        ResourceLoader resourceLoader = new DefaultResourceLoader();
        return resourceLoader.getResource(fileFullPath).getInputStream();
    }

}
总结
提示:这里对文章进行总结:
例如:以上就是今天要讲的内容,本文仅仅简单介绍了如何生成分享海报。例如:以上就是今天要讲的内容,本文仅仅简单介绍了如何生成分享海报。
以上就是java 生成分享海报工具类的详细内容,更多关于java 生成分享海报工具类的资料请关注脚本之家其它相关文章!

