lamp架构-php, nginx编译安装
文章目录
-
-
- 1.php 编译与安装
-
- 1.1 增加nginx用户,更改nginx配置
- 1.2 ./configure
- 1.3 make && make install
- 2. php启动方式设定
-
- 2.1 脚本启动
- 2.2 使用systemd启动
- 3. Nginx启动方式设定
- 4. nginx与php结合测试
- 5. php集合phpmyadmin测试
- 6. php添加memcache功能模块
- 7. openresty安装配置
-
1.php 编译与安装
1.1 增加nginx用户,更改nginx配置
为了能够保证nginx与php的正常通信,需要在编译php之前对nginx做相关配置。
[root@server11 ~]# yum install -y bzip2
[root@server11 ~]# ls
mysql-5.7.31  mysql-boost-5.7.31.tar.gz  nginx-1.18.0  nginx-1.18.0.tar.gz  php-7.4.12.tar.bz2
[root@server11 ~]# tar jxf php-7.4.12.tar.bz2
[root@server11 ~]# cd php-7.4.12/
[root@server11 php-7.4.12]# ls

[root@server11 ~]# nginx
[root@server11 ~]# ps aux
nobody    7487  0.0  0.0  46300  1908 ?        S    11:33   0:00 nginx: worker process
[root@server11 ~]# cat /etc/passwd
[root@server11 ~]# useradd -M -d /usr/local/nginx/ -s /sbin/nologin nginx
[root@server11 ~]# id nginx
uid=1002(nginx) gid=1002(nginx) groups=1002(nginx)
[root@server11 ~]# cd /usr/local/nginx/conf/
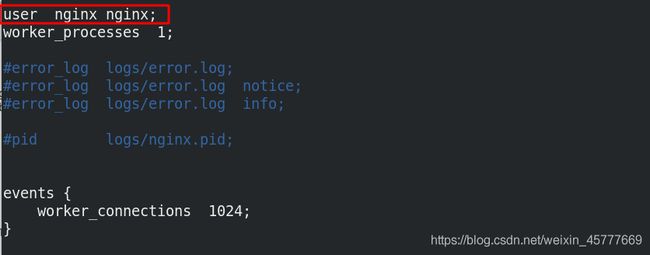
[root@server11 conf]# vim nginx.conf  ##编辑配置文件
user  nginx nginx;
[root@server11 conf]# nginx -s reload
[root@server11 conf]# ps aux   ##查看进程用户信息
nginx     7529  0.0  0.0  46420  2028 ?        S    11:40   0:00 nginx: worker process
1.2 ./configure
[root@server11 php-7.4.12]# ./configure --help | less
[root@server11 conf]# yum install -y systemd-devel
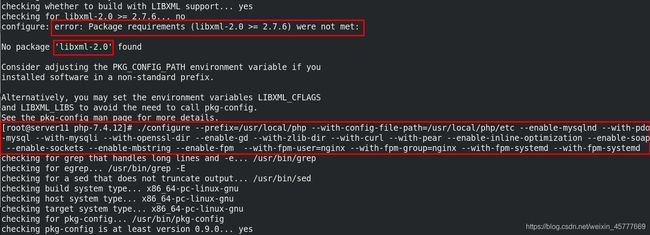
[root@server11 conf]# yum install -y libxml2-devel
[root@server11 conf]# yum install -y sqlite-devel
[root@server11 conf]# yum install -y libcurl-devel
[root@server11 conf]# yum install -y libpng-devel
[root@server11 ~]# yum install -y oniguruma-6.8.2-1.el7.x86_64.rpm oniguruma-devel-6.8.2-1.el7.x86_64.rpm

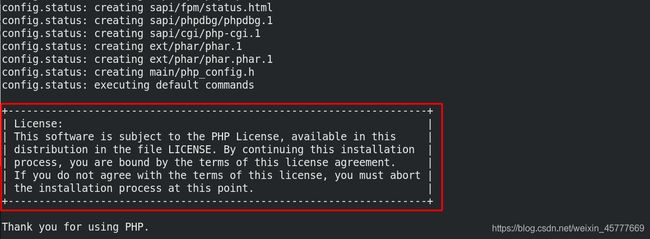
[root@server11 php-7.4.12]# ./configure --prefix=/usr/local/php --with-config-file-path=/usr/local/php/etc --enable-mysqlnd --with-pdo-mysql --with-mysqli --with-openssl-dir --enable-gd --with-zlib-dir --with-curl --with-pear --enable-inline-optimization --enable-soap --enable-sockets --enable-mbstring --enable-fpm  --with-fpm-user=nginx --with-fpm-group=nginx --with-fpm-systemd --with-fpm-systemd
1.3 make && make install
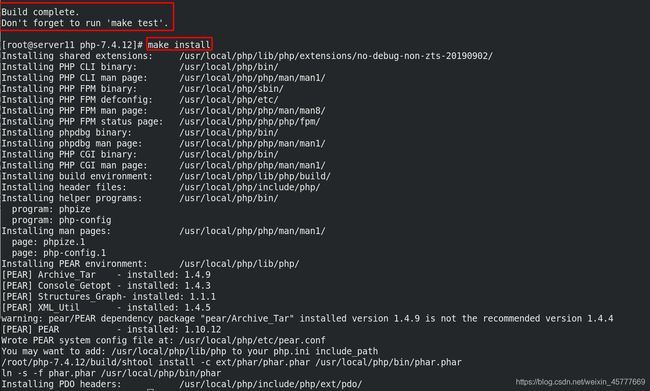
[root@server11 php-7.4.12]# make
[root@server11 php-7.4.12]# makeinstall
2. php启动方式设定
-
以启动php-fpm为例:一种常见的服务启动方式是: /etc/init.d/php-fpm start
Linux中的/etc/init.d目录包含许多系统各种服务的启动和停止脚本,上述方式通过调用脚本的方式来启动服务,当然,事先要赋予该脚本可执行权限 -
第二种服务启动方式是利用systemd来启动:systemctl start php-fpm,相比于第一种传统的方式,这种启动服务的方式更加便捷、快速,且能够设置开机自启。使用了 systemd,就不需要再用init了。systemd 取代了initd,成为系统的第一个进程(PID 等于 1),其他进程都是它的子进程。
2.1 脚本启动
[root@server11 php]# pwd
/usr/local/php
[root@server11 fpm]# pwd
/root/php-7.4.12/sapi/fpm
[root@server11 fpm]# cp init.d.php-fpm /etc/init.d/php-fpm ## 复制服务脚本到/etc/init.d目录下
[root@server11 fpm]# chmod +x /etc/init.d/php-fpm  ## 为该脚本添加可执行权限
[root@server11 fpm]# /etc/init.d/php-fpm
Usage: /etc/init.d/php-fpm {
     start|stop|force-quit|restart|reload|status|configtest}
[root@server11 fpm]# cd /usr/local/php/
[root@server11 php]# cd etc/
[root@server11 etc]# ls
pear.conf  php-fpm.conf.default  php-fpm.d

[root@server11 etc]# cp php-fpm.conf.default php-fpm.conf ##复制php-fpm服务的配置文件模板,创建新的配置文件并根据需求做相应修改
[root@server11 etc]# vim php-fpm.conf
 17 pid = run/php-fpm.pid  ## 指定pid的存放目录 打开注释
[root@server11 etc]# cd php-fpm.d/
[root@server11 php-fpm.d]# ls
www.conf.default
[root@server11 php-fpm.d]# cp www.conf.default www.conf ##复制另外一个相关配置文件模板并编辑

[root@server11 php-7.4.12]# pwd
/root/php-7.4.12
[root@server11 php-7.4.12]# cp php.ini-production /usr/local/php/etc/php.ini  ##复制php主配置文件到php的配置目录下,用于开发和生产,注意配置文件的命名方式必须要是php-ini
[root@server11 php-7.4.12]# /etc/init.d/php-fpm start
Starting php-fpm  done
[root@server11 php-7.4.12]# ps axu
[root@server11 php-7.4.12]# netstat -antlp
2.2 使用systemd启动
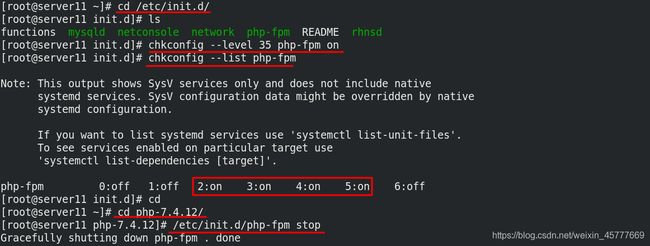
chkconfig --level 35 php-fpm on       ##设置开机自启的另外一种方式
chkconfig --list php-fpm         ##查看chkconfig的一些参数
[root@server11 system]# cd
[root@server11 ~]# cd /etc/init.d/
[root@server11 init.d]# ls
functions  mysqld  netconsole  network  php-fpm  README  rhnsd
[root@server11 init.d]# chkconfig --level 35 php-fpm on
[root@server11 init.d]# chkconfig --list php-fpm
[root@server11 init.d]# cd
[root@server11 ~]# cd php-7.4.12/
[root@server11 php-7.4.12]# /etc/init.d/php-fpm stop
Gracefully shutting down php-fpm . done
[root@server11 php-7.4.12]# cd sapi/fpm/
[root@server11 fpm]# cp php-fpm.service /usr/lib/systemd/system/
[root@server11 fpm]# cd /usr/lib/systemd/system/
[root@server11 system]# vim php-fpm.service  ##编辑配置文件,注释掉保护机制
 21 #ProtectSystem=full
[root@server11 system]# systemctl daemon-reload
[root@server11 system]# systemctl start php-fpm  ##启动服务
3. Nginx启动方式设定
[root@server11 ~]# cd /usr/local/nginx/conf/
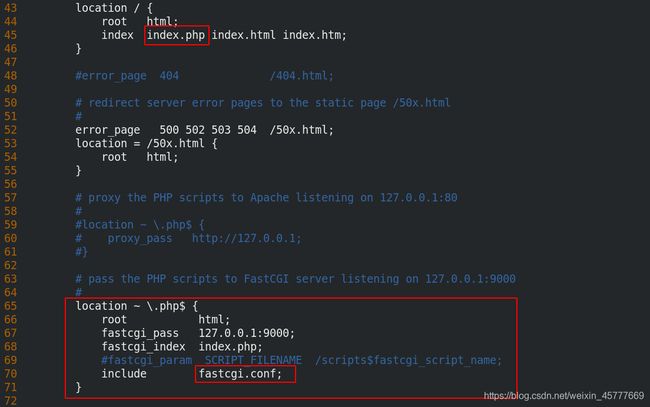
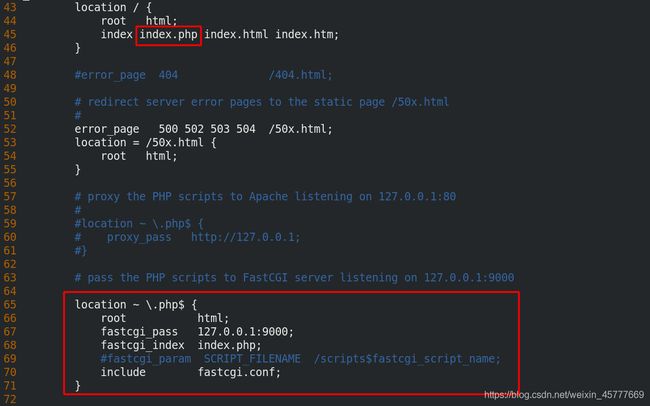
[root@server11 conf]# vim nginx.conf ## 编辑主配置文件 下图所示
[root@server11 system]# cd /lib/systemd/system
[root@server11 system]# vim nginx.service  ##编辑配置文件
[Unit]
Description=The NGINX HTTP and reverse proxy server
After=syslog.target network-online.target remote-fs.target nss-lookup.target
Wants=network-online.target

[Service]
Type=forking
PIDFile=/usr/local/nginx/logs/nginx.pid
ExecStartPre=/usr/local/nginx/sbin/nginx -t
ExecStart=/usr/local/nginx/sbin/nginx
ExecReload=/usr/local/nginx/sbin/nginx -s reload
ExecStop=/bin/kill -s QUIT $MAINPID
PrivateTmp=true

[Install]
WantedBy=multi-user.target

[root@server11 system]# ll /usr/local/nginx/logs/nginx.pid
-rw-r--r-- 1 root root 5 Apr  6 10:33 /usr/local/nginx/logs/nginx.pid
[root@server11 system]# systemctl daemon-reload  ## 重载daemon,让systemd后台能够识别到更改
[root@server11 system]# nginx -s stop  ##停止nginx
[root@server11 system]# systemctl start nginx  ##systemctl方式启动nginx
[root@server11 system]# systemctl enable nginx ##设置开机自启
Created symlink from /etc/systemd/system/multi-user.target.wants/nginx.service to /usr/lib/systemd/system/nginx.service.
4. nginx与php结合测试
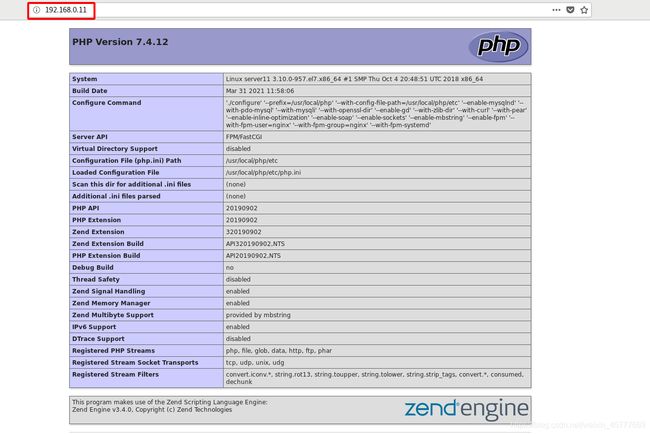
[root@server11 system]# cd /usr/local/nginx/html/ ## 进入到nginx的默认发布目录,编写php测试页面
[root@server11 html]# ls
50x.html  index.html  test.html
[root@server11 html]# vim index.php
<?php
phpinfo()
?>

[root@server11 html]# cd /usr/local/php/etc/
[root@server11 etc]# ls
[root@server11 etc]# vim php.ini  ## 编辑php的配置文件做访问测试
 962 date.timezone = Asia/Shanghai
[root@server11 etc]# systemctl reload php-fpm
5. php集合phpmyadmin测试
phpMyAdmin 是一个以PHP为基础,以Web-Base方式架构在网站主机上的MySQL的数据库管理工具,让管理者可用Web接口管理MySQL数据库。
[root@server11 ~]# /etc/init.d/mysqld start
Starting MySQL SUCCESS!
[root@server11 ~]# mysql -p
[root@server11 ~]# vim .bash_profile ##添加php的环境变量并使其生效
/usr/local/php/bin
[root@server11 ~]# source .bash_profile
[root@server11 ~]# cd /usr/local/php/etc/
[root@server11 etc]# ls
pear.conf  php-fpm.conf  php-fpm.conf.default  php-fpm.d  php.ini
[root@server11 etc]# vim php.ini  ##编辑php页面配置文件使其和mysql数据库结合
mysqli.default_socket = /usr/local/mysql/data/mysql.sock
[root@server11 etc]# systemctl reload php-fpm
[root@server11 ~]# unzip phpMyAdmin-5.0.2-all-languages.zip
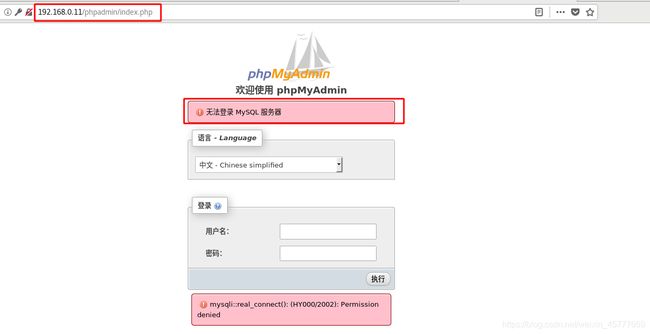
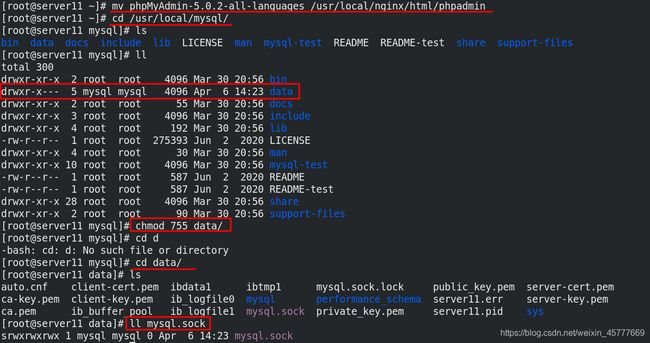
[root@server11 ~]# mv phpMyAdmin-5.0.2-all-languages /usr/local/nginx/html/phpadmin  ## 移动到nginx的默认发布目录下
## 上述问题是因为相关目录权限不够所导致的
[root@server11 ~]# cd /usr/local/mysql/
[root@server11 mysql]# ll
total 300
drwxr-xr-x  2 root  root    4096 Mar 30 20:56 bin
drwxr-x---  5 mysql mysql   4096 Apr  6 14:23 data
[root@server11 mysql]# chmod 755 data/
[root@server11 mysql]# cd data/
[root@server11 data]# ll mysql.sock
srwxrwxrwx 1 mysql mysql 0 Apr  6 14:23 mysql.sock
6. php添加memcache功能模块
memcached是高性能的分布式内存缓存服务器。一般的使用目的是,通过缓存数据库查询结果,减少数据库访问次数,以提高动态Web应用的速度、提高可扩展性。
客户端访问时整个流程:
client > nginx > fastcgi_pass > php-fpm:9000 > php-memcache > memcached:11211
[root@server11 ~]# tar zxf memcache-4.0.5.2.tgz
[root@server11 ~]# cd memcache-4.0.5.2/
[root@server11 memcache-4.0.5.2]# ls
cloudbuild.yaml  config.m4   CREDITS  Dockerfile   LICENSE       php7    tests
config9.m4       config.w32  docker   example.php  memcache.php  README
[root@server11 memcache-4.0.5.2]# yum install -y autoconf
[root@server11 memcache-4.0.5.2]# phpize ##phpize是一个运行脚本,主要作用是检测php的环境还有就是在特定的目录生成相应的configure文件,这样makeinstall之后,生成的.so文件才会自动加载到php扩展目录下面。
Configuring for:
PHP Api Version:         20190902
Zend Module Api No:      20190902
Zend Extension Api No:   320190902
[root@server11 memcache-4.0.5.2]# ./configure --enable-memcache
[root@server11 memcache-4.0.5.2]# make
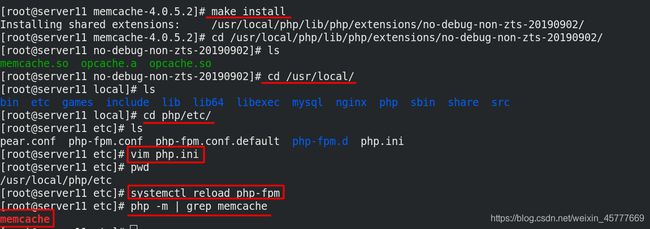
[root@server11 memcache-4.0.5.2]# make install
[root@server11 etc]# pwd
/usr/local/php/etc
[root@server11 etc]# vim php.ini
 913 extension=memcache   ##添加memcache扩展模块
[root@server11 etc]# systemctl reload php-fpm
[root@server11 etc]# php -m | grep memcache
memcache
## 访问流程: php > memcache.so > memcached
[root@server11 ~]# yum install -y memcached  ##安装
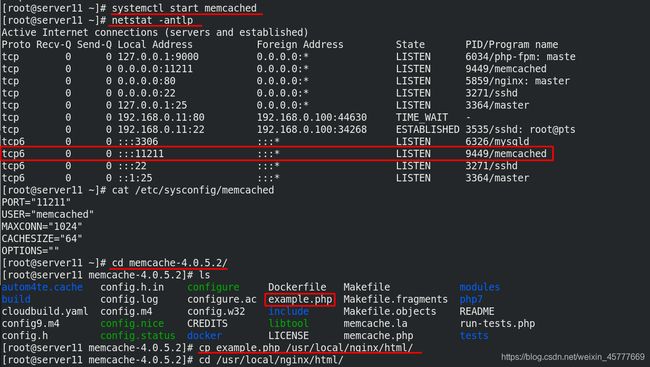
[root@server11 ~]# systemctl start memcached  ##启动memcached服务
[root@server11 ~]# netstat -antlp  ##查看有11211端口表示正常
tcp6       0      0 :::11211                :::*                    LISTEN      9449/memcached

[root@server11 ~]# cd memcache-4.0.5.2/
[root@server11 memcache-4.0.5.2]# cp example.php /usr/local/nginx/html/  ##复制memcache的示例页面到nginx的默认发布目录下
[root@server11 memcache-4.0.5.2]# cd /usr/local/nginx/html/
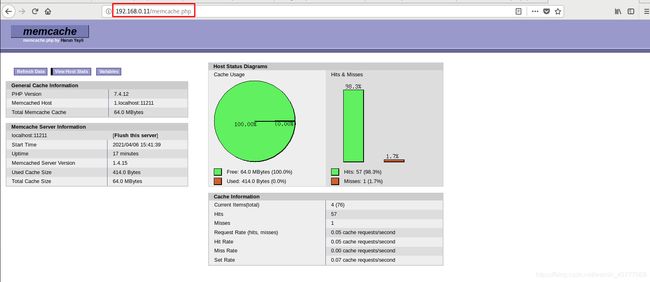
[root@server11 memcache-4.0.5.2]# cp memcache.php /usr/local/nginx/html/
[root@server11 memcache-4.0.5.2]# cd /usr/local/nginx/html/
[root@server11 html]# vim memcache.php
7. openresty安装配置
openresty:一个基于nginx的可伸缩的web平台
[root@server11 ~]# tar zxf openresty-1.19.3.1.tar.gz
[root@server11 ~]# cd openresty-1.19.3.1/
[root@server11 openresty-1.19.3.1]# ls
bundle  configure  COPYRIGHT  patches  README.markdown  README-windows.txt  util
[root@server11 openresty-1.19.3.1]# ./configure

[root@server11 openresty-1.19.3.1]# gmake
[root@server11 openresty-1.19.3.1]# gmake install ##源码编译安装
[root@server11 openresty-1.19.3.1]# cd /usr/local/openresty/
[root@server11 openresty]# ls
bin  COPYRIGHT  luajit  lualib  nginx  pod  resty.index  site
[root@server11 openresty]# cd nginx/
[root@server11 nginx]# systemctl stop nginx  ## 停掉原生的nginx服务
[root@server11 nginx]# pwd
/usr/local/openresty/nginx
[root@server11 nginx]# cd conf/
[root@server11 conf]# vim nginx.conf  ##编辑openresty中nginx的配置文件如下图
[root@server11 conf]# cd ..
[root@server11 nginx]# cd ..
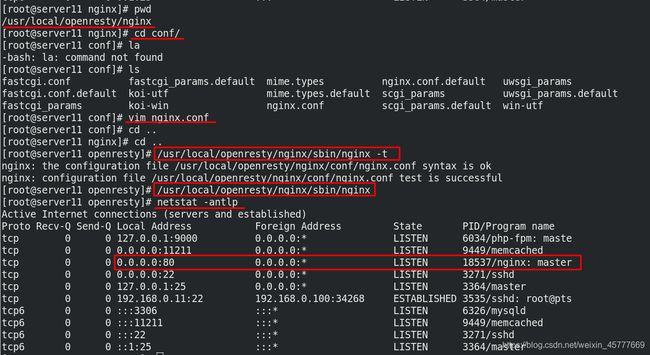
[root@server11 openresty]# /usr/local/openresty/nginx/sbin/nginx -t  ##检测nginx.conf文件是否有语法错误
nginx: the configuration file /usr/local/openresty/nginx/conf/nginx.conf syntax is ok
nginx: configuration file /usr/local/openresty/nginx/conf/nginx.conf test is successful
[root@server11 openresty]# /usr/local/openresty/nginx/sbin/nginx  ##启动openresty/nginx服务
[root@server11 openresty]# netstat -antlp ##能看到80端口表示服务开启成功
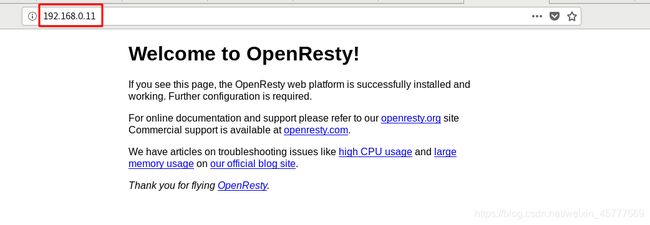
## 浏览器访问nginx服务器ip,能够看到openresty的测试页面
