当我们想将一个xml布局转化成view时,一般用到LayoutInflater.inflate方法,这个方法的重载有如下四种形式:
1. public View inflate(int resource, ViewGroup root)
2. public View inflate(int resource, ViewGroup root, boolean attachToRoot)
3. public View inflate(XmlPullParser parser, ViewGroup root)
4. public View inflate(XmlPullParser parser, ViewGroup root, boolean attachToRoot)
至于何时root不可以传null,何时可以传null,这里就不重点赘述了。这篇文章只是重点分析attachToRoot这个参数。
当attachToRoot为true时
将一个xml布局文件放入组件
layout_parent
主要它的颜色为白色
layout_btn
注意颜色为红色
MainActivity的主要代码为:
@Override protected void onCreate(Bundle savedInstanceState) {
    super.onCreate(savedInstanceState);
    setContentView(R.layout.layout_parent);
    final LinearLayout linearLayout = (LinearLayout) findViewById(R.id.ll);
    LayoutInflater inflater = LayoutInflater.from(this);
    inflater.inflate(R.layout.layout_btn, linearLayout, true);
}
查看效果如下:
这里设置的attachToRoot为true,查看源码,当不设置这个值的时候
/** * Inflate a new view hierarchy from the specified xml resource.
Throws * {@link InflateException} if there is an error.
* @param resource ID for an XML layout resource to load (e.g., *R.layout.main_page)
* @param root Optional view to be the parent of the generated hierarchy.
* @return The root View of the inflated hierarchy. If root was supplied, *         this is the root View; otherwise it is the root of the inflated * XML file.
*/
public View inflate(@LayoutRes int resource, @Nullable ViewGroup root){
      return inflate(resource, root, root != null);
}
通过源码可知,当不传入attachToRoot这个参数时,attachToRoot的值是根据root是否为null来决定的。
将xml布局放入自定义控件中
layout_custome_view
CustomerLayout
package com.ziv.test;

import android.content.Context;
import android.util.AttributeSet;
import android.view.LayoutInflater;
import android.widget.LinearLayout;
public class CustomLinear extends LinearLayout {
      public CustomLinear(Context context, AttributeSet attrs) {
      super(context, attrs);
      init();
}
 public CustomLinear(Context context) {
      super(context); init();
}
private void init() {
      LayoutInflater inflater = LayoutInflater.from(getContext());
      inflater.inflate(R.layout.layout_custome_view, this);
}
}
MainActivity的主要代码:
 @Override protected void onCreate(Bundle savedInstanceState) {
    super.onCreate(savedInstanceState);
    setContentView(newCustomLinear(this));
}
运行效果:
当attachToRoot为false时:
当attachToRoot为false时,意思是不将xml文件生成的view添加到root中,相当于根root毫无关系,独立的一个view,这时就需要单独的靠用addView()添加到要显示的位置上,实例如下:
@Override protected void onCreate(Bundle savedInstanceState) {
      super.onCreate(savedInstanceState);
      setContentView(R.layout.layout_parent);
      final LinearLayout linearLayout = (LinearLayout)findViewById(R.id.layout_parent);
      LayoutInflater inflater = LayoutInflater.from(this);
      Button button = (Button)inflater.inflate(R.layout.layout_btn, outLayout, false);
      linearLayout.addView(button);

}
//只有addView了才会立即添加到LinearLayout中去
运行一下,效果一样:
但是android中有几种情况是不需要手动设置attachToRoot设置为true,才会添加到root中去的。
第一种情况:
在fragment中的onCreateView中
package com.ziv.test;

import android.app.Fragment;
import android.os.Bundle;
import android.view.LayoutInflater;
import android.view.View;
import android.view.ViewGroup;
public class CustomFragment extends Fragment {
@Override public View onCreateView(LayoutInflater inflater, ViewGroup
 container, Bundle savedInstanceState) {
   View view = inflater.inflate(R.layout.layout_btn, container, false);
   return view;
}
}
第二种情况
在activity中:
@Override protected void onCreate(Bundle savedInstanceState) {
  super.onCreate(savedInstanceState);
  setContentView(R.layout.layout_parent);
  FragmentManager fragmentManager = getFragmentManager();
  FragmentTransaction fragmentTransaction = fragmentManager.beginTransaction();
  fragmentTransaction.replace(R.id.ll, new CustomFragment());
  fragmentTransaction.commit();
}
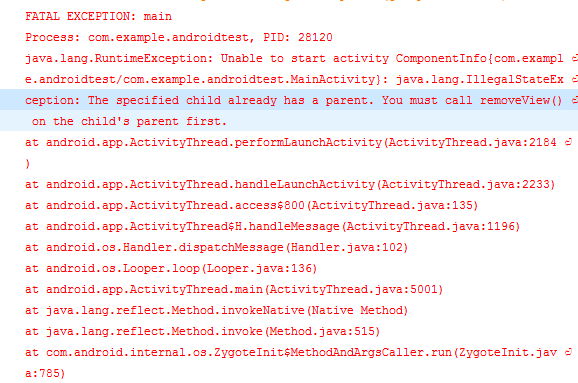
“add View”的逻辑由FragmentTransaction 进行处理了,如果我们这里将attachToRoot设置为true,就会有IllegalStateException.
所以组件自己有“add View”的机制,我们就不要再画蛇添足了。 可能会有疑问既然没有将创建的View 添加到root中,为什么还要添加root参数呢?直接使用
View view = inflater.inflate(R.layout.layout_btn, container, false);
不是更简单吗?如果这样写,lint会给出警告 Avoid passing null as the view root (needed to resolve layout parameters on the inflated layout’s root element)。 xml布局文件在解析成View的时候,需要root的布局信息(View的布局参数要受到root的限制)。如果不填写root,使用xml布局文件生成View的时候就会使用默认的LayoutParams.而这个不一定是符合要求的,View可能比设定的要小
有些时候无法明确的知道View的root,eg.当你实例化一个AlterDialog.
@Override protected void onCreate(Bundle savedInstanceState) {
    super.onCreate(savedInstanceState);
    setContentView(R.layout.layout_parent);
    LayoutInflater inflater = LayoutInflater.from(this);
    AlertDialog.Builder dialogBuilder = new AlertDialog.Builder(this);
    View customView = inflater.inflate(R.layout.layout_btn, null);
    dialogBuilder.setView(customView);
    dialogBuilder.show();
 }
第三种情况:
ListView或者RecyclerView中的adapter中的getView方法和onCreateViewHolder也是这种情况,输入自动addView。
综上所述:
- 如果知道root,一定要传,尽量避免传null
- 当不需要将布局文件生成的View添加到组件中时(组件有其自身的添加逻辑),attachToRoot设置成false.
- 当View已经添加到一个root中时,attachToRoot设置成false.
- 自定义组件应该将attachToRoot设置成true.s


