demo地址
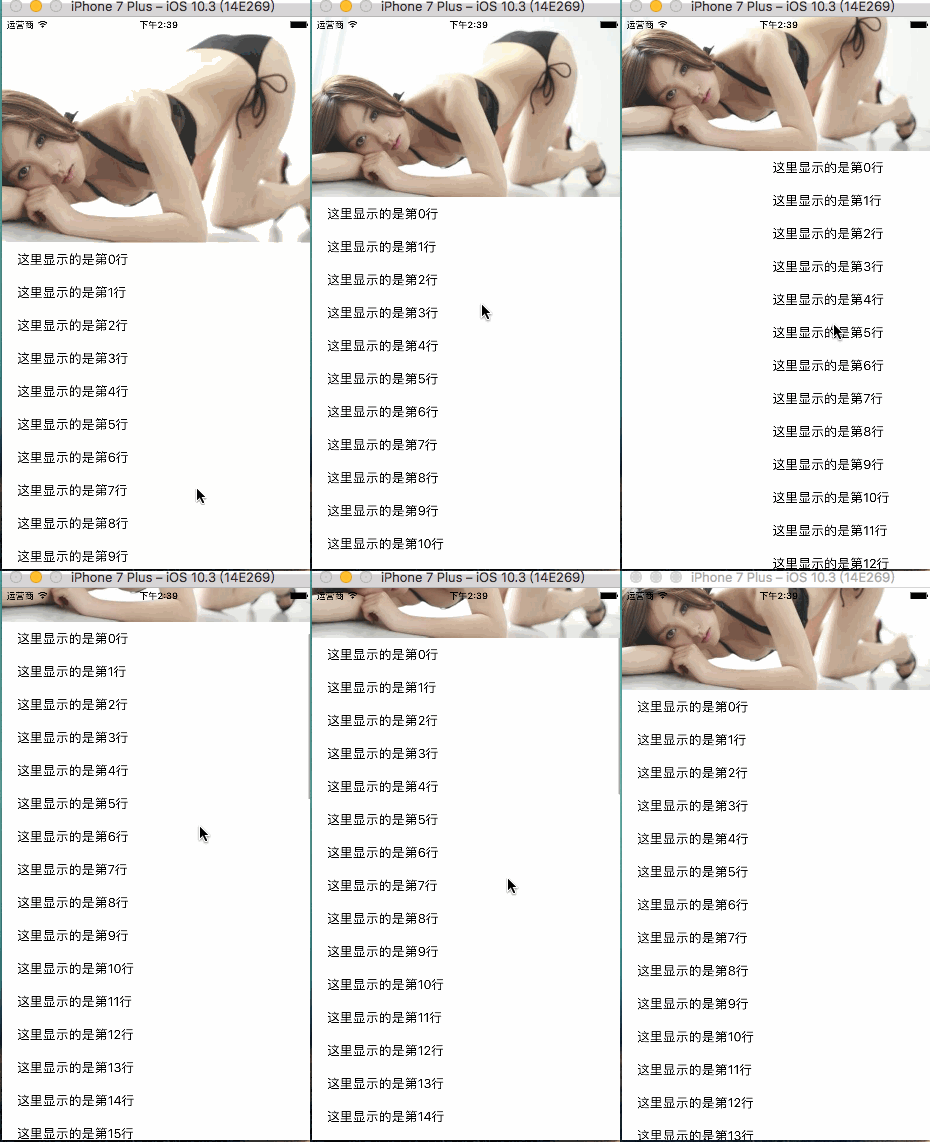
先看效果:
现在很多这样的需求,拿到需求的时候是不是不知所措呢?是不是在想着,那么难的控制器效果,iOS官方为何不专门出一个控件呢? 然后就去网上找一堆三方,看的一阵蒙蔽,再然后就是头大!!!!!
本篇文章教你快速如何实现,并可以封装后一句代码实现本效果,从此再也不用担心产品提这些需求了。(不知道我这是不是救了你们产品经理一命)
原理剖析
当看不明白时可以直接跳到代码实现部分
底层容器视图,可以左右滑动,那么可以采用UIScrollView和UICollectionView。
UIScrollView实现
- 底部采用UIScrollView,然后每页采用tableView(或者collectionView,scrollView,webView等),加到scrollView上
- 每页的tableView设置空的headerView
- 视觉上的headerView是添加到self.view上的,然后根据scollView.contentOffset.y的偏移更改headerView的frame
- segment放在橙色部分,添加到headerView上
优点: 每页的tableView可以分离到不同的UIViewController中,然后通过
 [self.scrollView addSubview:childVC.view];
 [self addChildViewController:childVC];
添加到scrollView,便于每个tableView的代码管理。
缺点:scrollView的subViews不复用,subViews较多的时候占用内存较大
- UICollectionView
- 底部采用UICollectionView,然后Cell中实现tableView(或者collectionView,scrollView,webView等)
- 每个cell中的tableView设置空的headerView
- 视觉上的headerView是添加到self.view上的,然后根据
collectionView.contentOffset.y的偏移更改headerView的frame - segment放在橙色部分,添加到headerView上
优点:cell复用,省内存
缺点:封装的话使用着没有UIScrollView的封装方便,代码也比UIScrollView多
实现
这里以UIScrollView为容器实现
//代码中用到的的宏定义
#define SCREEN_WIDTH [UIScreen mainScreen].bounds.size.width
#define SCREEN_HEIGHT [UIScreen mainScreen].bounds.size.height
#define HEAD_HEIGHT 240 //headerView的高度
//需要的视图
@property (nonatomic , strong) UIScrollView *hScrollView;
@property (nonatomic , strong) UITableView *tableView1;
@property (nonatomic , strong) UITableView *tableView2;
@property (nonatomic , strong) UIImageView *headView;
这里忽略各个view的实现部分,因为都是常规的视图创建,需要的就是实现滚动的代理,更改headerView的frame,让headerView看起来像是跟着scrollview滚动的
*
 scrollView滑动时调用
 */
- (void)scrollViewDidScroll:(UIScrollView *)scrollView {
    if (scrollView == self.hScrollView) {
        //如果是底层scrollView的滑动则不用更改headerView跟随滑动
        return;
    }

    //如果是其他scrollView的滑动则需要更改headerView跟随滑动
    CGFloat contentY = scrollView.contentOffset.y;


    // 偏移量contentY有三种情况:
    // 1. 头视图完全显示,视图下拉,即:contentY < 0,此时可做处理:headerView跟随下移或者headerView放放大
    // 2. 头视图部分显示,即contentY >= 0 && contentY < HEAD_HEIGHT,此时headerView跟随contentY移动
    // 3. 头视图隐藏(或者只显示segment),即contentY >= HEAD_HEIGHT,此时headerView固定frame
    if (contentY < 0) {
        self.headView.frame = CGRectMake(SCREEN_WIDTH * contentY / HEAD_HEIGHT /2, 0, SCREEN_WIDTH * (HEAD_HEIGHT - contentY)/HEAD_HEIGHT, HEAD_HEIGHT - contentY);//头视图放大
//        self.headView.frame = CGRectMake(0, -contentY, SCREEN_WIDTH, HEAD_HEIGHT);//头视图跟随下移
    }else if (contentY >= 0 && contentY < HEAD_HEIGHT) {
        self.headView.frame = CGRectMake(0, - contentY, SCREEN_WIDTH, HEAD_HEIGHT);
    }else if (contentY >= HEAD_HEIGHT) {
        if (CGRectGetMinY(self.headView.frame) != -HEAD_HEIGHT) {
            self.headView.frame = CGRectMake(0, - HEAD_HEIGHT, SCREEN_WIDTH, HEAD_HEIGHT);

        }}
}
但是此时左右滑动,切换page时,发现各个page的状态不同步,为了减少代码的调用次数多了,所以在另外两个代理中实现各个page的contentOffet的同步
//放开手指时调用
- (void)scrollViewDidEndDragging:(UIScrollView *)scrollView willDecelerate:(BOOL)decelerate
{
    if (scrollView == self.hScrollView) {

        return;
    }
    CGFloat contentY = scrollView.contentOffset.y;
    [self updateTableViewFrame:contentY];

}

//放开手指后,若tableView仍然自己滚动,自己滚动结束时会调用
- (void)scrollViewDidEndDecelerating:(UIScrollView *)scrollView
{
    if (scrollView == self.hScrollView) {

        return;
    }
    CGFloat contentY = scrollView.contentOffset.y;
    [self updateTableViewFrame:contentY];
}

- (void)updateTableViewFrame:(CGFloat)offsetY {
    if (offsetY >= HEAD_HEIGHT) {
  //头视图已隐藏时,若其他page的tableView的contentOffset的状态是headview没隐藏的状态,则更改为头视图已隐藏时的偏移量
        if ( self.tableView1.contentOffset.y <= HEAD_HEIGHT) {
            self.tableView1.contentOffset = CGPointMake(0, HEAD_HEIGHT);
        }

        if ( self.tableView2.contentOffset.y <= HEAD_HEIGHT) {
            self.tableView2.contentOffset = CGPointMake(0, HEAD_HEIGHT);
        }
    }else if (offsetY >= 0 && offsetY < HEAD_HEIGHT) {
// 有视图部分显示若其他page的tableView的contentOffset的状态不是headview部分隐藏的状态,则更改为头视图部分隐藏的偏移量
        self.tableView1.contentOffset = CGPointMake(0, offsetY);
        self.tableView2.contentOffset = CGPointMake(0, offsetY);

    }else if (offsetY < 0) {
//头视图完全显示时再下拉
        if ( self.tableView1.contentOffset.y > 0) {
            self.tableView1.contentOffset = CGPointMake(0, 0);
        }

        if ( self.tableView2.contentOffset.y > 0) {
            self.tableView2.contentOffset = CGPointMake(0, 0);
        }
    }
}
完成
封装
明白了怎么实现,也通过上面的简单demo完成了任务,然后呢,我们需要一劳永逸
如果每次有这样的需求,我们都实现一遍,明显是很费脑子的,我们程序员的脑细胞死的本来就多,就不要再做这些无谓的牺牲了,那么封装一下,一步到位才是我们想要的结果!!!
封装目标:
- 每页的数据由单独的UIViewController控制
- 继承封装好的ViewController后,只需要childVC,headerView,segment.height信息
- 能够监测到childVC切换到了第几个
注意: 因为每页(UIViewController)的tableView由UIViewController单独完成,所以tableView的代理肯定在它的VC中实现。所以封装的VC采用KVO监测contentOffset的变化。
#import


@interface SHViewController : UIViewController


/**
 添加要左右滑动的viewController
 使用viewController能够更好的

 @param childVCArray vc数组
 @param headerView 头视图
 @param segmentHeight segment高度
 */
- (void)addChildVCWithArray:(NSArray  *)childVCArray
                 headerView:(UIView *)headerView
              segmentHeight:(CGFloat)segmentHeight;

/**
 切换vc时调用,index为要显示的vc下表
 */
@property (nonatomic , copy) void(^viewControllerScrollToIndex)(NSInteger index);

@end
#import "SHViewController.h"
#define SCREEN_WIDTH [UIScreen mainScreen].bounds.size.width
#define SCREEN_HEIGHT [UIScreen mainScreen].bounds.size.height
#define WEAKSELF __weak typeof(self) weakSelf = self;
@interface SHViewController ()
<
UIScrollViewDelegate
>
@property (nonatomic, strong) UIScrollView *scrollView;
@property (nonatomic, strong) NSArray  *vcArray;
@property (nonatomic, strong) UIView *headerView;//头视图
@property (nonatomic, assign) CGFloat headerHeight;//头视图的高度
@property (nonatomic, assign) CGFloat segmentHeight;//segment的高度
@property (nonatomic, assign) CGFloat headerMaxScrollHeight;//headerView最大的上移距离
@property (nonatomic, assign) CGFloat viewHeight;//self.view的高度

@end

@implementation SHViewController

- (void)viewDidLoad {
    [super viewDidLoad];
    self.view.backgroundColor = [UIColor whiteColor];
    // Do any additional setup after loading the view.
    self.automaticallyAdjustsScrollViewInsets = NO;
    self.navigationController.navigationBar.translucent = NO;
    [self.view addSubview:self.scrollView];

}

- (CGFloat)viewHeight {
    if (_viewHeight > 0) {
        return _viewHeight;
    }

    CGFloat height = SCREEN_HEIGHT;
    if (self.navigationController && self.navigationController.isNavigationBarHidden == NO) {
        height -= 64;
    }

    if (self.tabBarController.tabBar.isHidden == YES) {
        height -= 49;
    }

    _viewHeight = height;
    return _viewHeight;
}

- (UIScrollView *)scrollView {
    if (!_scrollView) {
        _scrollView = [[UIScrollView alloc] initWithFrame:CGRectMake(0, 0, SCREEN_WIDTH, self.viewHeight)];
        _scrollView.showsHorizontalScrollIndicator = NO;
        _scrollView.pagingEnabled = YES;
        _scrollView.delegate = self;
    }
    return _scrollView;
}

- (void)addChildVCWithArray:(NSArray  *)childVCArray
                 headerView:(UIView *)headerView
                segmentHeight:(CGFloat)segmentHeight {
    //滚动的头视图
    if (headerView) {
        [self.view addSubview:headerView];
        self.headerView = headerView;
        self.headerHeight = CGRectGetHeight(headerView.frame);
        self.segmentHeight =  segmentHeight;
        self.headerMaxScrollHeight = self.headerHeight - self.segmentHeight;
    }

    if (!childVCArray || childVCArray.count <= 0) {
        return;
    }
    //scrollview的contentSize
    self.scrollView.contentSize = CGSizeMake(SCREEN_WIDTH * childVCArray.count, self.viewHeight);
    //需要左右滚动的segmentVC
    self.vcArray = childVCArray;
    WEAKSELF
    [childVCArray enumerateObjectsUsingBlock:^(id  _Nonnull obj, NSUInteger idx, BOOL * _Nonnull stop) {
        UIViewController* childVC = (UIViewController *)obj;
        childVC.view.frame = CGRectMake(SCREEN_WIDTH * idx, CGRectGetMinY(childVC.view.frame), SCREEN_WIDTH, CGRectGetHeight(childVC.view.frame));
        [weakSelf.scrollView addSubview:childVC.view];
        [weakSelf addChildViewController:childVC];
        UIScrollView *scrollView = [weakSelf getScrollViewWithVC:childVC];

        [scrollView addObserver:weakSelf forKeyPath:@"contentOffset" options:NSKeyValueObservingOptionInitial context:nil];
    }];
}

- (void)observeValueForKeyPath:(NSString *)keyPath ofObject:(id)object change:(NSDictionary *)change context:(void *)context
{
    UIScrollView *scrollView = object;
    CGFloat offsetY = scrollView.contentOffset.y;
    if ([keyPath isEqualToString:@"contentOffset"]) {
        //headerview的frame变化
        if (offsetY >= self.headerMaxScrollHeight) {
            if (CGRectGetMinY(self.headerView.frame) != -self.headerMaxScrollHeight) {
                self.headerView.frame = CGRectMake(0, - self.headerMaxScrollHeight, SCREEN_WIDTH, self.headerHeight);

            }}else if (offsetY >= 0 && offsetY < self.headerMaxScrollHeight) {

                self.headerView.frame = CGRectMake(0, - offsetY, SCREEN_WIDTH, self.headerHeight);
            }else if (offsetY < 0) {
//                self.headerView.frame = CGRectMake(SCREEN_WIDTH * offsetY / self.headerHeight /2.0,0, SCREEN_WIDTH * (self.headerHeight - offsetY)/self.headerHeight, self.headerHeight - offsetY);//头视图随着拉伸变大
                self.headerView.frame = CGRectMake(0, -offsetY, SCREEN_WIDTH, self.headerHeight);
            }

        //各个vc中scrollView的frame变化
        WEAKSELF
        [self.vcArray enumerateObjectsUsingBlock:^(id  _Nonnull obj, NSUInteger idx, BOOL * _Nonnull stop) {
            UIViewController* childVC = (UIViewController *)obj;
            UIScrollView *scrollView = [weakSelf getScrollViewWithVC:childVC];
            if (offsetY >= weakSelf.headerMaxScrollHeight) {
                if (scrollView.contentOffset.y < weakSelf.headerMaxScrollHeight)
                    scrollView.contentOffset = CGPointMake(0, weakSelf.headerMaxScrollHeight);
            }else if (offsetY >= 0 && offsetY < weakSelf.headerMaxScrollHeight) {
                if(scrollView.contentOffset.y != offsetY)
                    scrollView.contentOffset = CGPointMake(0, offsetY);
            }else if (offsetY < 0) {
                if (scrollView.contentOffset.y > 0)
                    scrollView.contentOffset = CGPointMake(0, 0);
            }
        }];

    }

}

-(void)scrollViewDidEndDecelerating:(UIScrollView *)scrollView {
    if (self.viewControllerScrollToIndex) {
        NSInteger index = scrollView.contentOffset.x / SCREEN_WIDTH;
        self.viewControllerScrollToIndex(index);
    }
}

- (UIScrollView *)getScrollViewWithVC:(UIViewController *)vc {
    for (UIView *tempView in vc.view.subviews) {
        if ([tempView isKindOfClass:[UIScrollView class]]) {
            return (UIScrollView *)tempView;
        }
    }

    return nil;
}

