WindowManagerService工作方式
《WindowManagerService架构剖析之addWindow流程》
《WindowManagerService架构剖析之窗口分组与分层》
《WindowManagerService架构剖析之token分析》
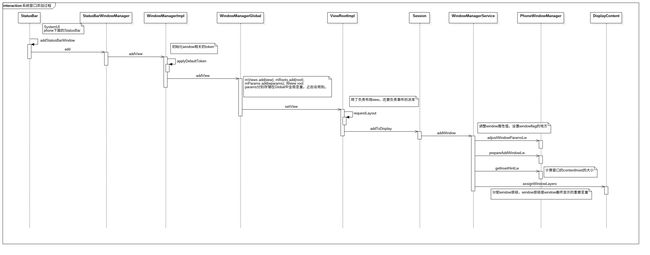
WMS工作过程中牵扯到比较多的类,我们先从简单的方面入手,从addWindow这个切入点来串起window管理的主要类之间的关系。
一、添加Window
1.1 系统窗口的添加过程
通过讲解StatusBar的添加过程,来分析一下系统窗口的add过程,同时也串联一下WMS中各个类之间的关系。com.android.systemui提供了系统UI界面的统一管理方案,它提供status bar、navigation bar、状态栏的combined bar等等。本次我们直接分析一下status bar的添加过程。
StatusBar.java
protected StatusBarWindowManager mStatusBarWindowManager;
private void addStatusBarWindow() {
        makeStatusBarView();
        mStatusBarWindowManager = Dependency.get(StatusBarWindowManager.class);
        mRemoteInputController = new RemoteInputController(mHeadsUpManager);
        mStatusBarWindowManager.add(mStatusBarWindow, getStatusBarHeight());
    }
makeStatusBarView()主要是设置statusbar的res资源和主题,还有设置statusbar的各种点击事件。直接跳到StatusBarWindowManager,在StatusBarWindowManager的构造函数中直接获取一个WindowManager服务,这个WindowManager服务可不是WMS,可以从注册的源头来看:
SystemServiceRegistry.java
final class SystemServiceRegistry {
        static {
//......
               registerService(Context.WINDOW_SERVICE, WindowManager.class,
                new CachedServiceFetcher() {
                      @Override
                      public WindowManager createService(ContextImpl ctx) {
                              return new WindowManagerImpl(ctx);
                    }});
//......
        }
}
所以这个WindowManager“服务”就是WindowManagerImpl,这儿确实比较容易混淆,但是WMS是通过ServiceManager注册到binder中的,所以不应该通过Context来获取,应该通过ServiceManager来获取。
WindowManagerGlobal.java
public static IWindowManager getWindowManagerService() {
        synchronized (WindowManagerGlobal.class) {
            if (sWindowManagerService == null) {
                sWindowManagerService = IWindowManager.Stub.asInterface(
                        ServiceManager.getService("window"));
                try {
                    if (sWindowManagerService != null) {
                        ValueAnimator.setDurationScale(
                                sWindowManagerService.getCurrentAnimatorScale());
                    }
                } catch (RemoteException e) {
                    throw e.rethrowFromSystemServer();
                }
            }
            return sWindowManagerService;
        }
    }
上面获取WMS,是通过ServiceManager,直接调用到底层的binder驱动。而这儿获取WindowManagerImpl实例,在静态代码块中写入hashmap中的,存取的地方不一样。接下来继续看WindowManagerImpl.java
StatusBarWindowManager.java
public class StatusBarWindowManager implements RemoteInputController.Callback, Dumpable {
    private final WindowManager mWindowManager;
    public StatusBarWindowManager(Context context) {
        mContext = context;
        mWindowManager = (WindowManager) context.getSystemService(Context.WINDOW_SERVICE);
       //......
    }

    public void add(View statusBarView, int barHeight) {
 /**
这里主要设置一下statusbar的layoutparams
**/
        mWindowManager.addView(mStatusBarView, mLp);
//......
    }
}
WindowManagerImpl类很简单,只是window操作过程中的一个媒介,它获取WindowManagerGlobal的单例,调用WindowManagerGlobal中的操作方法。
WindowManagerImpl.java
public final class WindowManagerImpl implements WindowManager {
    private final WindowManagerGlobal mGlobal = WindowManagerGlobal.getInstance();
@Override
    public void addView(@NonNull View view, @NonNull ViewGroup.LayoutParams params) {
        applyDefaultToken(params);
        mGlobal.addView(view, params, mContext.getDisplay(), mParentWindow);
    }
}
在WindowManagerGlobal的addView中,前面省略的部分是一些异常判断,如果一些屏幕显示参数异常等等。使用findViewLocked(...),如果当前的view已经添加过了,那就不要重复添加了,直接throw异常,反之则创建一个ViewRootImpl,这个对象是view层级的最顶层,主要是view和windowManager之间的媒介。这儿定义的几个ArrayList是将addView过程中的参数放在数据中,可供查找、更新、重绘等等。
WindowManagerGlobal.java
public final class WindowManagerGlobal {
//存储所有window对应的view
    private final ArrayList mViews = new ArrayList();
//存储所有window对应的ViewRootImpl,会有绑定的操作
    private final ArrayList mRoots = new ArrayList();
//存储所有window对应的布局参数
    private final ArrayList mParams =
            new ArrayList();
//存储那些正在被删除的view对象
    private final ArraySet mDyingViews = new ArraySet();
    public void addView(View view, ViewGroup.LayoutParams params,
            Display display, Window parentWindow) {
//......
        ViewRootImpl root;
        View panelParentView = null;

        synchronized (mLock) {
//......
            int index = findViewLocked(view, false);
            if (index >= 0) {
                if (mDyingViews.contains(view)) {
                    // Don't wait for MSG_DIE to make it's way through root's queue.
                    mRoots.get(index).doDie();
                } else {
                    throw new IllegalStateException("View " + view
                            + " has already been added to the window manager.");
                }
                // The previous removeView() had not completed executing. Now it has.
            }
//......
            root = new ViewRootImpl(view.getContext(), display);

            view.setLayoutParams(wparams);

            mViews.add(view);
            mRoots.add(root);
            mParams.add(wparams);

            // do this last because it fires off messages to start doing things
            try {
                root.setView(view, wparams, panelParentView);
            } catch (RuntimeException e) {
                // BadTokenException or InvalidDisplayException, clean up.
                if (index >= 0) {
                    removeViewLocked(index, true);
                }
                throw e;
            }
        }
    }
}
目前的这些操作,都是在本地操作,还没有通过binder通信和service交互,接下来开始和WMS通信的过程。
ViewRootImpl.java
public void setView(View view, WindowManager.LayoutParams attrs, View panelParentView) {
        synchronized (this) {
            if (mView == null) {
//......
                  requestLayout();
//......
                  try {
//......
                        res = mWindowSession.addToDisplay(mWindow, mSeq, mWindowAttributes,
                            getHostVisibility(), mDisplay.getDisplayId(),
                            mAttachInfo.mContentInsets, mAttachInfo.mStableInsets,
                            mAttachInfo.mOutsets, mInputChannel);
                  } catch (RemoteException e) {
//......
                  }
ViewRootImpl构造函数中mWindowSession = WindowManagerGlobal.getWindowSession();这儿的session实际上已经调用到service端了。当我们操作window,window有变化,肯定要去通知service端,同时更新Service端的一些信息。之前说ViewRootImpl与WMS进行通信,通信的工具就是session,在通信之前操作requestLayout(),就是要在WMS注册前准备好当前view树接收事件的准备,通过requestLayout()刷新异步请求,同时调用scheduleTraversals()来绘制view。
这儿要稍等等下,看一下传入的参数mWindow,这是一个继承IWindow.Stub的实例:
ViewRootImpl.java
public ViewRootImpl(Context context, Display display) {
//......
        mWindowSession = WindowManagerGlobal.getWindowSession();
//......
        mWindow = new W(this);
//......
}
static class W extends IWindow.Stub {
        private final WeakReference mViewAncestor;
        private final IWindowSession mWindowSession;

        W(ViewRootImpl viewAncestor) {
            mViewAncestor = new WeakReference(viewAncestor);
            mWindowSession = viewAncestor.mWindowSession;
        }
//......
}
构造这么一个W对象,作为client端的window对象,类实例就是一个Binder本地对象,其不仅持有ViewRootImpl实例,还持有Session实例,并且还包含之前传入的view,将其传入Service端,WMS利用传入的client-window实例传入WindowState构造函数中,赋值mClient对象,这时候WMS可以利用mClient要求应用程序侧的Activity来配合管理管理窗口的状态(可以触发调整Activity中window大小、设置Activity中window可见性等等)。这儿暂时不展开讲了,后面我们统一将这一块拎出来讲。
Session.java
public int addToDisplay(IWindow window, int seq, WindowManager.LayoutParams attrs,
            int viewVisibility, int displayId, Rect outContentInsets, Rect outStableInsets,
            Rect outOutsets, InputChannel outInputChannel) {
        return mService.addWindow(this, window, seq, attrs, viewVisibility, displayId,
                outContentInsets, outStableInsets, outOutsets, outInputChannel);
    }
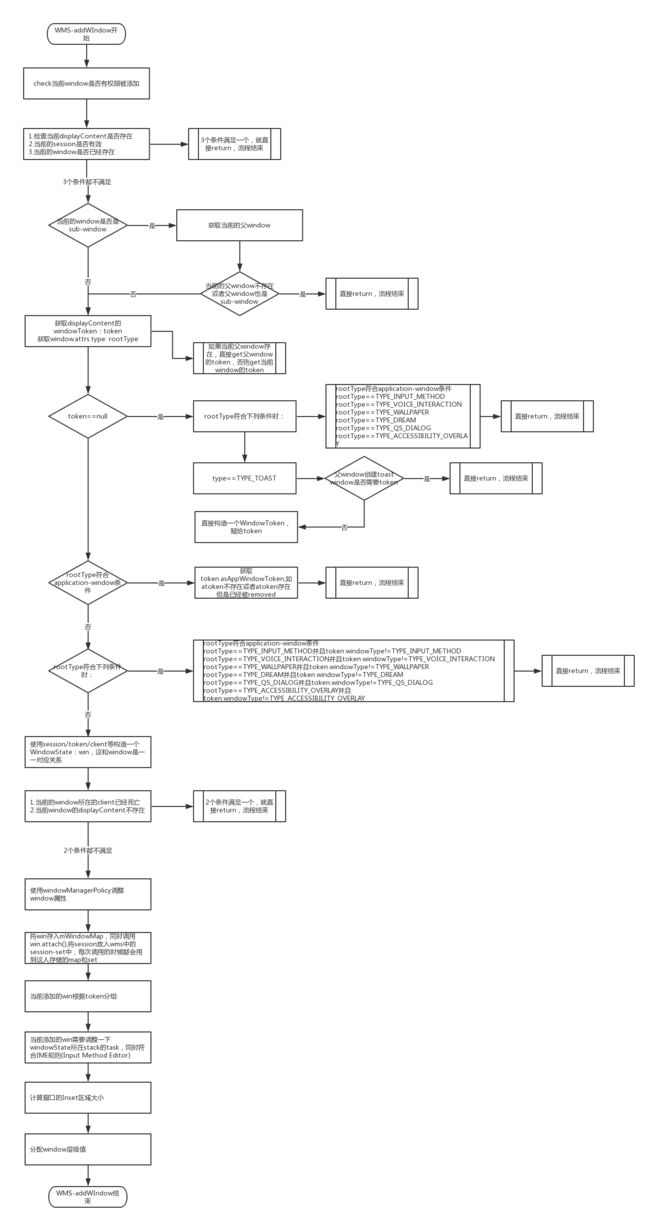
通过Session直接调用WMS的addWindow,接下来主要分析一下WMS中的addWindow:
这儿的代码实在太多,所以画了一个流程图,别看判断这么多,核心讲起来就几点:
client端传入的参数有session/attrs,qizhong
1.addWindow的window需要分组
2.window需要调整z-order
3.window需要显示
1.2 应用窗口的添加过程
对于WMS而言,它不会可以区分系统窗口和应用窗口,只是最终计算机的层级和window的权限会有不同。但是两种窗口的创建构成肯定是不同的。
我们在学习AMS的时候就知道当前启动一个Activity,首先要判断Activity所在的进程是否已经启动,如果已经运行启动,那么直接向这个进程发送启动特定Activity的指令;否则较创建该应用程序的进程,通过ActivityThread启动Activity。
首先分析代码,确定应用窗口是什么时候被添加的,我们知道Activity启动的流程是onCreate() ---> onStart() ---> onResume(),而且当前的Activity可见的地方是在onResume()中,那就到onResume()执行流程中找一下window何时被添加的。根据我们之前的文章:ActivityManagerService架构剖析(一) (https://www.jianshu.com/p/17b2844b2a27),可知具体的add过程是:
ActivityThread.java
final void handleResumeActivity(IBinder token,
            boolean clearHide, boolean isForward, boolean reallyResume, int seq, String reason) {
//......
//此调用直接触发onResume()
      r = performResumeActivity(token, clearHide, reason);
      if (r != null) {
//......
            if (r.window == null && !a.mFinished && willBeVisible) {
                  View decor = r.window.getDecorView();
//......
                  if (a.mVisibleFromClient) {
                        if (!a.mWindowAdded) {
                              a.mWindowAdded = true;
                              wm.addView(decor, l);
                         } else {

                        }
//......
                }
            }
      }
}
这儿的DecorView就是View树的顶层,所谓“修饰视图”:
Activity.java
public void setContentView(@LayoutRes int layoutResID) {
        getWindow().setContentView(layoutResID);
        initWindowDecorActionBar();
    }
然后进入PhoneWindow查看一下(PhoneWindow是Window的子类):
PhoneWindow.java
public void setContentView(int layoutResID) {
        if (mContentParent == null) {
            installDecor();
        } else if (!hasFeature(FEATURE_CONTENT_TRANSITIONS)) {
            mContentParent.removeAllViews();
        }
//......
    }
private void installDecor() {
        mForceDecorInstall = false;
        if (mDecor == null) {
            mDecor = generateDecor(-1);
        }
//......
}

protected DecorView generateDecor(int featureId) {
//......
        return new DecorView(context, featureId, this, getAttributes());
    }
上面的代码理解起来,DecorView是包含全部的view,我们平时常用的ContentView只是其中的content,还有标题栏等等。
至于子窗口的添加过程,可以参考源码PopupWindow.java,本文暂且到此为止,之后会分析Window的层级计算以及窗口的计算过程等等。

