1.滑动验证码
前面介绍了利用 tesserocr 来识别简单的图形验证码,和利用openCV识别滑动验证码的缺口处的位置坐标,本篇文章就正式介绍滑动验证码的破解思路,它需要拖动拼合滑块才可以完成验证,相对图形验证码来说识别难度加大了不少。
2.破解流程
- 获取小图片和带有缺口的图片
- 识别缺口位置
- 生成滑块拖动路径
- 模拟实现滑块拼合通过验证
代码实例是破解网易易盾滑动验证码 ,下面是程序控制chrome浏览器,自动破解验证码成功的结果。
3.保存图片到本地以便分析
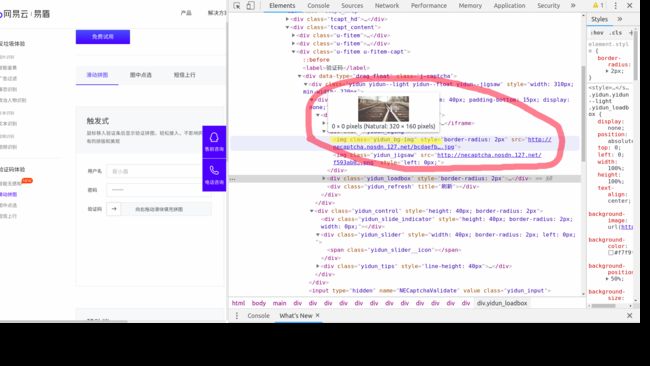
根据chrome调试工具获取到小图片和待带口图片的名字,如图是待缺口图片的信息,可以看到它的CLASS_NAME为yidun_bg.i,小图片的分析方法和它一致。
获取图片的代码
def get_pic(self):
    time.sleep(2)
    target = self.wait.until(EC.presence_of_element_located((By.CLASS_NAME, 'yidun_bg-img')))
    template = self.wait.until(EC.presence_of_element_located((By.CLASS_NAME, 'yidun_jigsaw')))
    target_link = target.get_attribute('src')
    template_link = template.get_attribute('src')
    target_img = Image.open(BytesIO(requests.get(target_link).content))
    template_img = Image.open(BytesIO(requests.get(template_link).content))
    target_img.save('target.jpg')
    template_img.save('template.png')
    local_img = Image.open('target.jpg')
    size_loc = local_img.size
    self.zoom = 320 / int(size_loc[0)
先是获取到了两张图片对象,然后获取它们的网络地址,并将其下载和保存下来。
注意
    local_img = Image.open('target.jpg')
    size_loc = local_img.size  #获取下载好的图片的大小(以像素为单位)
    self.zoom = 320 / int(size_loc[0]) # 网页上的图片为320像素
考虑到代码可能会在不同电脑上运行,为防止因为屏幕分辨率不一样,导致位移距离出现偏差所以后面操纵浏览器要移动的位移是需要缩放的。要获得到这个缩放系数,是将目标文件在网页上的大小和下载下来后实际的大小做比对,做除法即可获得缩放系数。
4.识别缺口位置
原理和实践在[Opencv_Python]模板匹配里已经完整的介绍了,这里不做赘述了。
def match(self, target, template):
    img_rgb = cv2.imread(target)
    img_gray = cv2.cvtColor(img_rgb, cv2.COLOR_BGR2GRAY)
    template = cv2.imread(template, 0)
    run = 1
    w, h = template.shape[::-1]
    print(w, h)
    res = cv2.matchTemplate(img_gray, template, cv2.TM_CCOEFF_NORMED)
    run = 1

    # 使用二分法查找阈值的精确值
    L = 0
    R = 1
    while run < 20:
        run += 1
        threshold = (R + L) / 2
        print(threshold)
        if threshold < 0:
            print('Error')
            return None
        loc = np.where(res >= threshold)
        print(len(loc[1]))
        if len(loc[1]) > 1:
            L += (R - L) / 2
        elif len(loc[1]) == 1:
            print('目标区域起点x坐标为:%d' % loc[1][0])
            break
        elif len(loc[1]) < 1:
            R -= (R - L) / 2
5.计算移动轨迹
移动轨迹是要完全模拟人移动滑块时的状态,即先加速再减速还可以加入回退和抖动。前段滑块做匀加速运动,后段滑块做匀减速运动,利用物理学 的加速度公式 即可完成验证 。
滑块滑动 的加 速度用 a 来表示 , 当前速度用 v 表示 , 初速度用 VO 表示 ,位移用s 表示 ,所需 时间用 t 表示,它们 之间 满足如下关系 :
s = VO * t + 1/2 * a * t * t
V=VO+a*t
利用这两个公式可以构造轨迹移动算法 ,计算出先加速后减速的运动轨迹,代码实现如下所示 :
def get_tracks(self, distance):
    print(distance)
    distance += 20
    v = 0
    t = 0.2
    forward_tracks = []
    current = 0
    mid = distance * 3 / 5  #减速阀值
    while current < distance:
        if current < mid:
            a = 2  #加速度为+2
        else:
            a = -3  #加速度-3
        s = v * t + 0.5 * a * (t ** 2)
        v = v + a * t
        current += s
        forward_tracks.append(round(s))

    back_tracks = [-3, -3, -2, -2, -2, -2, -2, -1, -1, -1]
    return {'forward_tracks': forward_tracks, 'back_tracks': back_tracks}
get_tracks()方法,传人的参数为要移动的总距离(我们通过上面的match函数已经计算出来了),它返回的是运动轨迹 。运动轨迹用 forward_track表示,它是一个列表,列表的每个元素代表每次移动多少距离 。
首先定义变量 mid ,即减速的阔值,也就是加速到什么位置开始减速 。 在这里 mid 值为 3/5 ,即模
拟前 3/5 路程是加速过程,后 2/5 路程是减速过程 。
接着定义当前位移的距离变量 current ,初始为 0 ,然后进入 while 循环,循环的条件是当前位移
小于总距离 。 在循环里我们分段定义了加速度,其中加速过程的加速度定义为 2 ,减速过程的加速度
定义为 3 。 之后套用位移公式计算出某个时间段内的位移,将当前位移更新并记录到轨迹里即可 。
直到运动轨迹达到总距离时,循环终止 。 最后得到的 forward_tracks 记录了每个时间间隔移动了多少位移,
这样滑块的运动轨迹就得到了 。同时为了模拟一个回退的过程也手工设置了back_tracks列表,用于指定回退的位移量。
模拟滑块拼合的过程
def crack_slider(self):
    self.open()
    target = 'target.jpg'
    template = 'template.png'
    self.get_pic()
    distance = self.match(target, template)
    tracks = self.get_tracks((distance + 7) * self.zoom)  # 对位移的缩放计算
    print(tracks)
    slider = self.wait.until(EC.element_to_be_clickable((By.CLASS_NAME, 'yidun_slider')))
    ActionChains(self.driver).click_and_hold(slider).perform()

    for track in tracks['forward_tracks']:
        ActionChains(self.driver).move_by_offset(xoffset=track, yoffset=0).perform()

    time.sleep(0.5)
    for back_tracks in tracks['back_tracks']:
        ActionChains(self.driver).move_by_offset(xoffset=back_tracks, yoffset=0).perform()

    ActionChains(self.driver).move_by_offset(xoffset=-4, yoffset=0).perform()
    ActionChains(self.driver).move_by_offset(xoffset=4, yoffset=0).perform()
    time.sleep(0.5)

    ActionChains(self.driver).release().perform(
调用 ActionChains 的 click and hold ()方法按住拖
动底部滑块,遍历运动轨迹获取每小段位移距离,调用 move_by_offset ()方法移动此位移,最后调用
release ()方法松开鼠标即可 。整个过程模拟的是先加速在减速,并超出了缺口的位置,再回退,并且回退的多了4个像素,然后又前进了4个像素,完全是为了模拟人的行为,因为现在的滑动验证码识别加入了
机器学习模型。如果我们只是简单的匀速且一次的拖动是肯定不行的。
6.整体代码
from PIL import Image
from selenium import webdriver
from selenium.webdriver import ActionChains
from selenium.webdriver.common.by import By

from selenium.webdriver.support import expected_conditions as EC
from selenium.webdriver.support.wait import WebDriverWait
import cv2
import numpy as np
from io import BytesIO
import time, requests


class CrackSlider():
    """
    通过浏览器截图,识别验证码中缺口位置,获取需要滑动距离,并模仿人类行为破解滑动验证码
    """
    def __init__(self):
        self.url = 'http://dun.163.com/trial/jigsaw'
        self.driver = webdriver.Chrome()
        self.wait = WebDriverWait(self.driver, 20)
        self.zoom = 1

    def open(self):
        self.driver.get(self.url)

    def get_pic(self):
        time.sleep(2)
        target = self.wait.until(EC.presence_of_element_located((By.CLASS_NAME, 'yidun_bg-img')))
        template = self.wait.until(EC.presence_of_element_located((By.CLASS_NAME, 'yidun_jigsaw')))
        target_link = target.get_attribute('src')
        template_link = template.get_attribute('src')
        target_img = Image.open(BytesIO(requests.get(target_link).content))
        template_img = Image.open(BytesIO(requests.get(template_link).content))
        target_img.save('target.jpg')
        template_img.save('template.png')
        local_img = Image.open('target.jpg')
        size_loc = local_img.size
        self.zoom = 320 / int(size_loc[0])

    def get_tracks(self, distance):
        print(distance)
        distance += 20
        v = 0
        t = 0.2
        forward_tracks = []
        current = 0
        mid = distance * 3 / 5  #减速阀值
        while current < distance:
            if current < mid:
                a = 2  #加速度为+2
            else:
                a = -3  #加速度-3
            s  = v * t + 0.5 * a * (t ** 2)
            v = v + a * t
            current += s
            forward_tracks.append(round(s))

        back_tracks = [-3, -3, -2, -2, -2, -2, -2, -1, -1, -1]
        return {'forward_tracks': forward_tracks, 'back_tracks': back_tracks}

    def match(self, target, template):
        img_rgb = cv2.imread(target)
        img_gray = cv2.cvtColor(img_rgb, cv2.COLOR_BGR2GRAY)
        template = cv2.imread(template, 0)
        run = 1
        w, h = template.shape[::-1]
        print(w, h)
        res = cv2.matchTemplate(img_gray, template, cv2.TM_CCOEFF_NORMED)
        run = 1

        # 使用二分法查找阈值的精确值
        L = 0
        R = 1
        while run < 20:
            run += 1
            threshold = (R + L) / 2
            print(threshold)
            if threshold < 0:
                print('Error')
                return None
            loc = np.where(res >= threshold)
            print(len(loc[1]))
            if len(loc[1]) > 1:
                L += (R - L) / 2
            elif len(loc[1]) == 1:
                print('目标区域起点x坐标为:%d' % loc[1][0])
                break
            elif len(loc[1]) < 1:
                R -= (R - L) / 2
        return loc[1][0]

def crack_slider(self):
    slider = self.wait.until(EC.element_to_be_clickable((By.CLASS_NAME, 'yidun_slider')))
    ActionChains(self.driver).click_and_hold(slider).perform()

    for track in tracks['forward_tracks']:
        ActionChains(self.driver).move_by_offset(xoffset=track, yoffset=0).perform()

    time.sleep(0.5)
    for back_tracks in tracks['back_tracks']:
        ActionChains(self.driver).move_by_offset(xoffset=back_tracks, yoffset=0).perform()

    ActionChains(self.driver).move_by_offset(xoffset=-4, yoffset=0).perform()
    ActionChains(self.driver).move_by_offset(xoffset=4, yoffset=0).perform()
    time.sleep(0.5)

    ActionChains(self.driver).release().perform()


if __name__ == '__main__':
    cs = CrackSlider()
    cs.open()
    target = 'target.jpg'
    template = 'template.png'
    cs.get_pic()
    distance = self.match(target, template)
    tracks = self.get_tracks((distance + 7) * cs.zoom)  # 对位移的缩放计算
    cs.crack_slider()
7.小结
滑动验证码的识别,基本思路是先用图像识别的知识(opencv的模板匹配功能)判断出要滑动的位移,再模拟人拖动滑块的过程(先加速,再减速,适当加入回退,和随机抖动)。下一篇专题文章,是目前,最为流行的点触验证码的破解。
关于作者
个人博客: https://yhch.xyz

