在之前《Angular2初探》一文中我们已经将Angular2基于webpack+Typescript的开发环境搭建好了,利用这些,我们接着探究一下如何使用组件(Component),路由(Router)与模块(Module)快速构建一个动态Angular2应用。
一、组件(Component)
组件是应用视图的基本单位,可以相互嵌套(需要在共同的模块中声明)。Angular2推荐的应用组织方式是将应用相关的样式,模板以及ts文件写入同一目录下。形如:
app
    - app.component.css
    - app.component.html
    - app.component.ts
bye
    - bye.component.css
    - bye.component.html
    - bye.component.ts
hello
    - hello.component.css
    - hello.component.html
    - hello.component.ts
使用Typescript装饰器语法,我们能够快速声明组件。
components/app/app.component.css
* {
    padding: 0;
    margin: 0;
}
components/app/app.component.html
{{title}}
Hello
Bye
components/app/app.component.ts
import { Component } from '@angular/core';

@Component({
    selector: 'main-app',
    templateUrl: './app.component.html',
    styleUrls: ['./app.component.css']
})

export class AppComponent {
    title = 'Angular Router App';
}
components/bye/bye.component.css
h2 {
    color: blue;
}
components/bye/bye.component.html
{{title}}
components/bye/bye.component.ts
import { Component } from '@angular/core';

@Component({
    selector: 'bye-app',
    templateUrl: './bye.component.html',
    styleUrls: ['./bye.component.css']
})
export class ByeComponent {
    title = 'Bye Angular 2~';
}
components/hello/hello.component.css
h2 {
    color: red;
}
components/hello/hello.component.html
{{title}}
components/hello/hello.component.ts
import { Component } from '@angular/core';

@Component({
    selector: 'hello-app',
    styleUrls: ['./hello.component.css'],
    templateUrl: './hello.component.html'
})

export class HelloComponent {
    title = 'Hello Angular 2';
}
二、路由(Router)
Angular2路由有两种模式,基于“hash URL”模式以及基于HTML5的“pushState”模式:
基于Hash URL —— “localhost:3000/#/users”
浏览器在当前地址的 URL 变化时总会往服务器发送页面请求,唯一的例外规则是:当这些变化位于“#”(被称为“ hash ”)后面时不会发送。通过把应用内的路由 URL 拼接在 # 之后,路由器可以获得这条“例外规则”带来的优点
pushState URL —— “localhost:3000/users”
现代 HTML 5 浏览器支持 history.pushState API ,这是一项可以改变浏览器的当前地址和历史,却又不会触发服务端页面请求的技术。路由器可以合成出一个“自然的” URL ,它看起来和那些需要进行页面加载的 URL 没什么区别。
Angular2框架默认的路由方式采用的是第二种,基于HTML5的“pushState”的路由。本文推荐大家也去使用这种,毕竟在当我们真正想要使用锚点(“#”)进行页面上的一些定位时,不会因使用了HashURL而造成一些困扰。
不过,如果真的想要用HTML5路由时,一定需要在页面
所以,在我们的入口html文件中,我们需要添加之。
index.html
    Angular With Webpack


    Loading...
Angular2路由功能通过RouterModule提供,我们需要在路由数组中定义路由规则,然后将这些规则暴露给模块。
apps/hello.routing.ts
import { ModuleWithProviders } from '@angular/core';
import { Routes, RouterModule } from '@angular/router';

import { HelloComponent } from '../components/hello/hello.component';
import { ByeComponent } from '../components/bye/bye.component';

const helloRoutes: Routes = [{
    path: 'hello',
    component: HelloComponent
}, {
    path: 'bye',
    component: ByeComponent
}, {
    path: '',  // 空路径规则,表征任何不符合规则的路由皆按此规则进行跳转
    redirectTo: '/hello',  // 重定向至“/hello”
    pathMatch: 'full'  // 路径匹配规则
}];

export const routing: ModuleWithProviders = RouterModule.forRoot(helloRoutes);
三、模块(Module)
模块是组织应用程序和使用外部程序库的最佳途径。
很多 Angular 库都是模块,比如:FormsModule、HttpModule、RouterModule。很多第三方库也封装成了 Angular 模块,比如:MaterialDesign 、Ionic 、AngularFire2 。
Angular 模块把组件、指令和管道打包成内聚的功能块,每块聚焦于一个特性分区、业务领域、工作流,或一组通用的工具。
模块还能用来把服务加到应用程序中。这些服务可能是内部研发的,比如应用日志服务;也可能是外部资源,比如 Angular 路由和 Http 客户端。模块可能在应用启动时主动加载,也可能由路由器进行异步 * 惰性加载 * 。
Angular 模块是一个由@NgModule装饰器提供元数据的类,元数据包括:
- 声明哪些组件、指令、管道属于该模块。
- 公开某些类,以便其它的组件模板可以使用它们。
- 导入其它模块,从其它模块总获得本模块所需的组件、指令和管道。
- 在应用程序级提供服务,以便应用中的任何组件都能使用它。
每个 Angular 应用至少有一个模块类—— * 根模块 * ,我们将通过引导根模块来启动应用。
对于组件很少的简单应用来说,只用一个 * 根模块 * 就足够了。随着应用规模的增长,我们可以从 * 根模块 * 中重构出一些 ** 特性模块 ** ,用它们来实现一组密切相关的功能。
简而言之,模块就是一个集装箱,里面有各种组件,以及一定的路由规则,我们只需要使用特定的方法,启动这个模块即可。
我们的组件与路由都已准备好,接下来就是“组装”的过程了。
apps/hello.module.ts
import { NgModule }       from '@angular/core';
import { BrowserModule }  from '@angular/platform-browser';

import { AppComponent } from '../components/app/app.component';
import { HelloComponent } from '../components/hello/hello.component';
import { ByeComponent } from '../components/bye/bye.component';

import { routing } from './hello.routing';

@NgModule({
    imports: [
        BrowserModule,
        routing
    ],
    declarations: [
        AppComponent,
        HelloComponent,
        ByeComponent
    ],
    bootstrap: [ AppComponent ]
})

export class HelloModule {}
组装完毕,在入口ts中启用这个模块。
main.ts
import { platformBrowserDynamic } from '@angular/platform-browser-dynamic';
import { enableProdMode } from '@angular/core';
import { HelloModule } from './apps/hello.module';
if (process.env.ENV === 'production') {
  enableProdMode();
}
platformBrowserDynamic().bootstrapModule(HelloModule);
另有两个ts文件也得加上
polyfills.ts(js补丁)
import 'core-js/es6';
import 'core-js/es7/reflect';
require('zone.js/dist/zone');
if (process.env.ENV === 'production') {
  // Production
} else {
  // Development
  Error['stackTraceLimit'] = Infinity;
  require('zone.js/dist/long-stack-trace-zone');
}
vendor.ts(方便webpack抽取公共js类库)
// Angular
import '@angular/platform-browser';
import '@angular/platform-browser-dynamic';
import '@angular/core';
import '@angular/common';
import '@angular/http';
import '@angular/router';

// RxJS
import 'rxjs';
// Other vendors for example jQuery, Lodash or Bootstrap
// You can import js, ts, css, sass, ...
四、编译运行
npm start
或者
webpack-dev-server --inline --progress --port 8080
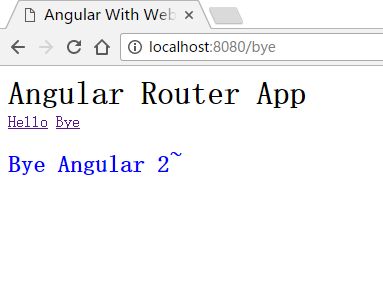
嗯,不太美观,不过这个目前并不重要,至少我们把架子搭了起来,剩下就是往里面填充实际的内容。
看到这里,相信各位对Angular2应用的组织有了一个相对直观的了解,“组件-路由-模块”关系形如下图:
我们在路由中定义视图跳转规则,在模块中注入这些路由与视图组件。通过“组件-路由-模块”的组合,在Angular2平台之上,我们便能够构建出丰富多彩的动态应用来。
源码与脚手架工程托管在github之上,有需要的读者可以自行clone之~
git clone https://github.com/HalZhan/myAngular2.git


