2.16-2.17 lnmp ---mysql,php,nginx,论坛的建立
一、lnmp的介绍
LNMP是指一组通常一起使用来运行动态网站或者服务器的自由软件名称首字母缩写。L指Linux,N指Nginx,M一般指MySQL,也可以指MariaDB,P一般指PHP,也可以指Perl或Python。
二、mysql的下载与安装
1、下载mysql安装包,解压
tar zxf mysql-boost-5.7.17.tar.gz
2、下载cmake安装包,安装
cmake是与编译工具
yum install -y cmake-2.8.12.2-4.el6.x86_64.rpm
mkdir /usr/local/lnmp
3、安装依赖文件
yum install gcc gcc-c++ -y
yum install -y ncurses-devel
yum install -y bison
4、编译
编译前,调整内存为2G以上
cd mysql-5.7.17/
cmake -DCMAKE_INSTALL_PREFIX=/usr/local/lnmp/mysql -DMYSQL_DATADIR=/usr/local/lnmp/mysql/data -DMYSQL_UNIX_ADDR=/usr/local/lnmp/mysql/data/mysql.sock -DWITH_MYISAM_STORAGE_ENGINE=1 -DWITH_INNOBASE_STORAGE_ENGINE=1 -DDEFAULT_CHARSET=utf8 -DDEFAULT_COLLATION=utf8_general_ci -DEXTRA_CHARSETS=all -DWITH_BOOST=boost/boost_1_59_0
5、安装
make install
mysql的初始化
1、复制mysql配置文件,并给配置文件增加执行权限
cd mysql-5.7.17/
ls
cd support-files/
ls
yum remove mysql -y ##卸载原来的mysql
cp mysql.server /etc/init.d/mysqld
cd /etc/init.d/
chmod +x mysqld ##增加执行权限
2、备份配置文件,并复制一份新的配置文件,并修改
cd /etc/
cp my.cnf my.cnf.bak ##备份配置文件
cd mysql-5.7.17/support-files/
cp my-default.cnf /etc/my.cnf ##复制配置文件
vim /etc/my.cnf ##编辑配置文件
修改如下
23 basedir = /usr/local/lnmp/mysql
24 datadir = /usr/local/lnmp/mysql/data
3、创立mysql用户和组,并修改权限
userdel -r mysql ##删除原有的用户和组
groupdel mysql
groupadd -g 27 mysql
useradd -u 27 -g 27 mysql
id mysql ##查看用户
chown root.mysql /usr/local/lnmp/mysql -R ##修改权限
4、配置环境变量
vim ~/.bash_profile
修改如下
10 PATH=$PATH:$HOME/bin:/usr/local/lnmp/mysql/bin
cd /usr/local/lnmp/mysql/bin/
source ~/.bash_profile ##加载
5、创立data目录,并第一次初始化,初始化后得到密码,保存
mkdir data
ll
chown mysql.mysql data -R
ll
cd data/
mysqld --user=mysql --initialize
初始化后得到密码,保存
6、第二次初始化
/etc/init.d/mysql start
mysql_secure_installation
7、登陆
[root@server1 mysql]# mysql -uroot -predhat
三、php的安装
1、解压PHP安装包
tar jxf php-5.6.35.tar.bz2
2、安装php的依赖的软件
cd php-5.6.35
yum install libxml2-devel -y
yum install -y openssl-devel
yum install -y libcurl-devel
yum install -y libjpeg-turbo-devel-1.2.2-1.el6.x86_64
yum whatprovides */jpeglib.h ##查看jpeglib.h文件所在的包
yum install libjpeg-turbo-devel-1.2.1-1.el6.x86_64 -y
yum whatprovides */png.h
yum install libpng-devel-1.2.49-1.el6_2.x86_64 -y
yum install -y freetype-devel -y
yum whatprovides */gmp.h
yum install gmp-devel-4.3.1-7.el6_2.2.x86_64 -y
yum whatprovides */mcrypt.h
yum install -y libmcrypt-* ##不再镜像包,是单独的包
yum install -y net-snmp
yum install -y net-snmp-devel
3、查看编译环境,编译,安装
cd php-5.6.35
./configure --prefix=/usr/local/lnmp/php --with-config-file-path=/usr/local/lnmp/php/etc --with-openssl --with-snmp --with-gd --with-zlib --with-curl --with-libxml-dir --with-png-dir --with-jpeg-dir --with-freetype-dir --with-gmp --with-gettext --with-pear --enable-mysqlnd --with-mysql=mysqlnd --with-mysqli=mysqlnd --with-pdo-mysql=mysqlnd --enable-inline-optimization --enable-soap --enable-ftp --enable-sockets --enable-mbstring -enable-fpm --with-fpm-user=nginx --with-fpm-group=nginx --with-mcrypt --with-mhash
make && make install
FastCGI 是由 fpm管理
4、创立nginx的用户和组
useradd nginx
id nginx
5、复制配置文件
cd /usr/local/lnmp/php/etc/
ls
cp php-fpm.conf.default php-fpm.conf
vim php-fpm.conf ##查看配置文件
149 user = nginx
150 group = nginx
6、复制主配置文件
cd ~/php-5.6.35
cp php.ini-production /usr/local/lnmp/php/etc/php.ini
vim /usr/local/lnmp/php/etc/php.ini
修改如下
936 date.timezone = Asia/Shanghai
7、复制启动文件,并增加启动权限
cd ~/php-5.6.35/sapi/fpm/
cp init.d.php-fpm /etc/init.d/php-fpm
chmod +x /etc/init.d/php-fpm
8、开启php,并查看是否存在9000端口
/etc/init.d/php-fpm start
netstat -antlp ##查看
tcp 0 0 127.0.0.1:9000 0.0.0.0:* LISTEN 1278/php-fpm
FastCGI = Fast Common Gateway Interface
FastCGI 是由 fpm管理
四、配置nginx
1、解压nginx安装包
tar zxf nginx-1.14.0.tar.gz
2、修改安装包中的文件
cd nginx-1.14.0
vim src/core/nginx.h
14 #define NGINX_VER "nginx/"
vim auto/cc/gcc
171 # debug
172 #CFLAGS="$CFLAGS -g" ##如果不注释,debug日志会非常多
3、安装依赖文件,编译,安装
yum install pcre-devel -y
cd nginx-1.14.0
./configure --help ##查看编译帮抓
./configure --prefix=/usr/local/lnmp/nginx --with-http_ssl_module --with-http_stub_status_module --with-threads --with-file-aio --user=nginx --group=nginx
make && make install
4、修改配置文件
cd /usr/local/lnmp/nginx/conf/
ls
vim nginx.conf
修改如下
65 location ~ \.php$ {
66 root html;
67 fastcgi_pass 127.0.0.1:9000;
68 fastcgi_index index.php;
69 #fastcgi_param SCRIPT_FILENAME /scripts$fastcgi_script_name;
70 include fastcgi.conf;
71 }
43 location / {
44 root html;
45 index index.php index.html index.htm;
46 }
5、添加开启文件
cd /usr/local/lnmp/nginx/sbin/
pwd
ln -s /usr/local/lnmp/nginx/sbin/nginx /usr/local/sbin/ ##添加开启软链接
6、查看结果,端口,访问网页,并编写php
nginx -t ##查看是否编译成功
nginx ##启动程序
netstat -antlp ##查看端口,80端口开启成功
7、访问网页,编写php访问网页
访问172.25.38.1,查看nginx的默认发布目录
编写,php发布信息
28 cd /usr/local/lnmp/nginx/html/
29 vim index.php
编写如下
phpinfo()
?>
访问172.25.38.1,查看php的默认发布目录
五、lnmp整合---论坛的使用
1、打开mysql,php,ngxin
/etc/init.d/mysqld start
/etc/init.d/php-fpm start
nginx
2、下载论坛的安装包,并解压到nginx的目录
yum install -y unzip ##解压zip包的工具
unzip Discuz_X3.2_SC_UTF8.zip -d /usr/local/lnmp/nginx/html/
3、修改论坛的名字---upload为论坛的包
cd /usr/local/lnmp/nginx/html/
ls
mv upload bbs
ls
4、登陆论坛
访问172.25.38.1/bbs
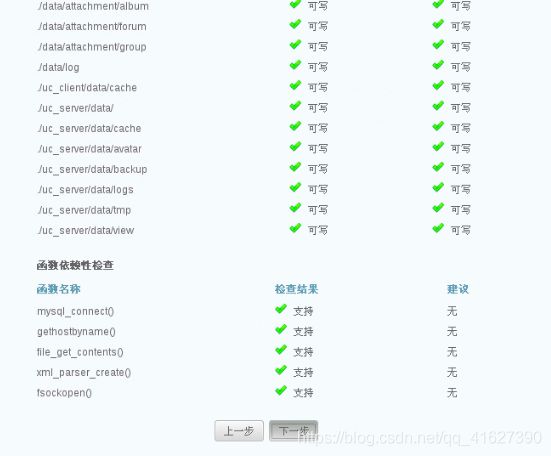
5、检查安装环境
发现没有权限,修改权限
cd /usr/local/lnmp/nginx/html/bbs/
ls
chmod 777 config/ -R
chmod 777 data -R
chmod 777 uc_* -R
6、创建数据库
安装的时候发现,数据库链接错误,没有文件或者目录
cd /usr/local/lnmp/php/
cd etc/
vim php.ini
编辑如下
1013 pdo_mysql.default_socket=/usr/local/lnmp/mysql/data/mysql.sock
1162 mysql.default_socket =/usr/local/lnmp/mysql/data/mysql.sock
1221 mysqli.default_socket = /usr/local/lnmp/mysql/data/mysql.sock
/etc/init.d/php-fpm reload ##重新加载
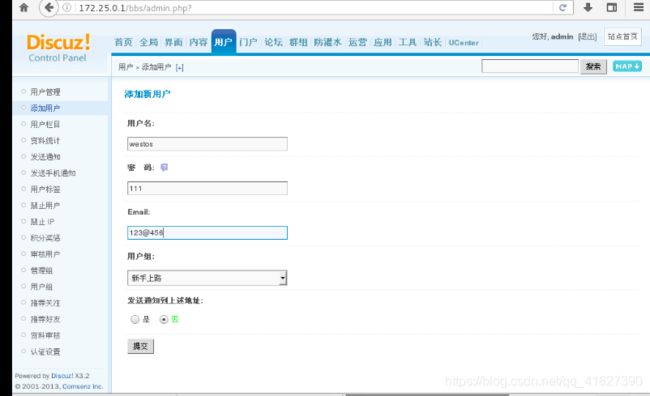
7、登陆论坛,管理员登陆
输入管理员帐号密码 --> 管理中心 --> 删除文件,过程如下
cd /usr/local/lnmp/nginx/html/bbs/install/
m -rf index.php
用户 --> 添加用户
8、通过数据库产看用户的信息
mysql -uroot -predhat
show databases;
use discuz;
show tables;
select * from pre_ucenter_memebers;
如果不打开php,是无法进行添加用户的,如果默认发布目录为php文件,只回下载php文件。


