使用Firebase云消息传递FCM和PHP的Android推送通知
最近,谷歌从谷歌云消息传递(GCM)迁移到Firebase云消息传递(FCM)。就像GCM一样,FCM是一种跨平台的消息传递解决方案,允许您发送消息。FCM是完全免费的,没有任何限制。
如果您已按照我之前关于GCM的任何教程进行操作,我强烈建议您立即迁移到Firebase。在本文中,我们通过构建一个简单的应用程序来了解firebase云消息的功能。我们还将学习如何将firebase集成到您的后端,以便您可以从服务器发送消息。
下载代码演示
1. Firebase消息类型
使用Firebase Cloud Messaging,您可以发送三种类型的消息,即通知消息,数据消息和包含通知和数据有效负载的消息。
1.1通知消息:
通知消息由firebase SDK本身处理。通常,通知消息包含标题,消息,图标等。这些消息可以从firebase控制台UI 发送。通过发送此类消息,您将无法控制通知。当应用程序处于后台时,通知将自动显示。
要发送通知消息,您需要在json数据中使用通知密钥。下面给出了通知消息的示例。
{
"to": "e1w6hEbZn-8:APA91bEUIb2JewYCIiApsMu5JfI5Ak...",
"notification": {
"body": "Cool offers. Get them before expiring!",
"title": "Flat 80% discount",
"icon": "appicon"
}
}
1.2数据信息:
数据消息必须由Android应用程序处理。如果要与通知一起发送一些其他数据,可以添加此类消息。但是无法通过firebase控制台发送这些消息。您需要具有服务器端逻辑才能使用Firebase API发送通知。发送此消息时需要使用数据密钥。
下面给出了数据消息json的示例。
{
"to": "e1w6hEbZn-8:APA91bEUIb2JewYCIiApsMu5JfI5Ak...",
"data": {
"name": "LG LED TV S15",
"product_id": "123",
"final_price": "2500"
}
}
1.3包含通知和数据有效负载的消息:
消息还可以包含通知和数据有效负载。发送这些消息时,将根据应用程序状态(后台/前台)在两种情况下处理。对于这些消息,我们可以使用通知和数据密钥。
在后台- 应用程序在通知托盘中接收通知有效负载,并仅在用户点击通知时处理数据有效负载。
在前台时- 应用程序收到两个有效负载可用的消息对象。
通知和数据有效负载消息的示例将是
{
"to": "e1w6hEbZn-8:APA91bEUIb2JewYCIiApsMu5JfI5Ak...",
"notification": {
"body": "Cool offers. Get them before expiring!",
"title": "Flat 80% discount",
"icon": "appicon"
},
"data": {
"name": "LG LED TV S15",
"product_id": "123",
"final_price": "2500"
}
}
2.消息定位
使用firebase发送消息时,您可以选择目标受众。您可以使用主题名称向单个用户或用户组发送。
2.1发送给单个用户
当单个用户定位时,firebase注册ID用于标识设备。该REG ID在被提及到申请JSON的。
{
"to": "e1w6hEbZn-8:APA91bEUIb2JewYCIiApsMu5JfI5Ak...",
"data": {
"message": "This is a Firebase Cloud Messaging Topic Message!",
}
}
2.2主题消息
当针对消息传递的用户部分时,主题消息传递非常有用。为此,所有用户都必须订阅firebase主题。例如:当您要向所有参与新闻的用户发送消息时,您可以创建一个名为news的主题并向新闻主题发送通知。
主题消息的请求格式如下。在对申请你需要提及的主题名称。
{
"to": "/topics/news",
"data": {
"message": "This is a Firebase Cloud Messaging Topic Message!",
}
}
3.集成Firebase云消息传递
我希望上面的信息能够很好地概述firebase功能及其提供的选项。现在我们将创建一个简单的应用程序,它从firebase控制台和PHP代码接收firebase消息。
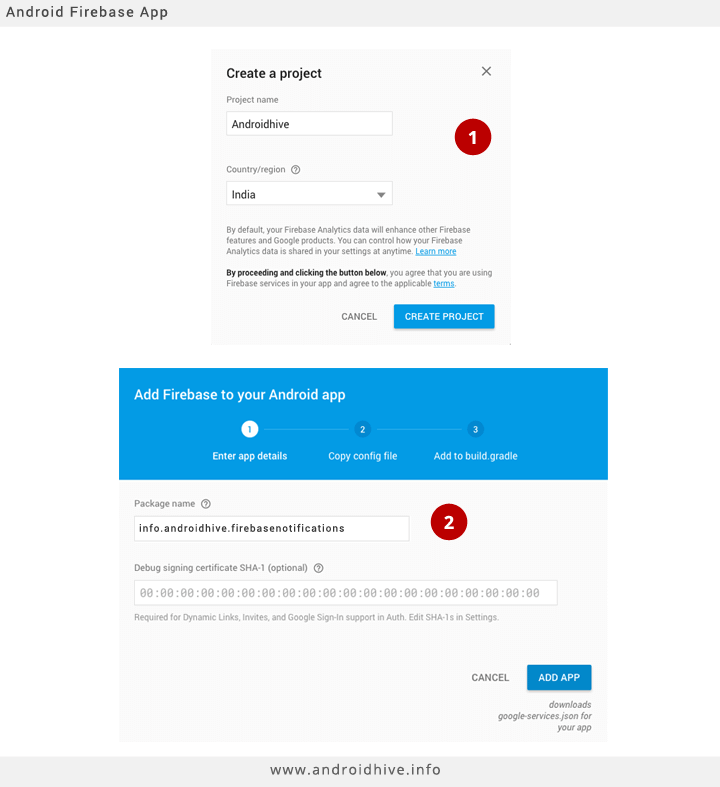
1。您需要做的第一件事是访问https://firebase.google.com/并创建一个帐户以访问其控制台。获得对控制台的访问权限后,您可以先创建第一个项目。
2。提供项目的包名称(我的是info.androidhive.firebasenotifications),您将在其中集成Firebase。在您按添加应用按钮时,将下载google-services.json文件。
3。从File⇒NewProject在Android Studio中创建一个新项目。在填写项目详细信息时,请使用您在firebase控制台中提供的相同包名称。在我的情况下,我使用相同的info.androidhive.firebasenotifications。
4。将google-services.json文件粘贴到项目的app文件夹中。此步骤非常重要,因为没有此文件,您的项目将无法构建。
5。现在打开位于项目主目录中的build.gradle并添加firebase依赖项。
的build.gradle
dependencies {
classpath 'com.android.tools.build:gradle:2.2.0-rc1'
classpath 'com.google.gms:google-services:3.0.0'
// NOTE: Do not place your application dependencies here; they belong
// in the individual module build.gradle files
}
6。打开app / build.gradle并添加firebase 消息传递依赖项。在文件的最底部,添加apply plugin:'com.google.gms.google-services'
应用程序/的build.gradle
dependencies {
compile 'com.google.firebase:firebase-messaging:9.6.0'
}
apply plugin: 'com.google.gms.google-services'
7。在项目文件夹下创建三个名为activity,app,service和utils的包。以下是此项目所需的结构和文件。

8。下载notification.mp3并将其放在res⇒原始文件夹中。此步骤是可选的,但是如果您希望在收到通知时播放自定义通知声音。
9。在apppackage 下创建一个名为Config.java的类。此类包含我们在整个应用中使用的所有常量值。
Config.java
packageinfo.androidhive.firebasenotifications.app;
publicclassConfig {
// global topic to receive app wide push notifications
publicstaticfinalString TOPIC_GLOBAL = "global";
// broadcast receiver intent filters
publicstaticfinalString REGISTRATION_COMPLETE = "registrationComplete";
publicstaticfinalString PUSH_NOTIFICATION = "pushNotification";
// id to handle the notification in the notification tray
publicstaticfinalintNOTIFICATION_ID = 100;
publicstaticfinalintNOTIFICATION_ID_BIG_IMAGE = 101;
publicstaticfinalString SHARED_PREF = "ah_firebase";
}
10。在utils包下创建一个名为NotificationUtils.java的类。此类包含在通知栏中显示消息(带有标题,消息,图像和时间戳)所需的必要功能。
NotificationUtils.java
packageinfo.androidhive.firebasenotifications.util;
importandroid.app.ActivityManager;
importandroid.app.Notification;
importandroid.app.NotificationManager;
importandroid.app.PendingIntent;
importandroid.content.ComponentName;
importandroid.content.ContentResolver;
importandroid.content.Context;
importandroid.content.Intent;
importandroid.graphics.Bitmap;
importandroid.graphics.BitmapFactory;
importandroid.media.Ringtone;
importandroid.media.RingtoneManager;
importandroid.net.Uri;
importandroid.os.Build;
importandroid.support.v4.app.NotificationCompat;
importandroid.text.Html;
importandroid.text.TextUtils;
importandroid.util.Patterns;
importjava.io.IOException;
importjava.io.InputStream;
importjava.net.HttpURLConnection;
importjava.net.URL;
importjava.text.ParseException;
importjava.text.SimpleDateFormat;
importjava.util.Date;
importjava.util.List;
importinfo.androidhive.firebasenotifications.R;
importinfo.androidhive.firebasenotifications.app.Config;
/**
* Created by Ravi on 31/03/15.
*/
publicclassNotificationUtils {
privatestaticString TAG = NotificationUtils.class.getSimpleName();
privateContext mContext;
publicNotificationUtils(Context mContext) {
this.mContext = mContext;
}
publicvoidshowNotificationMessage(String title, String message, String timeStamp, Intent intent) {
showNotificationMessage(title, message, timeStamp, intent, null);
}
publicvoidshowNotificationMessage(finalString title, finalString message, finalString timeStamp, Intent intent, String imageUrl) {
// Check for empty push message
if(TextUtils.isEmpty(message))
return;
// notification icon
finalinticon = R.mipmap.ic_launcher;
intent.setFlags(Intent.FLAG_ACTIVITY_CLEAR_TOP | Intent.FLAG_ACTIVITY_SINGLE_TOP);
finalPendingIntent resultPendingIntent =
PendingIntent.getActivity(
mContext,
0,
intent,
PendingIntent.FLAG_CANCEL_CURRENT
);
finalNotificationCompat.Builder mBuilder = newNotificationCompat.Builder(
mContext);
finalUri alarmSound = Uri.parse(ContentResolver.SCHEME_ANDROID_RESOURCE
+ "://"+ mContext.getPackageName() + "/raw/notification");
if(!TextUtils.isEmpty(imageUrl)) {
if(imageUrl != null&& imageUrl.length() > 4&& Patterns.WEB_URL.matcher(imageUrl).matches()) {
Bitmap bitmap = getBitmapFromURL(imageUrl);
if(bitmap != null) {
showBigNotification(bitmap, mBuilder, icon, title, message, timeStamp, resultPendingIntent, alarmSound);
} else{
showSmallNotification(mBuilder, icon, title, message, timeStamp, resultPendingIntent, alarmSound);
}
}
} else{
showSmallNotification(mBuilder, icon, title, message, timeStamp, resultPendingIntent, alarmSound);
playNotificationSound();
}
}
privatevoidshowSmallNotification(NotificationCompat.Builder mBuilder, inticon, String title, String message, String timeStamp, PendingIntent resultPendingIntent, Uri alarmSound) {
NotificationCompat.InboxStyle inboxStyle = newNotificationCompat.InboxStyle();
inboxStyle.addLine(message);
Notification notification;
notification = mBuilder.setSmallIcon(icon).setTicker(title).setWhen(0)
.setAutoCancel(true)
.setContentTitle(title)
.setContentIntent(resultPendingIntent)
.setSound(alarmSound)
.setStyle(inboxStyle)
.setWhen(getTimeMilliSec(timeStamp))
.setSmallIcon(R.mipmap.ic_launcher)
.setLargeIcon(BitmapFactory.decodeResource(mContext.getResources(), icon))
.setContentText(message)
.build();
NotificationManager notificationManager = (NotificationManager) mContext.getSystemService(Context.NOTIFICATION_SERVICE);
notificationManager.notify(Config.NOTIFICATION_ID, notification);
}
privatevoidshowBigNotification(Bitmap bitmap, NotificationCompat.Builder mBuilder, inticon, String title, String message, String timeStamp, PendingIntent resultPendingIntent, Uri alarmSound) {
NotificationCompat.BigPictureStyle bigPictureStyle = newNotificationCompat.BigPictureStyle();
bigPictureStyle.setBigContentTitle(title);
bigPictureStyle.setSummaryText(Html.fromHtml(message).toString());
bigPictureStyle.bigPicture(bitmap);
Notification notification;
notification = mBuilder.setSmallIcon(icon).setTicker(title).setWhen(0)
.setAutoCancel(true)
.setContentTitle(title)
.setContentIntent(resultPendingIntent)
.setSound(alarmSound)
.setStyle(bigPictureStyle)
.setWhen(getTimeMilliSec(timeStamp))
.setSmallIcon(R.mipmap.ic_launcher)
.setLargeIcon(BitmapFactory.decodeResource(mContext.getResources(), icon))
.setContentText(message)
.build();
NotificationManager notificationManager = (NotificationManager) mContext.getSystemService(Context.NOTIFICATION_SERVICE);
notificationManager.notify(Config.NOTIFICATION_ID_BIG_IMAGE, notification);
}
/**
* Downloading push notification image before displaying it in
* the notification tray
*/
publicBitmap getBitmapFromURL(String strURL) {
try{
URL url = newURL(strURL);
HttpURLConnection connection = (HttpURLConnection) url.openConnection();
connection.setDoInput(true);
connection.connect();
InputStream input = connection.getInputStream();
Bitmap myBitmap = BitmapFactory.decodeStream(input);
returnmyBitmap;
} catch(IOException e) {
e.printStackTrace();
returnnull;
}
}
// Playing notification sound
publicvoidplayNotificationSound() {
try{
Uri alarmSound = Uri.parse(ContentResolver.SCHEME_ANDROID_RESOURCE
+ "://"+ mContext.getPackageName() + "/raw/notification");
Ringtone r = RingtoneManager.getRingtone(mContext, alarmSound);
r.play();
} catch(Exception e) {
e.printStackTrace();
}
}
/**
* Method checks if the app is in background or not
*/
publicstaticbooleanisAppIsInBackground(Context context) {
booleanisInBackground = true;
ActivityManager am = (ActivityManager) context.getSystemService(Context.ACTIVITY_SERVICE);
if(Build.VERSION.SDK_INT > Build.VERSION_CODES.KITKAT_WATCH) {
List runningProcesses = am.getRunningAppProcesses();
for(ActivityManager.RunningAppProcessInfo processInfo : runningProcesses) {
if(processInfo.importance == ActivityManager.RunningAppProcessInfo.IMPORTANCE_FOREGROUND) {
for(String activeProcess : processInfo.pkgList) {
if(activeProcess.equals(context.getPackageName())) {
isInBackground = false;
}
}
}
}
} else{
List taskInfo = am.getRunningTasks(1);
ComponentName componentInfo = taskInfo.get(0).topActivity;
if(componentInfo.getPackageName().equals(context.getPackageName())) {
isInBackground = false;
}
}
returnisInBackground;
}
// Clears notification tray messages
publicstaticvoidclearNotifications(Context context) {
NotificationManager notificationManager = (NotificationManager) context.getSystemService(Context.NOTIFICATION_SERVICE);
notificationManager.cancelAll();
}
publicstaticlonggetTimeMilliSec(String timeStamp) {
SimpleDateFormat format = newSimpleDateFormat("yyyy-MM-dd HH:mm:ss");
try{
Date date = format.parse(timeStamp);
returndate.getTime();
} catch(ParseException e) {
e.printStackTrace();
}
return0;
}
}
11。在服务包下创建一个名为MyFirebaseInstanceIDService.java的类。此类接收firebase注册ID,该ID对于每个应用程序都是唯一的。要将消息发送到单个设备时,需要此注册ID。您可以将此令牌发送到您的服务器应用程序,以便稍后向设备发送通知。
只要firebase注册ID发生更改,就会调用onTokenRefresh()方法。
storeRegIdInPref()将注册ID存储在共享首选项中。
LocalBroadcastManager- 广播管理器将reg id广播到正在侦听的所有活动。
MyFirebaseInstanceIDService.java
packageinfo.androidhive.firebasenotifications.service;
importandroid.content.Intent;
importandroid.content.SharedPreferences;
importandroid.support.v4.content.LocalBroadcastManager;
importandroid.util.Log;
importcom.google.firebase.iid.FirebaseInstanceId;
importcom.google.firebase.iid.FirebaseInstanceIdService;
importinfo.androidhive.firebasenotifications.app.Config;
/**
* Created by Ravi Tamada on 08/08/16.
* www.androidhive.info
*/
publicclassMyFirebaseInstanceIDService extendsFirebaseInstanceIdService {
privatestaticfinalString TAG = MyFirebaseInstanceIDService.class.getSimpleName();
@Override
publicvoidonTokenRefresh() {
super.onTokenRefresh();
String refreshedToken = FirebaseInstanceId.getInstance().getToken();
// Saving reg id to shared preferences
storeRegIdInPref(refreshedToken);
// sending reg id to your server
sendRegistrationToServer(refreshedToken);
// Notify UI that registration has completed, so the progress indicator can be hidden.
Intent registrationComplete = newIntent(Config.REGISTRATION_COMPLETE);
registrationComplete.putExtra("token", refreshedToken);
LocalBroadcastManager.getInstance(this).sendBroadcast(registrationComplete);
}
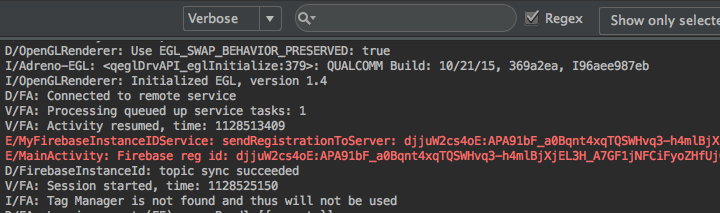
privatevoidsendRegistrationToServer(finalString token) {
// sending gcm token to server
Log.e(TAG, "sendRegistrationToServer: "+ token);
}
privatevoidstoreRegIdInPref(String token) {
SharedPreferences pref = getApplicationContext().getSharedPreferences(Config.SHARED_PREF, 0);
SharedPreferences.Editor editor = pref.edit();
editor.putString("regId", token);
editor.commit();
}
}
12。在servicepackage 下创建另一个名为MyFirebaseMessagingService.java的类。此类将firebase消息接收到onMessageReceived()方法中。
>当通知被发送的消息类型,火力自动显示该通知时,应用程序在背景。如果应用程序位于前台,handleNotification()方法将处理通知消息。
>当数据被发送的消息类型,handleDataMessage()方法用于不论应用程式状态(前景/背景)的处理的有效载荷。
>LocalBroadcastManager用于将消息广播到为广播接收器注册的所有活动。
MyFirebaseMessagingService.java
packageinfo.androidhive.firebasenotifications.service;
importandroid.content.Context;
importandroid.content.Intent;
importandroid.support.v4.content.LocalBroadcastManager;
importandroid.text.TextUtils;
importandroid.util.Log;
importcom.google.firebase.messaging.FirebaseMessagingService;
importcom.google.firebase.messaging.RemoteMessage;
importorg.json.JSONException;
importorg.json.JSONObject;
importinfo.androidhive.firebasenotifications.activity.MainActivity;
importinfo.androidhive.firebasenotifications.app.Config;
importinfo.androidhive.firebasenotifications.util.NotificationUtils;
/**
* Created by Ravi Tamada on 08/08/16.
* www.androidhive.info
*/
publicclassMyFirebaseMessagingService extendsFirebaseMessagingService {
privatestaticfinalString TAG = MyFirebaseMessagingService.class.getSimpleName();
privateNotificationUtils notificationUtils;
@Override
publicvoidonMessageReceived(RemoteMessage remoteMessage) {
Log.e(TAG, "From: "+ remoteMessage.getFrom());
if(remoteMessage == null)
return;
// Check if message contains a notification payload.
if(remoteMessage.getNotification() != null) {
Log.e(TAG, "Notification Body: "+ remoteMessage.getNotification().getBody());
handleNotification(remoteMessage.getNotification().getBody());
}
// Check if message contains a data payload.
if(remoteMessage.getData().size() > 0) {
Log.e(TAG, "Data Payload: "+ remoteMessage.getData().toString());
try{
JSONObject json = newJSONObject(remoteMessage.getData().toString());
handleDataMessage(json);
} catch(Exception e) {
Log.e(TAG, "Exception: "+ e.getMessage());
}
}
}
privatevoidhandleNotification(String message) {
if(!NotificationUtils.isAppIsInBackground(getApplicationContext())) {
// app is in foreground, broadcast the push message
Intent pushNotification = newIntent(Config.PUSH_NOTIFICATION);
pushNotification.putExtra("message", message);
LocalBroadcastManager.getInstance(this).sendBroadcast(pushNotification);
// play notification sound
NotificationUtils notificationUtils = newNotificationUtils(getApplicationContext());
notificationUtils.playNotificationSound();
}else{
// If the app is in background, firebase itself handles the notification
}
}
privatevoidhandleDataMessage(JSONObject json) {
Log.e(TAG, "push json: "+ json.toString());
try{
JSONObject data = json.getJSONObject("data");
String title = data.getString("title");
String message = data.getString("message");
booleanisBackground = data.getBoolean("is_background");
String imageUrl = data.getString("image");
String timestamp = data.getString("timestamp");
JSONObject payload = data.getJSONObject("payload");
Log.e(TAG, "title: "+ title);
Log.e(TAG, "message: "+ message);
Log.e(TAG, "isBackground: "+ isBackground);
Log.e(TAG, "payload: "+ payload.toString());
Log.e(TAG, "imageUrl: "+ imageUrl);
Log.e(TAG, "timestamp: "+ timestamp);
if(!NotificationUtils.isAppIsInBackground(getApplicationContext())) {
// app is in foreground, broadcast the push message
Intent pushNotification = newIntent(Config.PUSH_NOTIFICATION);
pushNotification.putExtra("message", message);
LocalBroadcastManager.getInstance(this).sendBroadcast(pushNotification);
// play notification sound
NotificationUtils notificationUtils = newNotificationUtils(getApplicationContext());
notificationUtils.playNotificationSound();
} else{
// app is in background, show the notification in notification tray
Intent resultIntent = newIntent(getApplicationContext(), MainActivity.class);
resultIntent.putExtra("message", message);
// check for image attachment
if(TextUtils.isEmpty(imageUrl)) {
showNotificationMessage(getApplicationContext(), title, message, timestamp, resultIntent);
} else{
// image is present, show notification with image
showNotificationMessageWithBigImage(getApplicationContext(), title, message, timestamp, resultIntent, imageUrl);
}
}
} catch(JSONException e) {
Log.e(TAG, "Json Exception: "+ e.getMessage());
} catch(Exception e) {
Log.e(TAG, "Exception: "+ e.getMessage());
}
}
/**
* Showing notification with text only
*/
privatevoidshowNotificationMessage(Context context, String title, String message, String timeStamp, Intent intent) {
notificationUtils = newNotificationUtils(context);
intent.setFlags(Intent.FLAG_ACTIVITY_NEW_TASK | Intent.FLAG_ACTIVITY_CLEAR_TASK);
notificationUtils.showNotificationMessage(title, message, timeStamp, intent);
}
/**
* Showing notification with text and image
*/
privatevoidshowNotificationMessageWithBigImage(Context context, String title, String message, String timeStamp, Intent intent, String imageUrl) {
notificationUtils = newNotificationUtils(context);
intent.setFlags(Intent.FLAG_ACTIVITY_NEW_TASK | Intent.FLAG_ACTIVITY_CLEAR_TASK);
notificationUtils.showNotificationMessage(title, message, timeStamp, intent, imageUrl);
}
}
13。打开AndroidManifest.xml并添加两个firebase服务MyFirebaseMessagingService和MyFirebaseInstanceIDService。
AndroidManifest.xml中
http://schemas.android.com/apk/res/android"
package="info.androidhive.firebasenotifications">
android:allowBackup="true"
android:icon="@mipmap/ic_launcher"
android:label="@string/app_name"
android:supportsRtl="true"
android:theme="@style/AppTheme">
android:name=".activity.MainActivity"
android:label="@string/title_main_activity">
14。最后,我们需要修改我们的主要活动,以在屏幕上显示传入的消息。打开主活动activity_main.xml的布局文件,修改布局如下。
activity_main.xml中
http://schemas.android.com/apk/res/android"
xmlns:tools="http://schemas.android.com/tools"
android:id="@+id/activity_main"
android:layout_width="match_parent"
android:layout_height="match_parent"
android:paddingBottom="@dimen/activity_vertical_margin"
android:paddingLeft="@dimen/activity_horizontal_margin"
android:paddingRight="@dimen/activity_horizontal_margin"
android:paddingTop="@dimen/activity_vertical_margin"
tools:context="info.androidhive.firebasenotifications.activity.MainActivity">
android:id="@+id/txt_push_message"
android:layout_width="wrap_content"
android:layout_height="wrap_content"
android:layout_alignParentTop="true"
android:layout_centerHorizontal="true"
android:layout_marginTop="40dp"
android:gravity="center_horizontal"
android:textColor="@color/colorPrimary"
android:textSize="26dp"/>
android:id="@+id/txt_reg_id"
android:layout_width="wrap_content"
android:layout_height="wrap_content"
android:layout_alignParentBottom="true"/>
15。打开MainActivity.java并执行以下必要的更改。在onResume()方法中,我们正在注册广播接收器。这样活动就会获得推送消息和注册ID。
displayFirebaseRegId()从共享首选项中获取firebase注册ID并将其显示在屏幕上。这仅供您参考,我们不会在应用程序的任何位置使用reg id。
订阅主题
如果要订阅任何主题,可以使用subscribeToTopic()函数。当客户端应用程序订阅新主题名称(Firebase项目尚不存在)时,将在FCM中创建该名称的新主题,并且任何客户端随后都可以订阅该主题。
FirebaseMessaging.getInstance().subscribeToTopic('news');
取消订阅主题
类似地,客户端可以通过调用unsubscribeFromTopic()方法取消订阅主题。
FirebaseMessaging.getInstance().unsubscribeFromTopic('news');
MainActivity.java
packageinfo.androidhive.firebasenotifications.activity;
importandroid.content.BroadcastReceiver;
importandroid.content.Context;
importandroid.content.Intent;
importandroid.content.IntentFilter;
importandroid.content.SharedPreferences;
importandroid.os.Bundle;
importandroid.support.v4.content.LocalBroadcastManager;
importandroid.support.v7.app.AppCompatActivity;
importandroid.text.TextUtils;
importandroid.util.Log;
importandroid.widget.TextView;
importandroid.widget.Toast;
importcom.google.firebase.messaging.FirebaseMessaging;
importinfo.androidhive.firebasenotifications.R;
importinfo.androidhive.firebasenotifications.app.Config;
importinfo.androidhive.firebasenotifications.util.NotificationUtils;
publicclassMainActivity extendsAppCompatActivity {
privatestaticfinalString TAG = MainActivity.class.getSimpleName();
privateBroadcastReceiver mRegistrationBroadcastReceiver;
privateTextView txtRegId, txtMessage;
@Override
protectedvoidonCreate(Bundle savedInstanceState) {
super.onCreate(savedInstanceState);
setContentView(R.layout.activity_main);
txtRegId = (TextView) findViewById(R.id.txt_reg_id);
txtMessage = (TextView) findViewById(R.id.txt_push_message);
mRegistrationBroadcastReceiver = newBroadcastReceiver() {
@Override
publicvoidonReceive(Context context, Intent intent) {
// checking for type intent filter
if(intent.getAction().equals(Config.REGISTRATION_COMPLETE)) {
// gcm successfully registered
// now subscribe to `global` topic to receive app wide notifications
FirebaseMessaging.getInstance().subscribeToTopic(Config.TOPIC_GLOBAL);
displayFirebaseRegId();
} elseif(intent.getAction().equals(Config.PUSH_NOTIFICATION)) {
// new push notification is received
String message = intent.getStringExtra("message");
Toast.makeText(getApplicationContext(), "Push notification: "+ message, Toast.LENGTH_LONG).show();
txtMessage.setText(message);
}
}
};
displayFirebaseRegId();
}
// Fetches reg id from shared preferences
// and displays on the screen
privatevoiddisplayFirebaseRegId() {
SharedPreferences pref = getApplicationContext().getSharedPreferences(Config.SHARED_PREF, 0);
String regId = pref.getString("regId", null);
Log.e(TAG, "Firebase reg id: "+ regId);
if(!TextUtils.isEmpty(regId))
txtRegId.setText("Firebase Reg Id: "+ regId);
else
txtRegId.setText("Firebase Reg Id is not received yet!");
}
@Override
protectedvoidonResume() {
super.onResume();
// register GCM registration complete receiver
LocalBroadcastManager.getInstance(this).registerReceiver(mRegistrationBroadcastReceiver,
newIntentFilter(Config.REGISTRATION_COMPLETE));
// register new push message receiver
// by doing this, the activity will be notified each time a new message arrives
LocalBroadcastManager.getInstance(this).registerReceiver(mRegistrationBroadcastReceiver,
newIntentFilter(Config.PUSH_NOTIFICATION));
// clear the notification area when the app is opened
NotificationUtils.clearNotifications(getApplicationContext());
}
@Override
protectedvoidonPause() {
LocalBroadcastManager.getInstance(this).unregisterReceiver(mRegistrationBroadcastReceiver);
super.onPause();
}
}
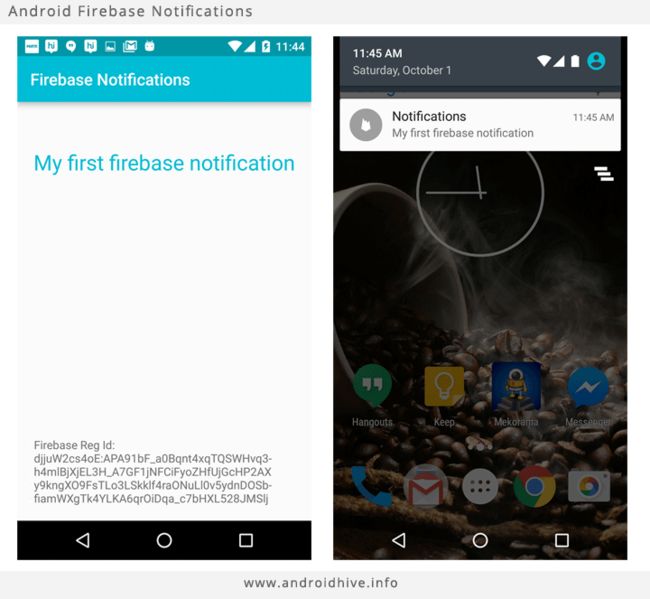
现在我们已经完成了firebase云消息的集成。为了验证它,运行项目,您应该在屏幕上看到firebase reg id。您还可以在LogCat中找到reg id。

4.从Firebase控制台发送消息
现在我们将从firebase控制台发送第一条消息。转到firebase控制台,然后单击左侧菜单中的通知。您将获得一个界面,您可以在其中键入消息,选择定位并发送消息。

5.从PHP后端发送消息
从firebase控制台发送消息并不总是许多应用程序的最佳解决方案。大量应用程序需要在发生事件时自动通知用户,这是使用firebase控制台无法实现的。要解决此问题,您需要从后端服务器集成firebase API。
让我们创建一个简单的PHP项目来从后端发送消息。我假设您具有PHP和WAMP的基本知识。如果您是新手,可以从本文获得帮助。
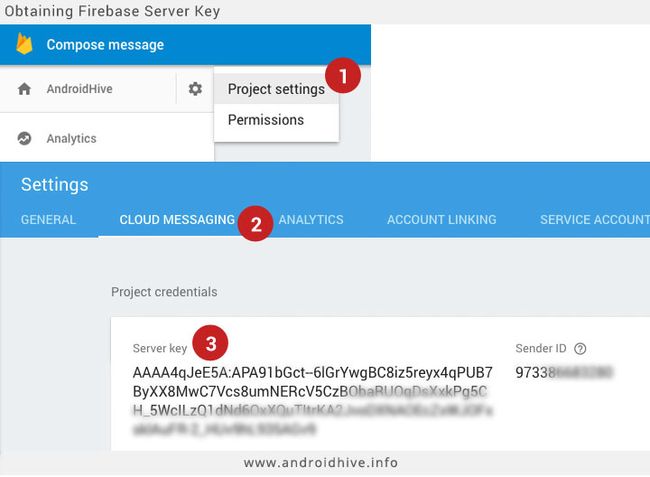
5.1获取Firebase服务器API密钥
Firebase提供Server API密钥以识别您的firebase应用。要获取服务器API密钥,请转到firebase控制台,选择项目和转到设置,选择“云消息传递”选项卡并复制服务器密钥。
1。转到您的WAMP目录并在htdocs或www中创建名为firebase的新文件夹。
2。创建一个名为config.php的文件并添加以下代码。在这里,我们定义了firebase Server API Key,以便向firebase端点发送请求。
config.php文件
// Firebase API Key
define('FIREBASE_API_KEY', 'AAAA4qJeE5A:APA91bGct--6lGrYwgBC8iz5reyx4qPUB7ByXX8MwC7Vcs8u...');
3。创建一个名为push.php的文件这个类准备和需要发送到firebase的推送通知json。
push.php
/**
* @author Ravi Tamada
* @link URL Tutorial link
*/
classPush {
// push message title
private$title;
private$message;
private$image;
// push message payload
private$data;
// flag indicating whether to show the push
// notification or not
// this flag will be useful when perform some opertation
// in background when push is recevied
private$is_background;
function__construct() {
}
publicfunctionsetTitle($title) {
$this->title = $title;
}
publicfunctionsetMessage($message) {
$this->message = $message;
}
publicfunctionsetImage($imageUrl) {
$this->image = $imageUrl;
}
publicfunctionsetPayload($data) {
$this->data = $data;
}
publicfunctionsetIsBackground($is_background) {
$this->is_background = $is_background;
}
publicfunctiongetPush() {
$res= array();
$res['data']['title'] = $this->title;
$res['data']['is_background'] = $this->is_background;
$res['data']['message'] = $this->message;
$res['data']['image'] = $this->image;
$res['data']['payload'] = $this->data;
$res['data']['timestamp'] = date('Y-m-d G:i:s');
return$res;
}
}
4。创建一个名为firebase.php的文件并添加以下代码。此类包含通过发出CURL请求将消息发送到firebase api的必要函数。
/**
* @author Ravi Tamada
* @link URL Tutorial link
*/
classFirebase {
// sending push message to single user by firebase reg id
publicfunctionsend($to, $message) {
$fields= array(
'to'=> $to,
'data'=> $message,
);
return$this->sendPushNotification($fields);
}
// Sending message to a topic by topic name
publicfunctionsendToTopic($to, $message) {
$fields= array(
'to'=> '/topics/'. $to,
'data'=> $message,
);
return$this->sendPushNotification($fields);
}
// sending push message to multiple users by firebase registration ids
publicfunctionsendMultiple($registration_ids, $message) {
$fields= array(
'to'=> $registration_ids,
'data'=> $message,
);
return$this->sendPushNotification($fields);
}
// function makes curl request to firebase servers
privatefunctionsendPushNotification($fields) {
require_once__DIR__ . '/config.php';
// Set POST variables
$url= 'https://fcm.googleapis.com/fcm/send';
$headers= array(
'Authorization: key='. FIREBASE_API_KEY,
'Content-Type: application/json'
);
// Open connection
$ch= curl_init();
// Set the url, number of POST vars, POST data
curl_setopt($ch, CURLOPT_URL, $url);
curl_setopt($ch, CURLOPT_POST, true);
curl_setopt($ch, CURLOPT_HTTPHEADER, $headers);
curl_setopt($ch, CURLOPT_RETURNTRANSFER, true);
// Disabling SSL Certificate support temporarly
curl_setopt($ch, CURLOPT_SSL_VERIFYPEER, false);
curl_setopt($ch, CURLOPT_POSTFIELDS, json_encode($fields));
// Execute post
$result= curl_exec($ch);
if($result=== FALSE) {
die('Curl failed: '. curl_error($ch));
}
// Close connection
curl_close($ch);
return$result;
}
}
?>
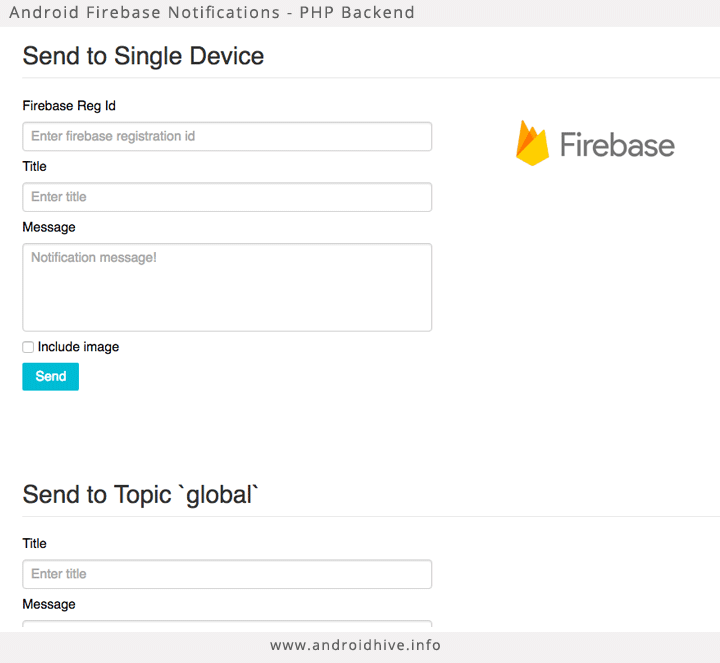
5。最后创建一个index.php并添加以下代码。这里我们创建一个简单的UI,它接受输入并将通知发送到Android设备。
的index.php
AndroidHive | Firebase Cloud Messaging
http://yui.yahooapis.com/pure/0.6.0/pure-min.css">
body{
}
div.container{
width: 1000px;
margin: 0 auto;
position: relative;
}
legend{
font-size: 30px;
color: #555;
}
.btn_send{
background: #00bcd4;
}
label{
margin:10px 0px !important;
}
textarea{
resize: none !important;
}
.fl_window{
width: 400px;
position: absolute;
right: 0;
top:100px;
}
pre, code {
padding:10px 0px;
box-sizing:border-box;
-moz-box-sizing:border-box;
webkit-box-sizing:border-box;
display:block;
white-space: pre-wrap;
white-space: -moz-pre-wrap;
white-space: -pre-wrap;
white-space: -o-pre-wrap;
word-wrap: break-word;
width:100%; overflow-x:auto;
}
// Enabling error reporting
error_reporting(-1);
ini_set('display_errors', 'On');
require_once__DIR__ . '/firebase.php';
require_once__DIR__ . '/push.php';
$firebase= newFirebase();
$push= newPush();
// optional payload
$payload= array();
$payload['team'] = 'India';
$payload['score'] = '5.6';
// notification title
$title= isset($_GET['title']) ? $_GET['title'] : '';
// notification message
$message= isset($_GET['message']) ? $_GET['message'] : '';
// push type - single user / topic
$push_type= isset($_GET['push_type']) ? $_GET['push_type'] : '';
// whether to include to image or not
$include_image= isset($_GET['include_image']) ? TRUE : FALSE;
$push->setTitle($title);
$push->setMessage($message);
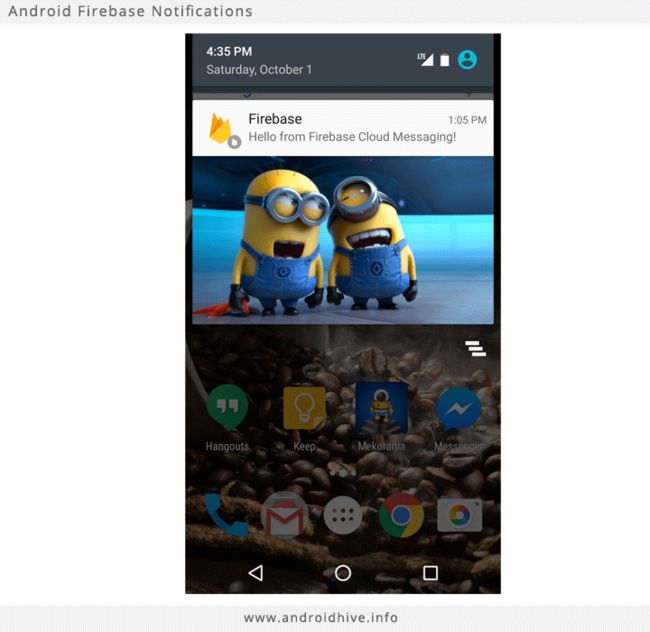
if($include_image) {
$push->setImage('https://api.androidhive.info/images/minion.jpg');
} else{
$push->setImage('');
}
$push->setIsBackground(FALSE);
$push->setPayload($payload);
$json= '';
$response= '';
if($push_type== 'topic') {
$json= $push->getPush();
$response= $firebase->sendToTopic('global', $json);
} elseif($push_type== 'individual') {
$json= $push->getPush();
$regId= isset($_GET['regId']) ? $_GET['regId'] : '';
$response= $firebase->send($regId, $json);
}
?>
Request:
Response:
Send to Single Device
Firebase Reg Id
Title
Message
Include image
Send
Send to Topic `global`
Title
Message
Include image
Send to Topic
6。从http:// localhost / firebaseurl 访问项目。(如果您的apache在端口上运行,请使用端口号访问该URL)
6.演示
如果您是PHP新手并且在运行上述PHP项目时遇到任何问题,您可以在此处访问同一项目。除了少量更改之外,UI与上面解释的相同。您需要提供自己的firebase服务器API密钥来测试您的应用程序。查看视频以了解如何使用演示页面。不要担心暴露您的服务器API密钥,您的数据不会以任何方式存储在演示页面中。
DEMO